

Posted by: Graziano Rizzi
Introduction
Sometimes it happens to have requests from the UX / UI department that deviate from the elements that the SDK of our platform provides us. In these cases the only possibility is to create custom elements but, sometimes, their realization is relatively complex.
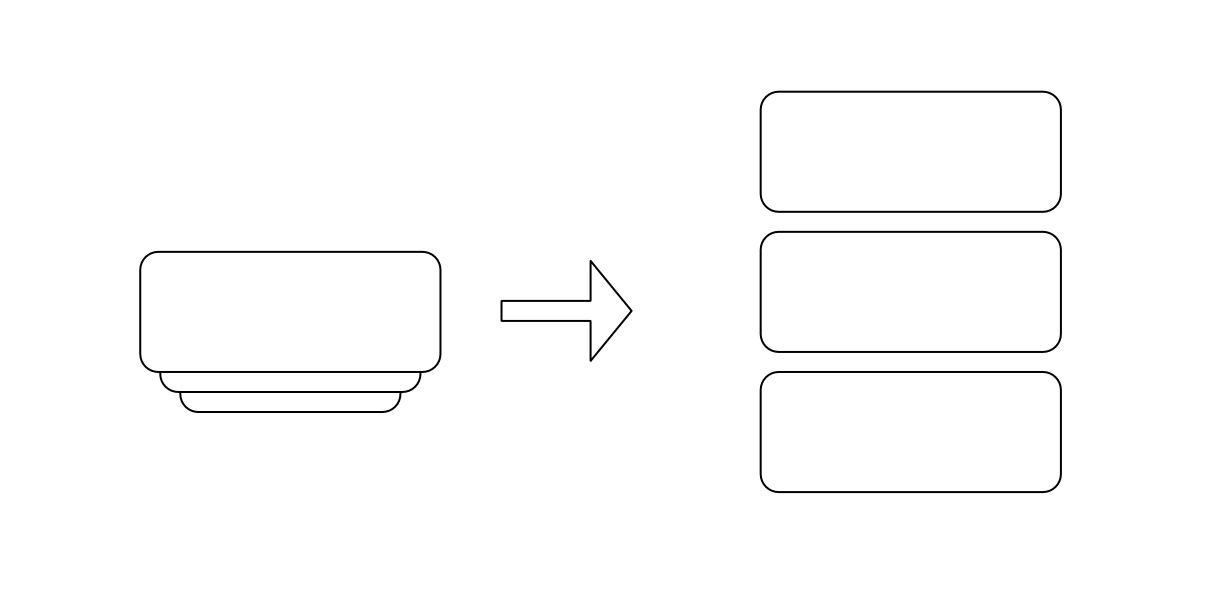
A few months ago my colleagues from the UX / UI department asked me if it was possible to create a component in Android that would represent a list of CardView but in two possible states, grouped and expanded.
In the initial state, the grouped one, only the first element of the list must be visible and an effect that recalls the presence of other elements underlying the first.
Is it possible to create a MotionLayout programmatically?
When asked about the feasibility of the component, I immediately started thinking about what I could use to create custom views with a similar transition.
Surely no native component came to my aid so I could not modify anything I had, of course creating a layout and inflate views inside it is not difficult but once the views with certain constraints have been inserted how could I change them to switch from the grouped state to the expanded one and vice versa?
The first idea that came to my mind was to use the MotionLayout which behaves perfectly when you want to change the constraints of a view from a starting state to an arrival state, however the transition is created at the xml level in a static way and this did not allow me to have dynamic number of elements. Anyway I didn’t give up and I looked in the example project that Google provides on the use of the ConstraintLayout and I found what I wanted! In fact it is possible to add views, constraints and transitions to a MotionLayout programmatically!
A classic Adapter
First of all, dealing with a list of elements, let’s create a simple Adapter
| class ExpandableStackViewAdapter( | |
| private val models: List<String>, | |
| private val context: Context | |
| ) : BaseAdapter() { | |
| override fun getCount(): Int = models.size | |
| override fun getItem(position: Int): String = models[position] | |
| override fun getItemId(position: Int): Long = position.toLong() | |
| override fun getView(position: Int, convertView: View?, parent: ViewGroup?): View { | |
| val view = LayoutInflater.from(context).inflate(R.layout.card, parent, false) | |
| view.findViewById<AppCompatTextView>(R.id.text).text = position.toString() | |
| return view | |
| } | |
| } |
and a simple layout for the elements
| <?xml version="1.0" encoding="utf-8"?> | |
| <androidx.cardview.widget.CardView xmlns:android="http://schemas.android.com/apk/res/android" | |
| xmlns:app="http://schemas.android.com/apk/res-auto" | |
| xmlns:tools="http://schemas.android.com/tools" | |
| app:cardCornerRadius="16dp" | |
| android:layout_width="300dp" | |
| app:cardUseCompatPadding="true" | |
| android:layout_height="200dp" | |
| android:layout_margin="16dp" | |
| android:id="@+id/cardContainer"> | |
| <androidx.constraintlayout.widget.ConstraintLayout | |
| android:layout_width="match_parent" | |
| android:layout_height="match_parent"> | |
| <androidx.appcompat.widget.AppCompatTextView | |
| android:id="@+id/text" | |
| android:layout_width="wrap_content" | |
| android:layout_height="wrap_content" | |
| android:textSize="64sp" | |
| app:layout_constraintBottom_toBottomOf="parent" | |
| app:layout_constraintEnd_toEndOf="parent" | |
| app:layout_constraintStart_toStartOf="parent" | |
| app:layout_constraintTop_toTopOf="parent" | |
| tools:text="1" /> | |
| </androidx.constraintlayout.widget.ConstraintLayout> | |
| </androidx.cardview.widget.CardView> |
Next we create a custom view by extending MotionLayout and a method to set the adapter
| class ExpandableStackView @JvmOverloads constructor( | |
| context: Context, attrs: AttributeSet? = null, defStyleAttr: Int = 0 | |
| ) : MotionLayout(context, attrs, defStyleAttr) { | |
| fun setAdapter(adapter: BaseAdapter) { } | |
| } |
Let’s start working with the MotionLayout
The MotionLayout is based on 3 basic components:
- MotionScene
- Transition
- ConstraintSet (one for the starting state and one for the ending state)
we must therefore create these components programmatically to make everything work correctly.
The MotionScene is very simple to create, you just need the MotionLayout instance we are working with:
val scene = MotionScene(this)
The two ConstraintSets are also very simple to create:
val startSet = ConstraintSet()
startSet.clone(this)

val endSet = ConstraintSet()
endSet.clone(this)
The clone() method is used to copy the ConstraintLayout parameters into the ConstraintSet (the MotionLayout is a ConstraintLayout) so that the Parent can be referred to in the construction of the constraints.
The most complex element to create is the Transition, in fact to build an instance of this class we must use the method:
Transition buildTransition(
    MotionScene scene,
    int transitionId,
    int startConstraintSetId,
    ConstraintSet startConstraintSet,
    int endConstraintSetId,
    ConstraintSet endConstraintSet
)
As we can see from the parameters of this method we need the MotionScene, the two ConstraintSets and 3 ids, one for each constraint set and one for the transition.
To generate these 3 ids we will use the View.generateViewId() method
Well now we have what we need
First we create the instances of these classes inside the setAdapter()method
| fun setAdapter(adapter: BaseAdapter) { | |
| val scene = MotionScene(this) | |
| val startSetId = View.generateViewId() | |
| val startSet = ConstraintSet() | |
| startSet.clone(this) | |
| val endSetId = View.generateViewId() | |
| val endSet = ConstraintSet() | |
| endSet.clone(this) | |
| val transitionId = View.generateViewId() | |
| val transaction = TransitionBuilder.buildTransition( | |
| scene, | |
| transitionId, | |
| startSetId, startSet, | |
| endSetId, endSet | |
| ) | |
| transaction.duration = 1000 | |
| scene.addTransition(transaction) | |
| scene.setTransition(transaction) | |
| setScene(scene) | |
| setTransition(transitionId) | |
| } |
let’s check the last instructions added after the creation of the Transition.
The first method is very simple
transaction.duration = 1000
It is used to set the duration of the transition in ms.
The others are used to add the transition to the scene and set it as an active transition, in fact you can add more than one transition to a scene but only one can be the current transition.
scene.addTransition(transaction)
scene.setTransition(transaction)
The last two lines instead are used to add the created scene and transition to the MotionLayout
setScene(scene) setTransition(transitionId)
Let’s start playing with in ConstraintSet
Now is the time to play with ConstraintSets.
For the grouped state the idea is to place the first views on top and add the following views (maximum 2) below it and add some margin so that the bottom side of the underlying views is visible under the view above. .
To give the view a depth effect we will use a scale factor.
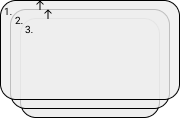
The first (1.) view will have the TOP anchored to the TOP of the parent, the second view (2.) will have the TOP anchored to the TOP of the first view but with a margin, in the same way the third (3.) view will have the TOPanchored to the TOP of the second plus a margin.
If there are more than 3 views, the following ones will be anchored to the third but without margin in order to hide them perfectly.
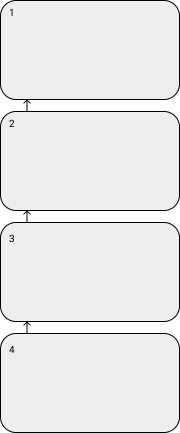
In the expanded state the views will simply be concatenated, so starting from the first which will always be anchored to the TOP of the parent, the subsequent ones will anchor their TOP with the BOTTOM of the previous view.
OUR VIDEO RECOMMENDATION


Jobs
The method we will use to set the constraints on the ConstraintSet is
public void connect(
    int startID,
    int startSide,
    int endID,
    int endSide,
    int margin
)
We can define methods to help us apply constraints to views
| class ExpandableStackView @JvmOverloads constructor( | |
| context: Context, attrs: AttributeSet? = null, defStyleAttr: Int = 0 | |
| ) : MotionLayout(context, attrs, defStyleAttr) { | |
| fun setAdapter(adapter: BaseAdapter) { | |
| val scene = MotionScene(this) | |
| val startSetId = View.generateViewId() | |
| val startSet = ConstraintSet() | |
| startSet.clone(this) | |
| val endSetId = View.generateViewId() | |
| val endSet = ConstraintSet() | |
| endSet.clone(this) | |
| val transitionId = View.generateViewId() | |
| val transaction = TransitionBuilder.buildTransition( | |
| scene, | |
| transitionId, | |
| startSetId, startSet, | |
| endSetId, endSet | |
| ) | |
| transaction.duration = 1000 | |
| scene.addTransition(transaction) | |
| scene.setTransition(transaction) | |
| setScene(scene) | |
| setTransition(transitionId) | |
| } | |
| private fun boundTwoViewEnd( | |
| constraintSet: ConstraintSet, | |
| firstView: View, | |
| secondView: View | |
| ) { | |
| constraintSet.connect( | |
| secondView.id, | |
| ConstraintSet.TOP, | |
| firstView.id, | |
| ConstraintSet.BOTTOM, | |
| fromDpToPx(16).toInt() | |
| ) | |
| } | |
| private fun boundTwoViewStart( | |
| constraintSet: ConstraintSet, | |
| firstView: View, | |
| secondView: View, | |
| marginBottom: Int | |
| ) { | |
| constraintSet.connect( | |
| secondView.id, | |
| ConstraintSet.TOP, | |
| firstView.id, | |
| ConstraintSet.TOP, | |
| marginBottom | |
| ) | |
| } | |
| private fun connectViewToParent( | |
| constraintSet: ConstraintSet, | |
| firstView: View | |
| ) { | |
| constraintSet.connect( | |
| firstView.id, | |
| ConstraintSet.START, | |
| ConstraintSet.PARENT_ID, | |
| ConstraintSet.START | |
| ) | |
| constraintSet.connect( | |
| firstView.id, | |
| ConstraintSet.END, | |
| ConstraintSet.PARENT_ID, | |
| ConstraintSet.END | |
| ) | |
| } | |
| } |
The first method, boundTwoViewEnd, is used to create the constraints between two views in the expanded state.
The second method, boundTwoViewStart, is used to create constraints between two views in the grouped state.
The third method, connectViewToParent, is used to create the constraints between the views and the parent, in this case to connect them to the START and END side.
Inflating of the Views
We use the adapter to create instances of the views
| for (i in 0 until adapter.count) { | |
| val view = adapter.getView(i, null, this) | |
| view.id = View.generateViewId() | |
| startSet.constrainHeight(view.id, ConstraintSet.WRAP_CONTENT) | |
| endSet.constrainHeight(view.id, ConstraintSet.WRAP_CONTENT) | |
| connectViewToParent(startSet, view) | |
| connectViewToParent(endSet, view) | |
| } |
We create a for loop starting from 0 up to the number of elements present in the list passed to the adapter, for each element we call the method
val view = adapter.getView(i, null, this)
so the adapter does inflate single views.
Once we have the view instance we have to generate a new id and assign it to the view because each view generated will have the same id and the constraints will be applied incorrectly.
view.id = View.generateViewId()
Now we put a height constraint for each single view, for the width we set it by linking the views to the START and END of the parent with the connectViewToParent method.
startSet.constrainHeight(view.id, ConstraintSet.WRAP_CONTENT)
endSet.constrainHeight(view.id, ConstraintSet.WRAP_CONTENT)

connectViewToParent(startSet, view)
connectViewToParent(endSet, view)
In this way we have set the size constraints and the horizontal ones for both the start state and the end state, we need to set the vertical constraints which are the most complex part.
As explained in the case of vertical constraints, all views, except for the first view which will have the TOP anchored to the TOP of the parent, will be anchored to the previous view.
We must therefore keep a reference to the view previously added to be able to insert the constraints on the current view, we insert a list in which we will add the views as the constraints are created.
| val views = mutableListOf<View>() | |
| for (i in 0 until adapter.count) { | |
| val view = adapter.getView(i, null, this) | |
| val cardView = view.findViewById<CardView>(R.id.cardContainer) | |
| view.id = View.generateViewId() | |
| startSet.constrainHeight(view.id, ConstraintSet.WRAP_CONTENT) | |
| endSet.constrainHeight(view.id, ConstraintSet.WRAP_CONTENT) | |
| connectViewToParent(startSet, view) | |
| connectViewToParent(endSet, view) | |
| if (i == 0) { | |
| startSet.connect( | |
| view.id, | |
| ConstraintSet.TOP, | |
| ConstraintSet.PARENT_ID, | |
| ConstraintSet.TOP | |
| ) | |
| endSet.connect( | |
| view.id, | |
| ConstraintSet.TOP, | |
| ConstraintSet.PARENT_ID, | |
| ConstraintSet.TOP | |
| ) | |
| } else { | |
| views[i - 1].let { | |
| boundTwoViewEnd(endSet, it, view) | |
| if (i == adapter.count - 1) { | |
| endSet.connect( | |
| view.id, | |
| ConstraintSet.BOTTOM, | |
| ConstraintSet.PARENT_ID, | |
| ConstraintSet.BOTTOM, | |
| fromDpToPx(16).toInt() | |
| ) | |
| } | |
| boundTwoViewStart( | |
| startSet, it, view, | |
| if (i < 3) | |
| fromDpToPx(8).toInt() | |
| else | |
| 0 | |
| ) | |
| } | |
| } | |
| views.add(view) | |
| } |
In the case of i = 0 we are working with the first view, so we link its TOP to the TOP of the parent both in the start and end constraints.
if (i == 0) {
    startSet.connect(
        view.id,
        ConstraintSet.TOP,
        ConstraintSet.PARENT_ID,
        ConstraintSet.TOP
    )
    endSet.connect(
        view.id,
        ConstraintSet.TOP,
        ConstraintSet.PARENT_ID,
        ConstraintSet.TOP
    )
}
If i> 0 then we have already added at least the first view to the list and we need to connect the current view to the previous one, so we retrieve the last view added from the list
views[i - 1].let { }
Then connect the current and previous view with the methods created before
boundTwoViewEnd(endSet, it, view)
boundTwoViewStart(
    startSet, it, view,
    if (i < 3)
        fromDpToPx(8).toInt()
    else
        0
)
In the start constraints if the index of the current view is less than 3 we add some margin to the TOP so that the view is positioned slightly lower than the previous view and the lower margin will be visible below it. We add the margin only to the second and third view so as not to have a view that is too long.
Finally if we are working with the last view to add I connect it to the parent’s BOTTOM and add a margin to it so that it is detached from the bottom side of the parent.
f (i == adapter.count - 1) {
    endSet.connect(
        view.id,
        ConstraintSet.BOTTOM,
        ConstraintSet.PARENT_ID,
        ConstraintSet.BOTTOM,
        fromDpToPx(16).toInt()
    )
}
Well now we just have to add the views to the layout in the opposite way to how they were created because the order of addition determines the Z index, if we added them in the order of creation the view on top of the stack would be the last created instead of the first.
| fun setAdapter(adapter: BaseAdapter) { | |
| val scene = MotionScene(this) | |
| val startSetId = View.generateViewId() | |
| val startSet = ConstraintSet() | |
| startSet.clone(this) | |
| val endSetId = View.generateViewId() | |
| val endSet = ConstraintSet() | |
| endSet.clone(this) | |
| val views = mutableListOf<View>() | |
| for (i in 0 until adapter.count) { | |
| val view = adapter.getView(i, null, this) | |
| val cardView = view.findViewById<CardView>(R.id.cardContainer) | |
| view.id = View.generateViewId() | |
| startSet.constrainHeight(view.id, ConstraintSet.WRAP_CONTENT) | |
| endSet.constrainHeight(view.id, ConstraintSet.WRAP_CONTENT) | |
| connectViewToParent(startSet, view) | |
| connectViewToParent(endSet, view) | |
| if (i == 0) { | |
| startSet.connect( | |
| view.id, | |
| ConstraintSet.TOP, | |
| ConstraintSet.PARENT_ID, | |
| ConstraintSet.TOP | |
| ) | |
| endSet.connect( | |
| view.id, | |
| ConstraintSet.TOP, | |
| ConstraintSet.PARENT_ID, | |
| ConstraintSet.TOP | |
| ) | |
| } else { | |
| views[i - 1].let { | |
| boundTwoViewEnd(endSet, it, view) | |
| if (i == adapter.count - 1) { | |
| endSet.connect( | |
| view.id, | |
| ConstraintSet.BOTTOM, | |
| ConstraintSet.PARENT_ID, | |
| ConstraintSet.BOTTOM, | |
| fromDpToPx(16).toInt() | |
| ) | |
| } | |
| boundTwoViewStart( | |
| startSet, it, view, | |
| if (i < 3) | |
| fromDpToPx(8).toInt() | |
| else | |
| 0 | |
| ) | |
| } | |
| } | |
| views.add(view) | |
| } | |
| views.asReversed().forEach { | |
| addView(it) | |
| } | |
| val transitionId = View.generateViewId() | |
| val transaction = TransitionBuilder.buildTransition( | |
| scene, | |
| transitionId, | |
| startSetId, startSet, | |
| endSetId, endSet | |
| ) | |
| transaction.duration = 1000 | |
| scene.addTransition(transaction) | |
| scene.setTransition(transaction) | |
| setScene(scene) | |
| setTransition(transitionId) | |
| } |
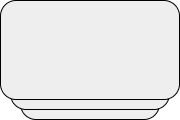
We should currently have a similar situation
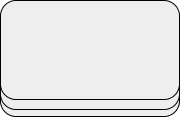
however we would like to give some depth to the view to have something like that
We then add a scale factor to the views behind the first.
if (i == 1) {
    startSet.setScaleX(
        view.id,
        0.95f
    )
} else {
    startSet.setScaleX(
        view.id,
        0.9f
    )
}
For the first view we do not enter any scaling factor, for the second we scale its length by 5%, while for all the views from the third onwards we scale their length to 10%.
Let’s see the current result
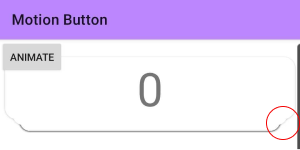
Not exactly what we expected, as you can see in the red circle there is a problem with the elevation of the cards.
A Game of Shadows

All the elements that we have inserted in this MotionLayout are CardView, although the order in which they are added determines the Z index, having all the same cardElevation, the shading is not displayed correctly.
To solve this problem we should set a higher cardElevation for the cards in the foreground and gradually lower for those placed behind on the constraint of the grouped state.
For the expanded state instead we have to set the same cardElevation for all the cards.
Unfortunately we don’t have a method to directly set the cardElevation on the constraint but digging a bit into the MotionLayout and ConstraintSetcode I discovered that it is possible to exploit the CustomAttributesprogrammatically.
So I created this extension on ConstraintSet to set up the CardElevation
| fun ConstraintSet.setCardElevation(cardView: CardView, elevation: Float) { | |
| getConstraint(cardView.id)?.let { | |
| it.mCustomConstraints["CardElevation"] = ConstraintAttribute( | |
| "CardElevation", | |
| ConstraintAttribute.AttributeType.DIMENSION_TYPE, | |
| elevation | |
| ) | |
| } | |
| } |
I will explore the use of CustomAttributes from code in a future article.
The idea is to set, for the ConstraintSet of the grouped state, the cardElevation of the first view at 8dp, for the second at 6dp and for the third at 4dp while for all the others at 0dp in order not to create a bad effect of overlapping of the shadows.
For the constraint of the expanded state, the elevation of all the cards will be 4dp.
| fun setAdapter(adapter: BaseAdapter) { | |
| val scene = MotionScene(this) | |
| val startSetId = View.generateViewId() | |
| val startSet = ConstraintSet() | |
| startSet.clone(this) | |
| val endSetId = View.generateViewId() | |
| val endSet = ConstraintSet() | |
| endSet.clone(this) | |
| val views = mutableListOf<View>() | |
| for (i in 0 until adapter.count) { | |
| val view = adapter.getView(i, null, this) | |
| val cardView = view.findViewById<CardView>(R.id.cardContainer) | |
| view.id = View.generateViewId() | |
| startSet.constrainHeight(view.id, ConstraintSet.WRAP_CONTENT) | |
| endSet.constrainHeight(view.id, ConstraintSet.WRAP_CONTENT) | |
| connectViewToParent(startSet, view) | |
| connectViewToParent(endSet, view) | |
| if (i == 0) { | |
| startSet.setCardElevation(cardView, 8f) | |
| endSet.setCardElevation(cardView, 4f) | |
| startSet.connect( | |
| view.id, | |
| ConstraintSet.TOP, | |
| ConstraintSet.PARENT_ID, | |
| ConstraintSet.TOP | |
| ) | |
| endSet.connect( | |
| view.id, | |
| ConstraintSet.TOP, | |
| ConstraintSet.PARENT_ID, | |
| ConstraintSet.TOP | |
| ) | |
| } else { | |
| if (i == 1) { | |
| startSet.setScaleX( | |
| view.id, | |
| 0.95f | |
| ) | |
| startSet.setCardElevation(cardView, 6f) | |
| endSet.setCardElevation(cardView, 4f) | |
| } else { | |
| startSet.setScaleX( | |
| view.id, | |
| 0.9f | |
| ) | |
| if (i == 2) { | |
| startSet.setCardElevation(cardView, 4f) | |
| endSet.setCardElevation(cardView, 4f) | |
| } else { | |
| startSet.setCardElevation(cardView, 0f) | |
| endSet.setCardElevation(cardView, 4f) | |
| } | |
| } | |
| views[i - 1].let { | |
| boundTwoViewEnd(endSet, it, view) | |
| if (i == adapter.count - 1) { | |
| endSet.connect( | |
| view.id, | |
| ConstraintSet.BOTTOM, | |
| ConstraintSet.PARENT_ID, | |
| ConstraintSet.BOTTOM, | |
| fromDpToPx(16).toInt() | |
| ) | |
| } | |
| boundTwoViewStart( | |
| startSet, it, view, | |
| if (i < 3) | |
| fromDpToPx(8).toInt() | |
| else | |
| 0 | |
| ) | |
| } | |
| } | |
| views.add(view) | |
| } | |
| views.asReversed().forEach { | |
| addView(it) | |
| } | |
| val transitionId = View.generateViewId() | |
| val transaction = TransitionBuilder.buildTransition( | |
| scene, | |
| transitionId, | |
| startSetId, startSet, | |
| endSetId, endSet | |
| ) | |
| transaction.duration = 1000 | |
| scene.addTransition(transaction) | |
| scene.setTransition(transaction) | |
| setScene(scene) | |
| setTransition(transitionId) | |
| } |
Let’s get the CardView instance from the current view using
val cardView = view.findViewById<CardView>(R.id.cardContainer)
Then for the first view (i = 0) we set the elevation to 8dp for the start and 4dp for the end
if (i == 0) {
    startSet.setCardElevation(cardView, 8f)
    endSet.setCardElevation(cardView, 4f)
    startSet.connect(
        view.id,
        ConstraintSet.TOP,
        ConstraintSet.PARENT_ID,
        ConstraintSet.TOP
    )
    endSet.connect(
        view.id,
        ConstraintSet.TOP,
        ConstraintSet.PARENT_ID,
        ConstraintSet.TOP
    )
}
For the second view (i = 1) we set the elevation to 6dp for the start and 4dp for the end
if (i == 1) {
    startSet.setScaleX(
        view.id,
        0.95f
    )
    startSet.setCardElevation(cardView, 6f)
    endSet.setCardElevation(cardView, 4f)
}
For the third view (i = 2) we set the elevation to 4dp for the start and 4dpfor the end while for all the other views (i> 2) we set to 0dp for the start and 4dp for the end
if (i == 1) {
    ...
} else {
    startSet.setScaleX(
        view.id,
        0.9f
    )
    if (i == 2) {
        startSet.setCardElevation(cardView, 4f)
        endSet.setCardElevation(cardView, 4f)
    } else {
        startSet.setCardElevation(cardView, 0f)
        endSet.setCardElevation(cardView, 4f)
    }
}
That’s all folks
Here is the final result

| class ExpandableStackView @JvmOverloads constructor( | |
| context: Context, attrs: AttributeSet? = null, defStyleAttr: Int = 0 | |
| ) : MotionLayout(context, attrs, defStyleAttr) { | |
| fun setAdapter(adapter: BaseAdapter) { | |
| val scene = MotionScene(this) | |
| val startSetId = View.generateViewId() | |
| val startSet = ConstraintSet() | |
| startSet.clone(this) | |
| val endSetId = View.generateViewId() | |
| val endSet = ConstraintSet() | |
| endSet.clone(this) | |
| val views = mutableListOf<View>() | |
| for (i in 0 until adapter.count) { | |
| val view = adapter.getView(i, null, this) | |
| val cardView = view.findViewById<CardView>(R.id.cardContainer) | |
| view.id = View.generateViewId() | |
| startSet.constrainHeight(view.id, ConstraintSet.WRAP_CONTENT) | |
| endSet.constrainHeight(view.id, ConstraintSet.WRAP_CONTENT) | |
| connectViewToParent(startSet, view) | |
| connectViewToParent(endSet, view) | |
| if (i == 0) { | |
| startSet.setCardElevation(cardView, 8f) | |
| endSet.setCardElevation(cardView, 4f) | |
| startSet.connect( | |
| view.id, | |
| ConstraintSet.TOP, | |
| ConstraintSet.PARENT_ID, | |
| ConstraintSet.TOP | |
| ) | |
| endSet.connect( | |
| view.id, | |
| ConstraintSet.TOP, | |
| ConstraintSet.PARENT_ID, | |
| ConstraintSet.TOP | |
| ) | |
| } else { | |
| if (i == 1) { | |
| startSet.setScaleX( | |
| view.id, | |
| 0.95f | |
| ) | |
| startSet.setCardElevation(cardView, 6f) | |
| endSet.setCardElevation(cardView, 4f) | |
| } else { | |
| startSet.setScaleX( | |
| view.id, | |
| 0.9f | |
| ) | |
| if (i == 2) { | |
| startSet.setCardElevation(cardView, 4f) | |
| endSet.setCardElevation(cardView, 4f) | |
| } else { | |
| startSet.setCardElevation(cardView, 0f) | |
| endSet.setCardElevation(cardView, 4f) | |
| } | |
| } | |
| views[i - 1].let { | |
| boundTwoViewEnd(endSet, it, view) | |
| if (i == adapter.count - 1) { | |
| endSet.connect( | |
| view.id, | |
| ConstraintSet.BOTTOM, | |
| ConstraintSet.PARENT_ID, | |
| ConstraintSet.BOTTOM, | |
| fromDpToPx(16).toInt() | |
| ) | |
| } | |
| boundTwoViewStart( | |
| startSet, it, view, | |
| if (i < 3) | |
| fromDpToPx(8).toInt() | |
| else | |
| 0 | |
| ) | |
| } | |
| } | |
| views.add(view) | |
| } | |
| views.asReversed().forEach { | |
| addView(it) | |
| } | |
| val transitionId = View.generateViewId() | |
| val transaction = TransitionBuilder.buildTransition( | |
| scene, | |
| transitionId, | |
| startSetId, startSet, | |
| endSetId, endSet | |
| ) | |
| transaction.duration = 1000 | |
| scene.addTransition(transaction) | |
| scene.setTransition(transaction) | |
| setScene(scene) | |
| setTransition(transitionId) | |
| } | |
| private fun boundTwoViewEnd( | |
| constraintSet: ConstraintSet, | |
| firstView: View, | |
| secondView: View | |
| ) { | |
| constraintSet.connect( | |
| secondView.id, | |
| ConstraintSet.TOP, | |
| firstView.id, | |
| ConstraintSet.BOTTOM, | |
| fromDpToPx(16).toInt() | |
| ) | |
| } | |
| private fun boundTwoViewStart( | |
| constraintSet: ConstraintSet, | |
| firstView: View, | |
| secondView: View, | |
| marginBottom: Int | |
| ) { | |
| constraintSet.connect( | |
| secondView.id, | |
| ConstraintSet.TOP, | |
| firstView.id, | |
| ConstraintSet.TOP, | |
| marginBottom | |
| ) | |
| } | |
| private fun connectViewToParent( | |
| constraintSet: ConstraintSet, | |
| firstView: View | |
| ) { | |
| constraintSet.connect( | |
| firstView.id, | |
| ConstraintSet.START, | |
| ConstraintSet.PARENT_ID, | |
| ConstraintSet.START | |
| ) | |
| constraintSet.connect( | |
| firstView.id, | |
| ConstraintSet.END, | |
| ConstraintSet.PARENT_ID, | |
| ConstraintSet.END | |
| ) | |
| } | |
| } |
| class ExpandableStackViewAdapter( | |
| private val models: List<String>, | |
| private val context: Context | |
| ) : BaseAdapter() { | |
| override fun getCount(): Int = models.size | |
| override fun getItem(position: Int): String = models[position] | |
| override fun getItemId(position: Int): Long = position.toLong() | |
| override fun getView(position: Int, convertView: View?, parent: ViewGroup?): View { | |
| val view = LayoutInflater.from(context).inflate(R.layout.card, parent, false) | |
| view.findViewById<AppCompatTextView>(R.id.text).text = position.toString() | |
| return view | |
| } | |
| } |
The code could be further improved by using, for example, the ViewHolderpattern and adding views with index greater than 2 only in the expanded state and removing them in the grouped state to avoid unnecessary views.
Conclusion
The MotionLayout is very fun to use and allows you to create excellent animations but using only the xml limits the possibilities a bit, building a MotionLayout from code instead gives many more possibilities but is a bit cumbersome.
In fact, as seen the use of CustomAttributes does not have direct support from code and you have to dig a little to be able to use them, we hope that in the future Google will improve MotionLayout support via code.
UPDATE:
I created a git repository with a sample project:
https://github.com/GRizzi91/MotionStackView
Unfortunately, version 2.1.0 of ConstraintLayout seems to have changed something and with this version this example crashes, it remains valid for version 2.0.4, I will try to fix the problem with 2.1.0 and update the article.

