Let’s take a look into the most popular static code analysis tools that you can use to implement and enforce custom rules in your codebase. Some of the benefit from using a linter. These benefits are: enforce standards programmatically, automate code quality and code maintenance.
In Android Studio you’re probably familiar with these kind of messages.
You can write your own rules by using these tools:
We’ll describe the step by step process to write some rules on a demo project that you can find here.
Custom rules with Android Lint API
To start with, we’re going to write rules by using the Android Lint API. Some of the advantages are:
- You can write rules for Java, Kotlin, Gradle, XML and some other file types.
- No need to add plugins to make the warnings/errors visible on Android Studio
- Simpler integration with your project.
One of the disadvantages is this footnote on their repository https://github.com/googlesamples/android-custom-lint-rules
The lint API is not a final API; if you rely on this be prepared to adjust your code for the next tools release.
So, these are the steps to create our first rule:
- Create a new module in your project where your custom rules will live in. We’ll call this module android-lint-rules.
- Modify the build.gradle file on that module to something like this.
| apply plugin: 'kotlin' | |
| apply plugin: 'com.android.lint' | |
| dependencies { | |
| compileOnly "com.android.tools.lint:lint-api:$lintVersion" | |
| testImplementation "com.android.tools.lint:lint:$lintVersion" | |
| testImplementation "com.android.tools.lint:lint-tests:$lintVersion" | |
| } | |
| jar { | |
| manifest { | |
| attributes("Lint-Registry-v2": "dev.cristopher.lint.DefaultIssueRegistry") | |
| } | |
| } |
Here we’re importing as a compileOnly the dependency that will allow us to write our custom rules com.android.tools.lint:lint-api. You should also beware that here I’m using the lint-api:27.2.0, which is still on beta.
Here we also specify the Lint-Registry-v2 which will point to the class that will contain the list of rules.
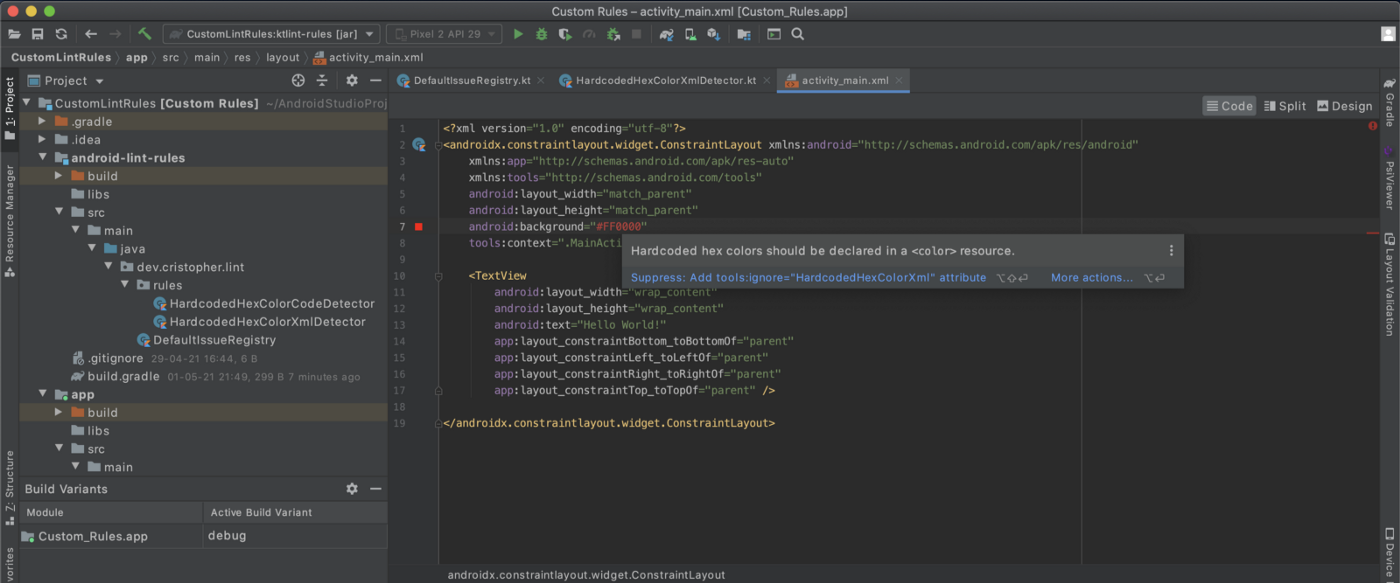
3. Write the first rule to avoid hardcoded colors on our layouts.
| @Suppress("UnstableApiUsage") | |
| class HardcodedColorXmlDetector : ResourceXmlDetector() { | |
| companion object { | |
| val REGEX_HEX_COLOR = "#[a-fA-F\\d]{3,8}".toRegex() | |
| val ISSUE = Issue.create( | |
| id = "HardcodedColorXml", | |
| briefDescription = "Prohibits hardcoded colors in layout XML", | |
| explanation = "Hardcoded colors should be declared as a '<color>' resource", | |
| category = Category.CORRECTNESS, | |
| severity = Severity.ERROR, | |
| implementation = Implementation( | |
| HardcodedColorXmlDetector::class.java, | |
| Scope.RESOURCE_FILE_SCOPE | |
| ) | |
| ) | |
| } | |
| override fun getApplicableAttributes(): Collection<String>? { | |
| // Return the set of attribute names we want to analyze. The `visitAttribute` method | |
| // below will be called each time lint sees one of these attributes in a | |
| // XML resource file. In this case, we want to analyze every attribute | |
| // in every XML resource file. | |
| return XmlScannerConstants.ALL | |
| } | |
| override fun visitAttribute(context: XmlContext, attribute: Attr) { | |
| // Get the value of the XML attribute. | |
| val attributeValue = attribute.nodeValue | |
| if (attributeValue.matches(REGEX_HEX_COLOR)) { | |
| context.report( | |
| issue = ISSUE, | |
| scope = attribute, | |
| location = context.getValueLocation(attribute), | |
| message = "Hardcoded hex colors should be declared in a '<color>' resource." | |
| ) | |
| } | |
| } | |
| } |
Depending on the rule that we want to implement, we’ll extend from a different Detector class. A detector is able to find a particular problem. Each problem type is uniquely identified as an Issue. In this case we’ll use a ResourceXmlDetector since we want to check for hardcoded hexadecimal colors in each xml resource.
After the class declaration we create all the information needed to define an Issue. Here we can specify the category and severity, along with the explanation that will be display in the IDE if the rule is triggered.
Then we need to specify the attributes that are going to be scanned. We can return a specific list of attributes like this mutableListOf(“textColor”, “background”) or we can return XmlScannerConstants.ALL to scan all the attributes on each layout. That’ll depend on your use case.
Finally we have to add the logic needed to decide if that attribute is an hexadecimal color, so we can raise a report.
4. Create a class called DefaultIssueRegistry that extends IssueRegistry. Then you need to override the issues variable and list all of them.
If you are going to create more rules, you need to add all of them here.
| class DefaultIssueRegistry : IssueRegistry() { | |
| override val issues = listOf( | |
| HardcodedHexColorXmlDetector.ISSUE | |
| ) | |
| override val api: Int | |
| get() = CURRENT_API | |
| } |
5. To check that the rule is doing their job correctly we’re going to implement some tests. We need to have on our build.gradle these two dependencies as testImplementation: com.android.tools.lint:lint-testsand com.android.tools.lint:lint. Those will allow us to define a xml file right in the code and scan their content to see if the rule is working fine.
- The first test check if our rule still works if we’re using a custom property. So the TextView will contain a property called someCustomColor with the color #fff. Then, we can add several issues to scan the mock file, in our case we just specify our only written rule. Finally we say that the expected result should be 1 issue with an error severity.
- In the second test the behavior is really similar. The only change is that we’re testing our rule with a normal property and the hexadecimal color is including the alpha transparency.
- In the last test we check that our rule doesn’t raise any error if we specify a color by using our resources. In that case we set a text color with @color/primaryColor and the expected result is a clean execution.
| class HardcodedColorXmlDetectorTest { | |
| @Test | |
| fun `Given a hardcoded color on a custom text view property, When we analyze our custom rule, Then display an error`() { | |
| lint() | |
| .files( | |
| xml( | |
| "res/layout/layout.xml", | |
| """ | |
| <TextView xmlns:app="http://schemas.android.com/apk/res-auto" | |
| app:someCustomColor="#fff"/> | |
| """ | |
| ).indented() | |
| ) | |
| .issues(HardcodedColorXmlDetector.ISSUE) | |
| .allowMissingSdk() | |
| .run() | |
| .expectCount(1, Severity.ERROR) | |
| } | |
| @Test | |
| fun `Given a hardcoded color on a text view, When we analyze our custom rule, Then display an error`() { | |
| lint() | |
| .files( | |
| xml( | |
| "res/layout/layout.xml", | |
| """ | |
| <TextView xmlns:android="http://schemas.android.com/apk/res/android" | |
| android:textColor="#80000000"/> | |
| """ | |
| ).indented() | |
| ) | |
| .issues(HardcodedColorXmlDetector.ISSUE) | |
| .allowMissingSdk() | |
| .run() | |
| .expectCount(1, Severity.ERROR) | |
| } | |
| @Test | |
| fun `Given a color from our resources on a text view, When we analyze our custom rule, Then expect no errors`() { | |
| lint() | |
| .files( | |
| xml( | |
| "res/layout/layout.xml", | |
| """ | |
| <TextView xmlns:android="http://schemas.android.com/apk/res/android" | |
| android:textColor="@color/primaryColor"/> | |
| """ | |
| ).indented() | |
| ) | |
| .issues(HardcodedColorXmlDetector.ISSUE) | |
| .allowMissingSdk() | |
| .run() | |
| .expectClean() | |
| } | |
| } |
6. Now in the app module, where we want to apply all these rules, we’re going to add this line to the build.gradle file:
dependencies {
lintChecks project(':android-lint-rules')
....
}
And that’s it! If we try to set a hardcoded color in any layout an error will be prompt ?
This repository can be a good source if you need more ideas to add some custom rules https://github.com/vanniktech/lint-rules
Custom rules with ktlint
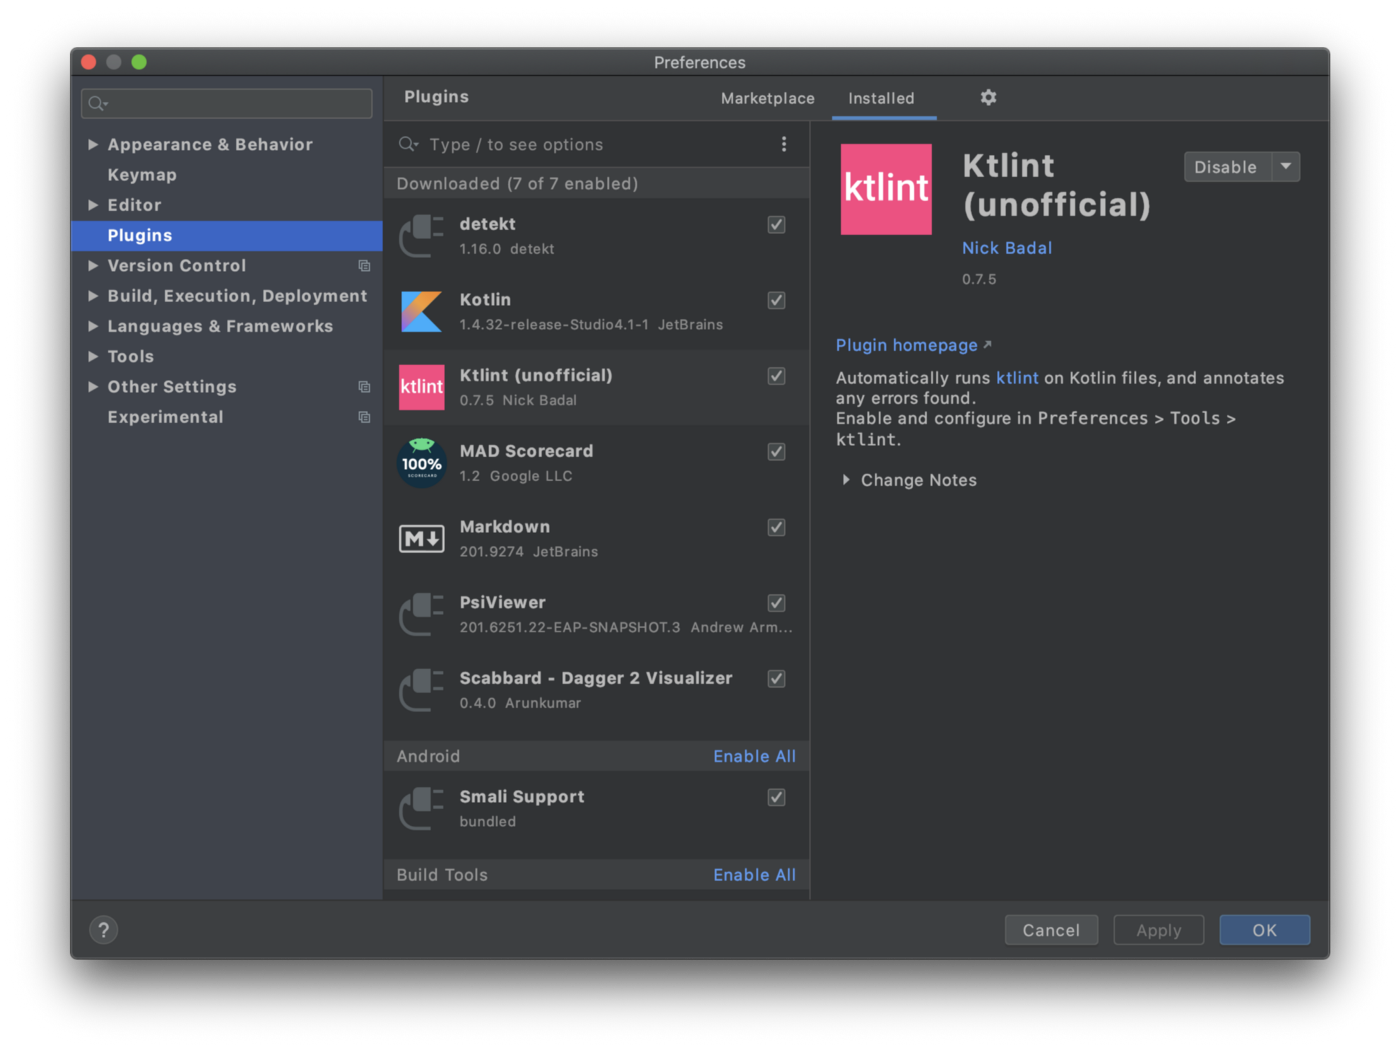
ktlint define itself as an anti-bikeshedding Kotlin linter with built-in formatter. One of the coolest things is that you can write your rules along with a way to autocorrect the issue, so the user can easily fix the problem. One of the disadvantages is that it’s specifically for Kotlin, so you can’t write rules for XML files, as we previously did. Also if you want to visualize the issues on Android Studio, you need to install a plugin. I’m using this one https://plugins.jetbrains.com/plugin/15057-ktlint-unofficial-
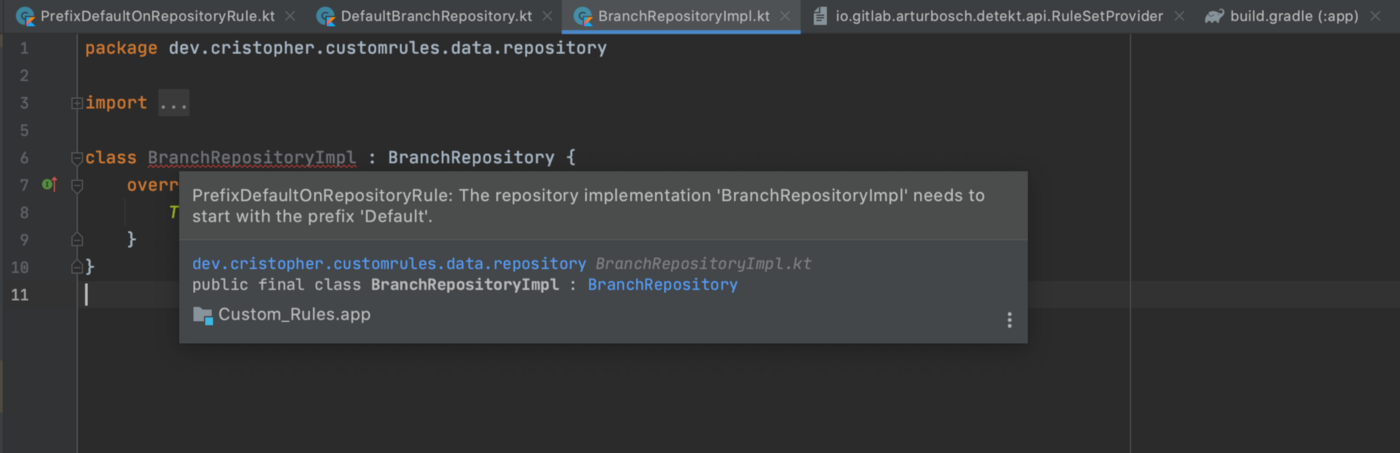
So, in this case we’re going to enforce a rule about Clean Architecture. Probably, you have heard that we shouldn’t expose our models from the data layer in our domain or presentation layers. Some people add a prefix on each model from the data layer to make them easy to identify. In this case we want to check that every model which is part of a package ended on data.dto should have a prefix Data in their name.
These are the steps to write a rule using ktlint:
- Create a new module where your custom rules will live in. We’ll call this module ktlint-rules
- Modify the build.gradle file on that module:
| plugins { | |
| id 'kotlin' | |
| } | |
| dependencies { | |
| compileOnly "com.github.shyiko.ktlint:ktlint-core:$ktlintVersion" | |
| testImplementation "junit:junit:$junitVersion" | |
| testImplementation "org.assertj:assertj-core:$assertjVersion" | |
| testImplementation "com.github.shyiko.ktlint:ktlint-core:$ktlintVersion" | |
| testImplementation "com.github.shyiko.ktlint:ktlint-test:$ktlintVersion" | |
| } |
3. Write a rule to enforce the use of a prefix (Data) in all the models inside a package name ending on data.dto.
First we need to extend the Rule class that ktlint provide for us and specify an id for your rule.
Then we override the visit function. Here we’re going to set some conditions to detect that the package ends with data.dto and verify if the classes inside that file has the prefix Data. If the classes doesn’t have that prefix, then we’re going to use the emit lambda to trigger the report and we’ll also offer a way to fix the problem.
| class PrefixDataOnDtoModelsRule : Rule("prefix-data-on-dto-model") { | |
| companion object { | |
| const val DATA_PREFIX = "Data" | |
| const val IMPORT_DTO = "data.dto" | |
| } | |
| override fun visit( | |
| node: ASTNode, | |
| autoCorrect: Boolean, | |
| emit: (offset: Int, errorMessage: String, canBeAutoCorrected: Boolean) -> Unit | |
| ) { | |
| if (node.elementType == ElementType.PACKAGE_DIRECTIVE) { | |
| val qualifiedName = (node.psi as KtPackageDirective).qualifiedName | |
| if (qualifiedName.isEmpty()) { | |
| return | |
| } | |
| if (qualifiedName.endsWith(IMPORT_DTO)) { | |
| node.treeParent.children().forEach { | |
| checkClassesWithoutDataPrefix(it, autoCorrect, emit) | |
| } | |
| } | |
| } | |
| } | |
| private fun checkClassesWithoutDataPrefix( | |
| node: ASTNode, | |
| autoCorrect: Boolean, | |
| emit: (offset: Int, errorMessage: String, canBeAutoCorrected: Boolean) -> Unit | |
| ) { | |
| if (node.elementType == ElementType.CLASS) { | |
| val klass = node.psi as KtClass | |
| if (klass.name?.startsWith(DATA_PREFIX, ignoreCase = true) != true) { | |
| emit( | |
| node.startOffset, | |
| "'${klass.name}' class is not using " + | |
| "the prefix Data. Classes inside any 'data.dto' package should " + | |
| "use that prefix", | |
| true | |
| ) | |
| if (autoCorrect) { | |
| klass.setName("$DATA_PREFIX${klass.name}") | |
| } | |
| } | |
| } | |
| } | |
| } |
The next steps are pretty similar to the ones on ktlint
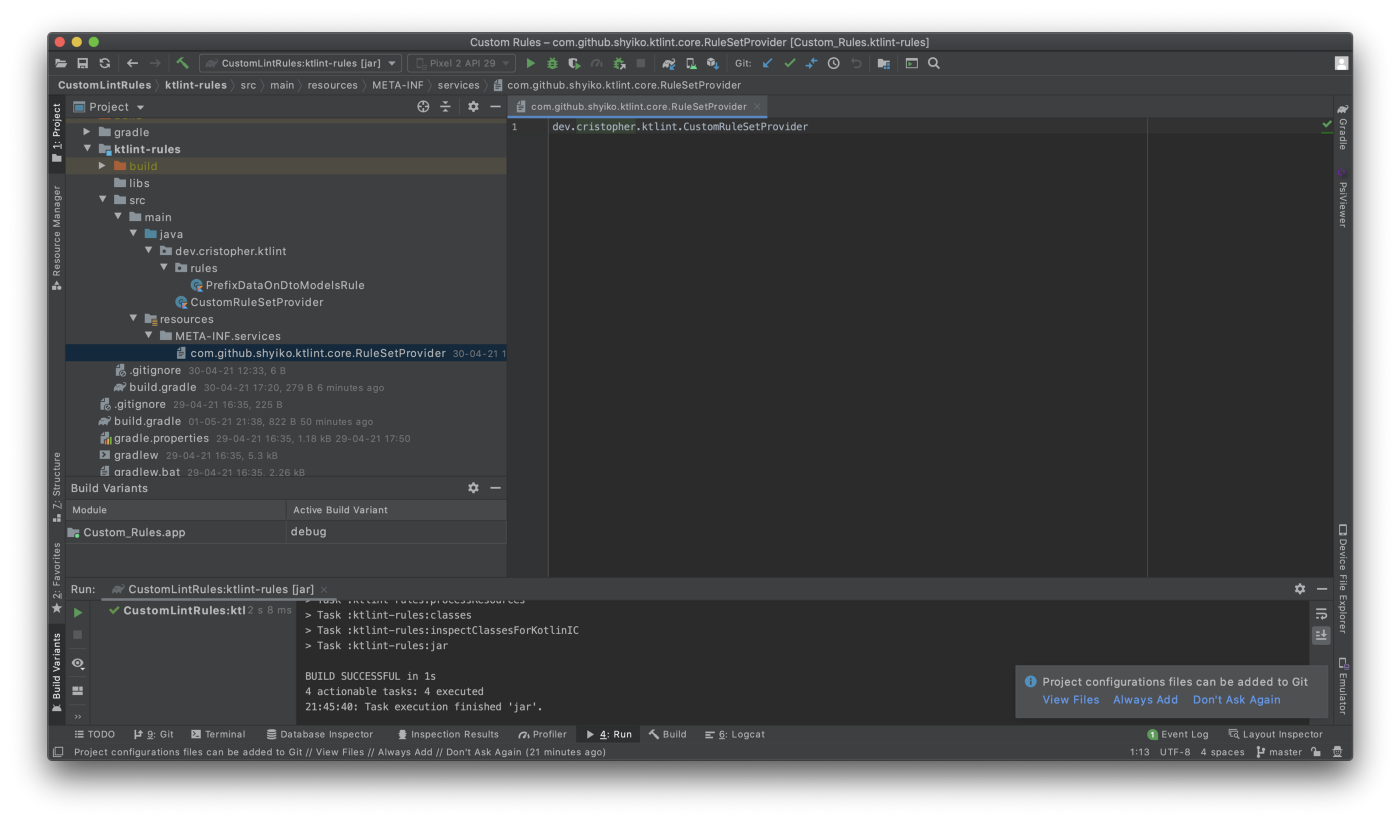
4. Create a class called CustomRuleSetProvider that extends RuleSetProvider. Then you need to override the get() function and list all your rules there.
| class CustomRuleSetProvider : RuleSetProvider { | |
| private val ruleSetId: String = "custom-ktlint-rules" | |
| override fun get() = RuleSet(ruleSetId, PrefixDataOnDtoModelsRule()) | |
| } |
OUR VIDEO RECOMMENDATION


Jobs
5. Create a file in the folder resources/META-INF/services. This file must contain the path to the class created on the step 4.
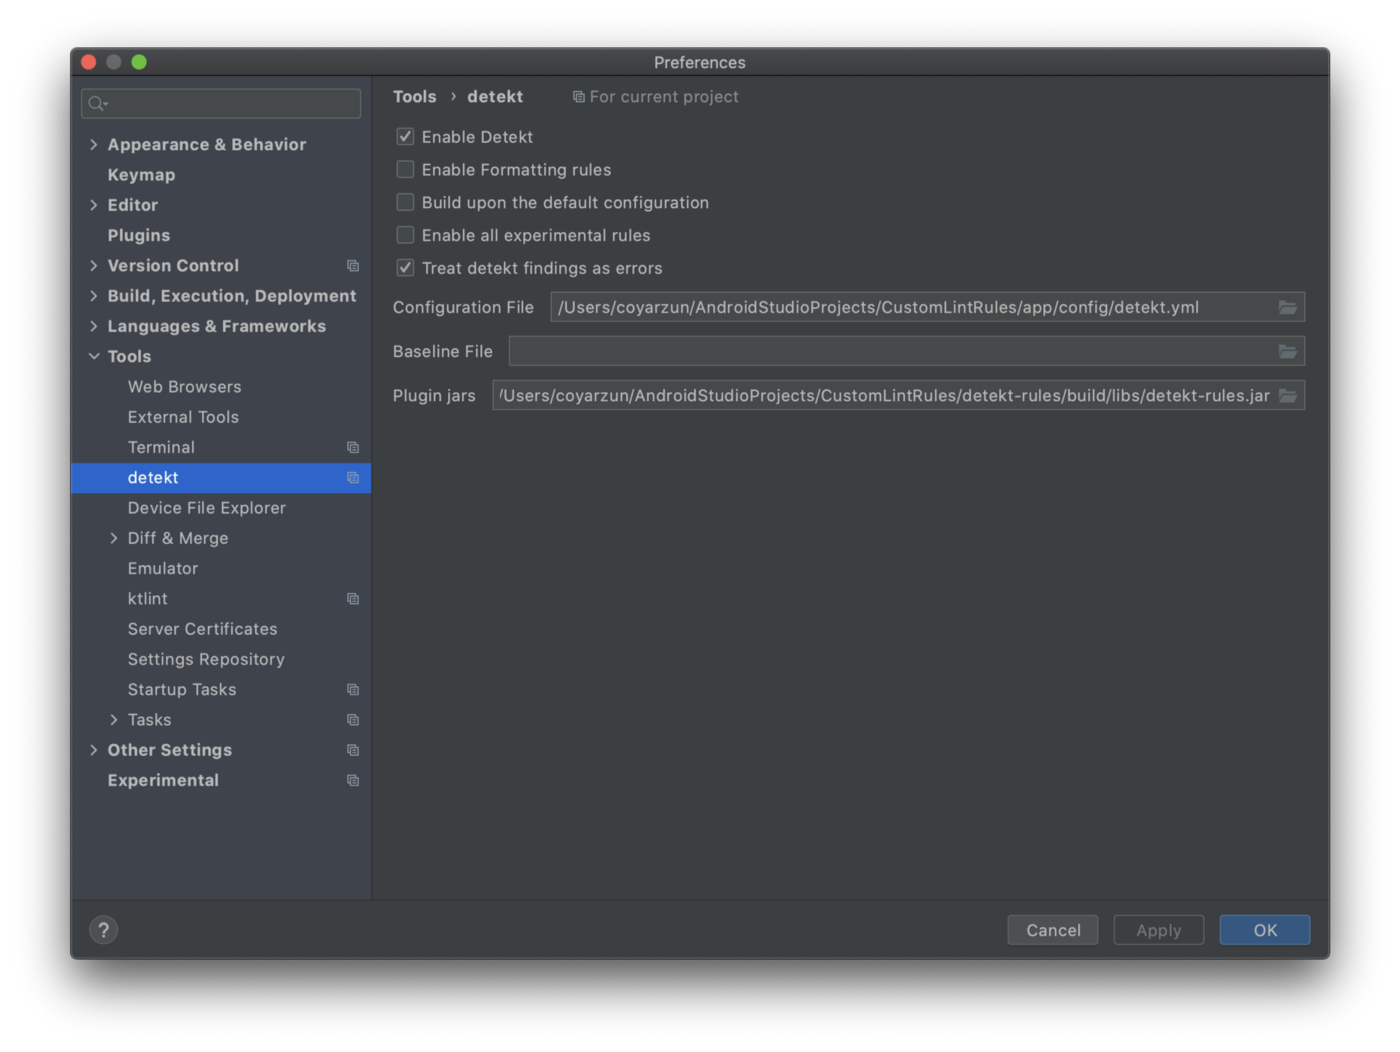
6. Now in our project we’re going to add this module, so the rules can be applied. To use detekt in your project you also need to a yaml style configuration file. You can get the default configuration from the same detekt repository here.
detekt {
    input = files("$rootDir/app/src")
    config = files("$rootDir/app/config/detekt.yml")
}dependencies {
    detektPlugins "io.gitlab.arturbosch.detekt:detekt-cli:$detektVersion"

    detektPlugins project(path: ':detekt-rules')
    ...
}
7. I also highly recommend to install this plugin so you can be notified in the same Android Studio about any errors found.
To see your custom rules in Android Studio you need to generate a jar from your module and add that path in the external rulset JARs like this:
And that’s it! Now you can see your custom rule applied ?