Posted by: Heitor Paceli
Automation is a key point of Software Testing once it make possible to reproduce test steps as many times as needed, across the different software versions, which can be tedious to be done manually and very error prone once it is likely to a human to forget to perform some required set up or misunderstand some test step, resulting in invalid results.
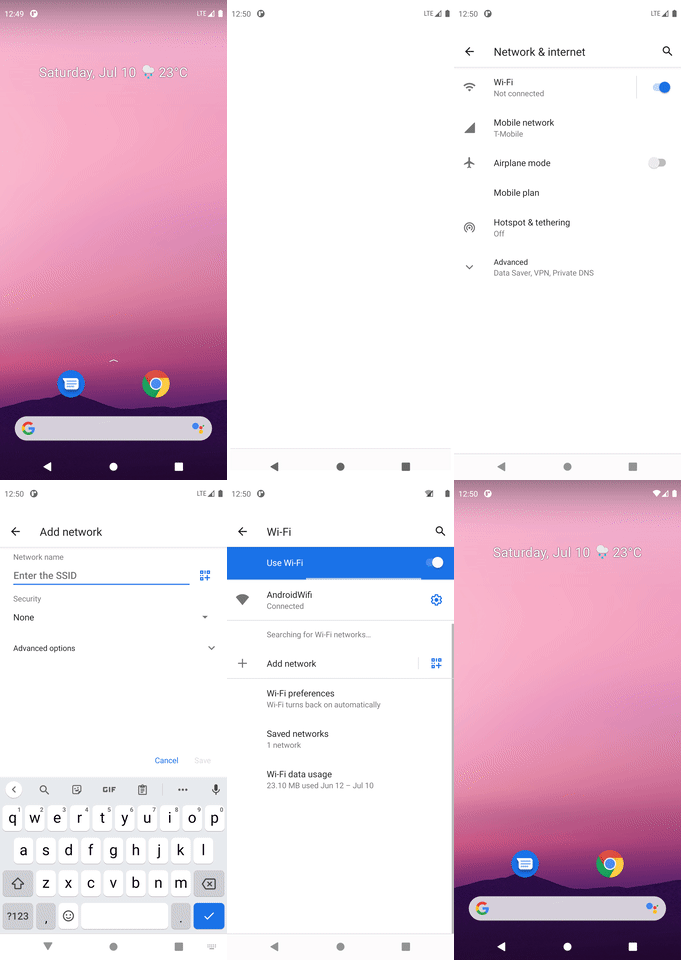
This article will explain how to write an UI Automator script to automatically test any Android application. We will write a simple test for the Android Settings app that adds a Wi-Fi network and check if the device is able to connect to it.

The example from this article was written using an Android Virtual Device with the system image R API level 30 ABI x86 target Android 11 (Google Play). You can use any image with Android 4.3 (API level 18) or higher and adapt the code according to its UI.
UI Automator
UI Automator is an Android testing framework that allows us to write scripts that can interact to any application installed in the device. UI Automator doesn’t require having access to the application source code to work. Because of that, the script can navigate and interact with the application tray, Settings application, third party applications or any other app you want to.
Creating the project
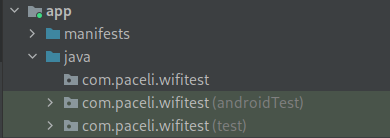
Create a new Project on Android Studio with no activity and minimum SDK 18 or higher. The Android Studio will create three different source sets in the project: main, androidTest and test. This is the default project structure in which main contains the application code, the test contains the unit tests that runs on the development machine and androidTest that is were the instrumented tests, like UI Automator ones, go by default.

If you are writing you scripts in the same project of your application, then you can just create your scripts inside androidTest directory, but in this article we are creating a project with UI Automator scripts only, to test another application which we don’t have access to its source code, so we will make some changes before starting it.
Open the build.gradle of the app module and add the following code inside android block:
| sourceSets { | |
| androidTest { | |
| java.srcDir 'src/main/java' | |
| } | |
| } |
This will change the directory of our instrumented tests to the maindirectory. Now you can delete both test and androidTest source sets. Also delete some resources that will no longer be used:
app/src/main/res/values/themes.xml
app/src/main/res/values-night/themes.xml
app/src/main/res/values/colors.xml
With our source sets configured, let’s add the required dependencies. Once our scripts are part of the main source set, we need to add the dependencies using implementation instead of androidTestImplementation. Also you can remove dependencies that will not be used:
| dependencies { | |
| implementation "org.jetbrains.kotlin:kotlin-stdlib:$kotlin_version" | |
| implementation 'androidx.test.ext:junit:1.1.3' | |
| implementation 'androidx.test:runner:1.4.0' | |
| implementation 'androidx.test.uiautomator:uiautomator:2.2.0' | |
| } |
After the change this is how your build.gradle will look like:
| plugins { | |
| id 'com.android.application' | |
| id 'kotlin-android' | |
| } | |
| android { | |
| compileSdkVersion 30 | |
| buildToolsVersion "30.0.3" | |
| defaultConfig { | |
| applicationId "com.paceli.wifitest" | |
| minSdkVersion 18 | |
| targetSdkVersion 30 | |
| versionCode 1 | |
| versionName "1.0" | |
| testInstrumentationRunner "androidx.test.runner.AndroidJUnitRunner" | |
| } | |
| buildTypes { | |
| release { | |
| minifyEnabled false | |
| proguardFiles getDefaultProguardFile('proguard-android-optimize.txt'), 'proguard-rules.pro' | |
| } | |
| } | |
| compileOptions { | |
| sourceCompatibility JavaVersion.VERSION_1_8 | |
| targetCompatibility JavaVersion.VERSION_1_8 | |
| } | |
| kotlinOptions { | |
| jvmTarget = '1.8' | |
| } | |
| sourceSets { | |
| androidTest { | |
| java.srcDir 'src/main/java' | |
| } | |
| } | |
| } | |
| dependencies { | |
| implementation "org.jetbrains.kotlin:kotlin-stdlib:$kotlin_version" | |
| implementation 'androidx.test.ext:junit:1.1.3' | |
| implementation 'androidx.test:runner:1.4.0' | |
| implementation 'androidx.test.uiautomator:uiautomator:2.2.0' | |
| } |
We are almost done configuring the project, we just need to modify the AndroidManifest.xml in order to remove reference to the deleted files and add the instrumentation. Open the manifest file and remove the themeatribute from application tag once we deleted theme XML files previously.
Once we are creating the scripts in the main source set, we need to manually add the instrumentation tag to the manifest files. Add the instrumentation inside the manifest tag with the name and targetPackageattributes. The name must be defined as androidx.test.runner.AndroidJUnitRunner and the targetPackage must be the same package of your application (which is com.paceli.wifitest, in this example).
You can see the AndroidManifest.xml with the changes below:
| <?xml version="1.0" encoding="utf-8"?> | |
| <manifest xmlns:android="http://schemas.android.com/apk/res/android" | |
| package="com.paceli.wifitest"> | |
| <application | |
| android:allowBackup="true" | |
| android:icon="@mipmap/ic_launcher" | |
| android:label="@string/app_name" | |
| android:roundIcon="@mipmap/ic_launcher_round" | |
| android:supportsRtl="true" /> | |
| <instrumentation | |
| android:name="androidx.test.runner.AndroidJUnitRunner" | |
| android:targetPackage="com.paceli.wifitest" /> | |
| </manifest> |
Writing our script
Having created and configured the project, we are good to proceed creating our first script. Create a new class and add the annotation @RunWith(AndroidJUnit4::class) in order to define AndroidJUnit4 as the test runner.
As usual in JUnit, the test methods must be annotated with @Test. Set up and tear down methods must be annotated with @Before and @Afterrespectively. For those who are not familiar with this approach, the code below shows the order that the methods are executed:
| package com.paceli.wifitest | |
| import android.util.Log | |
| import androidx.test.ext.junit.runners.AndroidJUnit4 | |
| import org.junit.* | |
| import org.junit.runner.RunWith | |
| @RunWith(AndroidJUnit4::class) | |
| class UiAutomatorOrder { | |
| /** | |
| * Run before the method with @Test annotation | |
| */ | |
| @Before | |
| fun before() { | |
| Log.d(TAG, "Before") | |
| } | |
| /** | |
| * Run after the method with @Before annotation | |
| * and before methods with @After annotation | |
| */ | |
| @Test | |
| fun test() { | |
| Log.d(TAG, "Test") | |
| } | |
| /** | |
| * Run after each method with @Test annotation | |
| */ | |
| @After | |
| fun after() { | |
| Log.d(TAG, "After") | |
| } | |
| companion object { | |
| private const val TAG = "UiAutomatorExample" | |
| /** | |
| * Run once before other methods from [UiAutomatorOrder] class | |
| */ | |
| @JvmStatic | |
| @BeforeClass | |
| fun beforeClass() { | |
| Log.d(TAG, "Before Class") | |
| } | |
| /** | |
| * Run once after other methods from [UiAutomatorOrder] class | |
| */ | |
| @JvmStatic | |
| @AfterClass | |
| fun afterClass() { | |
| Log.d(TAG, "After Class") | |
| } | |
| } | |
| } |
Running this example will produce the following logcat output:
Before Class
Before
Test
After
After Class
So let’s create a method named validateWifi in out test class and annotate it with @Test. In order to click on buttons, read text from screen, perform swipe gestures, and any other interaction with the UI, we need to get an instance of the UiDevice class. To achieve that, we declared a property to the class and added the init block with the code to get an instance. This is how our class is looking at this moment:
| package com.paceli.wifitest | |
| import androidx.test.ext.junit.runners.AndroidJUnit4 | |
| import androidx.test.platform.app.InstrumentationRegistry | |
| import androidx.test.uiautomator.UiDevice | |
| import org.junit.Test | |
| import org.junit.runner.RunWith | |
| @RunWith(AndroidJUnit4::class) | |
| class WifiTest { | |
| private val device: UiDevice | |
| init { | |
| val instrumentation = InstrumentationRegistry.getInstrumentation() | |
| device = UiDevice.getInstance(instrumentation) | |
| } | |
| @Test | |
| fun validateWifi() { | |
| } | |
| } |
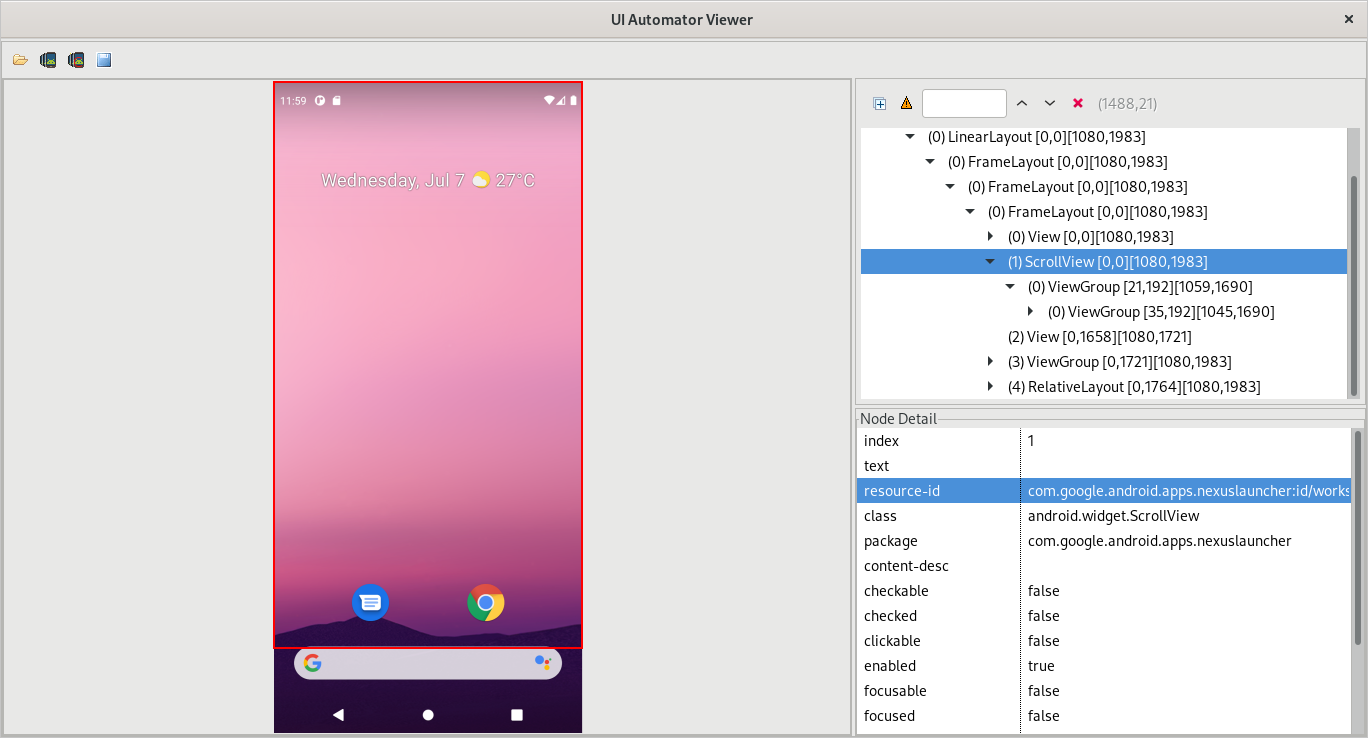
To interact with the elements from the screen, we need to get a reference to them using the UiDevice instance. To do that, we will call the method findObject passing the properties of the element we want to interact with. Some properties, like the text, are visible to the user, but there are several others that we cannot see on the device screen, so we need to dump the screen using the UI Automator Viewer tool that is available in the Android SDK at $ANDROID_HOME/tools/bin/uiautomatorviewer.

By clicking on the Device Screenshot button on the top left, the tool will show a screenshot and the dump of the screen currently displayed from the device connected to ADB. The elements can be chosen by clicking on them at the screenshot or at hierarchy view on the right side. Properties like index, text, content-desc, enabled, etc. are displayed in the Node detailview and.
The UiObject2 class represents the elements from screen and an instance of it is returned by the findObject method. In order to launch the Settings app, the user need to perform a scroll gesture on home screen to launch the applications list, and then click on Settings icon. So we obtained an instance of UiObject2 representing the workspace and another one for the Settings icon in the apps list screen, and then call the methods scroll and click respectively.
Job Offers
tired of reading
Take a break an watch a video
No results found.
| @Test | |
| fun validateWifi() { | |
| // Open apps list by scrolling on home screen | |
| val workspace = device.findObject( | |
| By.res("com.google.android.apps.nexuslauncher:id/workspace") | |
| ) | |
| workspace.scroll(Direction.DOWN, 1.0f) | |
| // Click on Settings icon to launch the app | |
| val settings = device.findObject( | |
| By.res("com.google.android.apps.nexuslauncher:id/icon").text("Settings") | |
| ) | |
| settings.click() | |
| } |
If some element takes some time to be displayed in the screen, we can use the method wait instead of the findObject. This method receives a SearchCondition and a timeout. Let’s use this approach to open the Network & internet section and then proceed up to the Add network screen.
| // ... | |
| // Wait up to 2 seconds for the element be displayed on screen | |
| val networkAndInternet = device.wait(Until.findObject(By.text("Network & internet")), 2000) | |
| networkAndInternet.click() | |
| // Click on element with text "Wi‑Fi" | |
| val wifi = device.wait(Until.findObject(By.text("Wi‑Fi")), 2000) | |
| wifi.click() | |
| // Click on element with text "Add network" | |
| val addNetwork = device.wait(Until.findObject(By.text("Add network")), 2000) | |
| addNetwork.click() |
In the Add network screen, there is a text field where the user must input the network SSID. To input text in a UI Automator script we just need to obtain the UiObject2 instance of this field and call the setText passing the string we want to input.

We will input the default name of Wi-Fi network in Android Virtual Device AndroidWifi (update accordingly to your needs) and then click on Savebutton to add it.
| // ... | |
| // Obtain an instance of UiObject2 of the text field | |
| val ssidField = device.wait(Until.findObject(By.res("com.android.settings:id/ssid")), 2000) | |
| // Call the setText method using Kotlin's property access syntax | |
| val ssid = "AndroidWifi" | |
| ssidField.text = ssid | |
| //Click on Save button | |
| device.findObject(By.res("android:id/button1").text("Save")).click() |
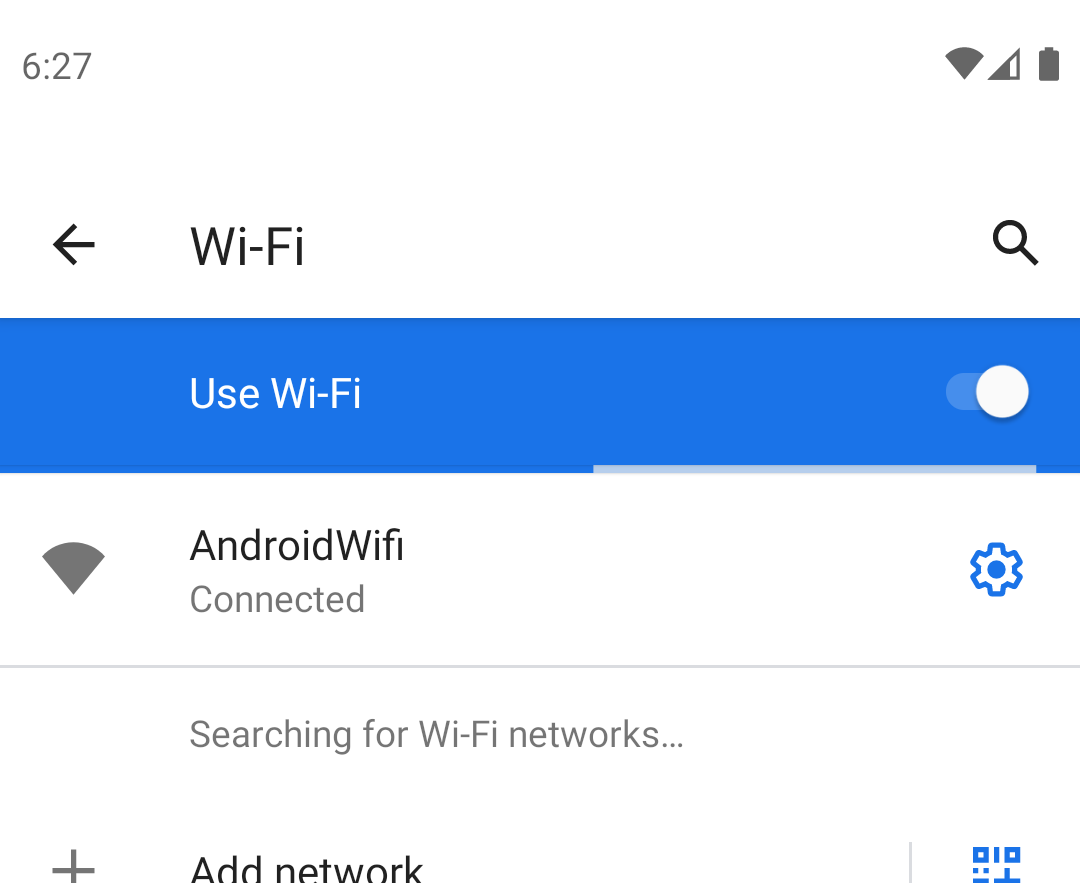
If everything went right, now the added Wi-Fi network must be listed in the the list of networks and the Android device must be connected to it (for simplicity’s sake, we are assuming there is no other saved Wi-Fi network before running this test).

In order to check if the Wi-Fi was correctly added and the Android device is connected to it, we can simply check if the word Connected is displayed below the network we just added. To do that let’s use the method hasObject that returns a boolean indicating whether some element is currently being displayed on screen.
| // ... | |
| // BySelector matching the just added Wi-Fi | |
| val ssidSelector = By.text(ssid).res("android:id/title") | |
| // BySelector matching the connected status | |
| val status = By.text("Connected").res("android:id/summary") | |
| // BySelector matching on entry of Wi-Fi list with the desired SSID and status | |
| val networkEntrySelector = By.clazz(RelativeLayout::class.qualifiedName) | |
| .hasChild(ssidSelector) | |
| .hasChild(status) | |
| // Perform the validation using hasObject | |
| // Wait up to 5 seconds to find the element we're looking for | |
| val isConnected = device.wait(Until.hasObject(networkEntrySelector), 5000) | |
| Assert.assertTrue("Verify if device is connected to added Wi-Fi", isConnected) |
We also have the option to use the Android APIs in order to get the SSID of current Wi-Fi the device is connected to. This is possible because the UI Automator script is installed as an Android application, so it has access to the APIs commonly used during applications development like intents, system services, contexts, etc.
To be able to get the Wi-Fi SSID, add these permissions to the AndroidManifest.xml:
<uses-permission android:name="android.permission.ACCESS_WIFI_STATE" />
<uses-permission android:name="android.permission.ACCESS_FINE_LOCATION" />
<uses-permission android:name="android.permission.ACCESS_BACKGROUND_LOCATION" />
The following method get the Context of the application (UI Automator script) and use it to get an instance of WifiManager and obtain the Wi-Fi SSID. We will use the return value to compare to the name of the network we added before.
| private fun getCurrentWifiSsid(): String? { | |
| val context = InstrumentationRegistry.getInstrumentation().context | |
| val wifiManager = context.getSystemService(Context.WIFI_SERVICE) as WifiManager | |
| val wifiInfo = wifiManager.connectionInfo | |
| // The SSID is quoted, then we need to remove quotes | |
| return wifiInfo.ssid?.removeSurrounding("\"") | |
| } |
Now the test method is ready. It will look like this:
| @Test | |
| fun validateWifi() { | |
| // Open apps list by scrolling on home screen | |
| val workspace = device.findObject( | |
| By.res("com.google.android.apps.nexuslauncher:id/workspace") | |
| ) | |
| workspace.scroll(Direction.DOWN, 1.0f) | |
| // Click on Settings icon to launch the app | |
| val settings = device.findObject( | |
| By.res("com.google.android.apps.nexuslauncher:id/icon").text("Settings") | |
| ) | |
| settings.click() | |
| // Wait up to 2 seconds for the element be displayed on screen | |
| val networkAndInternet = device.wait(Until.findObject(By.text("Network & internet")), 2000) | |
| networkAndInternet.click() | |
| // Click on element with text "Wi‑Fi" | |
| val wifi = device.wait(Until.findObject(By.text("Wi‑Fi")), 2000) | |
| wifi.click() | |
| // Click on element with text "Add network" | |
| val addNetwork = device.wait(Until.findObject(By.text("Add network")), 2000) | |
| addNetwork.click() | |
| // Obtain an instance of UiObject2 of the text field | |
| val ssidField = device.wait(Until.findObject(By.res("com.android.settings:id/ssid")), 2000) | |
| // Call the setText method using Kotlin's property access syntax | |
| val ssid = "AndroidWifi" | |
| ssidField.text = ssid | |
| //Click on Save button | |
| device.findObject(By.res("android:id/button1").text("Save")).click() | |
| // BySelector matching the just added Wi-Fi | |
| val ssidSelector = By.text(ssid).res("android:id/title") | |
| // BySelector matching the connected status | |
| val status = By.text("Connected").res("android:id/summary") | |
| // BySelector matching on entry of Wi-Fi list with the desired SSID and status | |
| val networkEntrySelector = By.clazz(RelativeLayout::class.qualifiedName) | |
| .hasChild(ssidSelector) | |
| .hasChild(status) | |
| // Perform the validation using hasObject | |
| // Wait up to 5 seconds to find the element we're looking for | |
| val isConnected = device.wait(Until.hasObject(networkEntrySelector), 5000) | |
| Assert.assertTrue("Verify if device is connected to added Wi-Fi", isConnected) | |
| // Perform the validation using Android APIs | |
| val connectedWifi = getCurrentWifiSsid() | |
| Assert.assertEquals("Verify if is connected to the Wifi", ssid, connectedWifi) | |
| } |
To have a complete test script, we need to perform some set up before the actual test is executed. If you tried running the script while the screen was other than the home screen, you noticed that a NullPointerExceptionoccurs. That happens because we assumed the device was in the home screen when the test starts. In order to guarantee that, add the following set up method with the @Before annotation.
| @Before | |
| fun setUp() { | |
| // Press Home key before running the test | |
| device.pressHome() | |
| } |
Now the Home key will always be pressed before running the test. You may want to return to home screen after after the test execution as well, to do that simply add another method with the @After annotation similar to what we did with the set up method.
| @After | |
| fun tearDown() { | |
| // Press Home key after running the test | |
| device.pressHome() | |
| } |
In summary set up methods are used to make sure that the device is in an required initial state. Tear down methods are responsible to perform a clean up after running the test in order to not influence the subsequent ones. Let’s suppose you are writing a script that adds a password to the device. This password must be removed on the tear down method, otherwise next scripts may be stuck in password screen.
Running the script using ADB
Once you created the scripts you probably may want to execute them outside Android Studio. To do that you need to build .apk file, install it on Android device and execute the test using ADB.
To build the .apk you can simply go to Build -> Make Project on Android Studio, or run the Gradle command:
# On Linux
./gradlew assembleDebug# On Windows
gradlew.bat assembleDebug
The .apk with the scripts will be available at app/build/outputs/apk/debug(app is the module’s name). With the .apk built, install it like any other application with the command:
adb install -r -g app-debug.apk
Finally, start the execution by running the following command:
adb shell am instrument -w -e class 'com.paceli.wifitest.WifiTest' com.paceli.wifitest/androidx.test.runner.AndroidJUnitRunner
com.paceli.wifitest.WifiTest — is the class name of the test script to be executed.
com.paceli.wifitest/androidx.test.runner.AndroidJUnitRunner — is the test package name and the runner class in the format <test_package_name>/<runner_class> .
See more details in the official documentation.
Conclusion
This is is how we create a UI Automator test script with no access to the application source code. I hope this article may have helped you creating your own test scripts, improving test coverage for you application and reducing manual effort.
The full project with the code presented in this article is available in this GitHub repository. Fell free to clone and modify it according to your needs. A good exercise may be to modify the code in order to launch the Wi-Fi activity directly, using intents, reducing the execution time, or to modify the set up ensuring that there isn’t any saved network before running the test. It’s up to you.
If you find this article helpful, please don’t forget to clap. I would also appreciate your feedback in the comments section. Thanks!
heitorpaceli/ui-automator-guide |
 |


