

Posted by: Satya Pavan Kantamani
Introduction
Nowadays authentication has become common in almost all apps. And many of us know it would be like an overhead for beginner developers to learn and start working on the complete authentication flow from the client and server-side. Also, small start-ups at the earliest point might not be interested to afford the server maintenance and costs. Knowing user identity and serving content related to user history would increase the app engagement. So one-stop solution for this could be firebase Authentication.
In this post let’s learn What is Firebase Authentication, How to configure the authentication, and simple usage of login and log-out using Firebase Auth.
If you directly want to jump to codebase please check out the Github repo android_sample_firebase_auth
What is Firebase Authentication?
Firebase Authentication is a feature that allows users to sign in to the application using email, password, phone number, and federated identity providers like Google, Facebook, Twitter, etc.. . Firebase authentication provides backend services, easy use SDKs, and pre-built UI libraries. Which makes implementation easy and simple for developers.
Let’s check how this authentication process work…
How does Authentication work?
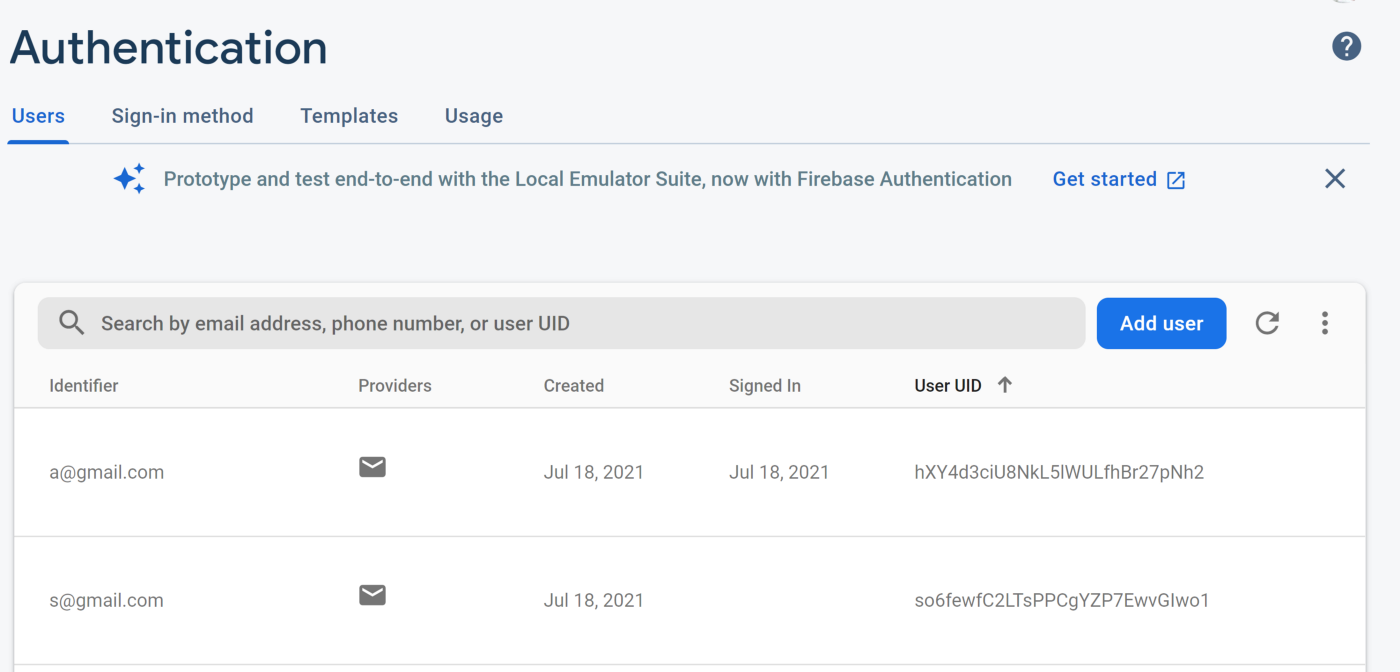
For sign-up purposes, we might need user details like email, password, phone number, etc… After capturing these details from the user, we pass them to Firebase Authentication SDK. Firebase backend services will process this information and create users in case of sign-up in the Authentication tab under the user’s section.
If we want a verification mechanism we can optionally opt-in for it so that we can eliminate the garbage or un-trusted users or hackers. I will be writing more on the verification processes in my upcoming posts. If you want more details of the Email verification process check Authenticate with Email on Android and for the mobile verification process check out Authenticate using a Phone Number. Firebase backend services will verify those and return a response.
After the user’s successful sign-in, we can access and control basic user profile information and data stored in other firebase products. We can also use other methods to update user details.
For sign-in, we can either use the pre-built FirebaseUI library which handles the multiplatform UI flow or we can manually set up Firebase authentication SDK into the project.
Let’s check how to set up the project in Firebase.
Add Firebase To Your Project
For adding firebase to your app, first, we need to create a project in the firebase console. Let’s see how to do that step-by-step
Step 1
- Go to firebase console and then click Add Project and enter a project name.
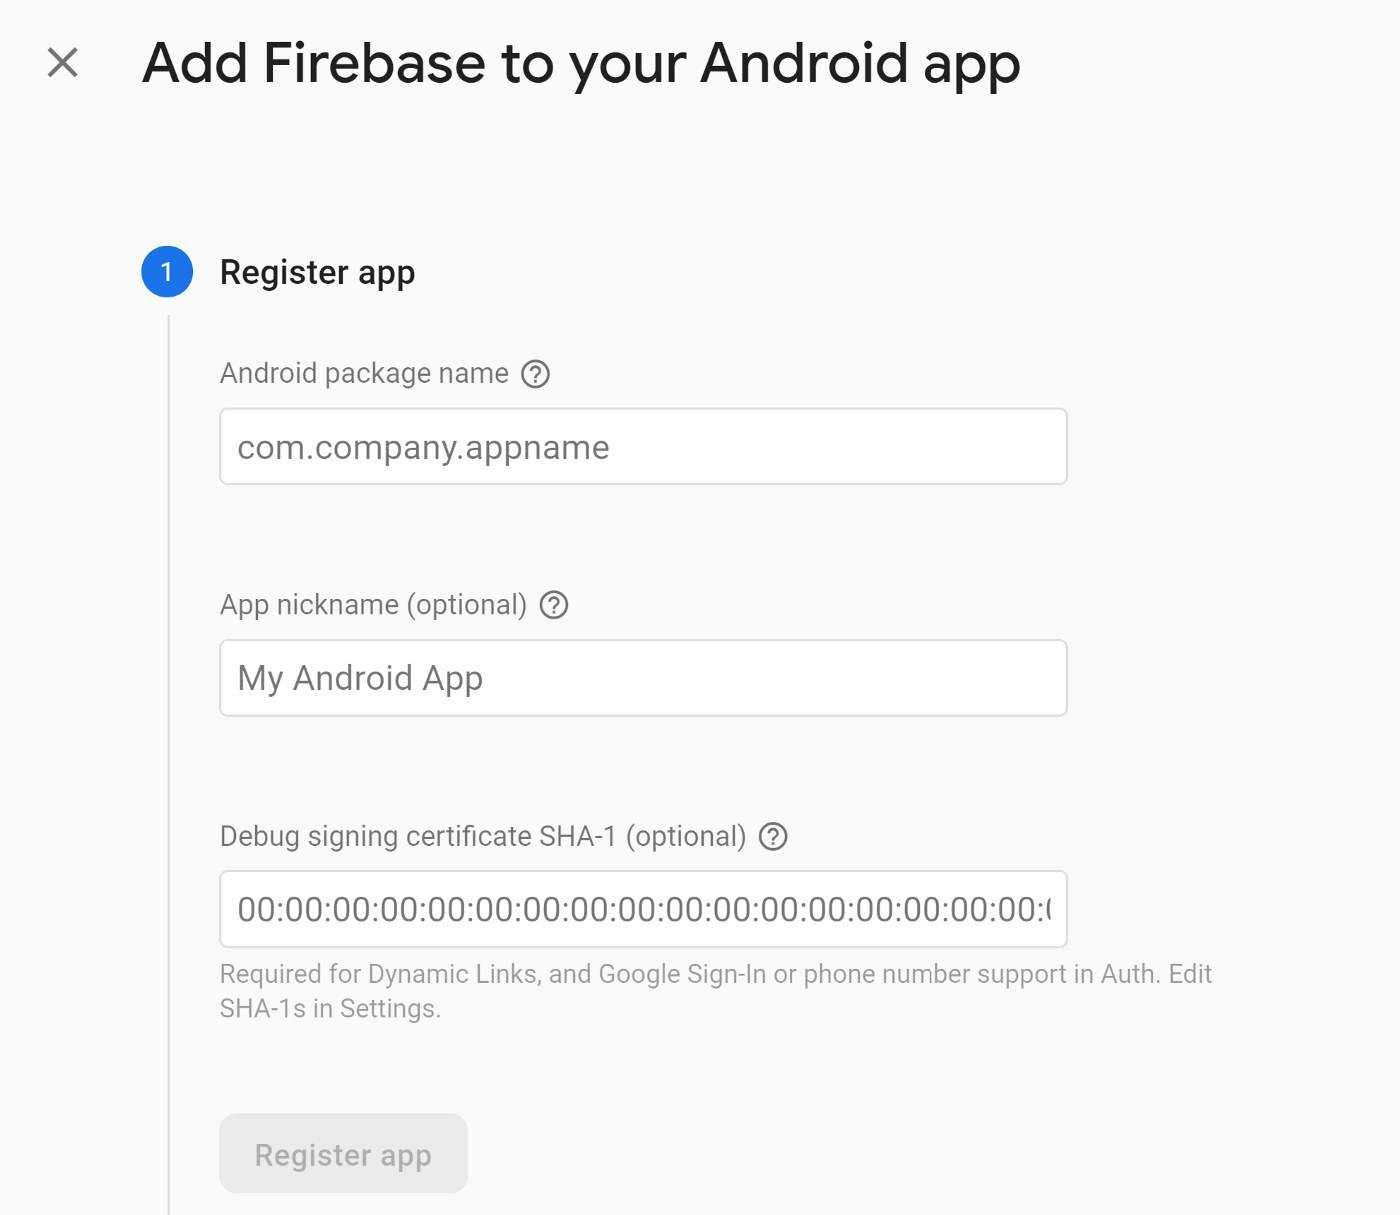
- To register your app with firebase. Click on the Android icon to launch the setup flow. Enter the application package name, other details and click on the Register app.
Step 2
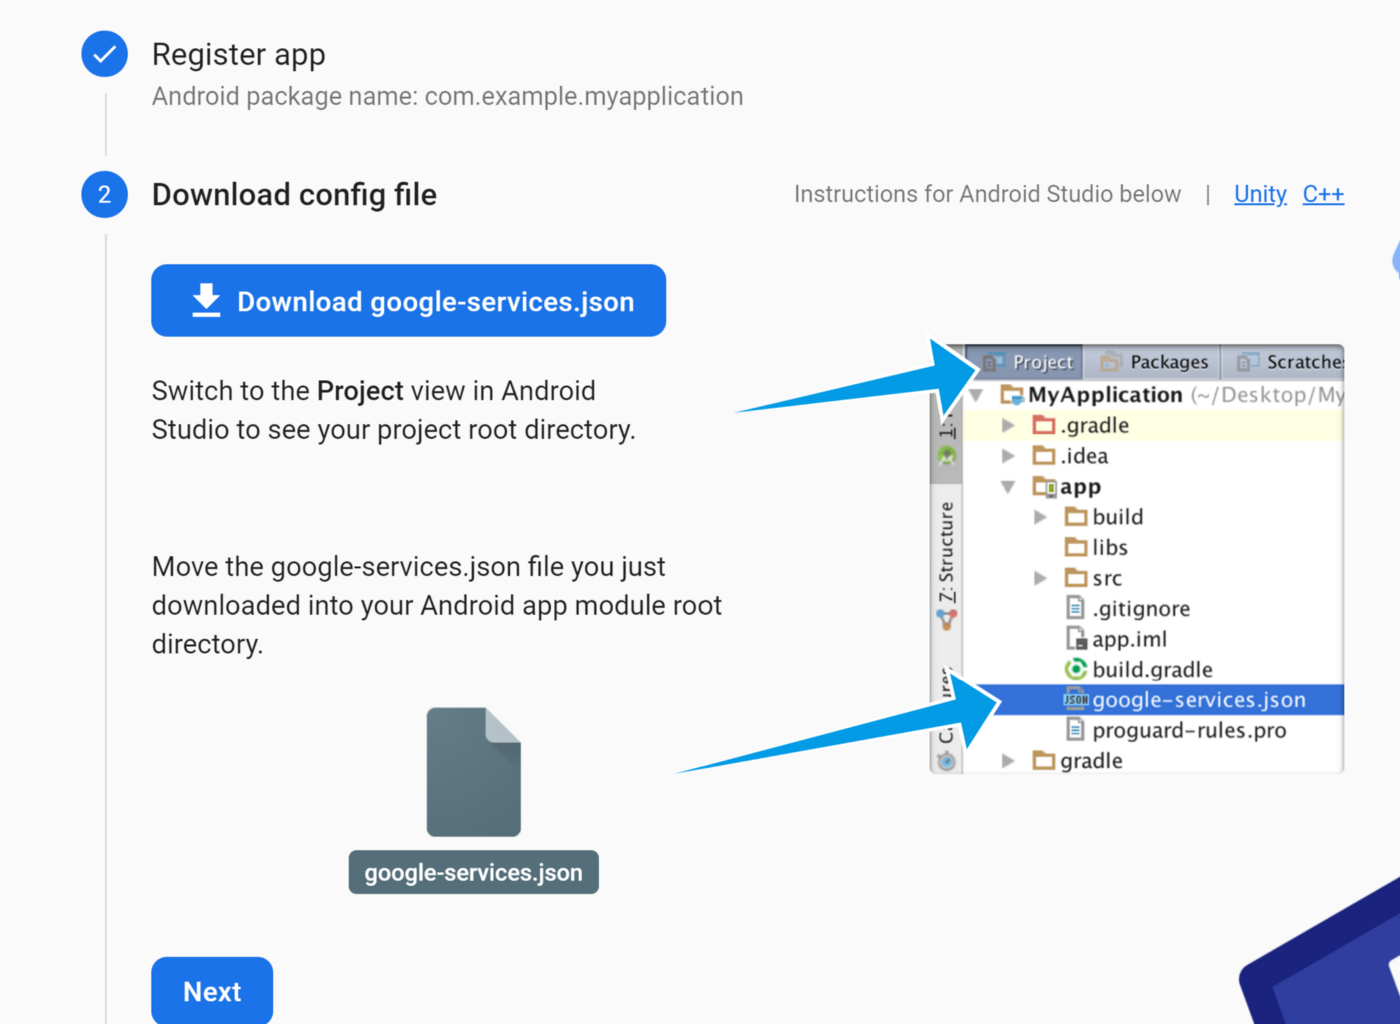
Add the Firebase configuration file into the app.
1. Download the google-services.json file and place it in the app module directory
2. In root or project-level build.gradle file, add google services Gradle plugin, also make sure that Google’s Maven repository → google() is added.
| repositories { | |
| google() | |
| } | |
| dependencies { | |
| ... | |
| classpath 'com.google.gms:google-services:4.3.8' | |
| } | |
| allprojects { | |
| repositories { | |
| ... | |
| google() | |
| } | |
| } |
3. In the app-level build.gradle file apply google services plugin
plugins {
 id ‘com.google.gms.google-services’
}
4. Now add the Firebase Auth dependency in the app-level build.gradle
implementation 'com.google.firebase:firebase-auth-ktx:21.0.1'
Step 3
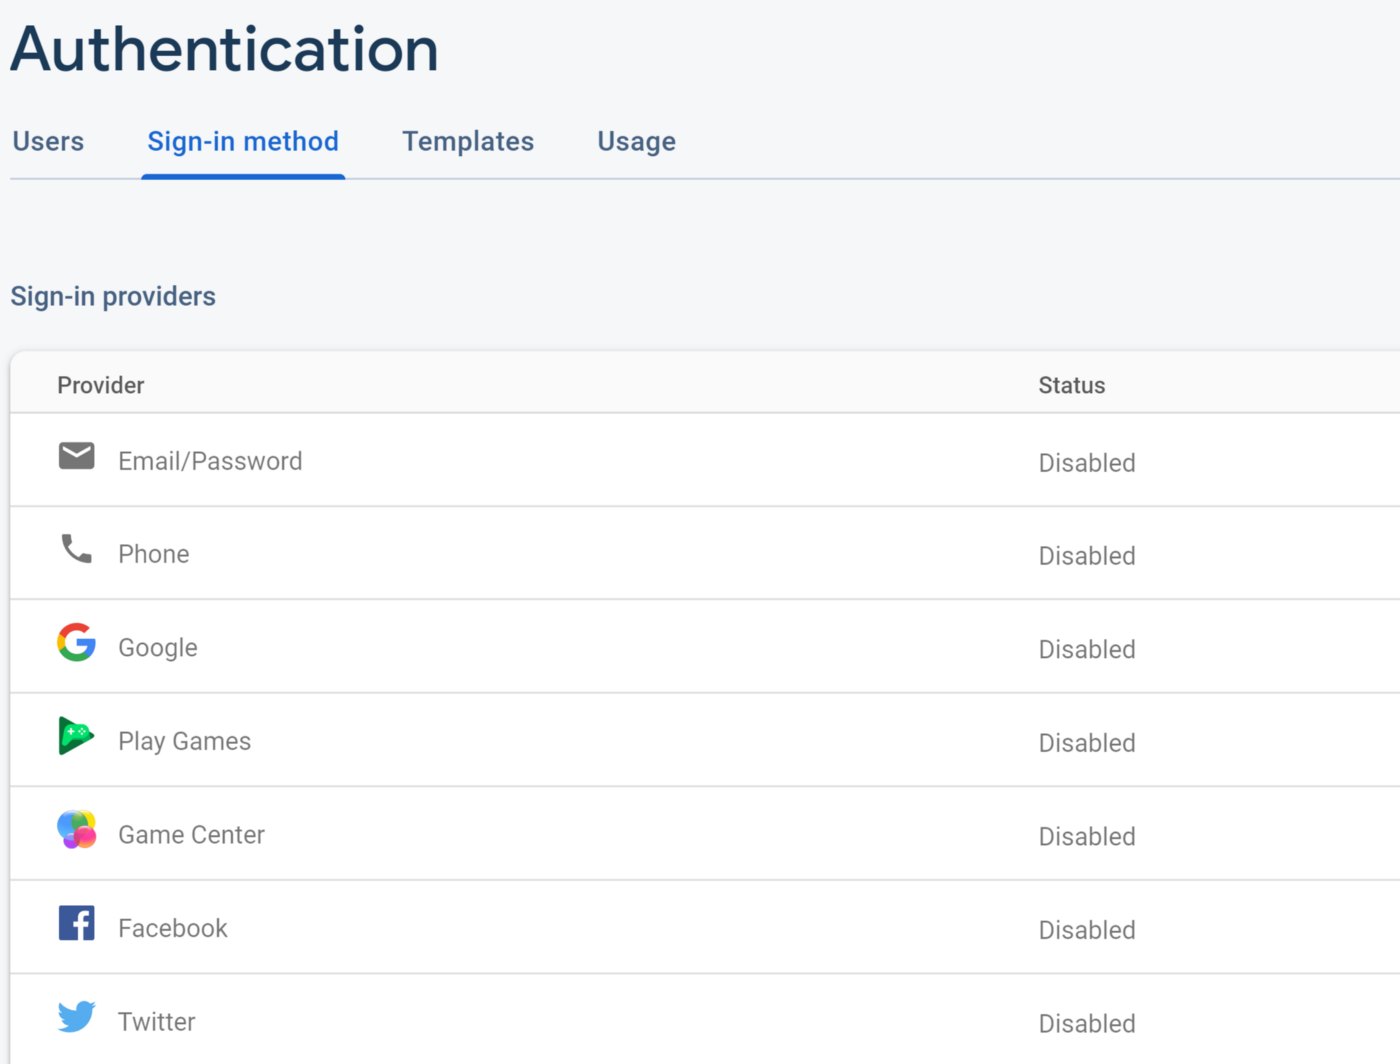
To use an authentication provider, we need to enable it in the Firebase console. Go to the sign-in method page in the Authentication section and enable the identity provider that you want for the application.
Left Menu → Build → Authentication
That’s it!! Set up is done, now let’s get started with user authentication.
User Authentication Flow
Let’s create a simple example with sign-up and sign-in flow using Firebase Authentication.
Step 1
For this, first, create an activity_main.xml file for entering email and password with sign-up and sign-in buttons.
| <?xml version="1.0" encoding="utf-8"?> | |
| <androidx.constraintlayout.widget.ConstraintLayout xmlns:android="http://schemas.android.com/apk/res/android" | |
| xmlns:app="http://schemas.android.com/apk/res-auto" | |
| xmlns:tools="http://schemas.android.com/tools" | |
| android:layout_width="match_parent" | |
| android:layout_height="match_parent" | |
| android:background="@color/white" | |
| android:padding="40dp" | |
| tools:context=".MainActivity"> | |
| <androidx.appcompat.widget.AppCompatEditText | |
| android:id="@+id/et_email" | |
| android:layout_width="match_parent" | |
| android:layout_height="wrap_content" | |
| android:hint="Enter email id" | |
| android:inputType="textEmailAddress" | |
| android:textColor="@color/black" | |
| android:textColorHint="@color/black" | |
| app:layout_constraintBottom_toBottomOf="parent" | |
| app:layout_constraintEnd_toEndOf="parent" | |
| app:layout_constraintStart_toStartOf="parent" | |
| app:layout_constraintTop_toTopOf="parent" /> | |
| <androidx.appcompat.widget.AppCompatEditText | |
| android:id="@+id/et_password" | |
| android:layout_width="match_parent" | |
| android:layout_height="wrap_content" | |
| android:layout_marginTop="6dp" | |
| android:hint="Enter password" | |
| android:textColor="@color/black" | |
| android:textColorHint="@color/black" | |
| app:layout_constraintEnd_toEndOf="parent" | |
| app:layout_constraintStart_toStartOf="parent" | |
| app:layout_constraintTop_toBottomOf="@id/et_email" /> | |
| <androidx.appcompat.widget.AppCompatButton | |
| android:id="@+id/btn_sign_in" | |
| android:layout_width="wrap_content" | |
| android:layout_height="wrap_content" | |
| android:layout_marginTop="20dp" | |
| android:background="@color/purple_500" | |
| android:paddingHorizontal="40dp" | |
| android:text="Sign In" | |
| android:textColor="@color/white" | |
| app:layout_constraintEnd_toEndOf="parent" | |
| app:layout_constraintStart_toStartOf="parent" | |
| app:layout_constraintTop_toBottomOf="@id/et_password" /> | |
| <androidx.appcompat.widget.AppCompatButton | |
| android:id="@+id/btn_sign_up" | |
| android:layout_width="wrap_content" | |
| android:layout_height="wrap_content" | |
| android:layout_marginTop="20dp" | |
| android:background="@color/purple_500" | |
| android:paddingHorizontal="40dp" | |
| android:text="Sign Up" | |
| android:textColor="@color/white" | |
| app:layout_constraintEnd_toEndOf="parent" | |
| app:layout_constraintStart_toStartOf="parent" | |
| app:layout_constraintTop_toBottomOf="@id/btn_sign_in" /> | |
| </androidx.constraintlayout.widget.ConstraintLayout> |
Step 2
Create an Activity and inflate layout file created above. Now declare an instance of FirebaseAuth
private lateinit var auth: FirebaseAuth
In onCreate() method initialize FirebaseAuth instance.
// Initialize Firebase Auth
auth = FirebaseAuth.getInstance()
Step 3
On activity initialization, check if the user is currently signed in or not. Based on the result we can do our custom implementation. Here we are currently navigating to HomeAcrivity on successful login by showing a toast message.
| public override fun onStart() { | |
| super.onStart() | |
| // Check if user is signed in (non-null) and update UI accordingly. | |
| val currentUser = auth.currentUser | |
| if (currentUser != null) { | |
| Toast.makeText( | |
| baseContext, "Already Logged In.", | |
| Toast.LENGTH_SHORT | |
| ).show() | |
| startHomeActivity() | |
| } | |
| } |
OUR VIDEO RECOMMENDATION


Jobs
Step 4
If the user is not registered or logged in then we need to show a page requesting him to enter the details.

Let’s check the signup process for a new user with an email id and password. Now let’s create a new user with an email id and password. For this, in the Activity, create a function createNewUser() which takes the email id and password provided by the user on the sign-up button click
| private fun createNewUser(email: String, password: String) { | |
| auth.createUserWithEmailAndPassword(email, password) | |
| .addOnCompleteListener(this) { task -> | |
| if (task.isSuccessful) { | |
| // Sign in success, update UI with the signed-in user's information | |
| val user = auth.currentUser | |
| Toast.makeText( | |
| baseContext, "Authentication Success.", | |
| Toast.LENGTH_SHORT | |
| ).show() | |
| startHomeActivity() | |
| } else { | |
| // If sign in fails, display a message to the user. | |
| Toast.makeText( | |
| baseContext, "Authentication failed.", | |
| Toast.LENGTH_SHORT | |
| ).show() | |
| } | |
| } | |
| } |
Step 5
Now let’s check the sign-in flow for an existing user with an email id and password. If the user is already created, sign in with an email id and password. For this, we can create a signInUser() function which takes the email id and password provided by the user on the sign-in button click.
| fun signInUser(email:String, password:String){ | |
| auth.signInWithEmailAndPassword(email, password) | |
| .addOnCompleteListener(this) { task -> | |
| if (task.isSuccessful) { | |
| // Sign in success, update UI with the signed-in user's information | |
| val user = auth.currentUser | |
| } else { | |
| // If sign in fails, display a message to the user. | |
| Toast.makeText(baseContext, "Authentication failed.", | |
| Toast.LENGTH_SHORT).show() | |
| } | |
| } | |
| } |
Step 6
If a user is signed in successfully, we can access data by fetching the currentUser method from the Firebase Auth instance. Let’s create a home activity, where we can show user information after successful login.
| fun getCurrentUserInfo(){ | |
| val user = Firebase.auth.currentUser | |
| user?.let { | |
| // Name, email address, and profile photo Url | |
| val uid = user.uid | |
| val name = user.displayName | |
| val email = user.email | |
| val photoUrl = user.photoUrl | |
| val emailVerified = user.isEmailVerified | |
| } | |
| } |
Step 7
As we are done with sign-up and login flows let’s move to the log-out part. To sign out a user, call signOut method on the Firebase Auth instance
fun signOutUser(){
    Firebase.auth.signOut()
}
Step 8
The HomeActivity with user info and logout functions
| package com.example.myapplication | |
| import android.content.Intent | |
| import androidx.appcompat.app.AppCompatActivity | |
| import android.os.Bundle | |
| import android.widget.Toast | |
| import androidx.appcompat.widget.AppCompatButton | |
| import androidx.appcompat.widget.AppCompatEditText | |
| import androidx.appcompat.widget.AppCompatTextView | |
| import com.google.firebase.auth.FirebaseAuth | |
| import com.google.firebase.auth.ktx.auth | |
| import com.google.firebase.ktx.Firebase | |
| class HomeActivity : AppCompatActivity() { | |
| lateinit var userDetails: AppCompatTextView | |
| override fun onCreate(savedInstanceState: Bundle?) { | |
| super.onCreate(savedInstanceState) | |
| setContentView(R.layout.activity_home) | |
| userDetails = findViewById(R.id.tv_user_details) | |
| getCurrentUserInfo() | |
| var btnSignOut = findViewById<AppCompatButton>(R.id.btn_sign_out) | |
| btnSignOut.setOnClickListener { | |
| signOutUser() | |
| } | |
| } | |
| private fun getCurrentUserInfo() { | |
| val user = Firebase.auth.currentUser | |
| user?.let { | |
| // Name, email address, and profile photo Url | |
| val uid = user.uid | |
| val name = user.displayName | |
| val email = user.email | |
| val photoUrl = user.photoUrl | |
| val emailVerified = user.isEmailVerified | |
| userDetails.text = user.email | |
| } | |
| } | |
| private fun signOutUser(){ | |
| Firebase.auth.signOut() | |
| Toast.makeText( | |
| baseContext, "User Signed out.", | |
| Toast.LENGTH_SHORT | |
| ).show() | |
| startActivity(Intent(this, MainActivity::class.java)) | |
| finish() | |
| } | |
| } |
Bonus: Sign in with a custom token
To create a custom token, refer to this link. When users sign in to the app, send user credentials to the authentication server, which will check the credentials and send a custom token if they are valid. After we receive the custom token, pass it to firebase auth to sign in user.
| fun signInWithCustomToken(customToken: String) { | |
| customToken?.let { | |
| auth.signInWithCustomToken(it) | |
| .addOnCompleteListener(this) { task -> | |
| if (task.isSuccessful) { | |
| // Sign in success, update UI with the signed-in user's information | |
| val user = auth.currentUser | |
| } else { | |
| // If sign in fails, display a message to the user. | |
| Toast.makeText( | |
| baseContext, "Authentication failed.", | |
| Toast.LENGTH_SHORT | |
| ).show() | |
| } | |
| } | |
| } | |
| } |
The final MainActivity code with sign up and sign-in flow
| package com.example.myapplication | |
| import android.content.Intent | |
| import androidx.appcompat.app.AppCompatActivity | |
| import android.os.Bundle | |
| import android.widget.Toast | |
| import androidx.appcompat.widget.AppCompatButton | |
| import androidx.appcompat.widget.AppCompatEditText | |
| import com.google.firebase.auth.FirebaseAuth | |
| import com.google.firebase.auth.ktx.auth | |
| import com.google.firebase.ktx.Firebase | |
| class MainActivity : AppCompatActivity() { | |
| private lateinit var auth: FirebaseAuth | |
| override fun onCreate(savedInstanceState: Bundle?) { | |
| super.onCreate(savedInstanceState) | |
| setContentView(R.layout.activity_main) | |
| // Initialize Firebase Auth | |
| auth = FirebaseAuth.getInstance() | |
| var tvEmail = findViewById<AppCompatEditText>(R.id.et_email) | |
| var tvPassword = findViewById<AppCompatEditText>(R.id.et_password) | |
| var btnSignIn = findViewById<AppCompatButton>(R.id.btn_sign_in) | |
| btnSignIn.setOnClickListener { | |
| if(tvEmail.text?.length == 0 || tvPassword.text?.length == 0){ | |
| Toast.makeText( | |
| baseContext, "Enter valid details", | |
| Toast.LENGTH_SHORT | |
| ).show() | |
| }else if(tvPassword.text?.length!! < 6){ | |
| Toast.makeText( | |
| baseContext, "Password must be at least 6 characters", | |
| Toast.LENGTH_SHORT | |
| ).show() | |
| } | |
| else{ | |
| signInUser(tvEmail.text.toString(),tvPassword.text.toString()) | |
| } | |
| } | |
| var btnSignUp = findViewById<AppCompatButton>(R.id.btn_sign_up) | |
| btnSignUp.setOnClickListener { | |
| if(tvEmail.text?.length == 0 || tvPassword.text?.length == 0){ | |
| Toast.makeText( | |
| baseContext, "Enter valid details", | |
| Toast.LENGTH_SHORT | |
| ).show() | |
| }else if(tvPassword.text?.length!! < 6){ | |
| Toast.makeText( | |
| baseContext, "Password must be at least 6 characters", | |
| Toast.LENGTH_SHORT | |
| ).show() | |
| } | |
| else { | |
| createNewUser(tvEmail.text.toString(), tvPassword.text.toString()) | |
| } | |
| } | |
| } | |
| public override fun onStart() { | |
| super.onStart() | |
| // Check if user is signed in (non-null) and update UI accordingly. | |
| val currentUser = auth.currentUser | |
| if (currentUser != null) { | |
| Toast.makeText( | |
| baseContext, "Already Logged In.", | |
| Toast.LENGTH_SHORT | |
| ).show() | |
| startHomeActivity() | |
| } | |
| } | |
| private fun startHomeActivity() { | |
| startActivity(Intent(this, HomeActivity::class.java)) | |
| finish() | |
| } | |
| private fun createNewUser(email: String, password: String) { | |
| auth.createUserWithEmailAndPassword(email, password) | |
| .addOnCompleteListener(this) { task -> | |
| if (task.isSuccessful) { | |
| // Sign in success, update UI with the signed-in user's information | |
| val user = auth.currentUser | |
| Toast.makeText( | |
| baseContext, "Authentication Success.", | |
| Toast.LENGTH_SHORT | |
| ).show() | |
| startHomeActivity() | |
| } else { | |
| // If sign in fails, display a message to the user. | |
| Toast.makeText( | |
| baseContext, "Authentication failed.", | |
| Toast.LENGTH_SHORT | |
| ).show() | |
| } | |
| } | |
| } | |
| private fun signInUser(email: String, password: String) { | |
| auth.signInWithEmailAndPassword(email.trim(), password.trim()) | |
| .addOnCompleteListener(this) { task -> | |
| if (task.isSuccessful) { | |
| // Sign in success, update UI with the signed-in user's information | |
| Toast.makeText( | |
| baseContext, "Authentication Success.", | |
| Toast.LENGTH_SHORT | |
| ).show() | |
| startHomeActivity() | |
| } else { | |
| // If sign in fails, display a message to the user. | |
| Toast.makeText( | |
| baseContext, "Authentication failed.", | |
| Toast.LENGTH_SHORT | |
| ).show() | |
| } | |
| } | |
| } | |
| fun signInWithCustomToken(customToken: String) { | |
| customToken?.let { | |
| auth.signInWithCustomToken(it) | |
| .addOnCompleteListener(this) { task -> | |
| if (task.isSuccessful) { | |
| // Sign in success, update UI with the signed-in user's information | |
| val user = auth.currentUser | |
| } else { | |
| // If sign in fails, display a message to the user. | |
| Toast.makeText( | |
| baseContext, "Authentication failed.", | |
| Toast.LENGTH_SHORT | |
| ).show() | |
| } | |
| } | |
| } | |
| } | |
| } |
Now let’s run the app and check the output

That’s it!! Signing in a new user and authentication process with firebase is done.
If you have any issues executing the code snippets please check out android_sample_firebase_auth
Summary
Firebase Authentication is used for apps that need a secure user authentication process and data access. We can simply use the existing SDKs and firebase-auth-related stuff to make this work.
In the upcoming post let’s learn about Firebase Database. Thank you for reading…


