

Posted By: Saurabh Pant
Yes! You heard it right. We’ll try to understand the complete OTP (one time password) login module using Firebase authentication and Jetpack components and will be using the following tools:
- Firebase for sending and authenticating OTP
- Hilt for dependency injection
- Jetpack for data binding, view models and live data
- MVVM architecture
- Structuring & maintaining the code
- Designing the layouts effectively
App flow
As there is less time and lot to develop, we’ll deep dive in the app via four aspects namely Design, App Code, Firebase integration and Common issues we could fall into. So let’s get started.
App Design
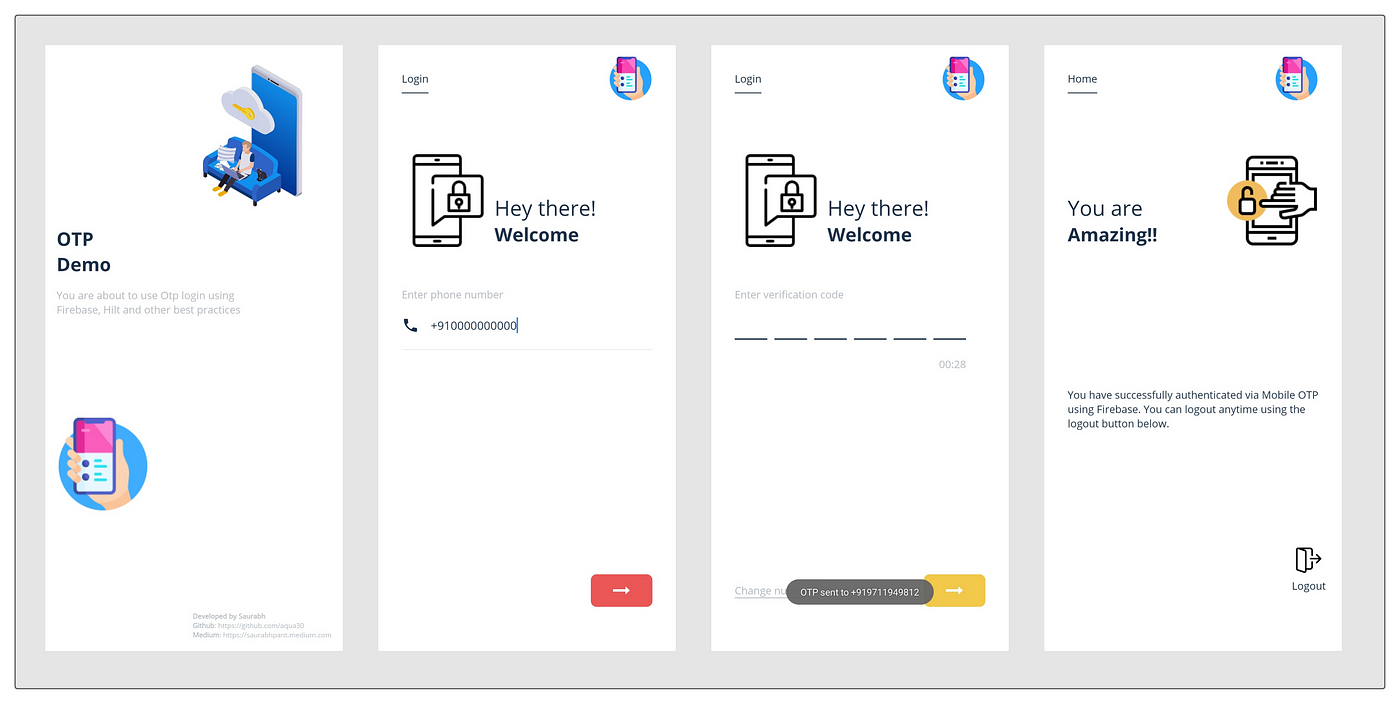
Before developing any app, one should always understand the intent of it and then design it and then starts its development. In our case, the intent is to have a very simple and user friendly UI for a user to login via OTP.
What it means is that in our design, user should have
- minimal clicks until it is logged in successfully
- app should directly show user its phone numbers to select from (only one tap)
- Keeping the action buttons close to the thumb so that app can be used single handedly
- Feature to auto populate OTP and directly starts validation (again saved typing effort and time) and on successful login, directly take user to Home screen
- Last and most importantly, user should feel that it is still on the same page i.e. it is a single page app 😄
With this we’ve understood our design and its intent as well. Let’s move to our code flow.
Code Flow
The code simply contains three Activities namely Splash, Login and Home. Although you won’t notice that many screens while using the app. A helicopter view of it is as shown:
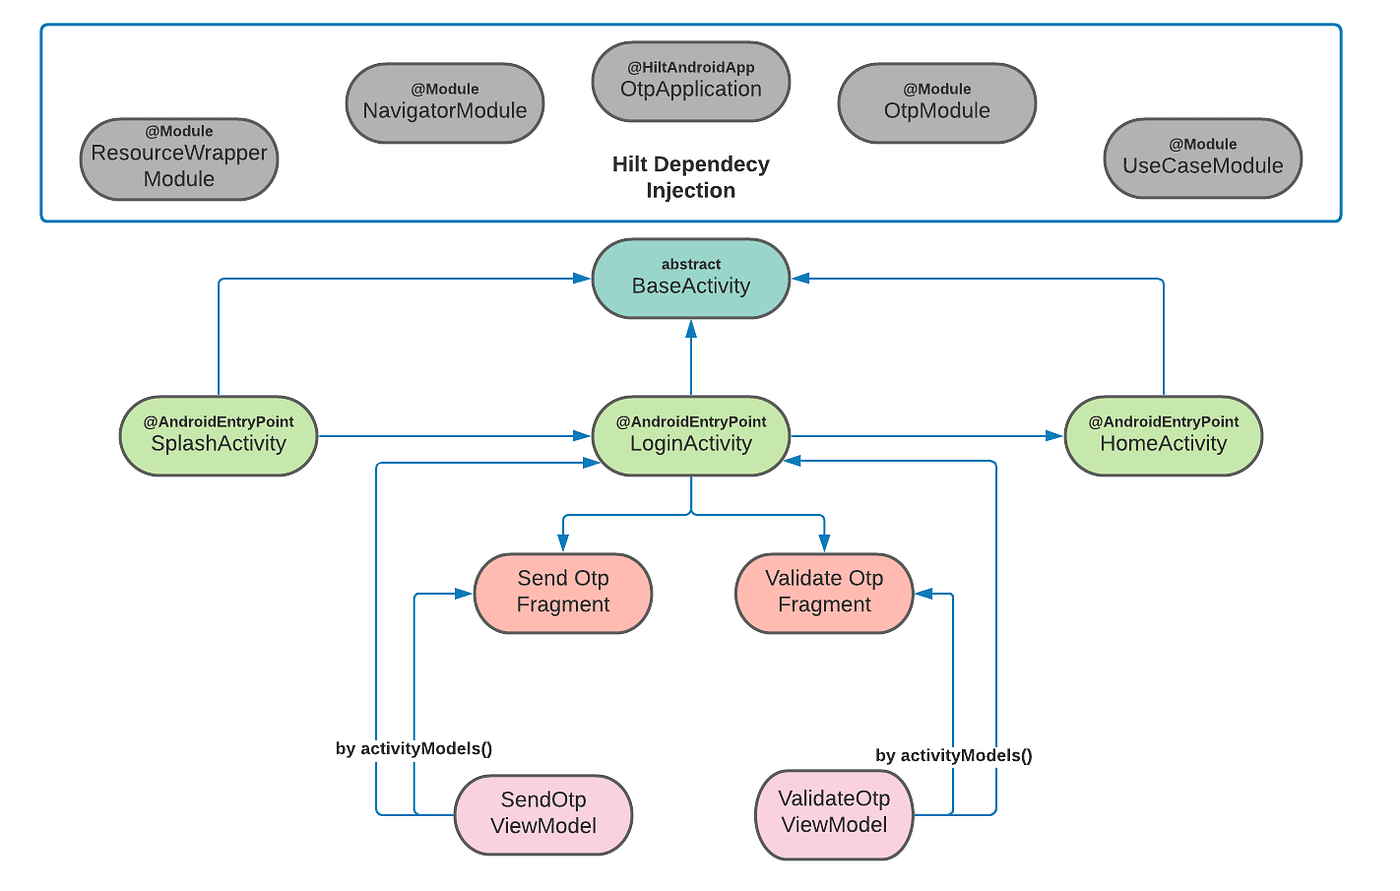
- BaseActivity which simply binds the views for us.
- SplashActivity decides which screen to show next based on the user logged in preference.
- LoginActivity responsible for showing the send and validate OTP screens as well as managing the OTP operation via OtpManager. OtpManager in turns handles the Firebase operation of sending and authentication of OTP. This way our activity gets immunity from any firebase and OTP related dependency.
- HomeActivity shows user that it is logged in successfully and can logout anytime.
Now, let’s take a look into the LoginActivity more deeply to understand its operations.
LoginActivity act as a driver in the process. It contains dependencies of ViewModels, OtpManager, Navigator and Resources. But it does not calculate anything directly. Following are the two strategies that LoginActivity follows
Firstly, the ViewModels instances created by LoginActivity as shown
/* view models objects */
private val sendOtpViewModel: SendOtpViewModel by viewModels()
private val validateOtpViewModel: ValidateOtpViewModel by viewModels()
is shared by its Fragments i.e SendOtpFragment and ValidateOtpFragment.
This is also known as SharedViewModel. Fragments obtain their instances using the activityViewModels() extensions which provide same instances (Singleton) of ViewModels as in activity.
/** In SendOtpFragment.kt **/
/* view mode object */
private val viewModel: SendOtpViewModel by activityViewModels()
/** In ValidateOtpFragment.kt **/
/* view model objects */
private val viewModel: ValidateOtpViewModel by activityViewModels()
This way LoginActivity gets access to the data that fragments operates on.
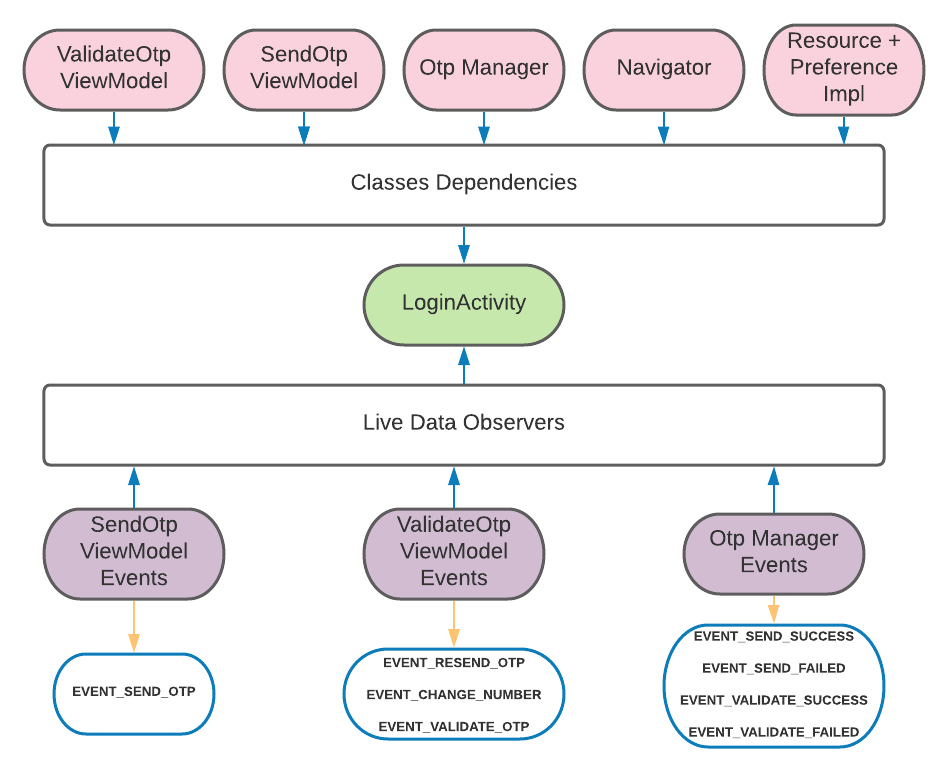
Secondly, it operates on the events sent via the various dependencies and decides its next action.
sendOtpViewModel.otpEvents.observe(this, {
    when(it) {
        EVENT_SEND_OTP -> {
            // command to send otp
        }
    }
})
validateOtpViewModel.validationEvents.observe(this, {
    when(it) {
        EVENT_RESEND_OTP -> {
            // command to resend otp
        }
        EVENT_CHANGE_NUMBER -> // command to go to send otp page
        EVENT_VALIDATE_OTP -> // command to validate the otp
    }
})
otpManager.subscribe().observe(this, {
    when(it) {
        EVENT_SEND_SUCCESS -> {
            when(otpRequestState) {
                EVENT_SEND_OTP ->
// indicates that OTP sent successfully via normal request and now display validate otp page
                EVENT_RESEND_OTP ->
// indicates that OTP was resent. Start the resend timer and stay on the current page
            }
        }
        EVENT_SEND_FAILED -> {
            when(otpRequestState) {
                EVENT_SEND_OTP ->
// indicates that user was on send otp page
               EVENT_RESEND_OTP ->
// indicates that user was on send otp page
            }
        }
        EVENT_VALIDATE_SUCCESS -> {
            // otp validate and move to home screen
        }
        EVENT_VALIDATE_FAILED -> // validation failed
    }
})
All our views are data binded. ViewModels contains observables to handle the UI directly in xmls and hence our views are free of any functional or visual operation management.
/* binding variables in ValidateOtpViewModel */
val loaderVisibility = ObservableBoolean(false)
val isResendClickable = ObservableBoolean(false)
val isError = ObservableBoolean(false)
val isResendLoaderVisible = ObservableBoolean(false)
val resendText = ObservableField<String>()
Hilt
Let us see a bit of our dependency injection using Hilt. It has removed so much of our boiler plate code that we used to have with Dagger. It has standardized the injections. To know more in detail checkout here.
To initiate our dependency generation, we simply mark our Application class with annotation @HiltAndroidApp
@HiltAndroidApp
class OtpApplication: Application()
Now we can simply annotate our view classes to make them injectable as follows
@AndroidEntryPoint
class LoginActivity: BaseActivity()
Yeah, it’s that simple. Now we can inject dependencies in our view classes. No more factories or declaration of any dependency.
Firebase integration
As we’re using Firebase, we need to set up our project.
On the cloud, log in to your firebase console -> under Authentication -> enable the Sign-In method -> Phone. Then, Download the google-services.json file and add it to app module.
In the project, we add the dependency
implementation 'com.google.firebase:firebase-auth:20.0.2'
Initialize firebase
mAuth = FirebaseAuth.getInstance()
Send OTP
private fun send(mobile: String) {
    val options = PhoneAuthOptions.newBuilder(mAuth)
        .setPhoneNumber(mobile)
        .setTimeout(5L, TimeUnit.SECONDS)
        .setActivity(activity)
        .setCallbacks(mCallbacks)
        .build()
    PhoneAuthProvider.verifyPhoneNumber(options)
}
Verify OTP
private fun resend(mobile: String) {
    val options = PhoneAuthOptions.newBuilder(mAuth)
        .setPhoneNumber(mobile)
        .setTimeout(5L, TimeUnit.SECONDS)
        .setActivity(activity)
        .setCallbacks(mCallbacks)
        .setForceResendingToken(mResendToken)
        .build()
    PhoneAuthProvider.verifyPhoneNumber(options)
}
The callback and the resend token part you can check out in the git repo. It is very straightforward.
Common issues/scenario
While developing the app, I got stuck in various scenarios whose solutions were easy but took me a while to get to them. Let me list out them in case anyone get stuck in similar situation.
- View model extension function:
/* view mode object in Fragment */
private val viewModel: SendOtpViewModel by activityViewModels()

/* view models objects in Activity */
private val sendOtpViewModel: SendOtpViewModel by viewModels()
OUR VIDEO RECOMMENDATION


Jobs
The ViewModel extension is used for quick ViewModel injection using the extension function activityViewModels() or viewModels(). Initially it was not recognized in the code and was throwing the compile time error.
To make it work, add the following dependencies. You can find these in dependencies.gradle.
def vFrag = '1.3.6'
def vActivity = '1.3.1'
ktxExtensions = [
        fragment: "androidx.fragment:fragment-ktx:$vFrag",
        activity: "androidx.activity:activity-ktx:$vActivity"
]
2. Hilt ViewModel:
While using Hilt with Jetpack components, add the following dependency
lifecycle = [
        viewModelKtx: "androidx.hilt:hilt-lifecycle-viewmodel:$vHiltCompiler"
]
It get confusing sometime which dependency to use while using ViewModels with Hilt.
3. Adding Hilt:
hilt = [ hilt: "com.google.dagger:hilt-android:$vHilt" ]
Its annotation processor
kapts = [ daggerCompiler: "com.google.dagger:hilt-compiler:$vHilt" ]
Towards finish line
So far, we’ve looked at how things are working and integrated in the app. The app looks pretty simple but incorporates many of the practices that one should follow.
As a bonus, you should look at the dependencies.gradle file to clean out the app gradle. This way you can arrange all the dependencies as per your convenience and naming convention to better understand them.
Also, we’ve used google’s phone validator library to validate the phone number.
phoneValidator = [
        lib: 'com.googlecode.libphonenumber:libphonenumber:8.12.3'
]
In case, you still want to have a complete look of the code flow then here you are
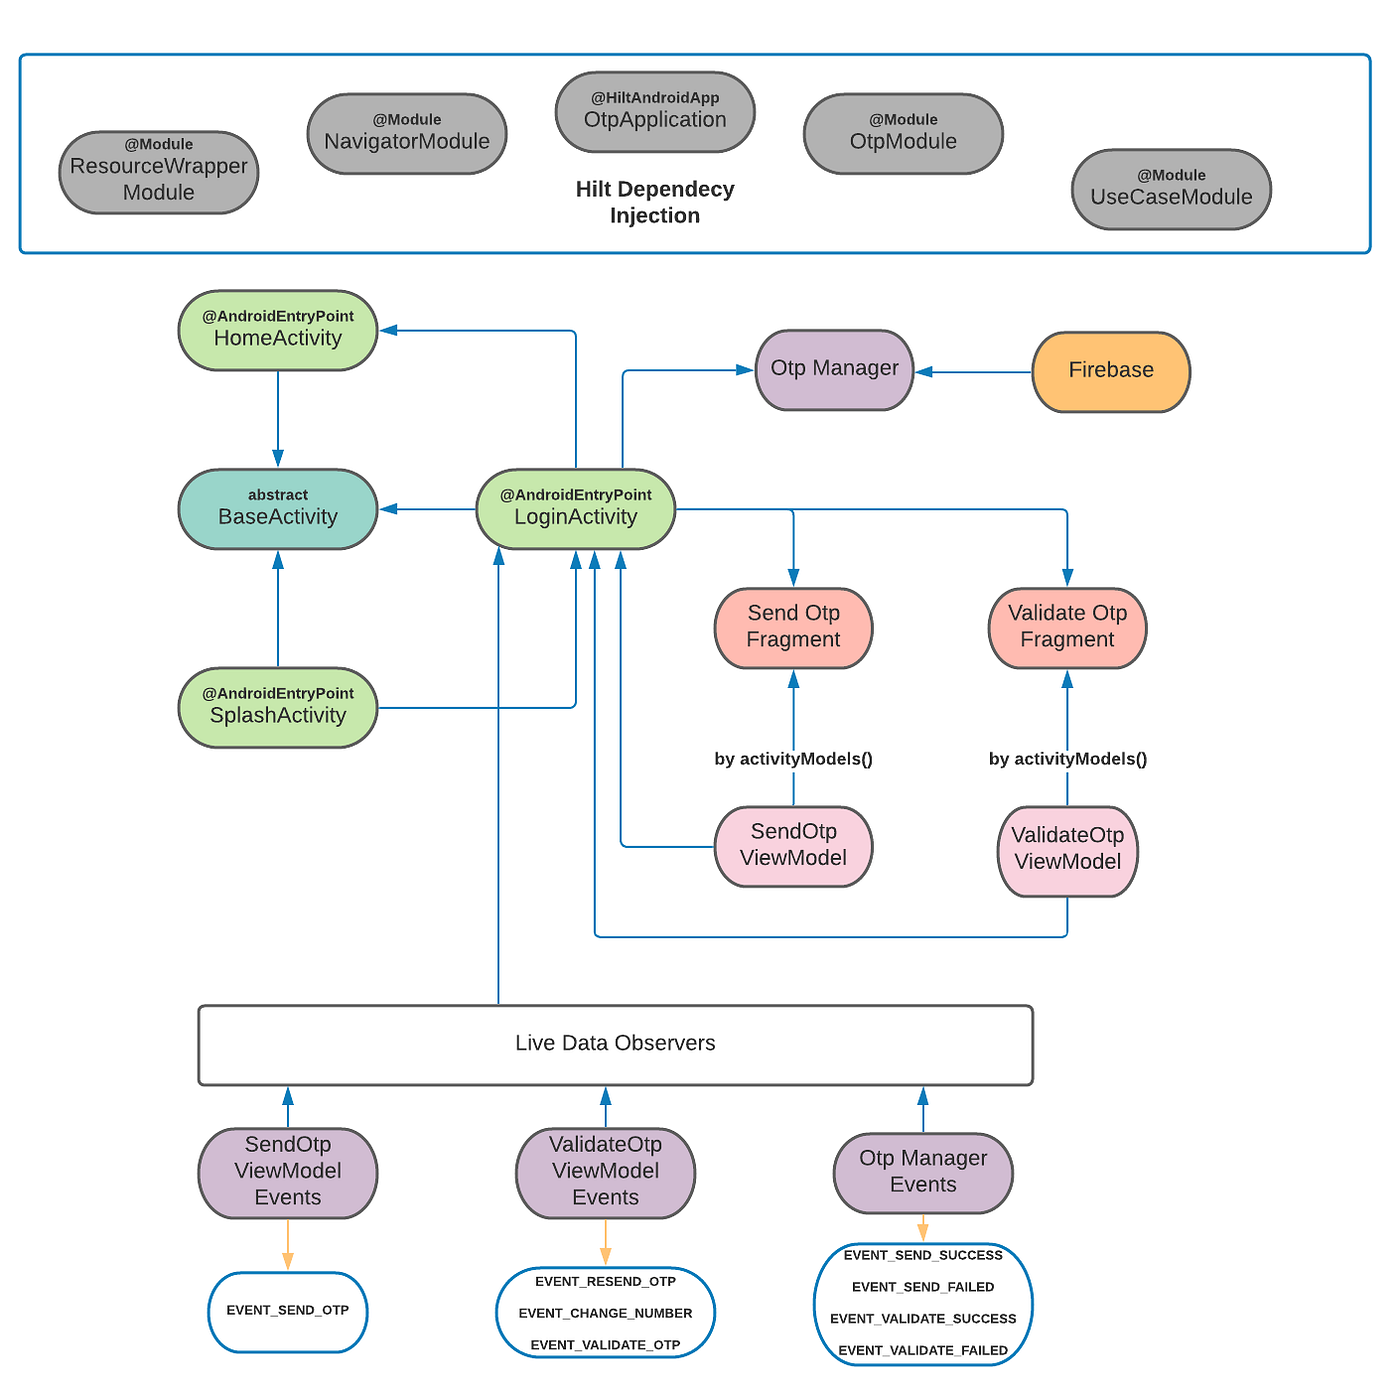
Now we’ve covered almost all aspects of the app and also understand the flow. You can now clone the repo and dive into the code to see it in action.
Let me know if all of this is of any help.
Input/feedback are always appreciated.
Keep Coding. Keep Learning. Keep Sharing.
Cheers!


