Why CI/CD for the app?
There are a lot of blogs and videos on why we need CI/CD. From my personal experience, I worked on a multi-flavoured app.
So, when I need to upload a build from a flavour, I’ve to find out the Keystore file, and it’s regarding alias and password. Also, I had to wait for the build to be finished and then upload the build file in several places. Finally, I had to notify the team that I had uploaded the build file.
Besides development, I had to manage many things, like secret management, uploading build, notifying the team, etc. Sometimes it creates overhead; sometimes, I forget which secret is for which flavour, and sometimes, I fail to inform the team.
That’s why I moved to CI/CD for the app. After that, I could keep focus only on development. Also, the next engineers who will work on that project will have nothing to worry about. Their task will be to push the code to a specific branch.
In this series of posts, I’ll show how you can upload app bundles to the Firebase App Distributions and the Play Store.
Local environment setup
- Almost all environment has Ruby installed by default. You can check if your local machine already has Ruby installed or not by running the command ruby -v in the terminal (for Linux and macOS) or command prompt (for windows). Running this command will show the installed Ruby version in the machine. If it’s not installed, you can install Ruby by following instructions here. For Ubuntu sudo apt-get install ruby; formacOS brew install ruby.
- Install RubyGems following the instructions here.
- You need to install Bundler to manage all dependencies of the Fastlane project. Run gem install bundler command to install. Also, you can follow the installation guide to install Bundler in your local machine.
After installing Ruby, RubyGems, and Bundler, your local machine is ready to proceed.
Prerequisites
Before proceeding further, there are some prerequisites. You’ve to make sure the following things are ready. These things are really really important. Summary of what you need to make sure is:
- There should have an app in Play Console.
- Firebase should be integrated into the app.
- Two separate service account at Google Cloud Platform console. One account should have Firebase App Distribution Admin role, and another should have Service Account User role.
- Create a JSON key under those service accounts each.
- Grant access to Play Console from API access page of Play Console
- Connect the Firebase project with the Play Store app.
Now I’m explaining these requirements in detail.
Before that, here you’re going to upload build into Firebase App Distribution using a JSON key of a service account. You might find this process very very confusing. There are two more ways to do that. Please follow the guidelines of Firebase App Distribution for other ways.
Getting back to the steps
- Your app should already be uploaded to any track in the Play Store. The track can be alpha or beta or production or any other track. Not necessary it should be published. Just have to make sure it’s uploaded to any track.
- Make sure a Firebase project is linked with the app. To link your app with a Firebase project, follow the guidelines here.
- Create a service account to manage Firebase services
- Go to Firebase project settings by clicking on the settings icon placed just at the right of Project Overview on the top left. Now go to Service accounts. Click on the link of service accounts. For a newly created project, it’s 4 Service accounts.
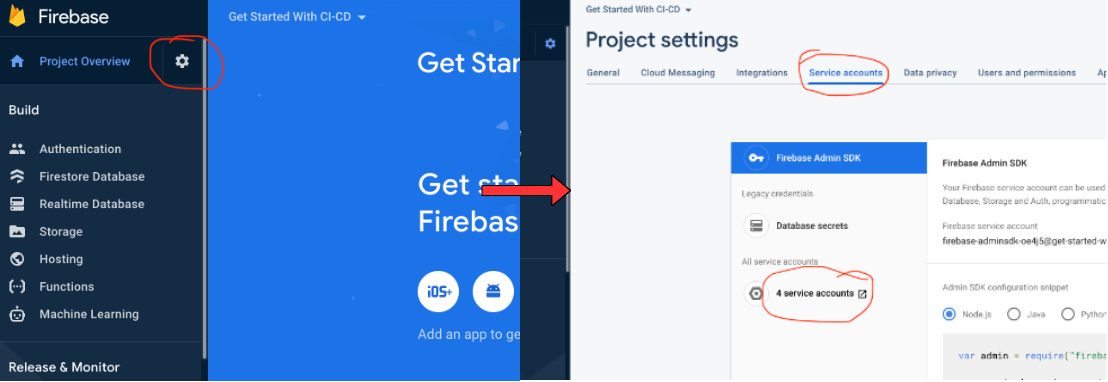 How to go to service account list page from Firebase project
- It will redirect to the google cloud platform console’s IAM & adminpage. From the left, click on Service accounts. Here you’ve to create a service account to manage the Firebase App Distribution service. You already may have account/s there. But it’s good practice to create a separate service account only to manage Firebase App Distribution.
- Now click on CREATE SERVICE ACCOUNT. I assume your Service account ID: firebase-app-dist-account.
- Then click on Create and continue.
- Now from the select role field, select Firebase App Distribution Adminrole and click Done.
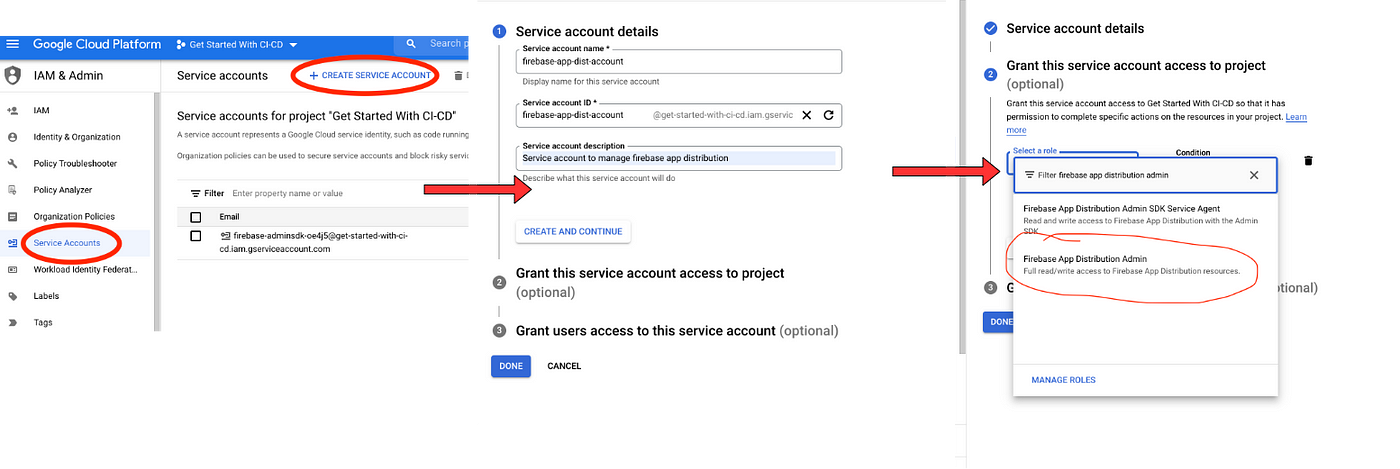
 How to create a service account at Google Cloud Platform
Job Offers
- From the service account list, click on firebase-app-dist-account@……………iam.gserviceaccount.com. From the top, click on the KEYS tab. Now create a JSON key by clicking on ADD KEY > CREATE NEW KEY. Select JSON. And click on CREATE. A JSON file will be downloaded. Rename the file to firebase-app-distribution-key.json so that you can find the file easily for future use.
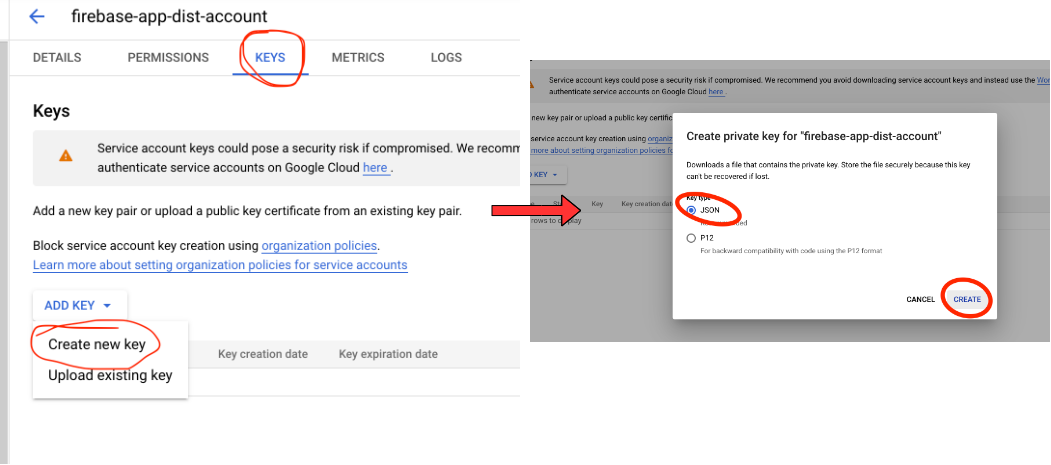 How to create a JSON key from a service account
- From the service accounts page in the Google Cloud Platform console, create another service account to manage the Play Console. Here I assume your Service account ID: playstore-app-dist-account. For this account, select Service Account User as the role. Create and continue next. Again create a json key under this service account and renamethe JSON file to playstore-app-distribution-key.json.
- From the Google Cloud Platform console menu, go to APIs & Services > Library. Search for Firebase App Distribution API. Make sure it’s enabled. If not, click enable. It may take some time to enable it.
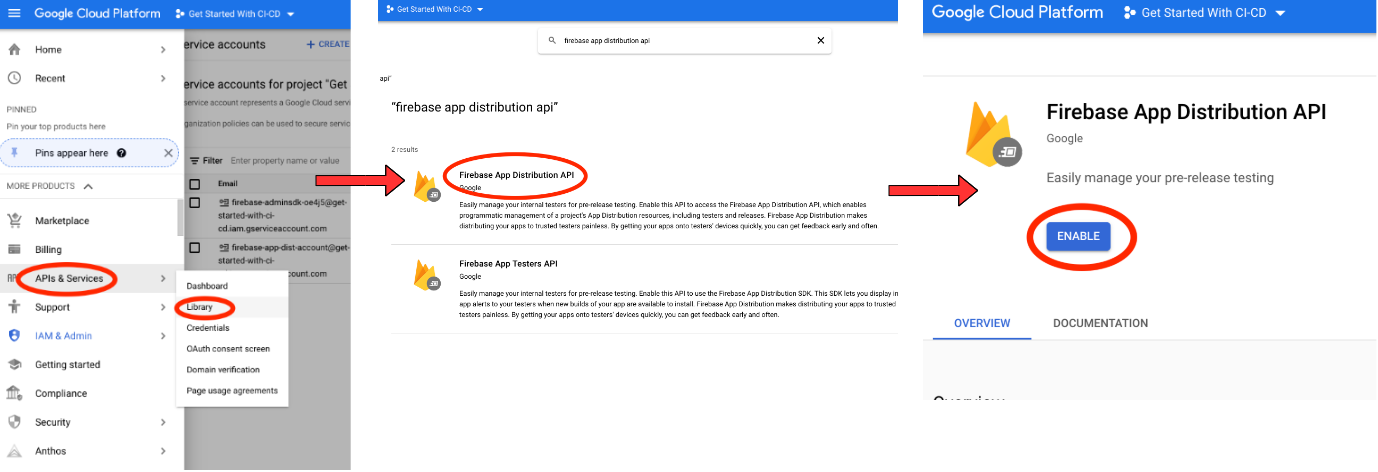 Enable Firebase App Distribution API from GCP
- Then search Google Play Android Developer API and enable the API.
 Enable Google Play Android Developer API from GCP
- From the Firebase project settings page, go to Integration. Now click on the link to connect your Google Play app from the Google Play card there.
- From the left menu at Firebase, go to App Distribution. Now click on Get started. Make sure your android app is selected there.

Start Firebase App Distribution service for an app
- Now go to your Play Console. From the left menu, go to Setup > API access. Link your Google Cloud project. And from the service account list at the bottom of the page, you can find the service account playstore-app-dist-account@…………..iam.gserviceaccount.com. Click on Grant access. It will navigate to a permissions page.
- From the App permissions tab, select your app/s for which you want to implement CI/CD.
- From the Account permissions tab, you can give access to all permissions. But you must have to check the following permissions:
- View app information and download bulk report (read-only)
- Edit and delete draft apps
- Release to production, exclude devices, and use Play App Signing
- Release apps to testing tracks
- Manage testing tracks and edit tester lists
- Manage store presence
That’s a lot of things, actually. If you don’t make things done before, then you’re doomed. Because from several places you’ve to permit several things. You may get lost in this process.
Something from experience
- Every Firebase project is linked with a Google Cloud Platform project. That’s why if you want to access a different Firebase project, you must create different JSON keys for different service accounts from there regarding the Google Cloud Platform project.
- You can connect only one Google Cloud Platform project with your Play Console. No matter how many apps do you have. There’s no way to connect each app separately with different Google Cloud Project’s service account in my knowledge. But, please talk with a Google Cloud Platform expert. There might be a way to connect by creating a service account, let’s say from ‘GCP project A’ and that service account has owner role in ‘GCP project B’. And if you connect “GCP project A’ with the Play Console, then you might have access to service accounts of ‘GCP project B’ from Google Play Console. I’m now sure about that. There must have a way to connect two different GCP projects.
- If you can’t find your GCP project from the API access of the Play Console, then either you’re not the owner of that GCP project or Google Play Android Developer API is not activated from the GCP project.
In the next post, I’m going to show the integration process of Fastlane. You’ll get amazed after integrating Fastlane successfully.


