The world of software engineering is becoming more and more fascinating as the teams expand in size, the scope of the project gets more extensive, and there are many opinionated solutions that are designed for any tech requirement. When it comes to Android, you notice a lot of trends, libraries, and architectures around the world that are attempting to solve specific problems. As the owner of Android, Google itself also comes with many suggested and opinionated conventions of implementing principles. So, Should we go with the flow, or should we rethink our custom business implementations?
One of the main controversial topics of Android development is Modularization. Back then, it wasn’t strange at all if your project had only one app module. You would have to concentrate on your app’s layers, separate them and follow some principles of some famous architecture. But these days, maintaining the projects is getting out of hand when you have a big team working on a monolithic project that confronts many issues like build time, code conflicts, and running your app per change. Because no matter your project is designed with the most cutting-edge architecture in the world, you might get frustrated while developing and running a huge project.
This article aims to give you a big picture of turning a big monolithic project into a multimodule one, clarifying the complicated situations that challenge your team while starting the Modularization tasks.
Modularization Mindset
Modularization was one of my favorite topics in Android, and not only did I read the blogs about how to modularize, but I also watched approaches of well-known companies like Square, Spotify, Airbnb, Soundcloud, etc. for modularizing their android apps. So Before jumping to the details of how to implement the modularization techniques, it made me think of sharing some fundamental topics that help to know what you’re getting into. Let’s make a long story short.
There are many reasons for Modularization:
- Build time: It takes forever and a day to compile and build your project.
- Reusability: You need to share some of your Features among multiple apps.
- Maintenance: There is no Separation of Concern. A big, spaghetti codebase that each Feature has many side effects on the other ones. also, it appears that your colleagues are not into respecting SOLID principles in action and be willing to open PRs that contain logic that accesses the world as a whole.
- Test: You can’t write a simple test scenario for a self-contained Feature, and you need to mock the whole world.
- Demo Apps: You are fed up with running the entire project for a slight change, and you have no idea how to run only a single Feature isolated from the whole app.
Fixing all the issues above sounds so cool, right? What about the other side? Is there any reasonable reason for not going into it? No! You have to. Do you hate Gradle? That makes sense because Gradle is not so cool at all unless you use it for a multimodule project.
Many people think that numerous Feature modules are an over-engineering thing, and it couldn’t help increase the build time, and it generates a lot of boilerplates. But the undercover point missing is that you no longer run the whole project each time you implement a Feature. In contrast, you implement your Feature, make your tests pass, run it through a small demo app, and then ask your CI system to build a real app for you or your QA team.
Layer vs. Feature Separation
One of the most common ways of Modularization in the old days was to separate the presentation and data layer (aka domain-data-presentation). It took the developers a while to find out that the domain-data-presentation layer was no longer enough to apply Modularization. Separating only these layers will target the small projects, and you wouldn’t benefit from the reasons mentioned above. Because when you develop a Feature, you will touch all the layers, and guess what? You will turn a lot of heads, and all of your layers will recompile every time.
That’s why I want to demonstrate how the incremental build works in the next section. You may be surprised that this layering in your project (without Feature separation) wouldn’t help you have isolated Features.
By incremental build, the build process can run independently in a shorter time than when you only have three modules for your data, domain, and presentation of the entire app. Instead, by Feature separation, you will have more isolated modules, and then you can apply these layers on each Feature module if you are interested. You can read more about these topics here and here.
Gradle Incremental Build
An incremental build is a build that avoids running tasks of building modules that have not changed since the previous build, no matter whether you enabled offline sync or not. It will help if you consider it while wiring your app’s modules. You never know what can come up when a bad wring between internal modules of your project is applied if you don’t see how Gradle works.
A lousy modularization structure will cause unnecessary builds and won’t help you increase the build speed. Gradle marks the cached modules by the “up-to-date” tag, and you can see them while tasks are running in the build output window. But how could the wiring cause a problem in the process of the incremental build? First, let’s find out about the “implementation” and the “api” keywords you usually use in your Gradle. Here is the official document:
api : dependencies which are transitively exported to consumers, for compile time and runtime.
implementation: dependencies which are not meant to be exposed to consumers.
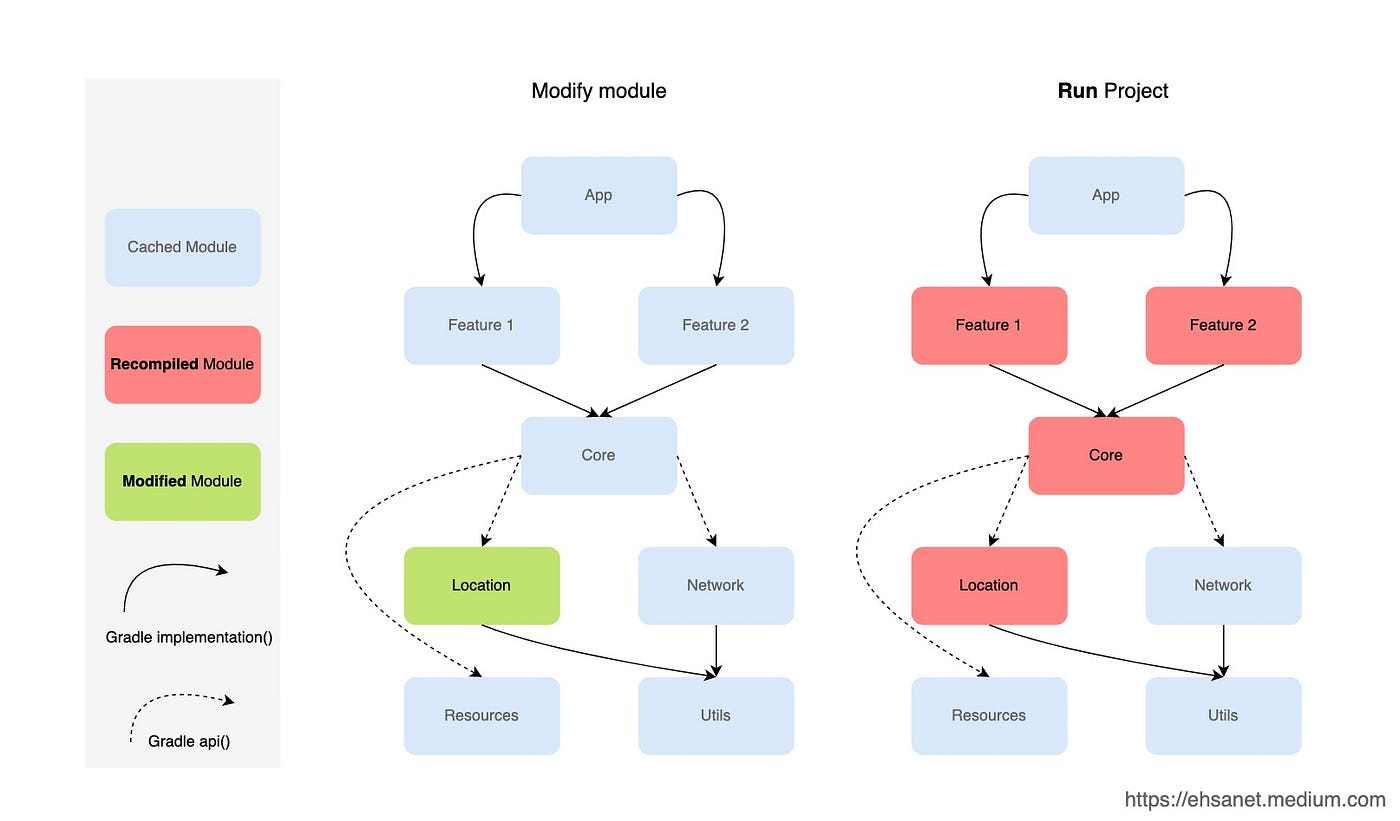
I want to show only an example of a project wiring with a classic modularization structure. I’m sure there are many possible wirings in a project with many modules. But let’s look at one example that I illustrate in the figure below. As you see, we have an app that depends on Feature1 and Feature2 modules. The dependencies between them are defined here. The main point of this wiring is that the Location is exposed to Feature1 and Feature2 as well as the Core module.
//App dependencies in Build.gradle
implementation project(path: ':feature1')
implementation project(path: ':feature2')
//Feature1 dependencies in Build.gradle
implementation project(path: ':core')
//Feature2 dependencies in Build.gradle
implementation project(path: ':core')
//Core dependencies in Build.gradle
api project(path: ':location')
api project(path: ':network')
api project(path: ':resources')
So let’s change a line of code in the Location module. We have an apidependency for Location, and not only dit it exposed to the Core module but it is also exposed to Feature1 and Feature2. So by modifying a module in this hierarchy, Gradle will recompile four modules. You can track compile tasks by searching “compileDebugKotlin” in your build window (the project is written with Kotlin).

How Gradle recompiles modules after a modification into a module that is exposed to its top layer
Job Offers
Circular Dependencies
When you implement your Features in a monolithic app, you can’t imagine how many cyclic dependencies you leave in your project unless you start to modularize it. That’s why I like Modularization, and the truth finally will come out! Because you can now get a taste of your codes!
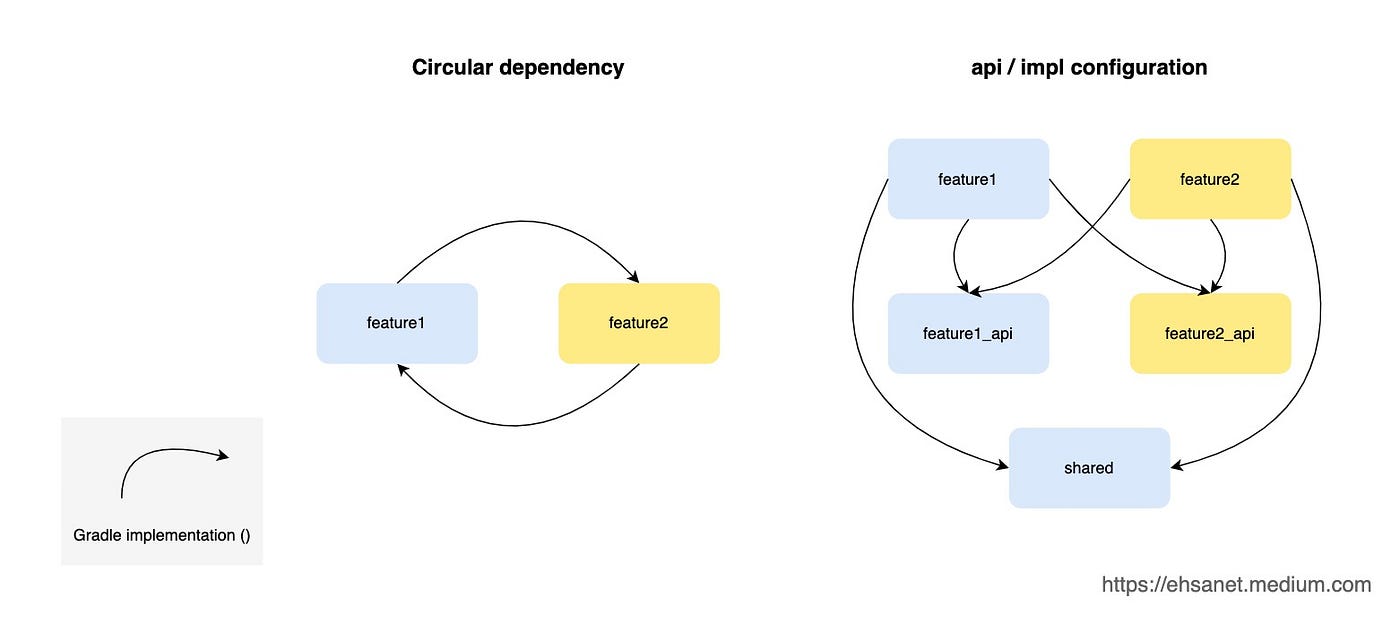
So, let’s assume you plan to decouple feature1 and feature2, and it’s an easy coupling (I mean, it’s not so traumatic yet!) that both features are dependent on each other. feature1 wants to see an Interface declared in a package in feature2and feature2 wants to see a model Class that belongs to feature1. That’s a simple circular dependency that is more often while doing Modularization. Suppose you created two separated modules, and they depend on each other. Gradle won’t let you have a circular dependency by showing this error:
FAILURE: Build failed with an exception.
* What went wrong:
Circular dependency between the following tasks: ....
What can we do about it?
Interestingly, It’s easy if you have already followed dependency injection principles in your project. Here are the rules:
- Step 1: Create three new modules: feature1_api, feature2_api, and shared
- Step 2: Implement feature1_api and shared dependency inside feature1.
- Step 3: Implement feature2_api and shared dependency inside feature2.
- Step 4: Move all common Android resources between feature1 and feature2to the shared module.
- Step 5: Move all common utils and helpers classes between feature1 and feature2 to the shared module.
- Step 6: Find all common model/entity classes between feature1 and feature2. If the common model/entity belongs to feature1’s responsibility, move it to feature1_api. Do this for feature2 too.
- Step 7: Find all common interfaces classes between feature1 and feature2. If the common interface belongs to feature1’s responsibility, move it to feature1_api. Do this for feature2 too.
- Step 8: Find all other common concrete classes (fully implemented) between feature1 and feature2. If the common class belongs to feature1’s responsibility, extract an interface out of its public functions, and move it to feature1_api. Do this for feature2 too.
- Step 9: Refactor all dependency injections related to feature1 and feature2and use the new interfaces (created in the previous step) instead of the concrete one (in Dagger, you can add a new @Binds for each interface).
You can see the details in the figure below.

Resolving circular dependencies by adding API, Impl, and shared modules.
Dynamic Features
Dynamic Features are a whole new concept in Modularization in Android that supports dynamic delivery by enabling the onDemand flag. Dynamic Features are based on the idea that users only use 20% of the app! (80/20 rule). Also, you may wonder that with each six MB you add to your APK size, your app’s new installs will decrease about 1.6 %.
To create a dynamic Feature, you need to apply its plugin com. Android.dynamic-feature. By introducing these kinds of modules, Google categorizes all Android modules in two categories:
- Layer-Based by structural isolation
- Feature-Based by onDemand delivery
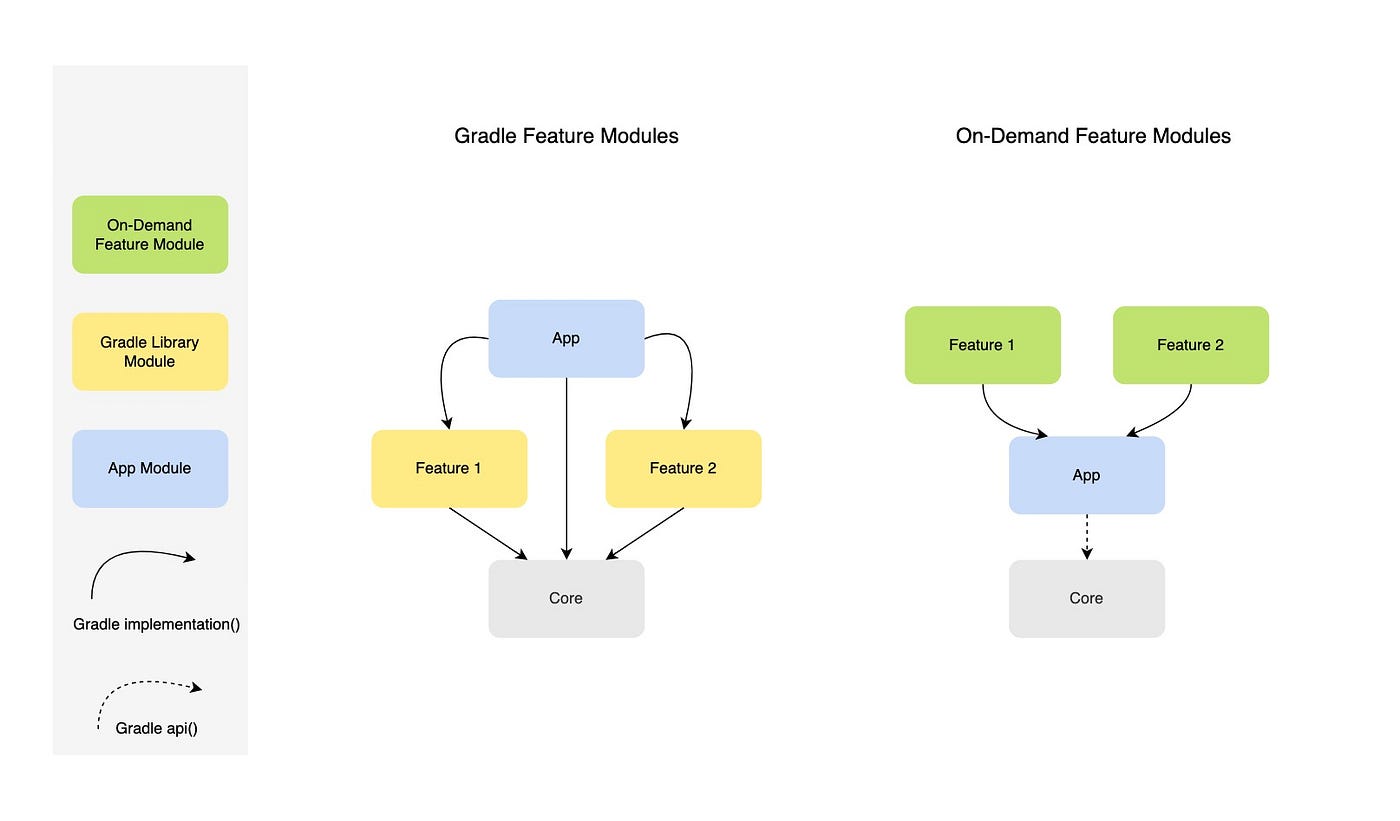
The structure of dynamic Features sounds so cool on the paper, and as you will see in the following figure, the Features are on the top level of the app, and they are implementing the app module. In this pattern, Any change in Features will no longer affect the app and the core modules of the app. So basically, you will have an application that not only you can load/unload Features on it in compile-time, you can download your Features on Runtime too, which means that you don’t need to put them in your released APK.
A new API for Android developers will download your Feature on the runtime through Google Play API. Even if you are not interested in the UX of downloading a Feature while the user is working with your app, you can still have your dynamic Feature inside your app and you will take advantage of the other benefit of Feature modules which is absolute structural isolation from the app.

Gradle Feature modules vs on-demand Feature modules
As I mentioned above, the dynamic Features are so cool in the Modularization mindset, but in practice, you will face a lot of limitations, especially in the context of Android. I don’t want to go to the details of the implementation, but here are the challenges in dynamic Features implementation:
- Navigation: Your features are not visible to each other. Also, the app has no idea about the features that led to using some weird solutions like Reflection, Deeplink, and BroadcastReceivers.
- Singleton Objects: like Database, you should decide whether you want only one DB for all modules or one DB per Feature.
For more details about how to implement thee Dynamic Delivery, see Google’s document:
https://developer.android.com/guide/playcore/feature-delivery
Gradle Build Scripts
Just after you have modularized your application, you will see multiple build.gradle files and configurations. Maintaining dependencies and their versions, applying default configs, Flavours, applying default plugins in all modules, writing custom Gradle Plugins, etc., across multimodule projects are those boilerplates added in every multimodule project. What makes it worse is that Groovy scripts have no autocompleted and runtime errors, and you have no control over your Scripts as a central place for doing that.
Gradle comes with the BuildSrc solution, a central place for your Gradle scripts. Hopefully, you can add Kotlin support to it and write your codes in Kotlin! BuildSrc would be a new directory in your project’s root and will include Kotlin classes that will be compiled and built before all your modules by Gradle:
The directory
buildSrcis treated as an included build. Upon discovery of the directory, Gradle automatically compiles and tests this code and puts it in the classpath of your build script. For multi-project builds there can be only onebuildSrcdirectory, which has to sit in the root project directory.buildSrcshould be preferred over script plugins as it is easier to maintain, refactor and test the code.
For more details about how to implement the buildSrc module, see the below articles:
https://quickbirdstudios.com/blog/gradle-kotlin-buildsrc-plugin-android/
https://www.droidcon.com/2021/07/19/better-dependency-management-using-buildsrc-kotlin-dsl/
Conclusion
So, Android Modularization by Feature is a paradigm shift in App development, and you need to rethink all things you have learned so far. By Modularization, you are going to end up having a clear mindset about these items:
- The Definition of a Feature
- Everything is an API.
- Multiple official and test Apps
- TDD Feature Development
This article demonstrated the basic idea behind Modularization and structural dependencies. We distinguished between simple Android Libraries and Dynamic Feature modules that Google had introduced. Also, we mentioned why you need to switch from a monolithic project to a multimodule one.


3 Comments. Leave new
Well done Ehsan.
I love this article! My one question is how do you avoid having test Apps (demos, samples) adding to the build time? They want to compile when I’m building the real app in CI.
This is the article I’ve been looking for. Found answers to all my questions related to modularization. Thanks a lot.