

Of this new generation of foldable devices, dual-screen devices, which provide symmetrical screens that work together in unique ways, are particularly interesting. But, they also present unique challenges.
A key feature of these foldable, responsive UIs is that screen sizes can change in runtime. This means that applications should recognize screen changes in runtime, which could be a challenging feature for developers to implement who need to focus on business code.
To get around this challenge, Google suggested a new solution: the Jetpack WindowManager. Now that the library is in the stable release, Google is encouraging all developers to adopt Jetpack WindowManager with its device-agnostic APIs, testing APIs, and WindowMetrics so you can respond easily to screen changes.
In this post, you’ll learn how to set up the foldable device emulator and how to use the Jetpack WindowManager library to build responsive UIs for Android.
For additional help, check out the links below:
Set Up the Foldable Emulator
To get started, you need to install a foldable emulator. In this tutorial, you will use Microsoft’s Surface Duo 2 emulator to run the demo project. To run the emulator, you will learn how to install and run the foldable emulator on Android Studio.
To get started, you can follow the instructions in the resources below:
Note: If you build with other foldable emulators, this project may not work properly on your emulator.
Download the Surface Duo Emulator
You can download the Surface Duo emulator image by following the steps below:
- Go to Microsoft Download Center.
- Click the Download button on the page.
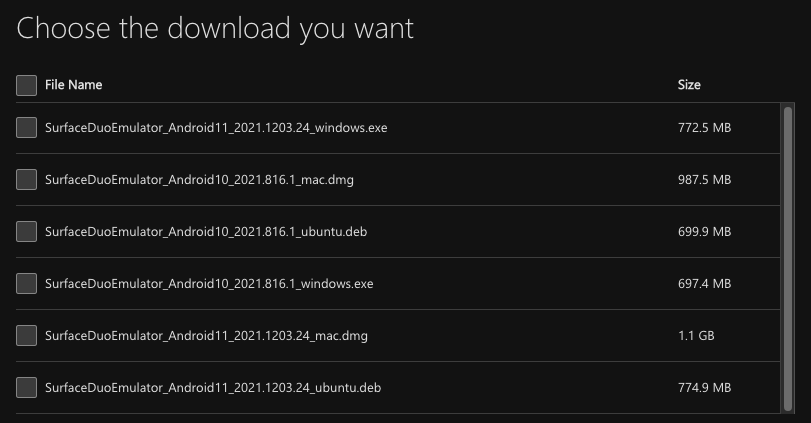
- Choose a download option as in the figure below. You should select the option that matches your PC environment.
- Click the Next button and start downloading the emulator file.
Install the SDK and Emulator
After downloading the emulator, follow the instructions below to install it on your PC:
👉 Instructions for Mac:
- Open the SurfaceDuoEmulator.dmg file.
- Copy the .jar file and the contents of the emulator folder to a new location on your local hard drive. (The emulator folder name cannot contain periods.)
- Navigate to the SurfaceDuoEmulator folder where you copied the emulator files.
- Run the ./run.sh by double-clicking (or type it on the terminal) to start the installation process. This can take some time — but at the end of the process, you will see the emulator launch.
👉 Window Instructions:
- Unzip the downloaded file.
- Launch the installer.
- After completing the SDK setup, launch the Surface Duo Emulator via the start menu link.
Note: If the emulator does not start, you might need to update the pointer to your Android SDK installation.
Run the Surface Duo 2 Emulator on Android Studio
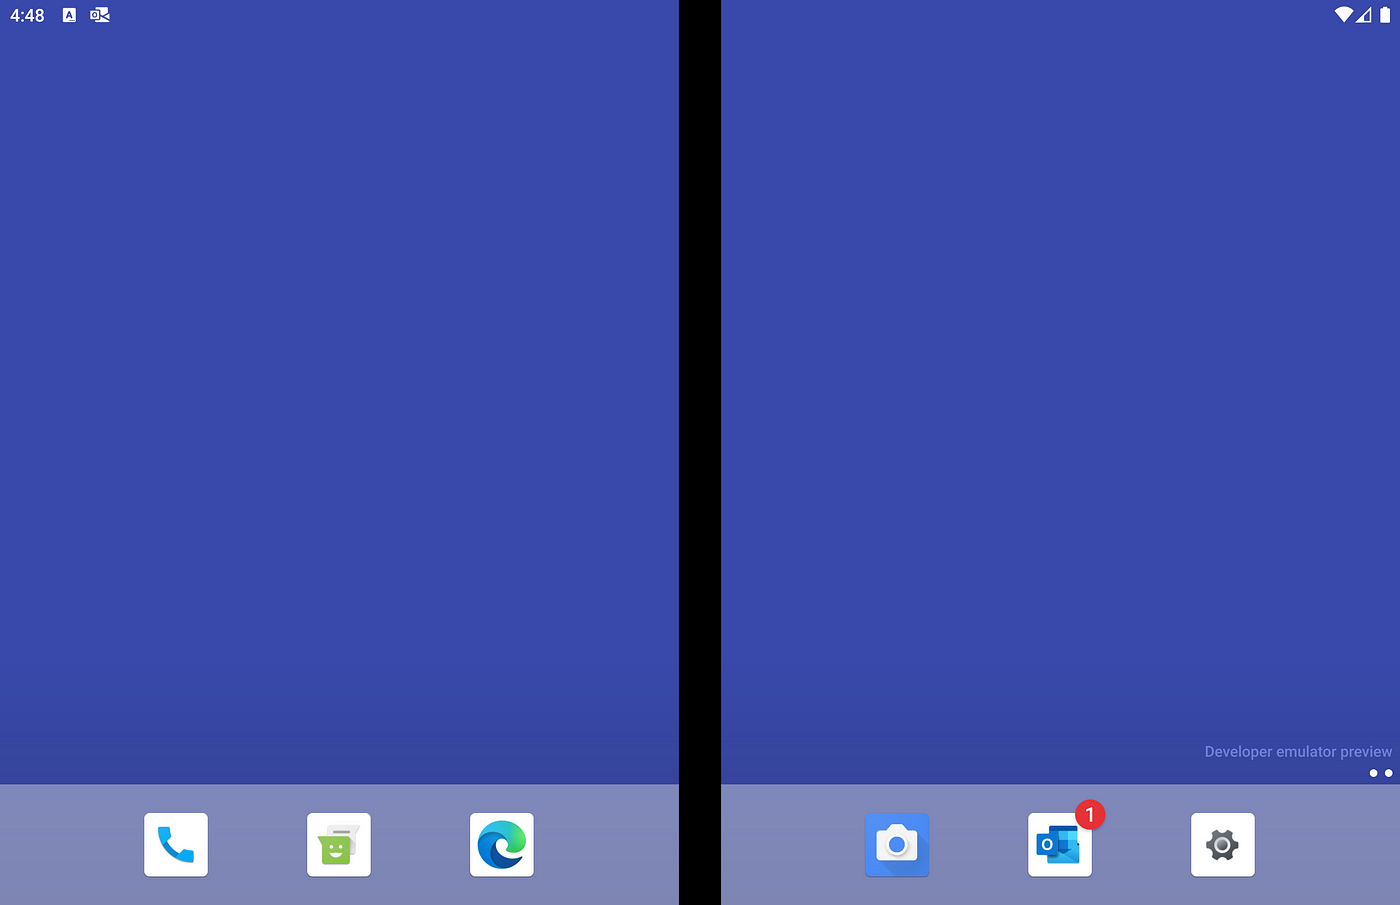
After running the Surface Duo 2 Emulator, you’ll see the result below on your PC:
The Surface Duo 2 emulator will automatically appear in the Android Studio available devices list like the figure below. Then, you can run this demo project on your Duo 2 emulator:

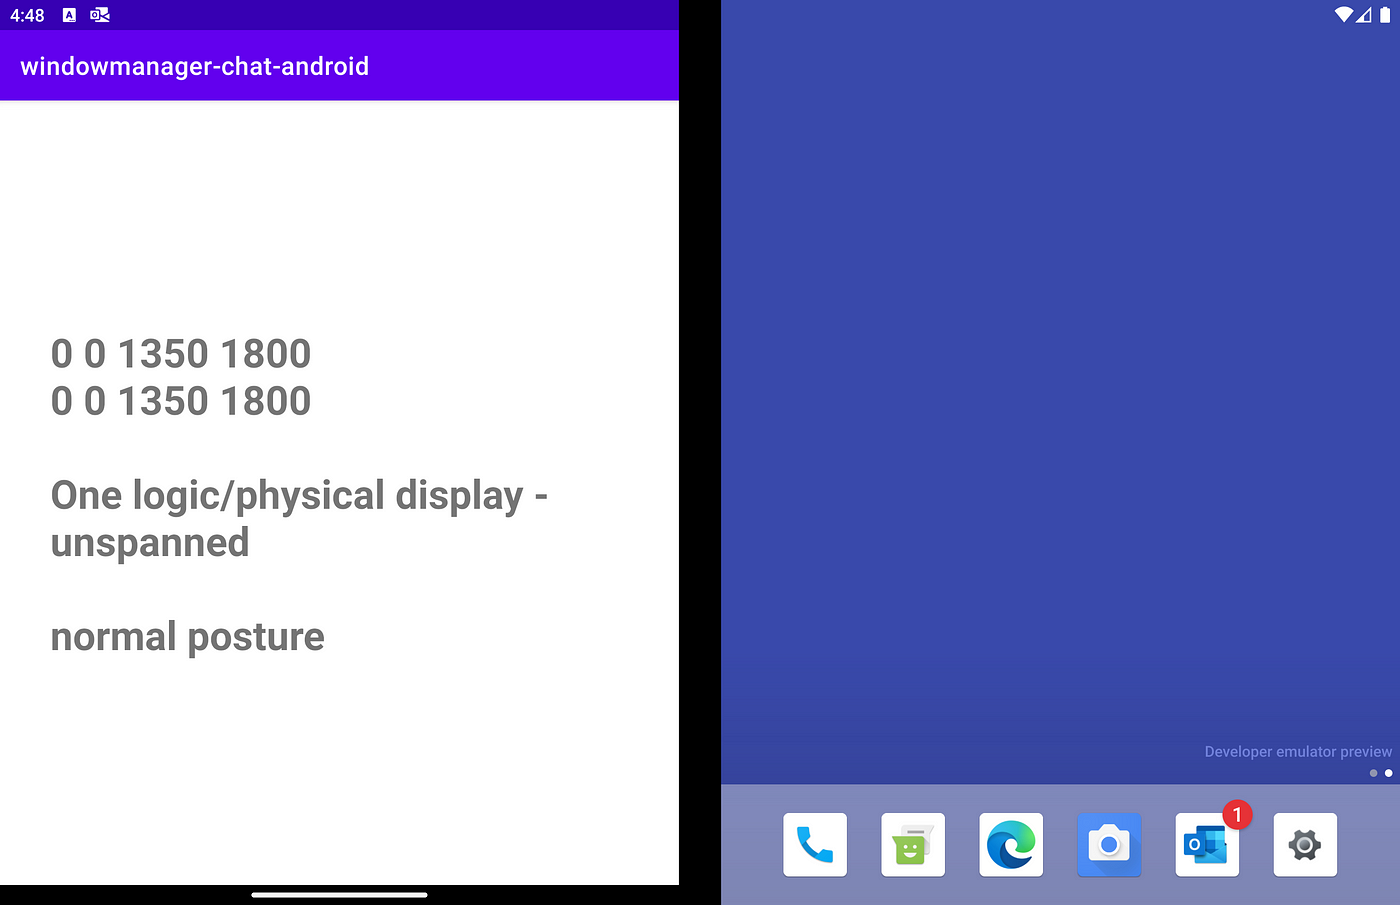
After running this demo project, you’ll see the result below:
Now, you can control the folding state and degree of the device on the Virtual sensors tab on the emulator controller:

Congratulations! 🎉 Now you can build projects for responsive UIs on the Surface Duo 2 emulator. Now let’s deep dive into the Jetpack WindowManager to see how the responsible application works.
Jetpack WindowManager
The Jetpack WindowManager library makes it possible for application developers to support new device form factors and implement responsive UIs. If you want to use this library in your project, add the following dependency in the build.gradle file for your app:
| dependencies { | |
| implementation "androidx.window:window:1.0.0" | |
| implementation "org.jetbrains.kotlinx:kotlinx-coroutines-android:1.5.2" | |
| } |
The Jetpack WindowManager version 1.0.0 contains the following key features:
- WindowMetricsCalculator: Interface to calculate the WindowMetrics for an Activity. It computes the size and position of the area the window would occupy with MATCH_PARENT width and height.
- WindowInfoTracker: Provides the
WindowLayoutInfo, which contains display features of a window as an observable type such as Flow or RxJava. - WindowLayoutInfo: Contains the display features of a window to distinguish whether the window encompasses a fold or hinge.
- FoldingFeature: Enables you to monitor the folded state of a foldable device to determine device postures.
This article will walk you through the key features of the Jetpack WIndowManager.
Set Up the Example UI
Before deep-diving into the WindowManager API, you need to set up an example layout on your Activity to observe the folded states and display configurations.
First, open the activity_main.xml file and copy-paste the following code:
| <?xml version="1.0" encoding="utf-8"?> | |
| <androidx.constraintlayout.widget.ConstraintLayout | |
| xmlns:android="http://schemas.android.com/apk/res/android" | |
| xmlns:app="http://schemas.android.com/apk/res-auto" | |
| xmlns:tools="http://schemas.android.com/tools" | |
| android:layout_width="match_parent" | |
| android:layout_height="match_parent" | |
| android:padding="40dp" | |
| tools:context=".MainActivity"> | |
| <TextView | |
| android:id="@+id/metrics" | |
| android:layout_width="wrap_content" | |
| android:layout_height="wrap_content" | |
| android:text="metrics" | |
| android:textSize="32sp" | |
| android:textStyle="bold" | |
| app:layout_constraintBottom_toTopOf="@id/layoutChanges" | |
| app:layout_constraintStart_toStartOf="parent" | |
| app:layout_constraintTop_toTopOf="parent" | |
| app:layout_constraintVertical_chainStyle="packed" /> | |
| <TextView | |
| android:id="@+id/layoutChanges" | |
| android:layout_width="wrap_content" | |
| android:layout_height="wrap_content" | |
| android:text="layout changes" | |
| android:textSize="32sp" | |
| android:textStyle="bold" | |
| android:layout_marginTop="32dp" | |
| app:layout_constraintBottom_toTopOf="@id/posture" | |
| app:layout_constraintStart_toStartOf="parent" | |
| app:layout_constraintTop_toBottomOf="@+id/metrics" /> | |
| <TextView | |
| android:id="@+id/posture" | |
| android:layout_width="wrap_content" | |
| android:layout_height="wrap_content" | |
| android:text="normal posture" | |
| android:textSize="32sp" | |
| android:textStyle="bold" | |
| android:layout_marginTop="32dp" | |
| app:layout_constraintBottom_toBottomOf="parent" | |
| app:layout_constraintStart_toStartOf="parent" | |
| app:layout_constraintTop_toBottomOf="@+id/layoutChanges" /> | |
| </androidx.constraintlayout.widget.ConstraintLayout> |
Next, enables the view binding in the build.gradle file with the following code:
| android { | |
| buildFeatures { | |
| viewBinding true | |
| } | |
| } |
Last, after clicking the sync button on Android Studio, initialize layouts with view binding with the following example:
| class MainActivity : AppCompatActivity() { | |
| override fun onCreate(savedInstanceState: Bundle?) { | |
| super.onCreate(savedInstanceState) | |
| val binding = ActivityMainBinding.inflate(layoutInflater) | |
| setContentView(binding.root) | |
| } | |
| } |
Calculating the Screen Size with WindowMetricsCalculator
Now, let’s get the window size with the WindowMetricsCalculator. The WindowMetricsCalculator finds the maximum dimensions and position of an area for the window by calculating MATCH_PARENT width and height and any flags that allow the window to extend behind cutout areas.
First, you create an instance of the WindowMetricsCaculator by using the getOrCreate() static method:
| val wmc = WindowMetricsCalculator.getOrCreate() |
Next, you can get the WindowMetrics, which contains the size information of the Window:
| val wmc = WindowMetricsCalculator.getOrCreate() | |
| val currentWM = wmc.computeCurrentWindowMetrics(this).bounds.flattenToString() | |
| val maximumWM = wmc.computeMaximumWindowMetrics(this).bounds.flattenToString() | |
| binding.metrics.text = "${currentWM}\n$maximumWM" |
After building, you’ll get the following result:
Flipped:
Jobs
Spanned:

Tracking Window With WindowInfoTracker
The WindowManager API provides tracking interfaces of the WindowLayoutInfo, which contains the list of DisplayFeatures located within the window. We can observe the window layout changes by using the windowLayoutInfo(activity)method, which provides the Flow of WindowLayoutInfo across Activity recreations with the code below:
| WindowInfoTracker.getOrCreate(this@MainActivity) | |
| .windowLayoutInfo(this@MainActivity) | |
| .collect { layoutInfo -> | |
| … | |
| } |
The windowLayoutInfo(activity) method returns Flow<WindowLayoutInfo>. We can observe the WindowLayoutInfo in our Activity with the code below:
| // Copyright 2022 Google LLC. | |
| // SPDX-License-Identifier: Apache-2.0 | |
| // | |
| // Create a new coroutine since repeatOnLifecycle is a suspend function. | |
| lifecycleScope.launch(Dispatchers.Main) { | |
| // The block passed to repeatOnLifecycle is executed when the lifecycle | |
| // is at least STARTED and is cancelled when the lifecycle is STOPPED. | |
| // It automatically restarts the block when the lifecycle is STARTED again. | |
| lifecycle.repeatOnLifecycle(Lifecycle.State.STARTED) { | |
| // Safely collect from WindowInfoTracker when the lifecycle is STARTED | |
| // and stops collection when the lifecycle is STOPPED | |
| WindowInfoTracker.getOrCreate(this@MainActivity) | |
| .windowLayoutInfo(this@MainActivity) | |
| .collect { layoutInfo -> | |
| // do something | |
| } | |
| } | |
| } |
Building a Responsive Screen With FoldingFeature
The WindowManager API provides you with FoldingFeature, which describes folds and hinges in the display. Its API provides access to important informatio related to the device methods below:
- state(): Represents the current posture state of the foldable device such as STATE_FLAT and STATE_HALF_OPENED.
- isSeparating(): Determines if a
FoldingFeatureshould split the window into multiple physical areas that users will view as logically separate. - orientation(): Returns
FoldingFeature.Orientation.HORIZONTALif the FoldingFeature width is greater than the height, orFoldingFeature.Orientation.VERTICALotherwise.
FoldingFeature provides two folding states: FLAT and HALF_OPENED. FLATmeans the posture state should be opened entirely flat, and HALF_OPENDED means two logical screen areas should be folded in between 30 and 150 degrees as seen in the figure below:
 Illustration by Google
FoldingFeature includes information like hinge orientation and the posture state which you’ve handled above, so we can use these values to check if the device is in tabletop mode or in book mode.
TableTop Mode

Illustration by Google
You can check if the device is in tabletop mode (half open with the hinge horizontal) with the code below:
| // Copyright 2022 Google LLC. | |
| // SPDX-License-Identifier: Apache-2.0 | |
| private fun isTableTopMode(foldFeature: FoldingFeature) = | |
| foldFeature.state == FoldingFeature.State.HALF_OPENED && | |
| foldFeature.orientation == FoldingFeature.Orientation.HORIZONTAL |
Book Mode
You can check if the device is in book mode (half open with the hinge vertical) with the code below:
| // Copyright 2022 Google LLC. | |
| // SPDX-License-Identifier: Apache-2.0 | |
| private fun isBookMode(foldFeature: FoldingFeature) = | |
| foldFeature.state == FoldingFeature.State.HALF_OPENED && | |
| foldFeature.orientation == FoldingFeature.Orientation.VERTICAL |
👉 You can find the full sample code in this post on GitHub.
For more information, you can also check out the references below:
- Support foldable and dual-screen devices with Jetpack WindowManager
- Unbundling the WindowManager
- Migrate your UI to responsive layouts
Using Jetpack WindowManager in Your App
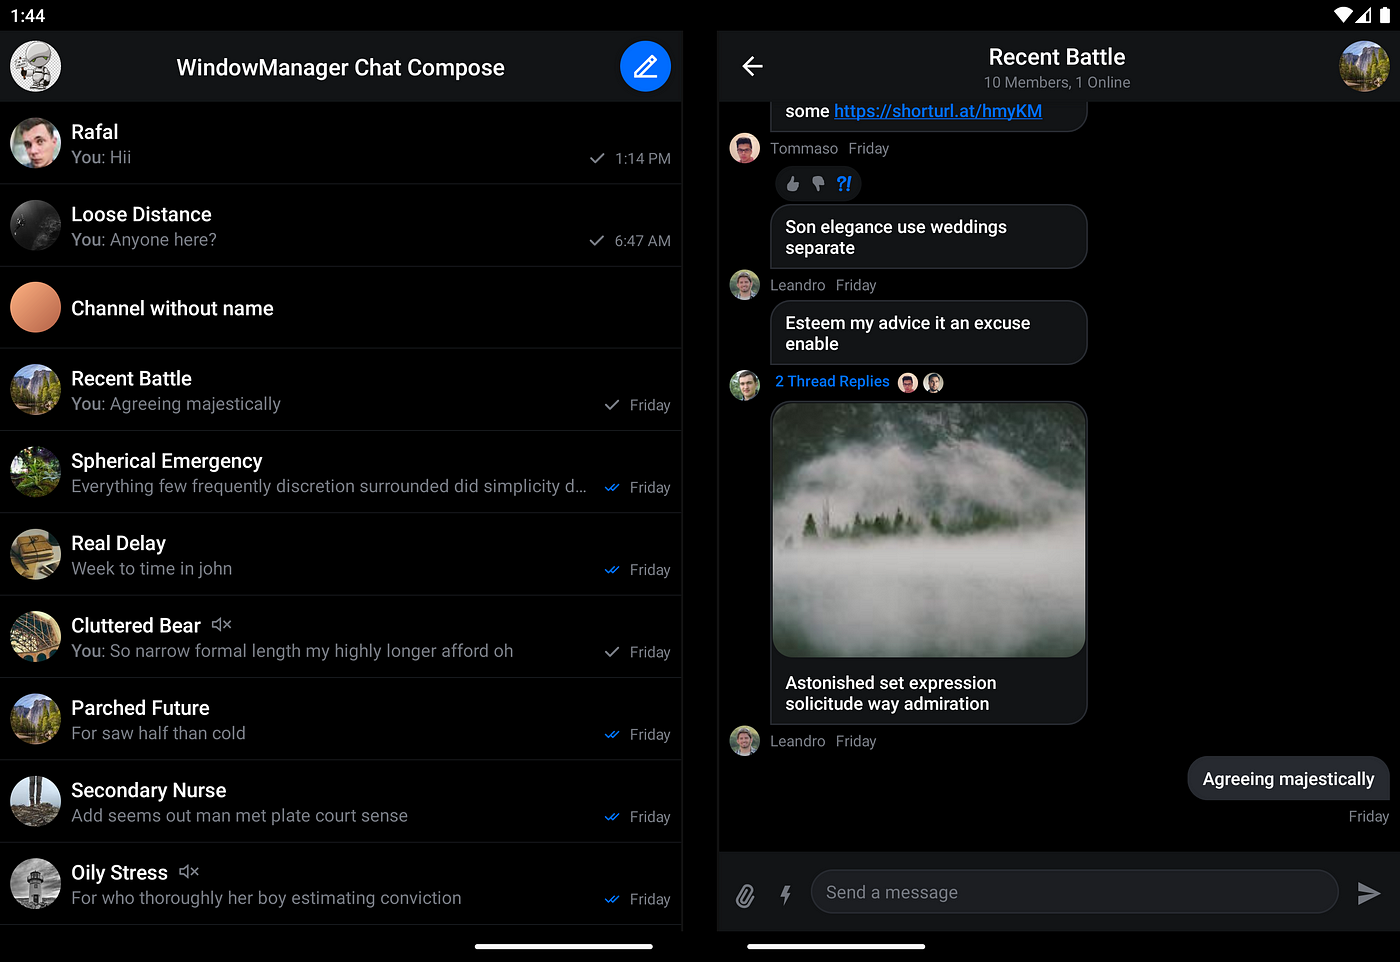
Let’s take a look at how you can use these APIs in our next application. In the screenshot below, you’ll see the the real-world example of the responsive UI with Jetpack WindowManager:
Foldable devices can have flexible screen sizes depending on folded states, so we can build responsive layouts based on specific breakpoints following the different screens. Google’s Material Design suggests some breakpoint guidelines about how content reflows on different screens.
Following the Material Design guidance, we can calculate the screen sizes and define breakpoints of the folding states with the code below:
| // Copyright 2022 Google LLC. | |
| // SPDX-License-Identifier: Apache-2.0 | |
| sealed class WindowSize(val size: DpSize) { | |
| class Compact(windowDpSize: DpSize) : WindowSize(windowDpSize) | |
| class Medium(windowDpSize: DpSize) : WindowSize(windowDpSize) | |
| class Expanded(windowDpSize: DpSize) : WindowSize(windowDpSize) | |
| } | |
| fun getWindowSizeClass(windowDpSize: DpSize): WindowSize = when { | |
| windowDpSize.width < 0.dp -> throw IllegalArgumentException("Dp value cannot be negative") | |
| windowDpSize.width < 600.dp -> WindowSize.Compact(windowDpSize) | |
| windowDpSize.width < 840.dp -> WindowSize.Medium(windowDpSize) | |
| else -> WindowSize.Expanded(windowDpSize) | |
| } |
If you’re using Jetpack Compose to build UIs on your app, you can observe the screen size with the following example:
| /** | |
| * Copyright 2022 Google LLC. | |
| * SPDX-License-Identifier: Apache-2.0 | |
| * | |
| * Remembers the [WindowSize] class for the window corresponding to the current window metrics. | |
| */ | |
| @Composable | |
| fun Activity.rememberWindowSizeClass(): WindowSize { | |
| // Get the size (in pixels) of the window | |
| val windowSize = rememberWindowSize() | |
| // Convert the window size to [Dp] | |
| val windowDpSize = with(LocalDensity.current) { | |
| windowSize.toDpSize() | |
| } | |
| // Calculate the window size class | |
| return getWindowSizeClass(windowDpSize) | |
| } | |
| /** | |
| * Remembers the [Size] in pixels of the window corresponding to the current window metrics. | |
| */ | |
| @Composable | |
| private fun Activity.rememberWindowSize(): Size { | |
| val configuration = LocalConfiguration.current | |
| // WindowMetricsCalculator implicitly depends on the configuration through the activity, | |
| // so re-calculate it upon changes. | |
| val windowMetrics = remember(configuration) { | |
| WindowMetricsCalculator.getOrCreate().computeCurrentWindowMetrics(this) | |
| } | |
| return windowMetrics.bounds.toComposeRect().size | |
| } |
The rememberWindowSizeClass() stores the WindowSize object in the Composition, and it will be updated if screen size changes. So you can build the responsive UIs with the example below:
| MessagingScreen(windowSize = rememberWindowSizeClass()) | |
| // Draws different UIs depending on the WindowSize. | |
| @Composable | |
| fun MessagingScreen(windowSize: WindowSize) { | |
| when (windowSize) { | |
| is WindowSize.Expanded -> MessagingScreenExpanded(windowSize) | |
| else -> MessagingScreenRegular() | |
| } | |
| } |
👉 You can find the full sample codes in this post on GitHub. This real-world example was built with Stream’s Jetpack Compose API, so check it out if you have further interest.
Conclusion
In this article, you learned how to set up the foldable emulator and the Jetpack WindowManager to build responsive UIs. Foldable devices provide a larger screen, which provides a more immersive user experience that improves productivity. So you can provide better user experiences by supporting responsive UIs for your Android application.
Again, you can find the full sample codes with examples in this article on GitHub.
To learn more about the foldable devices and how to use them, take a look at this Learn about foldables piece.
In case you have any feedback on this article, reach the team on Twitter @getstream_io or the author @github_skydoves.
And as always, happy coding!— Jaewoong
Originally published at https://getstream.io.

