


In this article, we will discuss everything about notifications and show you how you can use different notifications with examples.
Topics to cover:
- Notification Channels
- Requesting Notification Permission
- Simple Notification
- Add Action in a Notification
- Add direct reply action in the Notification
- Add Progress Bar in Notification
- Starting an activity from a Notification
- Expanded Notification
- Time-sensitive Notification
- Notification Groups
- Notification Badge
- Custom Notification
- Bubbles
What is a Notification in android?
A notification is a message that android provides outside your app’s UI to provide information about reminders, alerts, communication from other people, or other timely information from your app.
Before starting, create a new Android Project.
You can check out the code here.
1. Notification Channels :
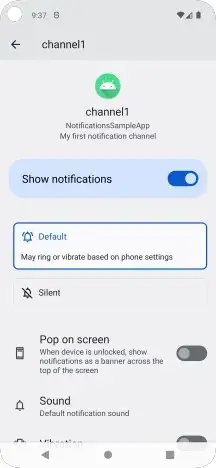
It is a representation of settings that applies to a group of notifications. You can consider it like different categories of notifications which you can configure separately. You can give different categories of notifications with different behavior.
Starting from Android 8.0(Oreo) you need to assign notifications with a notification channel.
Note: if you don’t provide a channel. you will not get notification from android 8 and above. so please make sure to provide a channel.
Let’s see how we create a notification channel:
- Create an object of NotificationChannel and give it a unique id, a name, and an importance level. You can pass a description text that will be shown in the system settings for that notification channel.
| fun createNotificationChannel() { | |
| if (Build.VERSION.SDK_INT > Build.VERSION_CODES.O) { | |
| val notificationChannel = NotificationChannel( | |
| "channel_id_1", | |
| "channel1", | |
| NotificationManager.IMPORTANCE_DEFAULT | |
| ) | |
| } | |
| } |
make sure to guard it with version check as it is only applicable from Android 8 onwards.
2. Now register this channel using NotificationManger.
| fun createNotificationChannel() { | |
| if (Build.VERSION.SDK_INT > Build.VERSION_CODES.O) { | |
| val notificationChannel = NotificationChannel( | |
| "channel_id_1", | |
| "channel1", | |
| NotificationManager.IMPORTANCE_DEFAULT | |
| ) | |
| notificationChannel.description = "My first notification channel" | |
| val notificationManager = getSystemService(NOTIFICATION_SERVICE) as NotificationManager | |
| notificationManager.createNotificationChannel(notificationChannel) | |
| } | |
| } |
3. Now call this method in onCreate() as you should register Notification Channels before showing notifications to users.
| override fun onCreate(savedInstanceState: Bundle?) { | |
| super.onCreate(savedInstanceState) | |
| setContent { | |
| ... | |
| } | |
| createNotificationChannel() | |
| } |
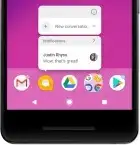
Now, run the app and check the settings of the app.
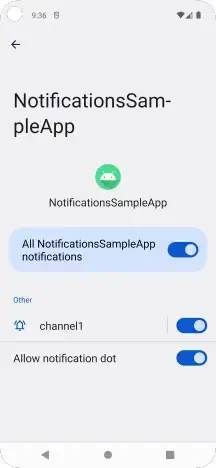
now, you see a notification channel has been created. If you click on the channel you will find different settings of that channel which I mentioned earlier.
So, the user can enable/disable sound, vibrations, etc.
2. Requesting Notification Permission :
Starting from Android 13 and above. you need to ask runtime permission to show a notification. You need to ask for POST_NOTIFICATIONS permission.
<uses-permission android:name="android.permission.POST_NOTIFICATIONS"/>
add this permission in your Manifest.xml file.
Now, ask this permission to enable.
I am using the accompanist library for easy handling of permission provided by google.
implementation "com.google.accompanist:accompanist-permissions:0.27.1"
Now, ask for permission
| class MainActivity : ComponentActivity() { | |
| override fun onCreate(savedInstanceState: Bundle?) { | |
| super.onCreate(savedInstanceState) | |
| setContent { | |
| NotificationsSampleAppTheme { | |
| Surface( | |
| modifier = Modifier.fillMaxSize(), | |
| color = MaterialTheme.colors.background | |
| ) { | |
| if (Build.VERSION.SDK_INT >= Build.VERSION_CODES.TIRAMISU) { | |
| Column( | |
| verticalArrangement = Arrangement.Center, | |
| horizontalAlignment = Alignment.CenterHorizontally | |
| ) { | |
| RequestNotificationPermission() | |
| } | |
| } | |
| } | |
| } | |
| } | |
| } | |
| @RequiresApi(Build.VERSION_CODES.TIRAMISU) | |
| @OptIn(ExperimentalPermissionsApi::class) | |
| @Composable | |
| private fun RequestNotificationPermission() { | |
| val notificationPermissionState = | |
| rememberPermissionState(android.Manifest.permission.POST_NOTIFICATIONS) | |
| if (notificationPermissionState.status.isGranted) { | |
| Text("Notification permission Granted") | |
| } else { | |
| Column { | |
| val textToShow = if (notificationPermissionState.status.shouldShowRationale) { | |
| "The notification permission is important for this app. Please grant the permission." | |
| } else { | |
| "notifications not available" | |
| } | |
| Text(textToShow) | |
| Spacer(modifier = Modifier.height(8.dp)) | |
| Button(onClick = { notificationPermissionState.launchPermissionRequest() }) { | |
| Text("Request permission") | |
| } | |
| } | |
| } | |
| } |
You, have to check for the Android version as you should show this for Android 13 and above. for below API 33, it is always granted.

Now, click on the button
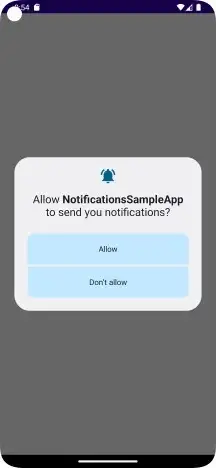
Accept it otherwise you can send notifications to the user.
There are a few exemptions where you don’t need to ask this permission;
- If it is related to Media Sessions.
- If your app is configured to self-manage phone calls
3. Simple Notification :
First, I will show you the anatomy of a notification.
- Small icon: This is required and set with
setSmallIcon(). - App name: This is provided by the system.
- Timestamp: This is provided by the system but you can override it with
setWhen()or hide it withsetShowWhen(false). - Large icon: This is optional (usually used only for contact photos; do not use it for your app icon) and set with
setLargeIcon(). - Title: This is optional and set with
setContentTitle(). - Text: This is optional and set with
setContentText().
Let’s create a simple notification
Step 1: Make sure you are able to import NotificationCompat. if not please add this dependency.
def core_version = "1.6.0"
dependencies {
    implementation "androidx.core:core:$core_version"
}
Step 2: Not you need to create NotificationCompat Builder which helps us to create a notification by adding different fields which are required.
Note: NotificationCompat is used for accessing notification features with backward compatibility. so that you don’t need to add version checks.
| val builder = NotificationCompat.Builder(context, NotificationChannels.CHANNEL1) | |
| .setSmallIcon(com.google.accompanist.permissions.R.drawable.notification_bg) | |
| .setContentTitle(textTitle) | |
| .setContentText(textContent) | |
| .setPriority(NotificationCompat.PRIORITY_DEFAULT) |
You need to have the channel id with you. so that notifications can fall into that particular channel which is required from Android 8 and above. you need to set the priority of notifications for Android 7 and below.
Step 3: Now, you need to hand over this notification to the Android system as showing a notification is not part of your app. Make sure to pass a unique notification id for that notification.
with(NotificationManagerCompat.from(context)) {
    notify(notificationId, builder.build())
}
You are done
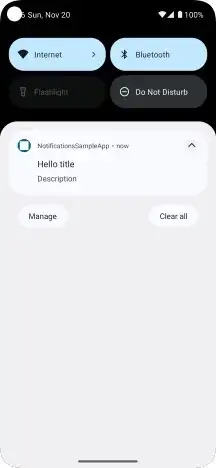
You will see a notification like this.
Updating a Notification:
To update this notification after you’ve issued it, call NotificationManagerCompat.notify() again, passing it a notification with the same ID you used previously. If the previous notification has been dismissed, a new notification is created instead.
Remove a notification:
You can add setAutoCancel to true or use NotificationManagerCompat and call cancel() with notification id
Set lock screen visibility:
To control the level of detail visible in the notification from the lock screen.
you need to call setVisibility() and for Android 8 and above
notificationChannel.lockscreenVisibility = Notification.VISIBILITY_SECRET
There are types of VISIBILITY
VISIBILITY_PUBLICthat show the notification’s full content.VISIBILITY_SECRETdoesn’t show any part of this notification on the lock screen.VISIBILITY_PRIVATEshows basic information, such as the notification’s icon and the content title, but hides the notification’s full content.
4. Add Action in a Notification :
You can add up to 3 actions in a notification.
Let’s see how we can add an action
Step 1: You need a PendingIntent that will contain an Intent it can be an activity, broadcast receiver, etc.
| private fun addAction(context: Context,action: String): PendingIntent { | |
| val intent = Intent(context, MyBroadCastReceiver::class.java) | |
| intent.action = action | |
| return PendingIntent.getBroadcast(context, 0, intent, PendingIntent.FLAG_UPDATE_CURRENT or PendingIntent.FLAG_IMMUTABLE) | |
| } |
I have created a BroadCastReceiver and registered it in Manifest.xml
<receiver android:name=".broadcast_receiver.MyBroadCastReceiver"/>
Step 2: Create MyBroadCastReceiver.kt
| class MyBroadCastReceiver: BroadcastReceiver() { | |
| override fun onReceive(p0: Context?, p1: Intent?) { | |
| val actionString = p1?.action | |
| Log.i("MyBroadCastReceiver",actionString?:"") | |
| } | |
| } |
Step 3: call addAction() on NotificationCompat Builder
builder.addAction(R.drawable.ic_launcher_background ,"Click",addAction(context,"Click Action"))
Now, check the output
When You click it you will get a log with the action string received.
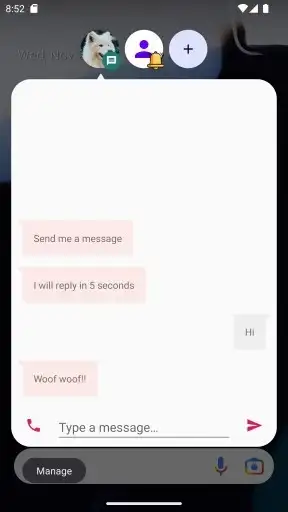
5. Add direct reply action in the Notification :
You might have seen direct replies in Chat Apps where you can add any reply to a conversation. we will be creating that direct reply action.

Step 1: You need to create a RemoteInput. it is used to take response from a user as this input is not part of your app which is why it is Remote like RemoteViews.
| private fun createRemoteInput(): RemoteInput{ | |
| return RemoteInput.Builder(KEY_TEXT_REPLY).run { | |
| setLabel("Add Reply") | |
| build() | |
| } | |
| } |
You need to pass a String Key which we will use later to get the response.
Step 2: Now we will create a PendingIntent as we did above.
| val replyIntent = Intent(context, MyBroadCastReceiver::class.java) | |
| replyIntent.action = "reply_action" | |
| val replyPendingIntent: PendingIntent = | |
| PendingIntent.getBroadcast(context, | |
| 1234, | |
| replyIntent, | |
| PendingIntent.FLAG_UPDATE_CURRENT or PendingIntent.FLAG_MUTABLE | |
| ) |
Step 3: Now create Action Builder which will help us to create a relation between the RemoteInput and PendingIntent.
NotificationCompat.Action.Builder(
        androidx.core.R.drawable.notification_action_background,
        "Reply", replyPendingIntent)
        .addRemoteInput(createRemoteInput())
        .build()
Step 4: Add action to the notification
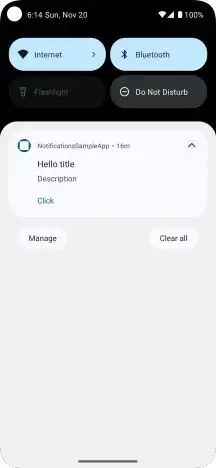
.addAction(replyAction(context))
Let’s see the output
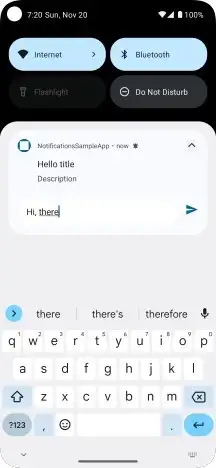
You can see the RemoteInput.
now, when you click send icon. it will keep loading as we have to respond to this response.
Step 5: Now, we will handle fetching reply text and update notification.
| private fun getMessageText(intent: Intent): CharSequence? { | |
| return RemoteInput.getResultsFromIntent(intent)?.getCharSequence(Notification.KEY_TEXT_REPLY) | |
| } |
to get the reply you need to pass the broadcast receiver’s intent and fetch the text.
| override fun onReceive(p0: Context?, p1: Intent?) { | |
| val actionString = p1?.action | |
| if(actionString == "reply_action"){ | |
| val repliedNotification = android.app.Notification.Builder(p0!!, NotificationChannels.CHANNEL1) | |
| .setSmallIcon(androidx.core.R.drawable.notification_bg_low_normal) | |
| .setContentText(getMessageText(p1)) | |
| .build() | |
| NotificationManagerCompat.from(p0).apply { | |
| this.notify(12313, repliedNotification) | |
| } | |
| } | |
| } |
here we are fetching the message and updating the same notification using id.
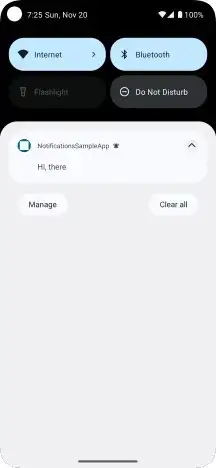
Now, once you click send icon. it will update the notification.
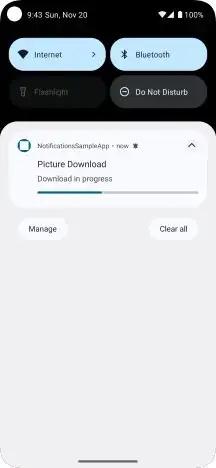
6. Add Progress Bar in Notification :
Now, We will work on showing progress in Notification. You might have seen this on your phone.
Step 1: Create a NotificationBuilder
| val builder = NotificationCompat.Builder(context, NotificationChannels.CHANNEL1).apply { | |
| setContentTitle("Picture Download") | |
| setContentText("Download in progress") | |
| setSmallIcon(com.google.accompanist.permissions.R.drawable.notification_bg) | |
| priority = NotificationCompat.PRIORITY_LOW | |
| } |
Step 2: In builder, you need to setProgress() with the maximum and current progress of the task if you don’t know the progress of the task you can use an indeterminate progress bar.
| val PROGRESS_MAX = 100 | |
| val PROGRESS_CURRENT = 0 | |
| val notificationManagerCompat = NotificationManagerCompat.from(context) | |
| builder.setProgress(PROGRESS_MAX, PROGRESS_CURRENT, false) | |
| notificationManagerCompat.notify(1234, builder.build()) | |
| CoroutineScope(Dispatchers.Default).launch { | |
| for (i in PROGRESS_CURRENT..PROGRESS_MAX step 10) { | |
| builder.setProgress(PROGRESS_MAX, i, false) | |
| notificationManagerCompat.notify(1234, builder.build()); | |
| delay(1000) | |
| } | |
| delay(10000) | |
| builder.setContentText("Download complete") | |
| .setProgress(0, 0, false) | |
| notificationManagerCompat.notify(1234, builder.build()) | |
| } |
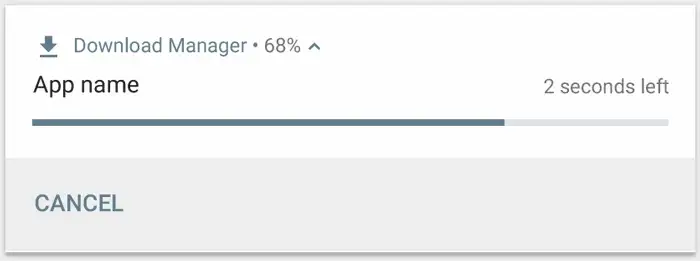
so, to update progress. you need to run a background task and update the progress.
if you call the method. you will see this output.
If you want to show an indeterminate progress bar just call
setProgress(0,0,true)
7. Starting an activity from a Notification :
So, here we will see how we can start an activity with a proper navigation experience for the user. To preserve this navigation experience, you should start the activity with a fresh task. It also depends on the activity you show on the tap of notification.
Regular activity:
This is an activity that exists as a part of your app’s normal UX flow. So when the user arrives in the activity from the notification, the new task should include a complete back stack, allowing them to press Back and navigate up the app hierarchy.
Special activity:
The user only sees this activity if it’s started from a notification. In a sense, this activity extends the notification UI by providing information that would be hard to display in the notification itself. So this activity does not need a back stack. It is specially created for Notification.
First, we take a look at regular activity pending intent.
TaskStackBuilder: it provides a way to obey the correct conventions around cross-task navigation.
To start a “regular activity” from your notification, set up the PendingIntent using TaskStackBuilder so that it creates a new back stack as follows.
Step 1: Define the natural hierarchy for your activities by adding the android:parentActivityName attribute to each <activity> element in your app manifest file.
| <activity | |
| android:name=".MainActivity2" | |
| android:exported="false" | |
| android:label="@string/title_activity_main2" | |
| android:parentActivityName=".MainActivity" | |
| android:theme="@style/Theme.NotificationSampleApp"> | |
| <meta-data | |
| android:name="android.app.lib_name" | |
| android:value="" /> |
Step 2: To start an activity that includes a back stack of activities, you need to create an instance of TaskStackBuilder and call addNextIntentWithParentStack(), passing it the Intent for the activity, you want to start.
| val resultIntent = Intent(context, MainActivity2::class.java) | |
| val resultPendingIntent: PendingIntent? = TaskStackBuilder.create(context).run { | |
| addNextIntentWithParentStack(resultIntent) | |
| getPendingIntent(0, | |
| PendingIntent.FLAG_UPDATE_CURRENT or PendingIntent.FLAG_IMMUTABLE) | |
| } |
Step 3: Create notification builder and setContentIntent with resultIntent.
| fun createNotificationWithBackStack(context: Context){ | |
| val resultIntent = Intent(context, MainActivity2::class.java) | |
| val resultPendingIntent: PendingIntent? = TaskStackBuilder.create(context).run { | |
| addNextIntentWithParentStack(resultIntent) | |
| getPendingIntent(0, | |
| PendingIntent.FLAG_UPDATE_CURRENT or PendingIntent.FLAG_IMMUTABLE) | |
| } | |
| val builder = NotificationCompat.Builder(context, NotificationChannels.CHANNEL1) | |
| .setSmallIcon(com.google.accompanist.permissions.R.drawable.notification_bg) | |
| .setContentTitle("textTitle") | |
| .setContentIntent(resultPendingIntent) | |
| .setContentText("textContent") | |
| .setPriority(NotificationCompat.PRIORITY_DEFAULT) | |
| .setVisibility(VISIBILITY_SECRET) | |
| .addAction( | |
| R.drawable.ic_launcher_background, | |
| "Click", | |
| addAction(context, "click_action") | |
| ) | |
| .addAction(replyAction(context)) | |
| .setAutoCancel(true) | |
| val notificationManagerCompat = NotificationManagerCompat.from(context) | |
| notificationManagerCompat.notify(12345, builder.build()) | |
| } |
Here, When you tap on the notification. you can see no new task has been created but now for Special activities you will see a new task will there.
Let’s start opening a special activity
Step 1: Go to Manifest.xml and add this in MainActivity2.
android:taskAffinity=""
android:excludeFromRecents="true"
task affinity combined with ACTIVITY_NEW_TASK will help not to open activity in an existing task.
excludeFromRecents: this will help you not to find this recent UI after navigating back.
Step 2: Now, create a PendingIntent with intent having flag ACTIVITY_NEW_TASK.
val notifyIntent = Intent(context, MainActivity2::class.java).apply {
    flags = Intent.FLAG_ACTIVITY_NEW_TASK or Intent.FLAG_ACTIVITY_CLEAR_TASK
}
val notifyPendingIntent = PendingIntent.getActivity(
    context, 0, notifyIntent,
    PendingIntent.FLAG_UPDATE_CURRENT or PendingIntent.FLAG_IMMUTABLE
)
Step 3: notify
| fun createNotificationWithSpecialActivity(context: Context){ | |
| val notifyIntent = Intent(context, MainActivity2::class.java).apply { | |
| flags = Intent.FLAG_ACTIVITY_NEW_TASK or Intent.FLAG_ACTIVITY_CLEAR_TASK | |
| } | |
| val notifyPendingIntent = PendingIntent.getActivity( | |
| context, 0, notifyIntent, | |
| PendingIntent.FLAG_UPDATE_CURRENT or PendingIntent.FLAG_IMMUTABLE | |
| ) | |
| val builder = NotificationCompat.Builder(context, NotificationChannels.CHANNEL1) | |
| .setSmallIcon(com.google.accompanist.permissions.R.drawable.notification_bg) | |
| .setContentTitle("textTitle") | |
| .setContentIntent(notifyPendingIntent) | |
| .setContentText("textContent") | |
| .setPriority(NotificationCompat.PRIORITY_DEFAULT) | |
| .setVisibility(VISIBILITY_SECRET) | |
| .addAction( | |
| R.drawable.ic_launcher_background, | |
| "Click", | |
| addAction(context, "click_action") | |
| ) | |
| .addAction(replyAction(context)) | |
| .setAutoCancel(true) | |
| with(NotificationManagerCompat.from(context)) { | |
| notify(123456, builder.build()) | |
| } | |
| } |
So, now you can see the new task and once you press back you will not see the new task in recent.
Jobs
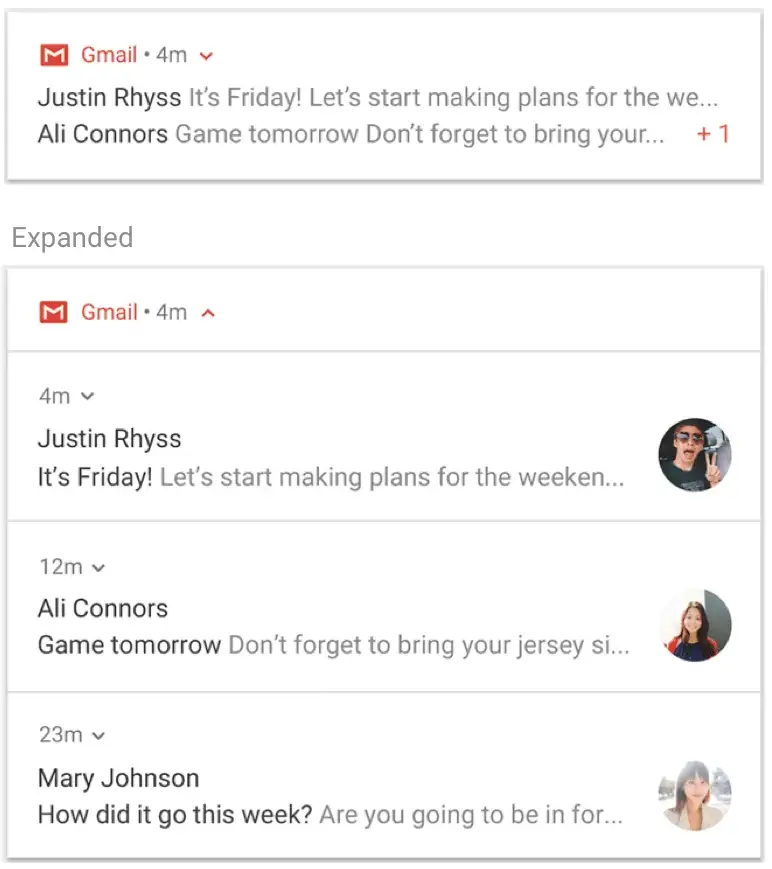
8. Expanded Notification :
If you think your app notification should show more information than Simple Notification. Then we can use Expanded Notification. It is not a new type of notification we will just add style and a few more settings to the notification.
Now, to add a large image in a notification follow this
| fun createNotificationWithLargeIcon(context: Context){ | |
| val icon = BitmapFactory.decodeResource( | |
| context.resources, | |
| R.drawable.aquarium | |
| ) | |
| val notification = NotificationCompat.Builder(context, NotificationChannels.CHANNEL1) | |
| .setSmallIcon(R.drawable.desk) | |
| .setContentTitle("imageTitle") | |
| .setContentText("imageDescription") | |
| .setStyle(NotificationCompat.BigPictureStyle() | |
| .bigPicture(icon)) | |
| .build() | |
| with(NotificationManagerCompat.from(context)) { | |
| notify(1234567, notification) | |
| } | |
| } |
Here, I am using a few images. you can use yours.
You just have to add a style name BigPictureStyle() and add your bitmap.
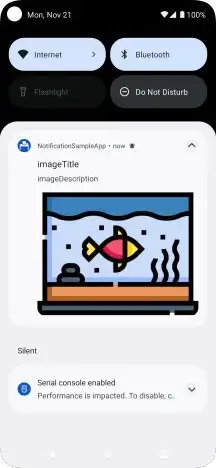
you will see something like this
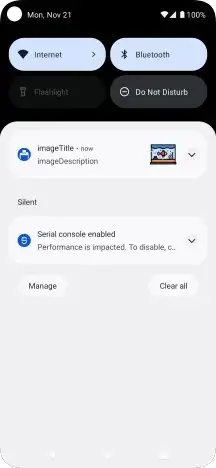
you can add this icon as a thumbnail like this
val notification = NotificationCompat.Builder(context, NotificationChannels.CHANNEL1)
    .setSmallIcon(R.drawable.desk)
    .setContentTitle("imageTitle")
    .setContentText("imageDescription")
    .setStyle(NotificationCompat.BigPictureStyle()
        .bigPicture(icon).bigLargeIcon(null))
    .setLargeIcon(icon)
    .build()
bigLargIcon is null because we don’t want to see this thumbnail in expanded form.
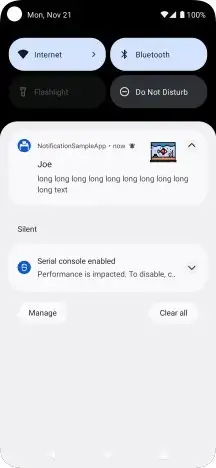
You can add Large Text as well
| fun createNotificationWithLargeText(context: Context){ | |
| val icon = BitmapFactory.decodeResource( | |
| context.resources, | |
| R.drawable.aquarium | |
| ) | |
| val notification = NotificationCompat.Builder(context, NotificationChannels.CHANNEL1) | |
| .setSmallIcon(R.drawable.desk) | |
| .setContentTitle("Joe") | |
| .setContentText("Lending Money") | |
| .setLargeIcon(icon) | |
| .setStyle(NotificationCompat.BigTextStyle() | |
| .bigText("long long long long long long long long long long text ")) | |
| .build() | |
| with(NotificationManagerCompat.from(context)) { | |
| notify(12544567, notification) | |
| } | |
| } |
Next up is, showing conversation text.
| fun createNotificationWithConversationText(context: Context){ | |
| val message1 = NotificationCompat.MessagingStyle.Message("Hi, there", | |
| 12345L, | |
| "Martin") | |
| val message2 = NotificationCompat.MessagingStyle.Message("Hello", | |
| 12345L, | |
| "You") | |
| val notification = NotificationCompat.Builder(context, NotificationChannels.CHANNEL1) | |
| .setSmallIcon(R.drawable.desk) | |
| .setStyle(NotificationCompat.MessagingStyle("Arun") | |
| .addMessage(message1) | |
| .addMessage(message2)) | |
| .build() | |
| with(NotificationManagerCompat.from(context)) { | |
| notify(12544567, notification) | |
| } | |
| } |
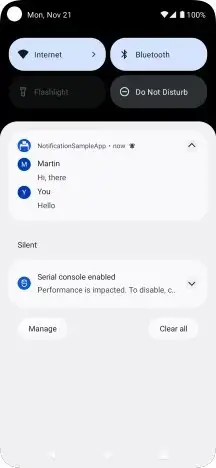
Simple, use MessageStyle and call addMessage() with the message object.
One last is adding media controls as we see in music player apps.
| fun createNotificationWithMediaControl(context: Context){ | |
| val icon = BitmapFactory.decodeResource( | |
| context.resources, | |
| R.drawable.aquarium | |
| ) | |
| val mediaSession = MediaSessionCompat(context,"myTag") | |
| val notification = NotificationCompat.Builder(context, NotificationChannels.CHANNEL1) | |
| .setVisibility(NotificationCompat.VISIBILITY_PUBLIC) | |
| .setSmallIcon(R.drawable.desk) | |
| .addAction(R.drawable.previous, "Previous", null) | |
| .addAction(R.drawable.pause, "Pause", null) | |
| .addAction(R.drawable.next, "Next", null) | |
| .setStyle(androidx.media.app.NotificationCompat.MediaStyle() | |
| .setShowActionsInCompactView(0,1,2) | |
| .setMediaSession(mediaSession.sessionToken)) | |
| .setContentTitle("music_land") | |
| .setContentText("Creative Awesome Band") | |
| .setLargeIcon(icon) | |
| .build() | |
| with(NotificationManagerCompat.from(context)) { | |
| notify(12544567, notification) | |
| } | |
| } |
we need to add this dependency
implementation "androidx.media:media:1.6.0"
So, here as you can see we have added 3 actions in the expanded and collapsed forms of notification.
Simply, add actions as we do in notifications but when adding actions in the collapsed form you use MediaStyle().
For collapsed form, you call setActionsInCompatView() and setMediaSessionToken.
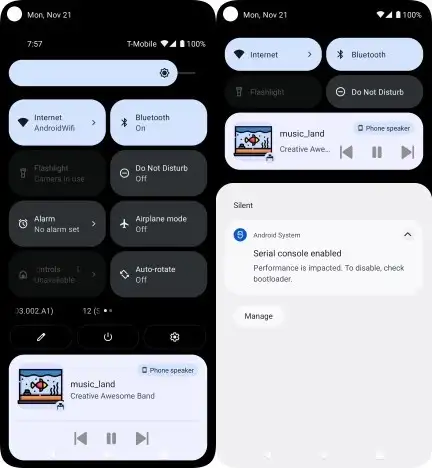
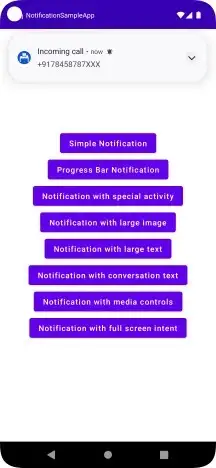
9. Time-sensitive Notification :
When you want to get the user’s attention for some urgent message. you should show time-sensitive notifications.
Step 1: For Android 8 and above you need to set notification channel priority as HIGH and below set notification of priority.
val notificationChannel = NotificationChannel(
    CHANNEL1,
    "channel1",
    NotificationManager.IMPORTANCE_HIGH
)
Step 2: Everything is the same except for one thing
| fun createFullScreenIntentNotification(context: Context){ | |
| val fullScreenIntent = Intent(context, MainActivity2::class.java) | |
| val fullScreenPendingIntent = PendingIntent.getActivity(context, 0, | |
| fullScreenIntent, PendingIntent.FLAG_UPDATE_CURRENT or PendingIntent.FLAG_MUTABLE) | |
| val notificationBuilder = | |
| NotificationCompat.Builder(context, NotificationChannels.CHANNEL1) | |
| .setSmallIcon(R.drawable.desk) | |
| .setContentTitle("Incoming call") | |
| .setContentText("+9178458787XXX") | |
| .setPriority(NotificationCompat.PRIORITY_HIGH) | |
| .setCategory(NotificationCompat.CATEGORY_CALL) | |
| .setFullScreenIntent(fullScreenPendingIntent, true) | |
| val incomingCallNotification = notificationBuilder.build() | |
| with(NotificationManagerCompat.from(context)) { | |
| notify(1445457, incomingCallNotification) | |
| } | |
| } |
just setFullScreenIntent instead of setContentIntent.
But if you want to open full-screen intent. use this code for API 27 and above.
| override fun onCreate(savedInstanceState: Bundle?) { | |
| super.onCreate(savedInstanceState) | |
| if (Build.VERSION.SDK_INT >= Build.VERSION_CODES.O_MR1) { | |
| setShowWhenLocked(true); | |
| setTurnScreenOn(true); | |
| } | |
| ... | |
| } |
and for Api 26 and below
val flags = WindowManager.LayoutParams.FLAG_SHOW_WHEN_LOCKED or WindowManager.LayoutParams.FLAG_DISMISS_KEYGUARD or WindowManager.LayoutParams.FLAG_TURN_SCREEN_ON or WindowManager.LayoutParams.FLAG_FULLSCREEN
window.addFlags(flags)
You will see a heads-up notification.
If you lock the screen. you will see your activity opens
10. Notification Groups :
You would have seen this on your phone.
Grouping notifications is very common in new android phones.
If your app sends notifications. you can group them and add a summary notification to them.
you can do this as follows:
Step 1: Create a Notification as always by adding setGroup().setGroup will help to associate similar notifications in a group that you want to be grouped.
val newMessageNotification1 = NotificationCompat.Builder(context, NotificationChannels.CHANNEL1)
    .setSmallIcon(R.drawable.email)
    .setContentTitle("Arun")
    .setContentText("Ooo")
    .setLargeIcon(icon)
    .setGroup(GROUP_KEY_WORK_EMAIL)
    .build()
Step 2: you need to create a summary notification that will help the user to get an idea about the child notifications.
| val summaryNotification = NotificationCompat.Builder(context, NotificationChannels.CHANNEL1) | |
| .setContentTitle("Summary") | |
| .setContentText("Two new messages") | |
| .setSmallIcon(R.drawable.email) | |
| .setStyle(NotificationCompat.InboxStyle() | |
| .addLine("Arun Ooo") | |
| .addLine("Alex Outside") | |
| .setBigContentTitle("2 new messages") | |
| .setSummaryText("arun@example.com")) | |
| .setGroup(GROUP_KEY_WORK_EMAIL) | |
| .setGroupSummary(true) | |
| .build() |
just add the same group string and setGroupSummary to true.
You need to add InboxStyle to support API 24 and below.
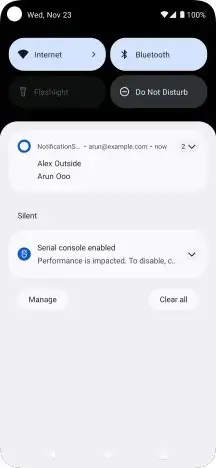
See, this is a summary notification. if you expand it you will see this.

11. Notification Badge :
From Android 8 and above android phone now supports notifications badges.
These dots appear by default in launcher apps that support them and there’s nothing your app needs to do. However, there might be situations in which you don’t want the notification dot to appear or you want to control exactly which notifications appear there.
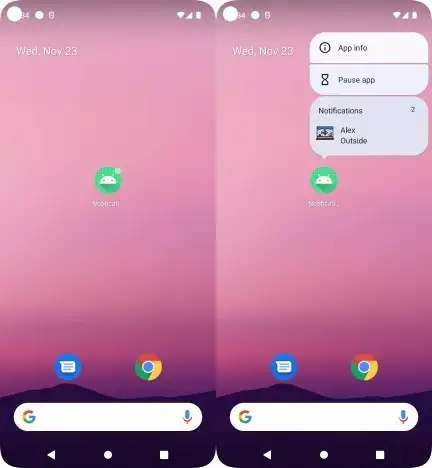
currently, you see a badge.
Disabling a notification badge.
notificationChannel.setShowBadge(false)
Modify Notification Count:
you can change the message count by:
notification.setNumber(messageCount)
12. Custom Notification :
You can create your custom layout notifications but it is not recommended as your app notification will differ from other notifications.
But still to show follow this:
Step 1: create your notification layout
| <?xml version="1.0" encoding="utf-8"?> | |
| <LinearLayout xmlns:android="http://schemas.android.com/apk/res/android" | |
| android:orientation="vertical" | |
| android:layout_width="match_parent" | |
| android:layout_gravity="center" | |
| android:layout_height="match_parent"> | |
| <TextView | |
| android:layout_width="match_parent" | |
| android:layout_height="wrap_content" | |
| android:layout_weight="1" | |
| android:gravity="center" | |
| android:text="TITLE" | |
| android:id="@+id/notification_title" | |
| style="@style/TextAppearance.Compat.Notification.Title" /> | |
| <TextView | |
| android:layout_width="match_parent" | |
| android:layout_height="wrap_content" | |
| android:layout_weight="1" | |
| android:gravity="center" | |
| android:text="TEXT" | |
| android:id="@+id/notification_text" | |
| style="@style/TextAppearance.Compat.Notification.Title" /> | |
| </LinearLayout> |
Step 2: Create an instance of remote view as showing your notification layout is not your app job.
| fun createCustomNotification(context: Context){ | |
| val notificationLayout = RemoteViews(context.packageName, R.layout.notification_small) | |
| val notificationLayoutExpanded = RemoteViews(context.packageName, R.layout.notification_small) | |
| val customNotification = NotificationCompat.Builder(context, NotificationChannels.CHANNEL1) | |
| .setSmallIcon(R.drawable.notification_icon) | |
| .setStyle(NotificationCompat.DecoratedCustomViewStyle()) | |
| .setCustomContentView(notificationLayout) | |
| .setCustomBigContentView(notificationLayoutExpanded) | |
| .build() | |
| with(NotificationManagerCompat.from(context)) { | |
| notify(1445457, customNotification) | |
| } | |
| } |
use DecoratedCustomViewStyle() and setCustomContentView() with your remote view.
12. Bubbles :
Finally, we have come to the last part.
This is a new feature in Android 11.
Using this feature you can communicate with people in a floating window.
Let’s see how we can develop this:
Step 1: First, you need to create an instance of Person.
val person = androidx.core.app.Person.Builder()
    .setName(simpleMessage.sender)
    .setIcon(icon)
    .setImportant(true)
    .build()
Step 2: Now, create an instance of BubbleMetadata.
BubbleMetadata is used to encapsulate the information needed to display a notification as a bubble.
you can configure various properties for when the bubble is expanded.
| private fun createBubbleMetadata( | |
| contentUri: Uri, | |
| icon: IconCompat | |
| ): NotificationCompat.BubbleMetadata { | |
| val bubbleIntent = | |
| PendingIntent.getActivity( | |
| context, | |
| REQUEST_BUBBLE, | |
| Intent(context, MainActivity3::class.java) | |
| .setAction(Intent.ACTION_VIEW) | |
| .setData(contentUri), | |
| PendingIntent.FLAG_UPDATE_CURRENT or PendingIntent.FLAG_MUTABLE | |
| ) | |
| val builder = NotificationCompat.BubbleMetadata.Builder(bubbleIntent, icon) | |
| return builder | |
| .setDesiredHeightResId(R.dimen.bubble_height) | |
| .setAutoExpandBubble(true) | |
| .setSuppressNotification(true) | |
| .build() | |
| } |
here as you can see we need the pendingIntent and icon they can’t be null for BubbleMetadata.you can set the height of the floating window.
Step 3: Create an instance of ShotcutInfoCompat.
ShotcutInfoCompat: this helps you access the features of ShortcutInfo.
A shortcut is basically an action that your app can perform and these shortcuts can be available in the phone launcher.
| private fun createDynamicShortcut( | |
| message: SimpleMessage, | |
| icon: IconCompat, | |
| person: androidx.core.app.Person | |
| ): ShortcutInfoCompat { | |
| return ShortcutInfoCompat.Builder(context, message.id.toString()) | |
| .setLongLived(true) | |
| .setIntent( | |
| Intent(context, MainActivity3::class.java) | |
| .setAction(Intent.ACTION_VIEW) | |
| .setData(createContentUri(message.text)) | |
| ) | |
| .setShortLabel(message.sender) | |
| .setIcon(icon) | |
| .setPerson(person) | |
| .build() | |
| } |
Step 4: Now you need to publish this shortcut via ShortcutManager.
| private fun addDynamicShortcut(shortcut: ShortcutInfo) { | |
| if (atLeastAndroid11()) { | |
| shortcutManager.pushDynamicShortcut(shortcut) | |
| } else { | |
| shortcutManager.addDynamicShortcuts(listOf(shortcut)) | |
| } | |
| } |
Step 5: Now, create a notification builder and pass bubbleMetadata and shortcut id. you need to take care of backward compatibility as well
| private fun getNotificationBuilder(): NotificationCompat.Builder { | |
| return if (Build.VERSION.SDK_INT >= Build.VERSION_CODES.O) { | |
| NotificationCompat.Builder(context, CHANNEL_NEW_BUBBLE) | |
| } else { | |
| NotificationCompat.Builder(context) | |
| } | |
| } |
| with(builder) { | |
| setContentTitle( | |
| context.resources.getString( | |
| R.string.message_from, | |
| simpleMessage.sender | |
| ) | |
| ) | |
| setSmallIcon(R.drawable.ic_stat_notification) | |
| setCategory(android.app.Notification.CATEGORY_MESSAGE) | |
| setContentIntent( | |
| PendingIntent.getActivity( | |
| context, | |
| REQUEST_CONTENT, | |
| Intent(context, MainActivity3::class.java) | |
| .setAction(Intent.ACTION_VIEW) | |
| .setData(contentUri), | |
| PendingIntent.FLAG_UPDATE_CURRENT or PendingIntent.FLAG_MUTABLE | |
| ) | |
| ) | |
| setShowWhen(true) | |
| } |
Step 6: call the method by passing data.
BubbleNotificationView(context).showNotification(
    Message(
        123,
        "Arun",
        "Hello",
        R.drawable.ic_base_person
    )
)
Step 7: Make sure to add these properties resizeable and embedded. On devices running Android 10, notifications are not shown as bubbles unless you explicitly set documentLaunchMode to "always"
| <activity | |
| android:name=".MainActivity3" | |
| android:allowEmbedded="true" | |
| android:resizeableActivity="true" | |
| android:documentLaunchMode="always" | |
| android:theme="@style/Theme.AppCompat.Light" | |
| android:exported="false"> | |
| <meta-data | |
| android:name="android.app.lib_name" | |
| android:value="" /> | |
| </activity> |
Now, if you run the app.
https://gfycat.com/achingshorttermhoki
Now, we have come to the end of the article.
You can check out the code here.
Thank You for reading.
Thanks to Mario Sanoguera de Lorenzo
This article was originally published on proandroiddev.com


