

 Photo by Brian Jackson from Adobe is used
Before we start it’s assumed that you’re familiar with basic concepts of the Jetpack Navigation Component, such as NavHostFragment, NavController, and a Navigation Graph. At the end of this article, you will know how to manually implement the navigation component and support multiple back stacks using a custom toolbar and bottom navigation. We will use the latest stable version of the Jetpack Navigation Component. Currently, it’s 2.5.3. So add the following dependency in your build.gradle file, and let’s start.
dependencies {
    implementation 'androidx.navigation:navigation-fragment-ktx:2.5.3'
}
Navigation UI
The Navigation Component includes theNavigationUI class. This class contains static methods, for instance, setupWithNavController(), that manages navigation with the top app bar, the navigation drawer, and the bottom navigation view. Let’s give it a try and observe how it performs. Also, we’ll set the app:defaultNavHost to true to tell the NavHost to handle the system back navigation for us.
The GIF below shows a simple implementation of the NavigationUI.

Multiple back stacks implementation with the NavigationUI
Here is a code snippet that shows how easy it’s been done.
override fun onCreate(savedInstanceState: Bundle?) {
    super.onCreate(savedInstanceState)
    setContentView(R.layout.navigation_activity)
    setSupportActionBar(toolbar)
    setupActionBarWithNavController(navController, appBarConfiguration)
    bottomNav.setupWithNavController(navController)
}
Also, there is the NavigationAdvancedSample repository that you can check from the Android Architecture Components samples.
Strange things…
Two strange things are happening in the GIF above. Let’s see what I mean precisely by performing the following actions in this sequence.
- Open the app
- Click on one of the items (e.g.,
Ethereum) - Click on the
Profiletab - Click on the
Notificationsbutton - Trigger the system back navigation twice
- Click on the
Hometab
By opening the app, we landed in the Home tab with the TradingFragment destination. When the Ethereum item is clicked, the destination is changed to CoinDetailFragment, which also belongs to the HomeGraph. The Profile tab click changes the graph. Now let’s see what happened when we performed the system back navigation.
- The
NotificationsFragmentis popped from the back stack, which is okay. After a second back navigation action, theHometab is selected, and theTradingFragmentscreen is shown. But wait!!! When we selected theProfiletab, theCoinDetailFragmentscreen was a current destination in theHomeGraph. So why are we back to the start destination? - One more thing happens when we click on the selected
Hometab again. It navigates to theCoinDetailFragmentscreen. That’s strange, at least. - As a common behavior, I want to go back to the start destination of the corresponding navigation graph when I reselect the same tab, which is not implemented by default in the
NavigationUI. Such a common behavior has apps like Instagram, Youtube, Slack, Gmail, etc.
If you’re okay with this behavior and using the Material Design, then it will be wise to use the NavigationUI. Otherwise, you should implement it manually because it is impossible to tell the NavigationUI to change this behavior.
That is the reason to write this article which will explain how we can achieve the desired result using the Jetpack Navigation Component. Also, we will be using our custom view components.
Let’s start!
Let’s assume we have a custom design of the bottom navigation view, and the list of items can be scrolled behind it. It could be a requirement to highlight each bottom navigation item with a custom animation.

Custom bottom navigation view and a list of items that are scrolling behind it
In this case, we must create a custom bottom navigation view, which means we must manually implement all the navigation logic.
We are going to implement the following:
- Manual navigation for custom bottom navigation view that supports multiple back stacks
- Toolbar back button’s visibility changes depending on the currently visible screen
- Toolbar title changes
- Toolbar back button navigation
- System back navigation
Grab a cup of coffee, and let’s start!
Container for each navigation flow
We will create a fragment, let’s name it MainFragment, which will be the screen intended to contain the Main Navigation Host. As shown in the scheme, we will have four container fragments in the Main Navigation Graph.

Main Fragment and Main Navigation Graph
Each container fragment is intended to contain its own NavHost to control its nested screens. There reasonably raises the question, why are we creating four container fragments? We could use four nested navigation graphs instead. The answer is: yes, we could do that. The main reason to use container fragments is that we could have a common logic, views, etc., that a nested flow of screens could use. For instance, let’s assume we need to show/hide a floating action button (FAB) depending on what screen is currently showing. The first thought that may come to mind could be that we should put this FAB in the MainFragment so that the MainFragment will be in charge of controlling the FAB. That is logically true, but what if FAB must be shown/hidden only for some of the screens in the HomeContainerFragment’s children? Check the scheme for Home Navigation below.

Home Fragment and Home Navigation Graph
An example with a FAB is just one case. There could be a common logic for a particular flow of screens. All four container fragments could have different things in common with their children. Putting all that stuff in the MainFragment is unlikely a good solution. So let’s go forward with this solution. We assume that our four container fragments have their nested navigation host, and they are in charge of controlling navigation for their children. The scheme below shows what we will achieve, and of course, we’ll support multiple back stacks.
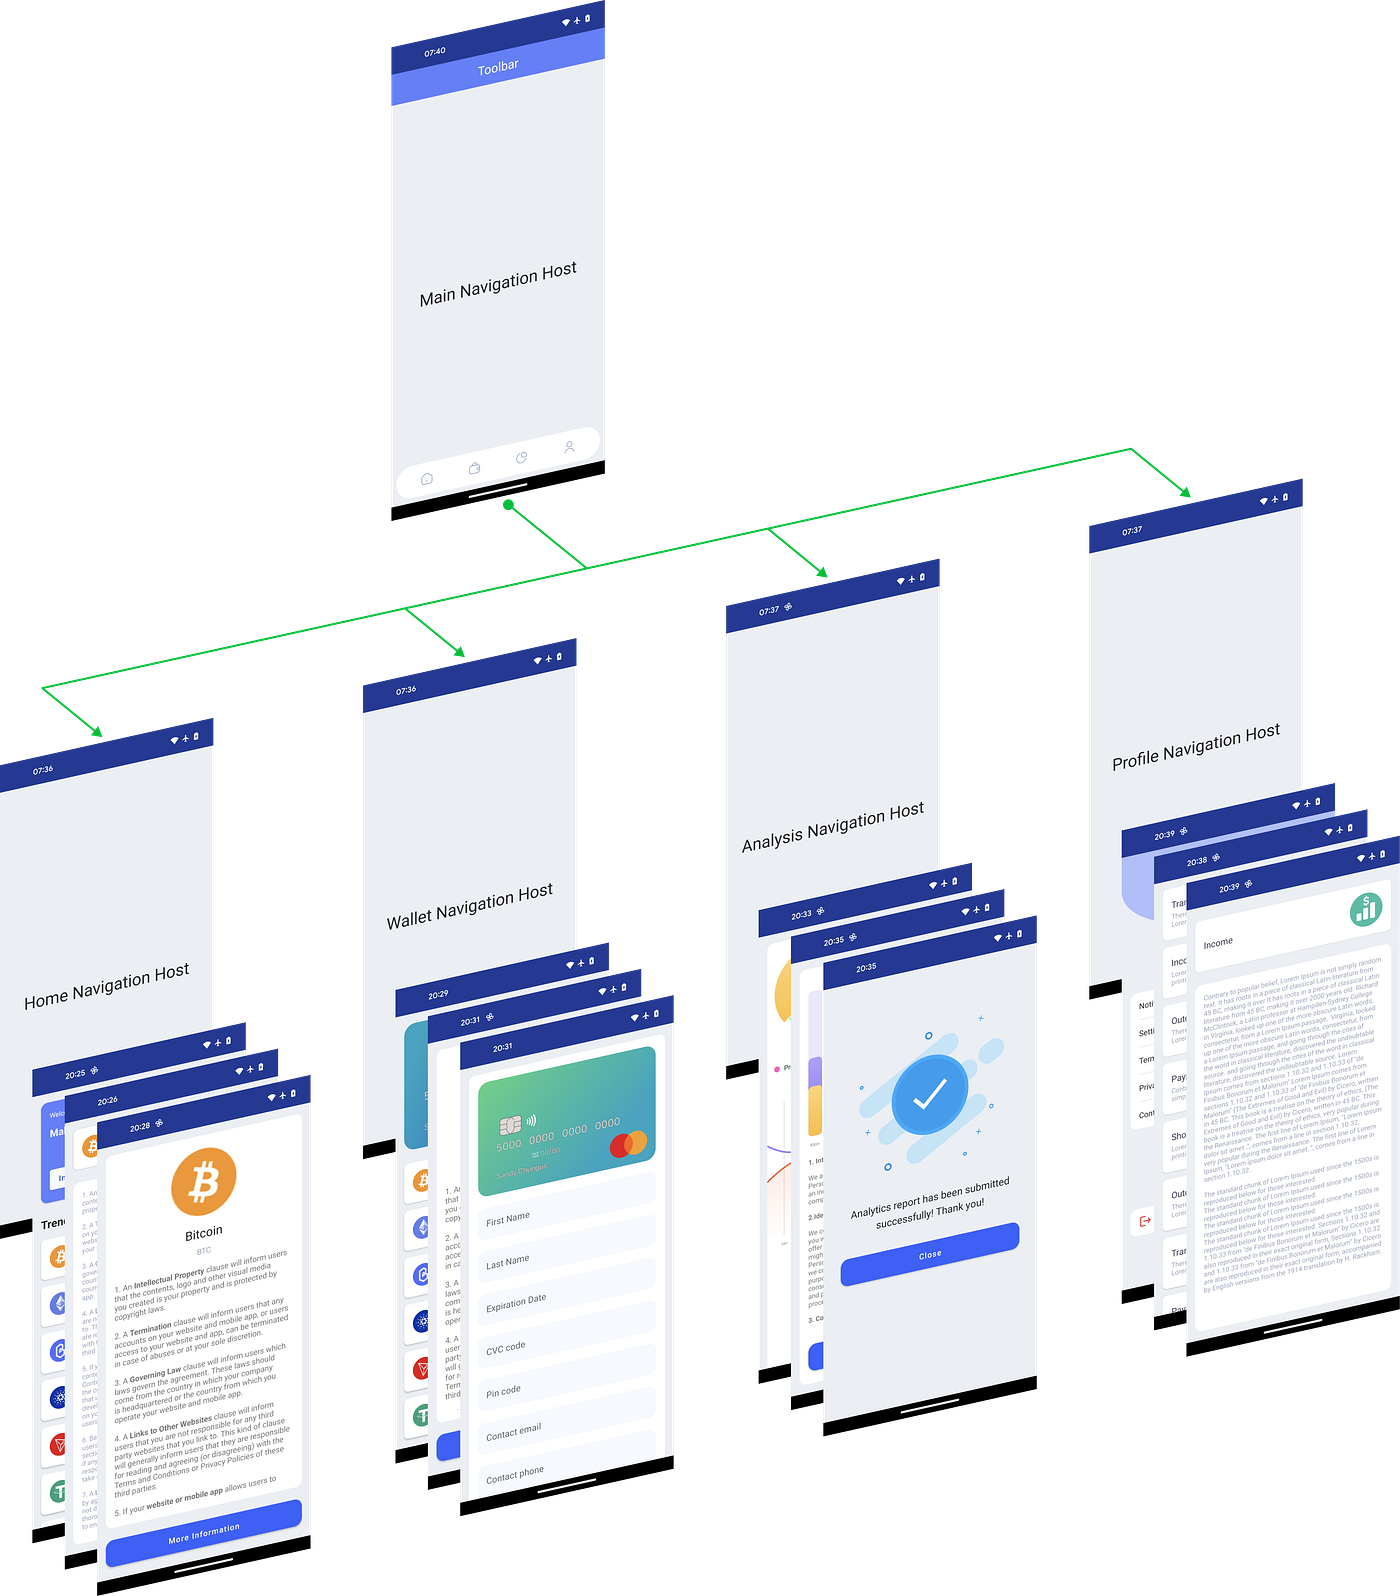
App Navigation Scheme
Support multiple back stacks manually
If an app has a bottom navigation menu, we mostly expect the behavior described below:
Let’s consider the “App Navigation Scheme” above.
- By opening an app, the user should be routed to the
StartDestination, which isTradingFragmentin theHomeNavigationGraph. - Then the user navigates within the
HomeNavigationGraphtoCoinHistoryFragment. - Then the user clicks on the
Wallettab and navigates to theWalletFragmentin theWalletNavigationGraph. - Then the user navigates within the
WalletNavigationGraphtoChangeCardInfoFragment. - Finally, by tapping on the
Hometab, the user should see theCoinHistoryFragment, but not theStartDestinationofHomeNavigationGraph.
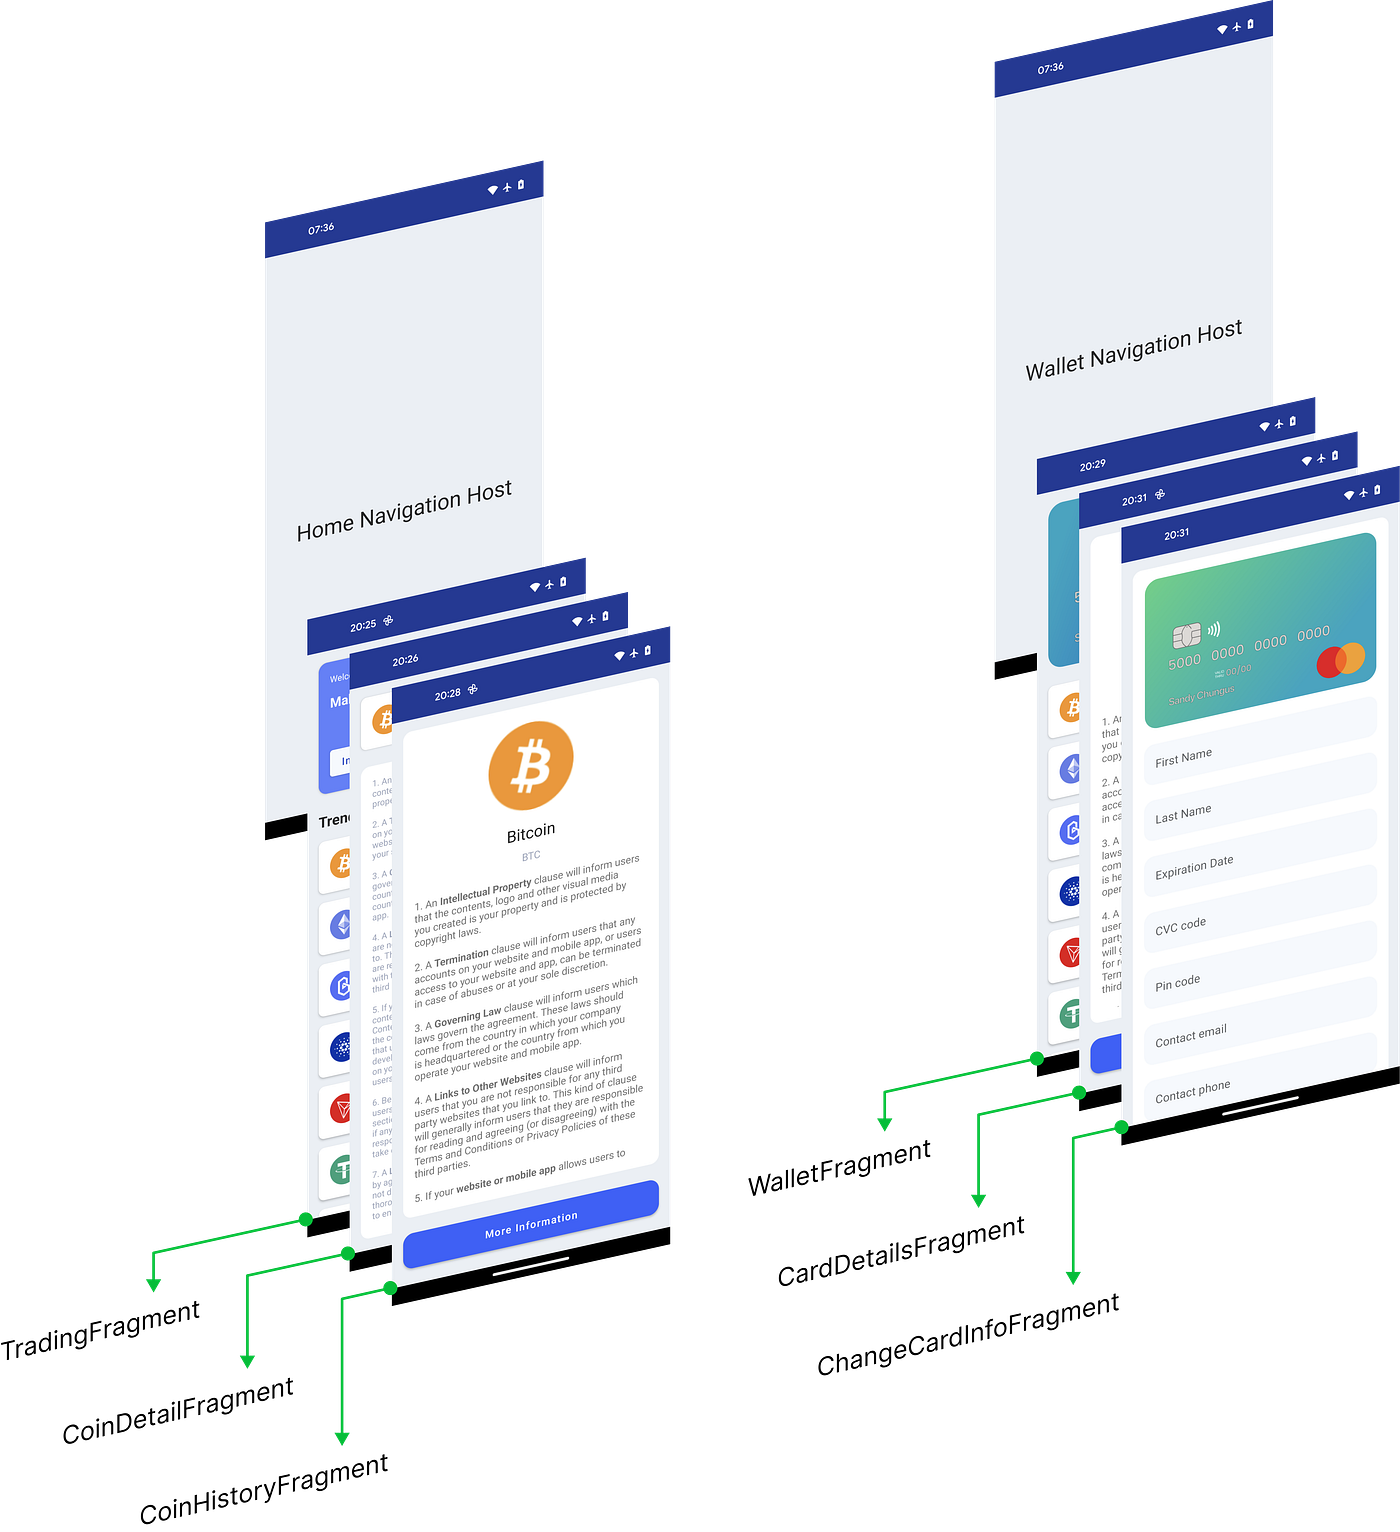
Fragments of Home and Wallet Graphs
OUR VIDEO RECOMMENDATION


Jobs
To implement such functionality, we should support multiple back stacks manually.
The Navigation component only provides multiple back stacks support in version 2.4.0 and higher.
A few key things have been added in Jetpack Navigation Component recently to support multiple back stacks.
<action
  android:id=”@+id/swap_stack”
  app:destination=”@id/second_stack”
  app:restoreState=”true”
  app:popUpTo=”@id/first_stack_start_destination”
  app:popUpToSaveState=”true” />
Here is the explanation that official documentation provides
When a navigation action needs to move the user from one back stack to another, set both
app:popUpToSaveStateandapp:restoreStatetotruein the corresponding<action>element. That way, the action saves the state of the current back stack while also restoring the previously saved state of the destination back stack, if it exists.
It looks pretty easy, huh?!
Yes, actually, it is. We just have to define a global action for each container fragment in the Main Navigation Host and use the action ID to navigate. But in our case, we have to do it programmatically, because we’re changing restoreState and saveState values dynamically. The code snippet below shows how this has been done for our example.
private fun navigateTo(destinationId: Int, navController: NavController) {
    val shouldSaveAndRestoreState = navController.currentDestination?.id != destinationId
    navController.navigate(destinationId, null, navOptions {
        launchSingleTop = true
        restoreState = shouldSaveAndRestoreState
        popUpTo(navController.graph.findStartDestination().id) {
            saveState = shouldSaveAndRestoreState
        }
    })
}
The launchSingleTop = true means that there will be, at most, one copy of a given destination on the top of the back stack. Actually, it works similarly to android.content.Intent.FLAG_ACTIVITY_SINGLE_TOP works with activities.
As you can see, we also have the shouldSaveAndRestoreState local property, which is responsible for whether we should restore the state or not. Let’s imagine the user navigated to the SuccessReportFragment within the AnalysisNavigationGraph, which is the third fragment in this case. Then the user clicks on the Analysis tab once again. In this case, we want the user to see this particular navigation graph’s start destination. To achieve this, we need not restore the state for the current navigation graph so that it will navigate to its start destination. The GIF below shows the multiple back stacks in action and handling the second click on the already selected tab.

Multiple back stacks in action
There is another way to do the same navigation logic when the user clicks on the selected tab again. We can pass that event to the corresponding container fragment so it’ll handle that navigation.
Custom Toolbar and BottomNavigationView state changes
Meanwhile, the Toolbar and BottomNavigationView, material design components provided by Google, automatically handle menu items highlighting and toolbar title, and back arrow state changes. We should do this work manually. We can use OnDestinationChangedListener to implement this functionality.
We will use OnDestinationChangedListener in the MainFragment to properly handle menu items highlighting. All the custom animations (if any) related to highlighting menu items could be done here.
private fun addDestinationChangeListener() {
    navController.addOnDestinationChangedListener { controller, destination, arguments ->
        destination.hierarchy.forEach {
            // Highlight menu items here
        }
    }
}
We’ll also use OnDestinationChangedListener in each container fragment (e.g., ProfileContainerFragment) to change the toolbar title or back arrow visibility. Check the example code snippet below:
private fun addDestinationChangeListener() {
    navController.addOnDestinationChangedListener { controller, destination, arguments ->
        destination.hierarchy.forEach {
            submitToolbarTitle(it.id)
            configureBackNavigation(it.id)
        }
    }
}
To change the toolbar title or back arrow visibility, we’ll use the destinationId. It could be done this way:
private fun submitToolbarTitle(destinationId: Int) = when (destinationId) {
    R.id.profileFragment -> R.string.profile
    R.id.settingsFragment -> R.string.settings
    R.id.contactUsFragment -> R.string.contact_us
    R.id.notificationsFragment -> R.string.notifications
    R.id.privacyPolicyFragment -> R.string.privacy_and_policy
    R.id.termsConditionsFragment -> R.string.terms_and_conditions
    R.id.notificationDetailsFragment -> R.string.notification_details
    else -> null
}?.let(mainGraphViewModel::submitToolbarTitle)
Our toolbar is in the MainFragment, and we must somehow pass the information from container fragments to the MainFragment. For this purpose, I have chosen to go forward with a ViewModel that is scoped to the MainFragment. Finally, we will get the same ViewModel instance in the MainFragment as well as in container fragments.
The system back navigation
We need more control over the system back navigation to achieve a desirable result, and therefore we should implement it manually. To do so, we are going to use the OnBackPressedDispatcher. The behavior we’re going to achieve is shown below:
Implementation of custom system back navigation
When the system back navigation is performed, depending on the current state, we will do the following:
- If the current destination for a particular container fragment is other than the
StartDestinationfor its graph, the system back navigation should pop to theStartDestination. - If the current destination for a particular container fragment is the
StartDestinationfor its graph, the system back navigation should bring us to theStartDestinationwithin theMainGraph(with its state restored). - If the current destination is the
StartDestinationfor theMainGraph, in our case, it will be theHomeContainerFragment, and the current destination is other than theStartDestinationwithin theHomeGraph, then the system back navigation will bring us to theStartDestinationof theHomeGraph. - If the current destination is the
StartDestinationfor theMainGraph, in our case, it will be theHomeContainerFragment, and the current destination is theStartDestinationwithin theHomeGraph, then the Activity’s back navigation should work.
Each container fragment will be in charge of handling the system back navigation within its NavHost. But once it reaches its start destination, it’ll pass the ability to handle the system back navigation to the MainFragment. To get it worked, we will create an onBackPressedCallback into each container fragment and change the onBackPressedCallback.isEnabled value depending on the current destination on the OnDestinationChangedListener.
private fun addDestinationChangeListener() {
    navController.addOnDestinationChangedListener { controller, destination, arguments ->
        destination.hierarchy.forEach {
            when (it.id) {
                navController.graph.findStartDestination().id -> onBackPressedCallback.isEnabled = false
                navController.graph.id -> Unit
                else -> onBackPressedCallback.isEnabled = true
            }
        }
    }
}
Each container fragment’s onBackPressedCallback implementation looks like the following.
override fun handleOnBackPressed() {
    navController.popBackStack(
        navController.graph.findStartDestination().id,
        false
    )
}
And the final step we are going to implement is the onBackPressedCallback for the MainFragment. In this case, when the system back navigation is performed, it will bring us to the StartDestination of the MainGraph whenever the onBackPressedCallback.isEnabled is true.
override fun handleOnBackPressed() {
    navController.run {
        val startDestinationId = graph.findStartDestination().id
        isEnabled = currentBackStackEntry?.destination?.id != startDestinationId
        if (isEnabled) {
            popBackStack(startDestinationId, false)
        }
    }
}
In addition, if we want the system back navigation to work as same as the toolbar back button, then that could be implemented by changing one line of code as shown below. This change must be implemented for each container fragment’s onBackPressedCallback.
override fun handleOnBackPressed() {
    navController.popBackStack()
}

The system back and the toolbar back button behaves the same
Summary
The NavigationUI covers everyday use cases by providing extension functions. But it’s only possible to use them if your custom view’s parent is NavigationBarView. It’s possible to extend BottomNavigationView or NavigationRailView because they are already children of NavigationBarView. But if you want to use your custom views or have more control over navigation, you must use the underlying API provided by Jetpack Navigation Component. Multiple back stacks support simplifies the boilerplate code we should have written to achieve the same result.
You can check the source codes of this project on GitHub:
This article was originally published on proandroiddev.com on December 30, 2022


