

Stop being afraid of Gradle and make it work for you

As Android developers, we use Gradle on a daily basis to configure our Android projects.
We are used to interacting with:
settings.gradle.ktswhich lists the modules used in a project.build.gradle.ktswhich allows us to configure Plugins and Tasks we want to use, thedependencies, etc… For instance, if you use thecom.android.applicationplugin, you will defineminSdkversion andbuildTypesconfiguration.
Sometimes, we add a new Plugin that “magically” brings new features and new DSLs to configure them.
| plugins { | |
| id("com.android.application") | |
| kotlin("android") | |
| id("com.google.gms.google-services") | |
| id("com.google.firebase.crashlytics") | |
| } |
We are more consumers than producers of these tools. Instead, we could develop our own Tasks and Plugins to fit our needs, making Gradle work for us and help us in our life as Android developers.
Who this article is for
- People who want to automate some tasks.
- People who want to understand how the tools they use daily work.
What you’ll learn
- What is a Task, how to create one, and how to use it.
- What is a Plugin, how to create one, and how to use it.
What will we build?

In this tutorial, we’ll develop a Plugin that copy in a new directory:
- the released APK
- the released Bundle
- the mapping file
The new directory will be named according to the Android application version code.
This Plugin can be useful for versioning your release apps to later easily test app migration or simply test old versions.
We won’t explain the Files management logic of this Plugin to stay focused on the Gradle part. If you want a simple implementation, check this Github Gist to get the code.
Write our first “enhanced” Task
Where to put the code
There are several possibilities:
- Directly in a Gradle module
build.gradle.kt:
- Pros: It’s the easiest way to create a Task. It will be automatically available for use without doing anything else.
- Cons: The Task is not available outside the script it’s defined in, so it’s not good for reusability.
2. In the buildSrc directory:
- Pros: Gradle automatically takes into account scripts inside this directory. Tasks will be available to all modules of the project.
- Pros: Your Task code is separated from where it’s used.
- Cons: A change in
buildSrccauses the whole project to become out-of-date and requires syncing again, even for a small change.
3. Create a standalone project to generate a JAR
- Pros: We can use a plugin like
maven-publishto release it on a repository. - Pros: The compiled Task code is in a JAR, so client project synchronization won’t take time to compile it at each synchronization, unlike in the
buildSrcsolution. - Cons: We have to set up a new project so it’s a little bit longer at the beginning.
Knowing Pro & Cons and for the simplicity of this article, we will write our code in the buildSrc directory but if you want to publish your Plugin, you will have to create a standalone project.
How to create a Task
If it doesn’t exist yet, create a buildSrc directory at the root of your project.
Add a build.gradle.kts containing the code:
| plugins { | |
| `kotlin-dsl` | |
| } | |
| repositories { | |
| // The org.jetbrains.kotlin.jvm plugin requires a repository | |
| // where to download the Kotlin compiler dependencies from. | |
| mavenCentral() | |
| } | |
kotlin-dsl plugin configures everything we need to write Kotlin code in the module.
Our Task will need some parameters to work:
- The location of the module directory the Task is setup in, to be able to retrieve generated release files.
- The app version to create the output directory.
- The directory location where to put the output.
Now, create an abstract class in src/main/kotlin called BundleReleaseFilesTask and put the following code:
| abstract class BundleReleaseFilesTask : DefaultTask() { | |
| @get:InputDirectory | |
| abstract val rootProject: DirectoryProperty | |
| @get:Input | |
| abstract val appVersion: Property<String> | |
| @get:OutputDirectory | |
| abstract val outputDirectory: DirectoryProperty | |
| @TaskAction | |
| fun run() { | |
| // Put File management logic here | |
| } | |
| } |
First, we see the declaration of the 3 parameters our Task needs. There are also a lot of things to explain here:
- A
DefaultTaskis an abstract class that you must extend to create your own Task. - Annotations
@get:Input,@get:InputDirectoryand@get:OutputDirectoryare used to mark which parameters have an impact on the Task output. The goal of these annotations is to skip the Task execution if the output already exists and inputs didn’t change. This is called Incremental build. When you execute a Task and it’s markedUP-TO-DATE, it means it wasn’t executed because the output would have been the same as the existing one. @TaskActionindicates to Gradle which method it has to call when the Task is executed.- Parameters are not primitive types but are Properties. A Property is lazy, the computation of its value is delayed until it’s used. If
appVersionvalue comes from a computation, we will delay its computation until we use it.
To have a mutable Property, a variable has to be abstract. This explains why your Task is an abstract class. Gradle is in charge of providing an implementation of your Task that creates the Properties.
How to use our new Task
Register your Task in the build.gradle.kts of your application module.
| tasks.register<BundleReleaseFilesTask>("bundleReleaseFiles") { | |
| rootProject.set(File(".")) | |
| appVersion.set("1.00.00") | |
| outputDirectory.set(File("build/outputs")) | |
| } |
OUR VIDEO RECOMMENDATION


Jobs
This code needs some explanation.
tasksis a TaskContainer. It allows to manage a set of Task instances. We use it to create our task instance.tasksis directly accessible in a Gradle files.registerallows to define a new Task that will be lazyly created. Thecreatemethod also exists to immediately create and configure a Task but it must be avoided to respect the Task Configuration Avoidance to not slow down the synchronization step.- In the
registermethod call, we set the classpath of our Task class and the name we give to our Task. - Parameters are Properties. We have to call
setto set a value.
How to execute our Task
Now that we have declared our Task, we can execute it. In a terminal, write:
| ./gradlew bundleReleaseFiles |
Here is the output:
| > Task :app:bundleReleaseFiles | |
| BUILD SUCCESSFUL in 2s |
In the case we execute the Task again and none of the inputs or output parameters change, the Task is marked as UP-TO-DATE and it won’t be executed again.
| > Task :app:bundleReleaseFiles UP-TO-DATE | |
| BUILD SUCCESSFUL in 421ms |
Write our first Plugin
We know our custom Task is useful for our needs and so we think to share BundleReleaseFilesTask with other projects.
To have an identical usage everywhere, we want to define its name, its group and set a description to prevent clients from doing so.
To do that, we can create a Plugin that will contain this logic.
Before we continue:
- Remove from your
build.gradle.ktsthe Task registration we previously did. Our Plugin will do the job. - Change the visibility of
BundleReleaseFilesTasktointernalto force clients to apply our Plugin to use the Task.
How to write a Plugin
We put our Plugin code next to our Task in the module buildSrc in src/main/kotlin. Name it BundleReleaseFilesPlugin and put the following code:
| class BundleReleaseFilesPlugin : Plugin<Project> { | |
| override fun apply(target: Project) { | |
| // TODO | |
| } | |
| } |
There are several things to explain here:
Plugin<T>is the interface to implement to create a Plugin. Theapplymethod has to be overriden. It will contain the whole logic. This method is called when the Plugin is applied.Tcan be of several typesProject,Settings andGradle. Here we useProject because we want to add our Task to an Android Application module, so we will apply the Plugin in thebuild.gradle.ktsof this module.
Make our Plugin usable
Before we add any logic to our Plugin, we will see how to make it usable by a Gradle module.
To do that, we use the java gradle plugin. It will help us create the jar containing our Plugin. The Plugin exposes a simple DSL to define:
class: the classpath of our Plugin class.id: the string that will be used to identify the Plugin and apply it in a module.
| gradlePlugin { | |
| plugins { | |
| create("bundleReleaseFiles") { | |
| id = "fr.bowser.bundle_release_files" | |
| implementationClass = "BundleReleaseFilesPlugin" | |
| } | |
| } | |
| } |
In the case we have several Plugins to declare, we would add several blocks in plugins, one for each Plugin.
How to use our new Plugin
To use our Plugin and make Gradle execute the apply method, we have to apply it in the module we want to set it up.
We add it in the builds.gradle.kts of our app, next to other Plugins like Firebase, Google-services and the com.android.application.
| plugins { | |
| ... | |
| id("fr.bowser.bundle_release_files") | |
| } |
Configure Plugin parameters
Our custom Task BundleReleaseFilesTask has some parameters. To make our Plugin work, we have to understand how to get these parameters to pass them to the Task.
We will use what we call an extension. It’s a simple Java/Kotlin bean with properties.
We need the following interface to match our Task parameters.
| interface BundleReleaseFilesPluginExtension { | |
| val appVersion: Property<String> | |
| val outputDirectory: DirectoryProperty | |
| } |
Gradle will be in charge of generating an implementation of this interface.
Note that we could have used an abstract class with abstract properties. It would be the same.
If you have been paying attention, you noticed that the rootProject parameter is not present here. Indeed, we don’t need it because we will retrieve the module path from the target parameter of the apply method.
Now, we create this extension in the apply method of our Plugin.
| class BundleReleaseFilesPlugin : Plugin<Project> { | |
| override fun apply(target: Project) { | |
| val extension = target.extensions.create( | |
| "bundleReleaseFiles", | |
| BundleReleaseFilesPluginExtension::class.java | |
| ) | |
| } | |
| } |
A Project has an ExtensionContainer used to create extensions. We set the name of our DSL and the class of the extension.
After that, we can use the extension variable to get the parameter values.
Now, let’s see how to declare the extension in our client module. Put the following code in the build.gradle.kts where you applied the Plugin.
| bundleReleaseFiles { | |
| appVersion.set("1.00.00") // current app version | |
| outputDirectory.set(File(".", "build/outputs")) | |
| } |
We use the name given at the extension creation to declare the DSL. For the parameters, we do the same thing for the two parameters that we did to declare our Task parameters.
Register BundleReleaseFilesTask in our Plugin
We can finally register our Task. This is the same logic that when we implemented our Task in the build file.
| class BundleReleaseFilesPlugin : Plugin<Project> { | |
| override fun apply(target: Project) { | |
| ... | |
| val bundleReleaseFiles = target.tasks.register( | |
| "bundleReleaseFiles", | |
| BundleReleaseFilesTask::class.java | |
| ) { | |
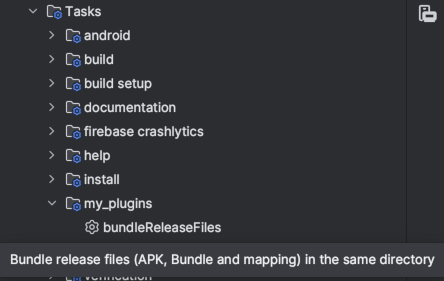
| this.group = "my_plugins" | |
| this.description = "Bundle release files (APK, Bundle and mapping) in the same directory" | |
| } | |
| } | |
| } |
There are 2 new parameters in the call to register the Task:
group: Tasks are grouped according this information. In IntelliJ, the Gradle window allows to see all the available Tasks grouped.description: Explain what the Task does.
After the Task registration, we call configure on its instance to pass the values got from the extension.
| class BundleReleaseFilesPlugin : Plugin<Project> { | |
| override fun apply(target: Project) { | |
| ... | |
| bundleReleaseFiles.configure { | |
| appVersion.set(extension.appVersion) | |
| rootProject.set(target.projectDir) // We get the rootProject from the "target" parameter | |
| outputDirectory.set(extension.outputDirectory) | |
| } | |
| } | |
| } |
For the rootProject Task parameter, we use the parameter target to get the projectDir. That’s why we were able to remove a parameter in our extension compared to our Task.
And that’s it, we configured everything to make our Plugin work. In the modules this plugin is applied, we can now execute the Task bundleReleaseFiles the same way that during the Task development.
| ./gradlew bundleReleaseFiles |
To go further
There are still a lot of subjects to dig in to improve our Plugin:
- How to publish the Plugin to use it in other projects.
- Automatically execute our Task after the generation of the release files by adding dependsOn.
- Have a better DX by providing default parameter values using Convention.
- Improve our DSL to prevent clients to manage Properties and prevent them to call the
setmethod on Properties.
Conclusion
This article was dense and we learned a lot of things:
- Extend
DefaultTaskto create your ownTask. - Use
Propertyto declare lazy parameters that will be computed only when used. - Use annotation
@get:Inputand@get:Outputto use Incremental build and skip unnecessary work. - Implement
Pluginto create your own Plugin. - Use an
Extensionto create a nice DSL to configure your Plugin. - How to use a Task and how to use a Plugin in a Gradle module
With all these knowledge, you should have a clear view of how all the Tasks and Plugins you daily use work, and more importantly, you have now all the keys to create your own piece of logic and make your life easier by automating some work.
If you have any questions or comments, don’t hesitate to write them. It would be a pleasure to answer it.
This article was previously published on proandroiddev.com


