

Posted by: Eakurnikov
So, in the first part, we’re done with checking out UI-test drivers and learning how the most popular of them work. We see that they all solve low-level tasks, i.e. find an element on the screen and execute some action with it. As a result, they provide an expressionless and awkward API that’s inconvenient to use to solve higher-level issues. For example, none of them provide their own mechanism for retrying failed actions or logging. Moreover, we also often have to work in tests with several drivers at once, for example, Espresso and UiAutomator.
Wrappers
This is where wrappers come in. We’ll be using the API of wrappers in our tests, and it’s wrappers that will ultimately provide our final set of procedures for our tests.
Before we explore and compare the most popular wrappers, we need to outline the basic requirements for tests.
Stability. A common issue with all UI testing tools is that none of them ensure fully stable tests. Tests using each of these will flake. In other words, if you run a working test a lot of times under the same conditions, then there are many cases where it may crash. But the reasons for these crashes can be completely unpredictable. You won’t be able to prevent crashes completely, as they’re often caused by instability in the surroundings and test run environment.
But you can still minimize the number of unsuccessful runs. This can often be accomplished by making edits to the test code or application, but sometimes the issue may be caused by the tool used to implement tests. Therefore, when choosing a tool, pay special attention to its principle of operation and estimate the number of potential points of failure it introduces into the overall UI test algorithm.
Multidriver. Our experience has proven to us that tests should use the white box model whenever possible. This ensures a higher speed and stability of their execution compared to black box testing. But sometimes this isn’t an option. Some tests may require functionality that only black box solutions can provide, for example, the ability to work with third-party or system applications. Therefore, our “dream” wrapper should be able to aggregate access to several drivers in its own interface to provide both white box and black box features.
Flexibility. The market is flooded with applications, and each is unique in its own way. Wrapper developers simply aren’t capable of foreseeing every little nuance in advance and can’t provide an exhaustive set of features useful to every user. Therefore, wrappers must have extension points and be flexible and configurable so test developers can easily adapt them to their needs.
Logs. We mentioned earlier that tests will inevitably fail. They won’t just flake, they’ll become outdated, lose their relevance and simply do what they were written to do: crash wherever the application’s behavior differs from what was expected, i.e. find bugs. This means that we’ll have to meditate a lot on failed tests, investigate all the circumstances of incidents, create and test hypotheses, and find and fix issues in the tests and application itself. So we’ll want not only a stacktrace with the error, but also complete logs so after the test we can understand what was going on and what went wrong.
Screenshots. Sometimes logs alone aren’t enough. It’s common to need to see what was actually rendered on the screen when an error occurred. Thus, it’s very helpful when screenshots are attached to logs.
Access to adb. adb is often required from tests, for example, to enable/disable the network, set geolocation, emulate fingerprint operations or use the file system.
Expressive API. Test code is also code, and often quite nontrivial. On the one hand, confusing, cluttered, wordy and imperative test code present a potential source of bugs in the tests and also makes them difficult to maintain. But on the other hand, creative engineers can do amazing things with the allocation of an increasing number of new abstractions, the complexity of manipulating them, and in general with the creation of their own wheels. In our opinion, a wrapper is technically fine if it ensures the uniformity of the test source code structure and provides a clear set of abstractions and use patterns.
Now let’s compare the most popular wrappers based on these criteria.
Appium

Appium is a relatively popular cross-platform open source tool for automating the testing of Android and iOS desktop and mobile apps.
Appium’s architecture is similar to Selenium WebDriver, a widely used wrapper that’s become the standard in web testing. Cross-platform functionality is achieved by using different drivers for different platforms. These drivers translate the client Appium code into commands that are executed on devices directly. Appium provides client libraries with a fixed API for writing tests.
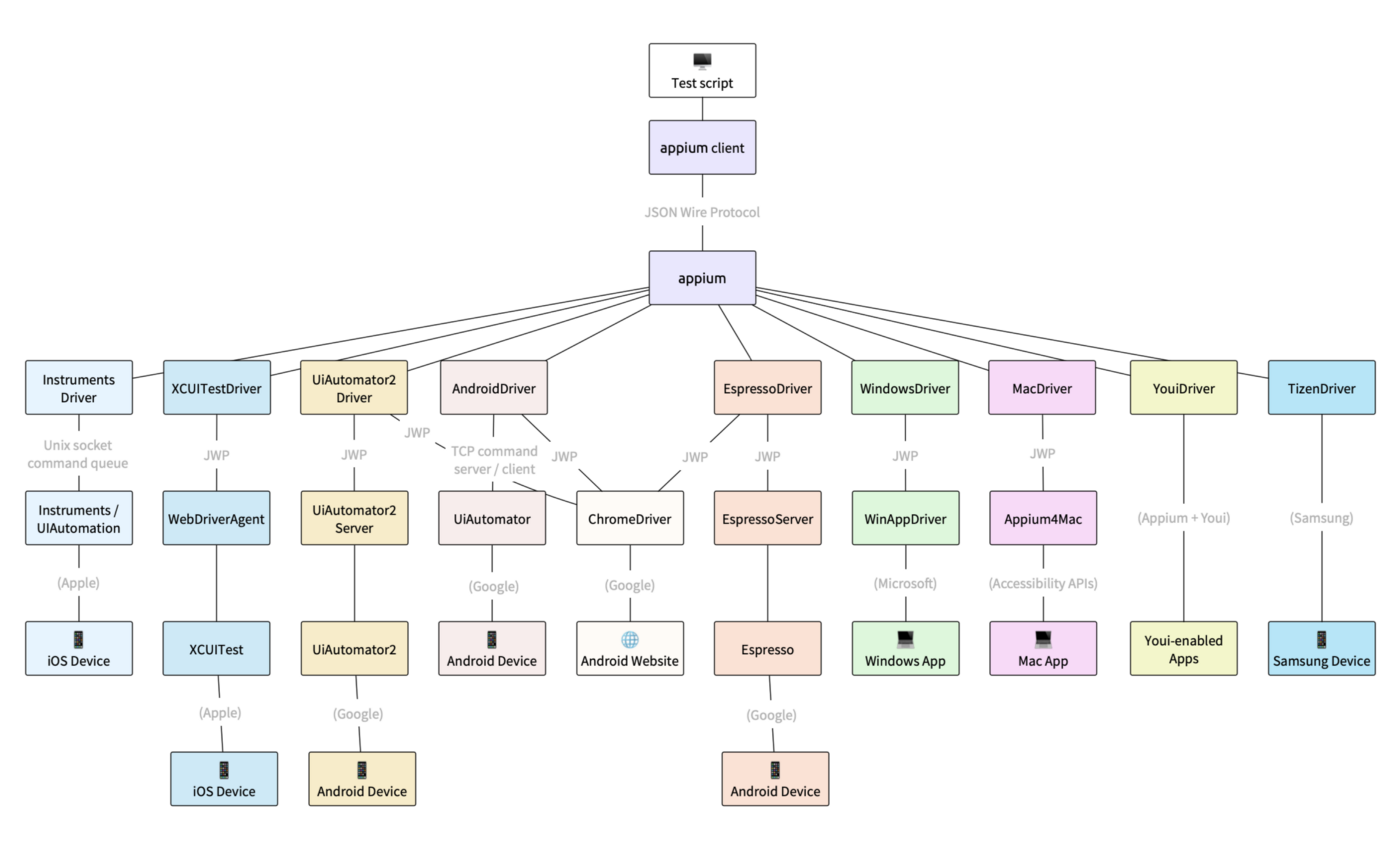
Stability. As you can see in the image, Appium is a rather unwieldy wrapper. In fact, it’s an entire HTTP server in Node.JS that creates and processes WebDriver sessions, where communication with the final command driver on the device actually takes place. But even though this level of complexity helps abstract from the platform, it still negatively affects test speed and stability alike. Appium adds its own overhead to the complex and unwieldy mechanisms hidden in the drivers.
Multidriver. Appium can abstract not only from the platform, but also from the driver used. As for Android, it uses its adapters to broadcast commands not only to UiAutomator’s black box, but more recently to Espresso’s white box as well. The adapter to the driver that will be used in the test is specified during configuration before the test starts.
Expressive API. Appium provides client libraries with a fixed facade API very similar to WebDriver for writing tests. Appium doesn’t offer any architecture for tests, everything is left up to the end developer.
Flexibility. Before starting a test, you can set the configuration, for example, the mobile device OS, its version, device type (real or emulator), the response wait period timeout from the Appium server, language, orientation, and application screen where the test starts. You can also specify which driver will be used before starting a test. However, the flexibility of settings and configuration is limited because the driver’s functionality can’t be extended.
Logs. Appium itself doesn’t provide a tool for logging steps, actions and test checks.
Screenshots. There’s no out-of-the-box feature available, but it’s easy to add one yourself or use three-party tools for this (Allure, the tool for reporting, also provides it’s mechanism to take screenshots).
Access to adb. Thanks to its client-server architecture, Appium has no issues sending adb commands to devices. This is a definitive advantage.
Conclusion. Appium is an impressive choice thanks to its cross-platform functionality. It’s also growing rapidly, with the Espresso being added not that long ago. However, its complicated client-server architecture as a necessary evil to ensure cross-platform functionality impedes high test stability, which coupled with the complexity of initializing test sessions, greatly increases the duration of test suites compared with competitors. Also there is a list of missing features in Appium, but some of them can be added using third-party tools (for example Cucumber, Allure). And for this you also most likely have to do some work and write code to integrate them with Appium. So it turns out that Appium itself needs a wrapper.
It’s also worth mentioning that Appium is a separate and often unfamiliar technology for Android developers. In addition, if your project uses Kotlin, you’ll have to revert to Java for your tests. Appium is often met with opposition from developers because of this fact, which is far from ideal, as based on our experience, it’s the developers who drive the autotesting process. Check out these presentations for more information: “Autotests in Avito: Reasons, How they Help, and What they Cost (RU)”, “How to Start Writing Autotests and Not Go Crazy (RU).”
Kakao

Kakao is a simple and easy to use Kotlin DSL for Espresso. It helps simplify the Espresso test code and increase its readability.
Expressive API. In essence, Kakao is a boilerplate code written for your benefit to support the following two patterns in tests:
- KView is a Kakao representation of an on-screen interface element that’s interacted with during a test. For example, Kakao provides ready-made implementations like KEditText, KButton and more. Users can also add their own.
- Screen is an implementation of the PageObject pattern that came about from web developers. Screen is a base class you can use as the basis to create your own stateless repositories of all KView on the app’s respective screens. It’s recommended to create a separate Screen for each activity, fragment or, for example, dialog of your application. Screens are described in separate files, which means the process of detecting interface elements on the screen is separate from the actual tests.
This architectural approach lets you write declarative tests that are much easier to maintain than bare Espresso tests. Instead of this:
| @Test | |
| public void espressoTest() { | |
| onView(allOf(allOf(withId(R.id.label_bf_hotelname), | |
| isDescendantOfA(withId(R.id.custom_view_trip_review))), | |
| isDescendantOfA(withId(R.id.contentView)))) | |
| .check(matches( | |
| withEffectiveVisibility(Visibility.VISIBLE) | |
| )); | |
| } |
you get this:
| object MainScreen : Screen<MainScreen>() { | |
| val hotelName = KTextView { withId(R.id.label_bf_hotelname) } | |
| } | |
| @Test | |
| fun kakaoTest() { | |
| MainScreen { | |
| hotelName { | |
| isVisible() | |
| } | |
| } | |
| } |
Stability. Kakao is a much thinner wrapper than Appium, so along with its bonuses, it hardly brings in any overhead to your tests. The commands are still executed inside the main thread of the application being tested. All the aspects of Espresso that affect test stability are also inherited, i.e. potential issues with complex asynchronous interfaces, lists, etc.
Multidriver. Kakao only wraps Espresso and is solely a white box with source access and blindness outside of the app undergoing testing.
Flexibility. Kakao implements an interceptor mechanism for extensibility. Users use a special API to inject a call of their own code as soon as a certain Espresso command is executed. This allows users to independently add, for example, waiting or retries of unsuccessful actions to tests. However, you still can’t do anything outside the process of the application being tested.
Logs. Just like in Espresso, there are no ready-made logs available. However, you can add them on your own using interceptors.
Screenshots. Kakao also doesn’t come with a way to take screenshots. You’ll need your own implementation.
Access to adb. None, just like in Espresso.
Conclusion. Thus, Kakao is a handy DSL to help make writing and maintaining Espresso tests easier. But as concerns many mundane tasks, you’ll have to use UiAutomator as well, which no longer has a very expressive API. Over time, you’ll most likely have to write a lot of your own add-ons to expand functionality, for example, for logging and replays.
OUR VIDEO RECOMMENDATION


Jobs
Barista

Barista is a large library with tons of useful solutions and methods for working with Espresso.
Expressive API. Like Kakao, this library is built on top of Espresso. However, Barista is more of a wide range of methods you can use selectively in your Espresso tests. These methods include:
- Convenient and concise helper methods for interacting with interface elements that hide Espresso calls. For example, for a normal button click, instead of onView(withId(R.id.button)).perform(click()) in bare Espresso, we get the simple clickOn(R.id.button) method. Or instead of a bunch of lines of code for clicking on a list item, we just get clickListItem(R.id.list, 4).
- The expanded, Android-specific Assertions API.
- A tool for mocking intent results, albeit thus far only with the camera.
- A tool for working with runtime permissions.
- A huge number of test rules, for example, for restarting flaky tests or clearing shared preferences or databases/deleting files from a device after running a test.
Unlike Espresso, Barista also knows how to work with NestedScrollViewand includes a lot of other useful features. But the library doesn’t provide any special DSL, so the formation of test architecture is up to the user.
Stability. Thanks to the FlakyTestRule mentioned above, users are able to restart failed tests. However, runners usually do a good job of this on their own. The library also lacks a retrace mechanism for individual actions and checks, which wouldn’t force you to restart the entire test every time, saving you time.
Multidriver. Solely a white box because it runs on top of Espresso.
Flexibility. There’s not really much to expand in this library, besides maybe getting inspired and highlighting Espresso working methods in your project. Your freedom here is limited only by Espresso’s functionality.
Logs. There’s no mechanism for logging steps, actions and checks in tests.
Screenshots. There’s also no screenshot capture mechanism.
Access to adb. None, just like in Espresso.
Conclusion. Barista isn’t very well suited to build tests entirely on. It’s more helpful to just use from time to time as a collection of methods you can pick and choose from to solve specific issues. Or you can implement it in your project and manually adapt it to work with other tools.
Kaspresso

A wrapper framework for UI testing that claims to rid the world of evil and aims to become the only dependency for tests in your project (but not yet).
Expressive API. Its creators were inspired by the achievements of Avito engineers and the beauty of Kakao. Kaspresso extends the laconic Kakao DSL by providing its own Kotlin DSL to describe test sections and steps in which Kakao continues to exist with its Screens and KView.
| @RunWith(AndroidJUnit4::class) | |
| class OpenHomeScreenTest : TestCase() { | |
| @Test | |
| fun kaspressoTest() { | |
| before { ... } | |
| .after { ... } | |
| .run { | |
| step("1. Open Home screen") { | |
| MainScreen { | |
| openHomeScreenBtn.click() | |
| } | |
| } | |
| step("2. Check Home title") { | |
| HomeScreen { | |
| title.isVisible() | |
| } | |
| } | |
| step("3. Do some stuff") { ... } | |
| } | |
| } | |
| } |
A lot of work went into Kaspresso API to solve the main issues any autotest developer runs into at one point or another. Proper use of the framework gets people using proven patterns for constructing declarative, maintainable and stable tests (see How to write autotests).
Multidriver. As a wrapper framework, Kaspresso aggregates calls to both Espresso and UiAutomator under its API. Thus, tests using it can work both inside the process of the app being tested, and outside it when necessary. For example, if during a test you need to go to a third-party application or click a notification, this won’t be a problem with Kaspresso. Kaspresso also offers Kautomator, its own Kakao-esque wrapper for working with UiAutomator, which makes calling Espresso and UiAutomator visually indistinguishable for users.
| object KakaoScreen : Screen<KakaoScreen>() { | |
| val title = KTextView { withText(R.string.title1) } | |
| val btn = KButton { withId(R.id.button1) } | |
| } | |
| object KautomatorScreen : UiScreen<KautomatorScreen>() { | |
| val title = UiTextView { withText(R.string.title2) } | |
| val btn = UiButton { withId(pkgName, R.id.button2) } | |
| } | |
| @Test | |
| fun kaspressoTest() { | |
| KakaoScreen { | |
| title.isVisible() | |
| btn.click() | |
| } | |
| KautomatorScreen { | |
| title.isVisible() | |
| btn.click() | |
| } | |
| } |
To interact with the device and operating system, you can use the special device facade. Here’s a short list of what Kaspresso makes possible:
- dial numbers and make calls
- send and read text messages
- work with a file system
- manage network settings, language and geolocation
- install and delete apps during a test
- screenshot capture
- change device orientation
- interact with hard buttons: back, home, recents.
Kaspresso’s architecture is in large part based on the interceptor pattern, which ensures that the following four points of this criterion are met.
Flexibility. Kaspresso gives users the ability to configure and expand, thus allowing custom implementations of different types of interceptors. You can inject a call of your own code in response to various events, for example, ViewAction or ViewAssertion for each call, start, successful completion or failure of a step of your test or the test as a whole. We should emphasize separately that all parameters can be configured before starting a test, unnecessary functionality can be disabled, and missing functionality can be added (see Configurator).
Stability. Kaspresso penetrates deep into Espresso and UiAutomator and knows how to repeat failed actions or checks, close pop-up system dialogs, and automatically scroll to an element in ScrollView if needed, which significantly increases test stability. (It is worth noting here that the autoscroll to the desired element inside the RecyclerView is implemented in Kakao and is also available for use). You can use ready-made interceptor implementations or special helper methods. For example, to repeat an unsuccessful button click, wrap your action in flakySafely:
| MainScreen { | |
| flakySafely { | |
| btn.click() | |
| } | |
| } |
Logs. Ready-made implementations of interceptors are available and used by default to log the required information about each action or check, as well as the stage of the life cycle of steps or the test as a whole.
Screenshots. It also has interceptor implementations to take screenshots after each step and at the end of the test. This mechanism is easy to customize, and Kaspresso can take screenshots exactly when you need them. Screenshots can also just be taken from the test code:
| device.screenshots.take("MainScreen_step_1") |
See also Localization autotests.
Access to adb. Another equally crucial component of Kaspresso is AdbServer, an HTTP server that can execute adb commands requested from the test. It runs on the host the devices or emulators the tests will run on are connected to. When a test is launched on the device, a connection is made to the server, so the server can execute the commands requested from the adb test for the desired device. AdbServer is used to implement most functions available through the device facade. Also, inside tests you have access to a simple and convenient API for calling the required adb commands:
| adbServer.performAdb("emu sms send +79111111111 $smsText") | |
| adbServer.perfromShell("rm -f $filePath") |
However, AdbServer is optional, so you don’t need to run it unless you need to call adb in your tests.
Picking the right wrapper
| Appium | Kakao | Barista | Kaspresso | ||
|---|---|---|---|---|---|
| Expressive API | - | + | +/- | + | |
| Multidriver | + | - | - | + | |
| Flexibility | +/- | + | - | + | |
| Stability | - | +/- | +/- | + | |
| Logs | - | +/- | - | + | |
| Screenshots | - | - | - | + | |
| Access to adb | + | - | - | + | |
| Crossplatform | + | - | - | - |
This chart makes it easy to choose the right wrapper. If you’re just starting to wade into the world of autotesting, the easiest place to start is Kaspresso. This framework will solve all kinds of issues you’ll inevitably face. It provides a convenient API that integrates and extends Kakao, and hides calls to Espresso, UiAutomator and AdbServer, which greatly expands what you can accomplish. Last but not least, it also contains special extension points so you can get it to behave as you need.
Thanks for reading.
Authors:
Thanks to Omolara Adejuwon.
Tags: Android, AndroidDev, Kaspresso, Espresso, Testing
View original article at:

Originally published: July 14, 2021


