Posted by: Sergey Nes
In this article, I will explicitly define a practical, step-by-step guide to model complex UI Screens using the Finite State Machine. I will also demonstrate how to implement FSM in Kotlin and Jetpack Compose, although the techniques described in this article are easily transferable to any other language or framework.
Understanding the Problem
As we already know, the Jetpack Compose framework works in three phases: composition, measurement, and rendering. To build an interactive UI that reacts to the users actions or any other events, all you need to do is declare a different appearance for a particular state. Then Compose framework will handle all changes for you whenever these states changes are occurring. Sounds good, however for real-world applications with complex screens and user flows, we might need to have too many states variables that may conflict in the race of hardcoded conditions. Also, most apps usually contain side effects, e.g., changing a state from the network response, and so on. Moreover, as we all remember, the increase in the number of condition variables increases the complexity of the code and computation exponentially.
One of the ways to solve all those problems is a Finite State Machine.
Let’s use one of the screens from my StudyCards app as an example to detect the problem and test the solution. This screen is not too complex, so the implementation will not be too long. However, it is complicated enough to see the benefits from the solution.
An Example Screen
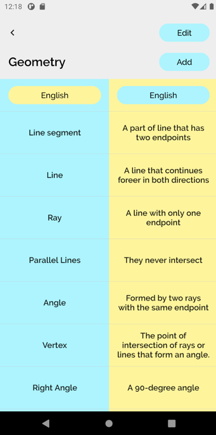
I wanted to build a screen representing the deck of cards as a table of two columns, one column for the front side value and the second for the value of the backside. In this screen, a user can modify existed deck or create a new deck of cards. Here is the list of screen features:
– Add a new flash card;
– Edit card;
– Delete cards from the deck;
– Edit the name of the deck itself;
Also, I wanted to allow all of these user interactions on one screen!! Look at Figure 1.
To make this screen work as I want, I can define a bunch of state variables and let the user mutate them by his actions. However, it will cause unnecessary recompositions, most likely, race conditions, also, it will make this screen needlessly complex. And of course, it will be hard to maintain and recall how this code works in a couple of months.
A Solution
A Finite State Machine is a computation model (or an architectural design pattern) that can simulate complex systems’ behavior. FSM works well for systems whose state changes as a result of particular inputs or actions. In such a model, we can define all possible states and couple them with possible permitted actions. So all states of the finite state machine are the results of known predefined actions.
Although we will not dive too deep into the theory and different types of state machines, yet we have to recall some of FSM’s properties. Most important is that the FSM model is deterministic — we don’t want our code to have free will, don’t we? Also, it has a few more critical to us properties:
- It has a finite number of possible states.
- A finite number of permitted actions.
- The system can be only in one of the predefined states at a time.
- The same state will always result from the same action, no matter how fast or how many times this action occurs.
A state machine abstracts all logic related to states and transitions, and in general, this model is platform agnostic. So you can use the initial steps as a guide for building an FSM for any system and programming language.
To create a minimal state machine, we need to determine at least these four things:
- The initial state of the machine.
- A set of possible states.
- A set of possible actions.
- And the transition function that defines possible transitions.
Sometimes it could be helpful to define the Side Effects too, but we will not do it in this article.
I recommend not to hurry to implement a state machine in the code but create the State Table to find all possible states. Then draw the state machine Diagram to see all possible actions and state transitions!
A State Table (Truth Table)
First, let’s determine the whole set of possible states with the help of the State Table. I learned about state tables in the Computational Structure Course during my years in college. It is one of the approaches for optimizing a digital circuit within Karnaugh Maps. Although I’ve never used it to design and optimize hardware electronic devices or drivers, I find it extremely useful for software systems with complex state relations. It helps to keep track of the states and recognize optimization patterns. I hope this approach can help others as well.
A state table shows each possible combination of inputs and outputs in the system. In other words, it represents the relation between the states (the inputs of the screen) and UI elements on the screen (the outputs). Such a table helps define all possible states, avoid the race conditions, and also helps to optimize the number of states by merging equal and inverted states.
Let’s look at how it works for our screen. First, we need to create a column for each UI element on the screen: buttons, text views, lists, dialogs, and so on. Then, we will find out how many rows we will need for our table, a row for each state of the Finite State Machine. When the UI element is visible, we put 1 in the table and 0 when invisible.
The Columns (UI Elements/Outputs)
My screen contains the following UI elements: a button on the top right that should change the Title for three different states.
- Title Edit (Button Edit)
- Title Done (Button Edit).
- Title Save (Button Edit).
- A second button beneath the Edit button is the button with the Title Add.
- The name of the list is represented as a read-only TextView.
- Or an editable EditText field in Name-Edit mode.
- A two-column table with the values of the cards in a view mode.
- The same table is in delete mode.
- An input card dialog.
It means we need nine columns.
The Rows (States/Inputs)
In the Idle state, the top right buttons title is “Edit” the Add button is visible, the Name is read-only, and the EditText is invisible. The Table is shown in the view mode. InputDialog is hidden.
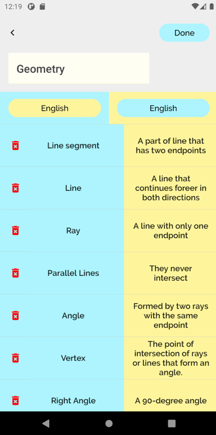
In the NameEdit state, the Edit button has the title “Done”, Add button is invisible, the Name is available for editing in the TextField element, NameTitle is invisible, the Table is shown in Delete mode. InputDialog is hidden.
In the NameChanged state, the Edit is turning into the “Save” button, the Add button is invisible, Name TextField is visible, and NameTitle is not. The Table is still in Delete mode. InputDialog is hidden. And so on.
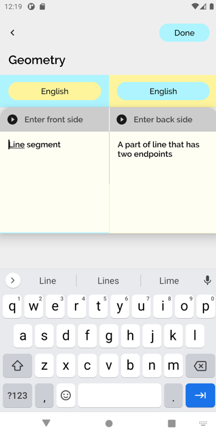
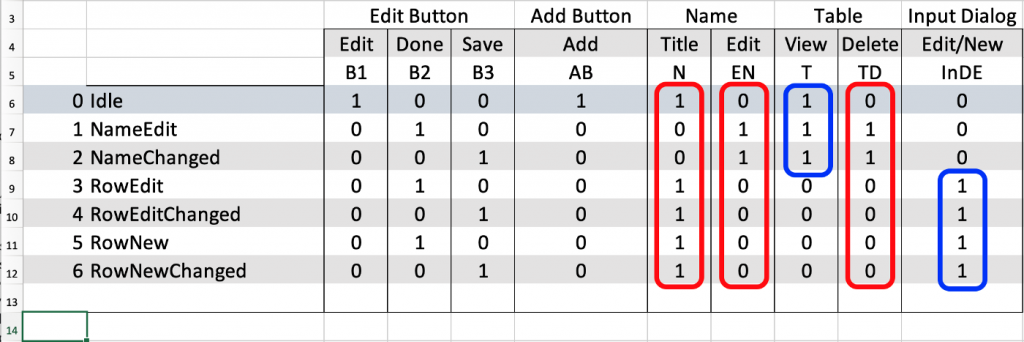
To make this screen work, we need four additional states: RowEdit, RowEditChange, RowNew, RowNewChange. All those states are similar to NameEdit or NameChanged. The main difference is that the InputDialog is showing instead of the Table. The result of this work is a table in Figure 2.
Finite State Machine Diagram
Drawing the Finite State Machine diagram is the best way to find all use cases, states, events, or side effects and make sure we didn’t miss something!
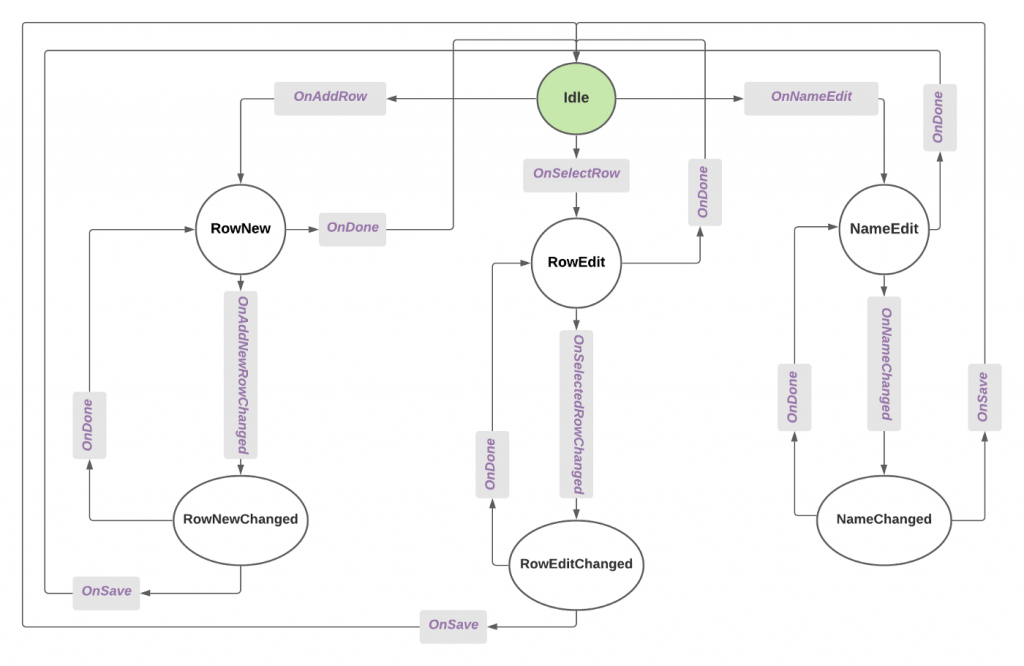
Initially, our screen is in the Idle state. The tap on the Edit button creates an event OnNameEdit that changes the state from Idle to NameEdit. Users can tap the Done button to return the machine to the Idle state or change the name and create an event OnNameChanged to change the state to the NameChanged. From here, users can either tap the Save button to return the machine into the Idle state or recover the name and return the machine to the NameEdit state.
Very similar works branch RowEdit and branch RowNew. The machine can switch to these states from the Idle state only, by OnSelectRow event (Select a row in Table) and OnAddRow event (Tap on Add button). Users can switch state back to the Idle by tapping the Done button. Or can create Changed events by editing/inputting text in the InputDialog.
In Figure 3, you can see the diagram of the state machine that we need to implement.
Let’s Code
Now, when we have everything we need in the blueprint, let’s code!
First, based on the State Table, we need to declare all variables to control our UI. We need a string to keep the string value of the Title for the Editbutton, let’s name it editButtonTitle. We need a flag to control the Addbutton visibility – isAddButtonVisible. The three columns marked in red, in Figure 2, we can merge into the one variable isEditNameMode. And the two inverse columns marked in blue we can merge in another variable isTableVisible.
A Sealed class instead of enum
Sealed class is the best way to declare a base state in Kotlin! Because Kotlin sealed classes allow us to create instances of different types with overridden members and methods. Also, because sealed class enforces a when statement to be an exhaustive and fail compilation in case we forget to implement a branch.
Let’s look at the table in Figure 2 and create a state for each row in the table. We can declare all these variables in the base sealed class as immutable values. And, then we will override them for each particular state, beginning from the Idle state, that inherits all values from the base class.
| sealed class ListScreenState( | |
| val back: ListScreenState? = Idle | |
| ){ | |
| open val editButtonTitle = "Edit" | |
| open val isAddButtonVisible = true | |
| open val isEditNameMode = false | |
| open val isTableVisible= true | |
| object Idle : ListScreenState() |
In the NameEdit state, the Edit button turns into a Done, the Add button becomes invisible, the Name becomes editable, and the table is turned into the delete mode.
| object NameEdit : ListScreenState() { | |
| override val editButtonTitle = "Done" | |
| override val isAddButtonVisible = false | |
| override val isEditNameMode = true | |
| } |
When the name changes, the Done button turns into the Save mode, all other elements remain the same.
| object NameChanged : ListScreenState(NameEdit) { | |
| override val editButtonTitle = "Save" | |
| override val isAddButtonVisible = false | |
| override val isEditNameMode = true | |
| } |
When the user selects a row or hits the Add button, the Edit button turns into a Done, and the Add button becomes invisible. Also, the table became invisible too, and the input dialog is showing instead of the table.
| object RowEdit : ListScreenState() { | |
| override val editButtonTitle = "Done" | |
| override val isAddButtonVisible = false | |
| override val isTableVisible = false | |
| } | |
| object RowNew : ListScreenState() { | |
| override val editButtonTitle = "Done" | |
| override val isAddButtonVisible = false | |
| override val isTableVisible = false | |
| } |
Similar to the name changed, when the row data changed, the Donebutton turns into the Save mode, all other elements remind the same. FSM can turn back into the Edit state in case the user recovers the initial data.
| object RowEditChanged : ListScreenState(RowEdit) { | |
| override val editButtonTitle = "Save" | |
| override val isAddButtonVisible = false | |
| override val isTableVisible = false | |
| } | |
| object RowNewChanged : ListScreenState(RowNew) { | |
| override val editButtonTitle = "Save" | |
| override val isAddButtonVisible = false | |
| override val isTableVisible = false | |
| } |
Actions/Events
Now, keeping in mind and looking at the diagram in Figure 3, let’s enumerate all possible actions:
OnNameEdit — a user clicks the Edit button;
OnNameChanged — a user changes the name of the deck;
OnAddNewRow — a user clicks the Add button;
OnAddNewRowChanged — a user inputs a data, and the data is valid;
OnSelectRow — a user selects a card by tapping on the row;
OnSelectRowChanged — a user changes a text on the sides of the chosen card;
OnDone action occurs when a user cancels his previous action or recover previously changed data;
OnSave — a user clicks the Save button to save the changes.
For the Action objects, I found it’s practical to keep the references to the source and target states to check if a particular action is permitted to make a transition from the current state.
| sealed class ListScreenActions( | |
| val source: ListScreenState, | |
| val target: ListScreenState | |
| ) { | |
| object OnNameEdit : ListScreenActions(Idle, NameEdit) | |
| object OnNameChanged : ListScreenActions(NameEdit, NameChanged) | |
| object OnAddNewRow : ListScreenActions(Idle, RowNew) | |
| object OnAddNewRowChanged : ListScreenActions(RowNew, RowNewChanged) | |
| object OnSelectRow : ListScreenActions(Idle, RowEdit) | |
| object OnSelectedRowChanged : ListScreenActions(RowEdit, RowEditChanged) | |
| class OnDone(fromState: ListScreenState): ListScreenActions(fromState, Idle) | |
| class OnSave(fromState: ListScreenState): ListScreenActions(fromState, Idle) | |
| } |
It looks like we have everything we need to model our screen. The next step is connecting the states and action into the “engine”, and assembling our state machine.
OUR VIDEO RECOMMENDATION


Jobs
A ScreenModel
In the ScreenModel, we declare only one composable state variable. And one composable method Init(), to initialize this variable.
| class ScreenModel { | |
| private lateinit var screenState: MutableState<ListScreenState> | |
| @Composable | |
| fun Init(state: ListScreenState = Idle) { | |
| screenState = remember { | |
| mutableStateOf(state) | |
| } | |
| } |
Then, we need a transition function onAction() — this is where the magic happens!
When the screenState changes, Compose Framework intelligently updates the relevant part of the screen. Also, note that the transition function does not have a switch or any hardcoded conditions. Except for line 5, here we check that the Action is valid for the current state. If the source value of the Action is equal to the current state, we update the state with the predefined target state. And it’s practical to have lambdas to run code before or after the state changes. Note that the state() function I declared at the bottom, in FSMCode13.kt, line 13.
| private fun onAction( action: ListScreenActions, | |
| runBefore: () -> Unit = {}, | |
| runAfter: () -> Unit = {} | |
| ) { | |
| if (state() == action.source) { | |
| runBefore() | |
| screenState.value = action.target | |
| runAfter() | |
| } | |
| } |
We define two methods to turn the machine into the EditName and EditNameChanged states.
| fun editName() { onAction(ListScreenActions.OnNameEdit) } | |
| fun editNameChanged() { onAction(ListScreenActions.OnNameChanged)} |
Two methods for a new row. The runAfter lambda I use to to initialize the input dialog.
| fun addNewRow(runAfter: () -> Unit) { | |
| onAction(ListScreenActions.OnAddNewRow, runAfter = runAfter) | |
| } | |
| fun editNewRow() { onAction(ListScreenActions.OnAddNewRowChanged) } |
Two methods to select and edit a row. In this case, the runAfter lambda I use to set the selected row’s values into the input dialog.
| fun selectedRow(runAfter: () -> Unit) { | |
| onAction(ListScreenActions.OnSelectRow, runAfter = runAfter) | |
| } | |
| fun editSelectedRow(){ onAction(ListScreenActions.OnSelectedRowChanged) } |
And a few helper methods to execute onDone, onSave, turn the machine into the previous state, and access the current state. I use the runBeforelambda in the save function, to save the changes.
| fun done() { onAction(ListScreenActions.OnDone(state()))} | |
| fun save(runBefore: () -> Unit) { | |
| onAction(ListScreenActions.OnSave(state()), runBefore = runBefore) | |
| } | |
| fun backToPrevState() { | |
| state().back?.let { | |
| screenState.value = it | |
| } | |
| } | |
| fun state(): ListScreenState = screenState.value | |
| } |
And this is how this machine works in live.


What have we learned
This article has explicitly defined a practical, step-by-step path to model complex UI Screens using the Finite State Machine, particularly for the app built in Jetpack Compose. My implementation is coupled with particular screen business logic. Yet, it can be easily decoupled and used as the basic abstract model for general usage.
Conclusion
Finite State Machine simplifies the screen model and maps and links all screen states and user actions. It allows us to get rid of hard-coded conditions in code. Moreover, the FSM model is very maintainable. The code running for each transition is independent of other events and states and should be isolated. So, we only need to implement a new isolated piece of code for any new feature without touching or breaking the old working code. This way, our system should never become overcomplicated.
However, be mindful, as usual, the state machine can not work well in asynchronous systems, at least without additional entities such as the events queue, for example. Also, the state machine model can become too complicated for applications where many different actions can be executed from the same state. One of the possible alternatives for this is the State pattern.
Before you decide to use any of the design patterns, check out as many available options as possible to find one that works for your case best!
Links on FSM/State pattern and Computation Structures:
https://en.wikipedia.org/wiki/Finite-state_machine
https://en.wikipedia.org/wiki/State_pattern
https://brilliant.org/wiki/finite-state-machines/
https://en.wikipedia.org/wiki/Karnaugh_map
https://github.com/Tinder/StateMachine
Good read on Jetpack Compose events, states and side effects:
https://jorgecastillo.dev/jetpack-compose-effect-handlers
https://medium.com/nerd-for-tech/handling-lifecycle-events-on-jetpack-compose-f4f53de41f0a
My Tutorial on Building UI Components from scratch in Jetpack Compose:
Part 1 of 3 (an iOS styled Home Screen List)
Part 2 of 3 (the Deck of Cards)
Part 3 of 3 (adding animation to the Deck of Cards)
StudyCards app:
https://play.google.com/store/apps/details?id=com.nes.studycards
https://apps.apple.com/us/app/study-cards-help-to-memorize/id1436913731