

Screenshot tests are the most effective way how to test your View layer. And if you are using Compose, you already have them — @Preview-annotated methods for Android Studio. I showed this in my previous article that demonstrated how to connect Showkase & Facebook’s screenshot testing library. But this library has a drawback — it requires instrumentation (device or emulator) to run. Which complicates the setup on CI and causes flakiness. In this article I will show you how to configure it without an emulator, including a CI setup.
Paparazzi
Screenshot testing without an emulator is possible with a Paparazzi library from Square. They use Android Studio renderer to render Android Views and Composables in regular unit tests (“test” folder). No need for instrumentation (“androidTest” folder). This means that screenshot tests are finished in seconds instead of minutes. You can use the cheapest cloud-based CI machine and it removes headaches with running Android emulator on CI. This library has recently hit a stable version 1.0.0.
If you want to run Paparazzi locally, just use these two Gradle tasks:
./gradlew recordPaparazziDebugcaptures all screenshots into a “snapshots” folder./gradlew verifyPaparazziDebugverifies if screenshots in the “snapshots” folder match and lets you know which ones are different
Showkase integration
I already described this library in my previous article. In short, it captures all your @Preview-annotated methods and makes them available for screenshot testing. Jump directly into my example integration, if you need full details.
This class is the main part of Showkase-Paparazzi integration:
| class ComponentPreview( | |
| private val showkaseBrowserComponent: ShowkaseBrowserComponent | |
| ) { | |
| val content: @Composable () -> Unit = showkaseBrowserComponent.component | |
| override fun toString(): String = | |
| showkaseBrowserComponent.group + ":" + showkaseBrowserComponent.componentName | |
| } | |
| @RunWith(TestParameterInjector::class) | |
| class ComposePaparazziTests { | |
| object PreviewProvider : TestParameter.TestParameterValuesProvider { | |
| override fun provideValues(): List<ComponentPreview> = | |
| Showkase.getMetadata().componentList.map(::ComponentPreview) | |
| } | |
| @get:Rule | |
| val paparazzi = Paparazzi( | |
| maxPercentDifference = 0.0, | |
| deviceConfig = PIXEL_5.copy(softButtons = false), | |
| ) | |
| @Test | |
| fun preview_tests( | |
| @TestParameter(valuesProvider = PreviewProvider::class) componentPreview: ComponentPreview, | |
| @TestParameter(value = ["1.0", "1.5"]) fontScale: Float, | |
| @TestParameter(value = ["light", "dark"]) theme: String | |
| ) { | |
| paparazzi.snapshot() { | |
| CompositionLocalProvider( | |
| LocalInspectionMode provides true, | |
| LocalDensity provides Density( | |
| density = LocalDensity.current.density, | |
| fontScale = fontScale | |
| ) | |
| ) { | |
| ShowkaseTheme(darkTheme = (theme == "dark")) { | |
| componentPreview.content() | |
| } | |
| } | |
| } | |
| } | |
| } |
TestParameterInjector
The class is using TestParameterInjector library from Google. It allows to create multiple unit tests from a single @Test method, which is great for screenshot testing. This example will create a screenshot test for every @Preview-annotated method. And as a bonus, screenshots for dark mode & 1.5 font scale! This can be easily extended with different locales, screen sizes, orientation etc.

CI integration
You want to compare screenshots with every pull request. You can quickly catch regression bugs even before merging the PR. But when you add or modify features, screenshot changes might be intentional. Therefore, my CI integration works like this:
- It compares the screenshots with the existing ones. If they are the same, the check is green.
- If they are different, it pushes the different screenshots to a different branch based on the PR branch.
- It posts a comment to the PR with a link to compare the two branches. GitHub does a pretty good job of showing differences between the images.
- If the change is intentional, you can simply merge the branch back to the PR branch. If not, you should fix the regression bug.
GitHub Actions
I really like GitHub Actions CI: seamless GitHub integration, free for small projects, tons of community-created Actions which you can reuse. So my example is for Actions, but the principle is the same for all CIs:
| name: Pull request validation (main) | |
| on: | |
| pull_request: | |
| branches: | |
| - main | |
| concurrency: | |
| group: pr-main-${{ github.head_ref }} | |
| cancel-in-progress: true | |
| jobs: | |
| screenshot-tests: | |
| runs-on: ubuntu-latest | |
| steps: | |
| - name: Check out code | |
| uses: actions/checkout@v2 | |
| with: | |
| fetch-depth: 0 | |
| - name: Run screenshot tests | |
| id: run-screenshot-tests | |
| run: ./gradlew verifyPaparazziDebug | |
| - name: Process failed screenshot tests | |
| if: failure() | |
| id: failed-screenshots | |
| run: "./.github/workflows/scripts/process_failed_screenshots.sh" | |
| env: | |
| GITHUB_TOKEN: ${{ secrets.GITHUB_TOKEN }} | |
| GITHUB_REPOSITORY: ${{ secrets.GITHUB_REPOSITORY }} | |
| PR_BRANCH: ${{ github.head_ref }} | |
| - name: Comment PR if screenshot tests failed | |
| uses: octokit/request-action@v2.0.0 | |
| if: always() && steps.failed-screenshots.outputs.PR_COMMENT | |
| with: | |
| route: POST /repos/:repo/issues/:issue_number/comments | |
| repo: ${{ github.repository }} | |
| issue_number: ${{ steps.failed-screenshots.outputs.PR_NUMBER }} | |
| body: ${{ steps.failed-screenshots.outputs.PR_COMMENT }} | |
| env: | |
| GITHUB_TOKEN: ${{ secrets.GITHUB_TOKEN }} |
OUR VIDEO RECOMMENDATION


Jobs
Check out the bash script for processing failed screenshot tests. And look at an example pull request. This check ran only 2:43 minutes. And most of the time was spent on building the app.
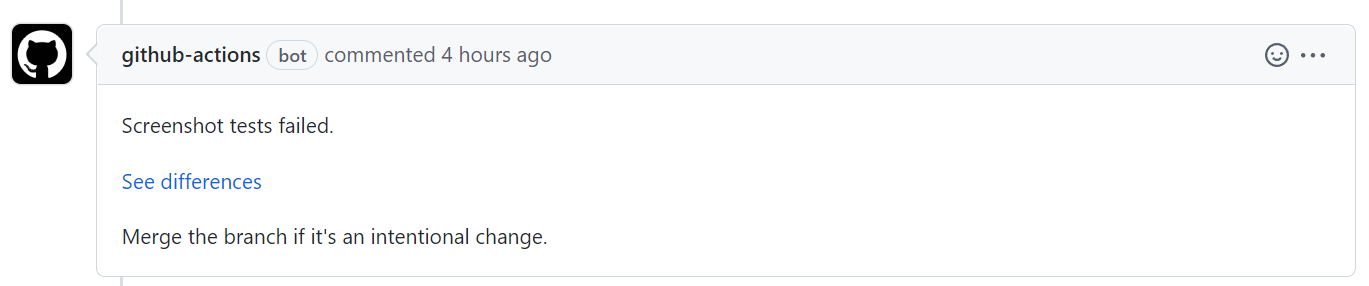 PR comment in case of screenshot tests failing
Summary
I showed you how to integrate Showkase library with Paparazzi library and create screenshot tests for all your Compose @Preview-annotated methods, including dark mode & 1.5 font scale. I showed you an example Github Actions integration with a workflow for merging intentional changes in screenshots. Everything runs in seconds without the need of Android emulator. Check out the GitHub repo for all details.
I believe that with this quick & easy setup, screenshot testing can become as useful and widespread as unit tests of the business logic.
Thanks to Bára Drbohlavová
This article was originally published on proandroiddev.com on July 01, 2022


