

Part I. Basic steps to implement MVI with the state-machine pattern
 “Learning strait” to adopt the state-machine MVI architecture by Ulyana Kotchetkova
This is the first article of the ‘MVI with state-machine’ series that describes the basic architecture and steps to build your logic. Check the other parts of the series for advanced topics:
The source code for the article and the very basic core library is available on GitHub. The library is totally optional — just in case you want to save some time on not writing your own core.
Introduction
The MVI pattern of architecting modern applications has been getting more and more popular in recent times. There are a lot of articles describing the pattern but to recap let’s see the key points that make up the approach:
- Model — A model holds the representation of the data state and changes it with reducing logic. Data changes are propagated to the view layer as a stream of complete view-states.
- View — The view layer observes user actions and UI-state changes from the model. As a result, it sets the intention for the triggered UI gesture passing it to the model to process. Each UI-state fully describes the complete view state!
- Intent — A representation of user’s gestures that changes the state of the model. View handles widget interactions and provides a stream of gestures to the model through the unified interface.
Key advantages of MVI:
- Single source of truth — one set of data and logic to define complete view-state
- Unidirectional data flow
- Thorough and complete testing of all logic with unit tests
- Friendly to Jetpack Compose view framework
However (as with any technology) there are some downsides that you may come across along with your app growth:
- Too much overkill for simple functions like LCE (Load/Content/Error) display
- Too much reducer logic based on if/else of the current data state that plays badly in complex multi-step scenarios.
- Steep learning curve to grasp the technology
The aim of the article
While there are plenty of MVI frameworks already available, I’d like to show you how you can implement the MVI architecture with a simple and easy way without external dependencies and framework locks. We’ll try to overcome the above drawbacks to give you more freedom to choose technology and to build a cohesive logic and data processing in a “less-opinionated” way. The samples target Android platform but there is no dependency on Android framework both in core components and implementation code so the logic could be used in Kotlin multiplatform projects as shown in part III of this article. The sample projects use Jetpack Compose at the view layer but it is not a restriction. You could use fragment transactions or direct view operations if you like them better.
State-machine definition
A state machine, is an abstract machine that can be in exactly one of a finite number of states at any given time. The machine can change from one state to another in response to some inputs: user gestures, results of asynchronous operations, etc. A state-machine is defined by a list of its states, its initial state, and the inputs that trigger transitions from state to state. The key point for me is that each state may operate only a sub-set of all the gestures that are relevant to it. For example, the music player can’t be paused (gesture) when it is in the stopped state. That gives us the ability to narrow down both the amount of logic and input/output data operated by each state and make low coupled and highly cohesive (thus easily maintainable and testable) code.
The basic task – Load-Content-Error
Let’s see how the MVI architecture and the state-machine pattern could be mixed together. Let’s start with a basic example (the full source code is available in lcefolder of the repository). Imagine we need to implement the classic master-detail view of items with the following screen flow:
 Load-Content-Error flow of the master-detail application
Let’s break down business requirements…
We have four application logical states which correspond to screen states for this application:
- Item list – the list of items to load is displayed. User clicks an item to load its contents.
- Loading item – the network operation is running. User waits for operation to complete.
- Item content – the loaded item content is displayed. User may return back to the item list.
- Item load error – the load operation has failed and we have a choice to retry load or to quit the application.
States and transitions
Each machine state may transition to another machine state as a result of Gesture or state’s internal logic. Let’s take a look at which Gestures each machine state processes and how they transition to next machine states:
| Logical state | Ui-State | Gesture/Event | Next state | Output |
|---|---|---|---|---|
| ItemList | ItemList | Back | Terminated | Finishes activity |
| ItemClicked | Loading | Loads requested item | ||
| Loading | Loading | Back | Item list | Cancels load and returns to list |
| onContent | Content | Displays loaded item | ||
| onError | Error | Displays load error | ||
| Content | Item | Back | Item list | Returns to the item list |
| Error | Error | Back | Item list | Returns to the item list |
| Retry | Loading | Retries load operation | ||
| Exit | Terminated | Finishes activity |
You could also create a state-diagram to represent your states and transitions:
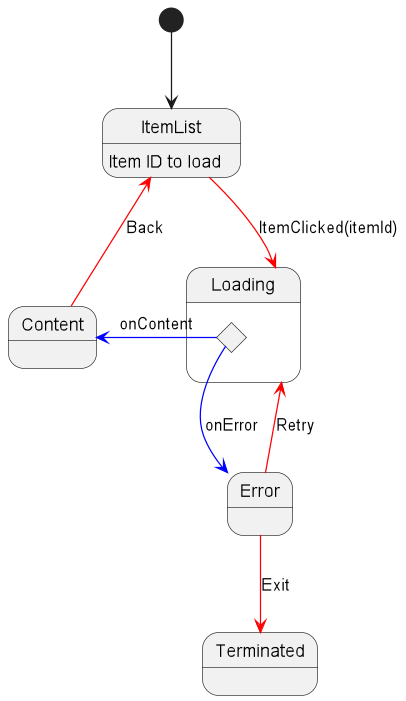
LCE state diagram
The diagram above has two types of inter-state transitions:
Red– user Intentions: clicks, swipes and other interactive `Gestures` that are originated by application user.Blue– transitions made by application logic: content display, errors, etc.
Each machine state should be able to:
- Update the
Ui-Stateof your application. - Process some relevant user interactions —
Gesturesignoring irrelevant - Hold some internal data state
- Transition to another machine state passing some of the shared data between
Now that we have our state requirements, let’s define the role of the state-machine:
- Hold the active machine state
- Delegate gesture processing to the current state
- Transition between states
- Propagate UI-state changes to the outside world
- Clean-up all resources on shutdown
Base components implementation
Let’s combine the state and the machine to see how do they relate to each other. We generalize gesture and UI-states hierarchies as G and U sealed class hierarchies accordingly.

State-machine class diagram
The state-machine implements a simple interface with the following methods:
process(gesture: G)— called by view upon user action. Delegated to current state.clear()— called by view to cleanup resources. Like inonClearedof Jetpack’sViewModel.setMachineState(machineState: CommonMachineState<G, U>)— called by the active state to transition to the new one.setUiState(uiState: U)— called by the active state to update view.
Optional: the state-machine interface above, being a bridge between two worlds, is divided into MachineOutput and MachineInput interfaces to be called by internal state and outside world. Just in case you want to go with a minimal interface available for your application parts.
Let’s create a basic implementation:
| /** | |
| * Common state machine | |
| * @param G UI gesture | |
| * @param U UI state | |
| */ | |
| interface CommonStateMachine<G: Any, U: Any> : MachineInput<G>, MachineOutput<G, U> { | |
| /** | |
| * Base state-machine implementation | |
| * @param init Initial state producer | |
| */ | |
| abstract class Base<G: Any, U: Any>( | |
| private val init: () -> CommonMachineState<G, U> | |
| ) : CommonStateMachine<G, U> { | |
| /** | |
| * Active machine state | |
| */ | |
| protected lateinit var activeState: CommonMachineState<G, U> | |
| /** | |
| * Sets active machine state | |
| */ | |
| final override fun setMachineState(machineState: CommonMachineState<G, U>) { | |
| clear() | |
| activeState = machineState | |
| startMachineState() | |
| } | |
| /** | |
| * Starts machine | |
| */ | |
| protected fun start() { | |
| activeState = init() | |
| startMachineState() | |
| started = true | |
| } | |
| /** | |
| * Updates state with UI gesture | |
| * @param gesture UI gesture to proceed | |
| */ | |
| final override fun process(gesture: G) { | |
| activeState.process(gesture) | |
| } | |
| /** | |
| * Cleans-up state-machine | |
| */ | |
| final override fun clear() { | |
| activeState.clear() | |
| } | |
| /** | |
| * Starts machine state | |
| */ | |
| private fun startMachineState() { | |
| activeState.start(this) | |
| } | |
| } | |
| } |
State machine base


Jobs
The concrete state machine implementation should also provide a way to update the view with a new UI state. For example the FlowStateMachine
exports UI state changes through uiState shared flow:
| open class FlowStateMachine<G: Any, U: Any>( | |
| init: () -> CommonMachineState<G, U> | |
| ) : CommonStateMachine.Base<G, U>(init) { | |
| private val mediator = MutableSharedFlow<U>( | |
| replay = 1, | |
| onBufferOverflow = BufferOverflow.DROP_OLDEST | |
| ) | |
| init { | |
| start() | |
| } | |
| /** | |
| * ExportedUI state | |
| */ | |
| val uiState: SharedFlow<U> = mediator.asSharedFlow() | |
| final override fun setUiState(uiState: U) { | |
| mediator.tryEmit(uiState) | |
| } | |
| } |
The state machine that exports UI updates through the Flow interface
The state and the state lifecycle
The base state class works with the state-machine instance and accepts delegated calls from it. The state has three state-machine interaction methods:
doProcess(gesture: G)— called by the state-machine to process a UI gesture.setUiState(uiState: U)— call from within your state implementation to update UI State.setMachineState(machineState: CommonMachineState<G, U>)— call from implementation to transition to the new machine state.
and two lifecycle methods:
doStart()— called by the state-machine when your state becomes active.doClear()— called by the state machine when your current state is about to be destroyed either by replacing the new state or when state-machine is about to be destroyed.
You can check the basic state implementation here. There is no rocket science there — just some template functions to handle state lifecycle. We’ll get into details a bit later.
The state lives between doStart and doClear calls. You could safely call interaction methods and expect gesture processing calls within that period. Make sure to cleanup all your pending operations in doClear handler. For example, the CoroutineState provides you the stateScope coroutine scope that is being cancelled in doClear:
| abstract class CoroutineState<G: Any, U: Any>: CommonMachineState<G, U>() { | |
| protected val stateScope = CoroutineScope(SupervisorJob() + Dispatchers.Main.immediate) | |
| override fun doClear() { | |
| stateScope.cancel() | |
| } | |
| } |
Note on threading: the library doesn’t provide any threading support and not thread-safe. So it is your responsibility to implement correct thread handling so all state changes happen on the desired thread. The CoroutineState above creates it’s scope with Dispatchers.Main.immediate.
App Implementation
Now that we have all basic components in place, let’s implement our application. First of all, let’s create our Gesture and UI-state systems using Kotlin sealed classes.
Gestures — events emitted by UI layer and passed to state-machine:
| sealed class LceGesture { | |
| /** | |
| * Item to load clicked | |
| * @property id Item ID to load | |
| */ | |
| data class ItemClicked(val id: ItemId) : LceGesture() | |
| /** | |
| * Retry operation clicked | |
| */ | |
| object Retry : LceGesture() | |
| /** | |
| * Backwards navigation gesture | |
| */ | |
| object Back : LceGesture() | |
| /** | |
| * Terminates activity | |
| */ | |
| object Exit : LceGesture() | |
| } |
LCE app gestures
UI-states — data that fully describes what user sees. Emitted by machine:
| sealed class LceUiState { | |
| /** | |
| * Item list view | |
| */ | |
| @Immutable | |
| data class ItemList(val items: List<ItemModel>) : LceUiState() | |
| /** | |
| * Loading spinner | |
| */ | |
| object Loading : LceUiState() | |
| /** | |
| * Item detail view | |
| */ | |
| data class Item(val contents: String) : LceUiState() | |
| /** | |
| * Error view | |
| */ | |
| data class Error(val error: Throwable) : LceUiState() | |
| /** | |
| * Terminator | |
| */ | |
| object Terminated : LceUiState() | |
| } |
LCE app UI-states
Let’s get to implementing machine states then.
Item list
This is the initializing state of our state-machine. It displays the list of items to load.
| class ItemListState : CommonMachineState<LceGesture, LceUiState>() { | |
| private val items = listOf( | |
| ItemId.LOADS_CONTENT to "Item that loads", | |
| ItemId.FAILS_WITH_ERROR to "Item that fails to load" | |
| ) | |
| override fun doStart() { | |
| setUiState(LceUiState.ItemList(items.map { ItemModel(it.first, it.second) })) | |
| } | |
| override fun doProcess(gesture: LceGesture) = when(gesture) { | |
| is LceGesture.ItemClicked -> onItemClicked(gesture.id) | |
| is LceGesture.Back -> onBack() | |
| else -> Timber.d("Unhandled gesture: %s", gesture) | |
| } | |
| private fun onItemClicked(id: ItemId) { | |
| setMachineState(LoadingState(id)) | |
| } | |
| private fun onBack() { | |
| setMachineState(TerminatedState()) | |
| } | |
| } |
Item list state
The list is hardcoded for this example so we just emit a complete view-state in doStart() template method.
User may click one item or another producing the ItemClicked gesture. We handle it in onItemClicked method by transitioning the machine to the LoadingState passing selected item id to load.
If users presses back button, he produces the Back gesture. The state machine is switched to the TerminatedState which terminates the activity.
Data ‘loading’ state
This state pretends to be running an asynchronous operation by starting a coroutine with delay.
| class LoadingState( | |
| @get:VisibleForTesting val id: ItemId, | |
| private val defaultDispatcher: CoroutineDispatcher = Dispatchers.Default | |
| ) : CoroutineState<LceGesture, LceUiState>() { | |
| override fun doStart() { | |
| setUiState(LceUiState.Loading) | |
| load() | |
| } | |
| private fun load() { | |
| stateScope.launch(defaultDispatcher) { | |
| delay(1000L) | |
| withContext(Dispatchers.Main) { | |
| when (id) { | |
| ItemId.LOADS_CONTENT -> toContent() | |
| ItemId.FAILS_WITH_ERROR -> toError() | |
| } | |
| } | |
| } | |
| } | |
| private fun toContent() { | |
| setMachineState(ContentState("Some item data...")) | |
| } | |
| private fun toError() { | |
| setMachineState(ErrorState(id, IOException("Failed to load item"))) | |
| } | |
| override fun doProcess(gesture: LceGesture) = when(gesture) { | |
| LceGesture.Back -> onBack() | |
| else -> Timber.d("Unhandled gesture: %s", gesture) | |
| } | |
| private fun onBack() { | |
| setMachineState(ItemListState()) | |
| } | |
| } |
Item loading state
We display a loading spinner in onStart() template and run the coroutine.
Given the hardcoded item ID the state finishes either in toContent or toError handler. Thus we transition to either the ContentState passing ‘loaded’ item data or to the ErrorState passing the error and the failed item ID to implement retry (see below).
If user clicks Back while waiting for result the machine is switched back to the item list. We subclass the CoroutineState here so our stateScope is cancelled when state is shut down.
Item contents state
This one is very basic. The state emits the loaded data passed to the constructor and handles Back to return to item-list.
| class ContentState(private val contents: String) : CommonMachineState<LceGesture, LceUiState>() { | |
| override fun doStart() { | |
| setUiState(LceUiState.Item(contents)) | |
| } | |
| override fun doProcess(gesture: LceGesture) = when (gesture) { | |
| LceGesture.Back -> onBack() | |
| else -> Timber.d("Unhandled gesture: %s", gesture) | |
| } | |
| private fun onBack() { | |
| setMachineState(ItemListState()) | |
| } | |
| } |
Item contents state
Error state
The last state worth mentioning is the error state that displays a popup with retry and fail options.
| class ErrorState(private val failed: ItemId, private val error: Throwable) : CommonMachineState<LceGesture, LceUiState>() { | |
| override fun doStart() { | |
| setUiState(LceUiState.Error(error)) | |
| } | |
| override fun doProcess(gesture: LceGesture) = when (gesture) { | |
| LceGesture.Back -> onBack() | |
| LceGesture.Retry -> onRetry() | |
| LceGesture.Exit -> onExit() | |
| else -> Timber.d("Unhandled gesture: %s", gesture) | |
| } | |
| private fun onRetry() { | |
| setMachineState(LoadingState(failed)) | |
| } | |
| private fun onBack() { | |
| setMachineState(ItemListState()) | |
| } | |
| private fun onExit() { | |
| setMachineState(TerminatedState()) | |
| } | |
| } |
Item load error state
We dispatch relevant user gestures by calling the appropriate handler and switching the state-machine to the new state. Worth to mention the onRetry handler — the new LoadingState is created there that will restart the item loading procedure from scratch.
Wiring with the application
Now that we have all states implemented let’s feed them to the state-machine and connect with the view subsystem. We need some place to retain the state-machine so let’s wrap it to the Jetpack ViewModel:
| class LceViewModel : ViewModel() { | |
| private fun initStateMachine(): CommonMachineState<LceGesture, LceUiState> = ItemListState() | |
| private val stateMachine = FlowStateMachine(::initStateMachine) | |
| val state: SharedFlow<LceUiState> = stateMachine.uiState | |
| fun process(gesture: LceGesture) { | |
| stateMachine.process(gesture) | |
| } | |
| override fun onCleared() { | |
| stateMachine.clear() | |
| } | |
| } |
LCE view-model
All we need to do here is:
- to figure out the initial state that machine will start from
- to create a state-machine instance
- to wire ui-state and gesture processing with the outside world
And here is our composable main view that connects to the view-model:
| @Composable | |
| fun LceScreen(onExit: @Composable () -> Unit) { | |
| val model: LceViewModel = viewModel() | |
| val state = model.state.collectAsState(LceUiState.Loading) | |
| BackHandler(onBack = { model.process(Back) }) | |
| Scaffold( | |
| modifier = Modifier.fillMaxSize(), | |
| backgroundColor = MaterialTheme.colors.background, | |
| topBar = { | |
| TopAppBar( | |
| title = { Text(stringResource(R.string.title)) }, | |
| navigationIcon = { | |
| IconButton(onClick = { model.process(Back) }) { | |
| Icon( | |
| imageVector = Icons.Filled.ArrowBack, | |
| contentDescription = "Back", | |
| tint = Color.White | |
| ) | |
| } | |
| } | |
| ) | |
| } | |
| ) { | |
| when (val uiState = state.value) { | |
| LceUiState.Loading -> Loading() | |
| is LceUiState.ItemList -> ItemList( | |
| state = uiState, | |
| onItemClicked = { model.process(ItemClicked(it)) } | |
| ) | |
| is LceUiState.Error -> LoadError( | |
| state = uiState, | |
| onRetry = { model.process(Retry) }, | |
| onBack = { model.process(Back) }, | |
| onExit = { model.process(Exit) } | |
| ) | |
| is LceUiState.Item -> ItemDetails(state = uiState) | |
| LceUiState.Terminated -> onExit() | |
| } | |
| } | |
| } |
LCE view
So far so good
I hope I’ve managed to showcase the simplicity of the state-machine pattern in implementing the application logic. It produces a clean and easy to grasp step-by-step logic with well-separated concerns and easy and thorough testing ability (see the source code for details). The pattern also attempts to be as non-opinionated as possible. Each state is a black-box with a defined contract and developers may choose the most suitable tools to implement each one without affecting the other.
The example above is a very basic one. However you could do things a lot more clean by using some of the additional abstractions and code organizing. Jump to Part II to learn more!
This article was originally published on proandroiddev.com on August 19, 2022


