

Part III. Multi-module and multi-platform logic
 “Learning strait” to adopt the state-machine MVI architecture by Ulyana Kotchetkova
This is the third part of the ‘MVI with state-machine’ series that describes how to split your logic into modules and promotes writing a multi-platform logic. Check the other parts of the series for basic steps and handy tools to mix-in overview:
The source code for the article and the very basic core library is available on GitHub. The library is totally optional — just in case you want to save some time on not writing your own core.
The code snippets in this article are based on the login module and the register multiplatform module of the advanced example — ‘Welcome app’. The modules are then provided to the main application.
Note on multiplatform
Although the logic for registration flow is made common, I’ve failed to implement registration view in androidMain source of registration module due to some Kotlin-multiplatform glitches or misconfiguration. The problem is Android sources fail to import common dependencies from other common modules. If anyone could help me fixing that issue I’ll much appreciate this 🙂
Multi-module applications
Let’s take a more complicated example with a multi-screen flow like the imaginary customer on-boarding:
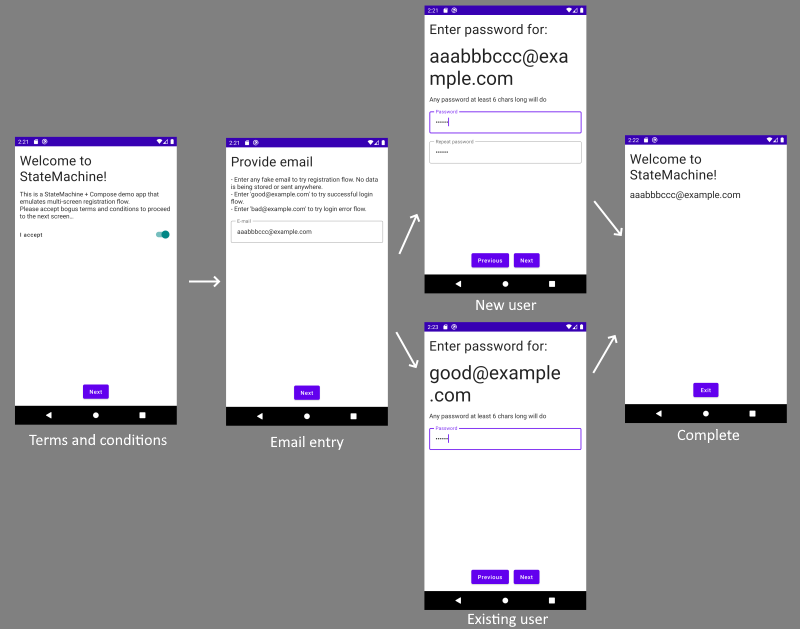 Welcome application screen flow
The user is required to accept terms and conditions and to enter his email. Then the logic checks if he is already registered or a new customer and runs the appropriate flow to login or to register a user.
Imagine we want the login flow and the registration flow to be in separate modules to split the work between teams.
Here is the state diagram for the app:
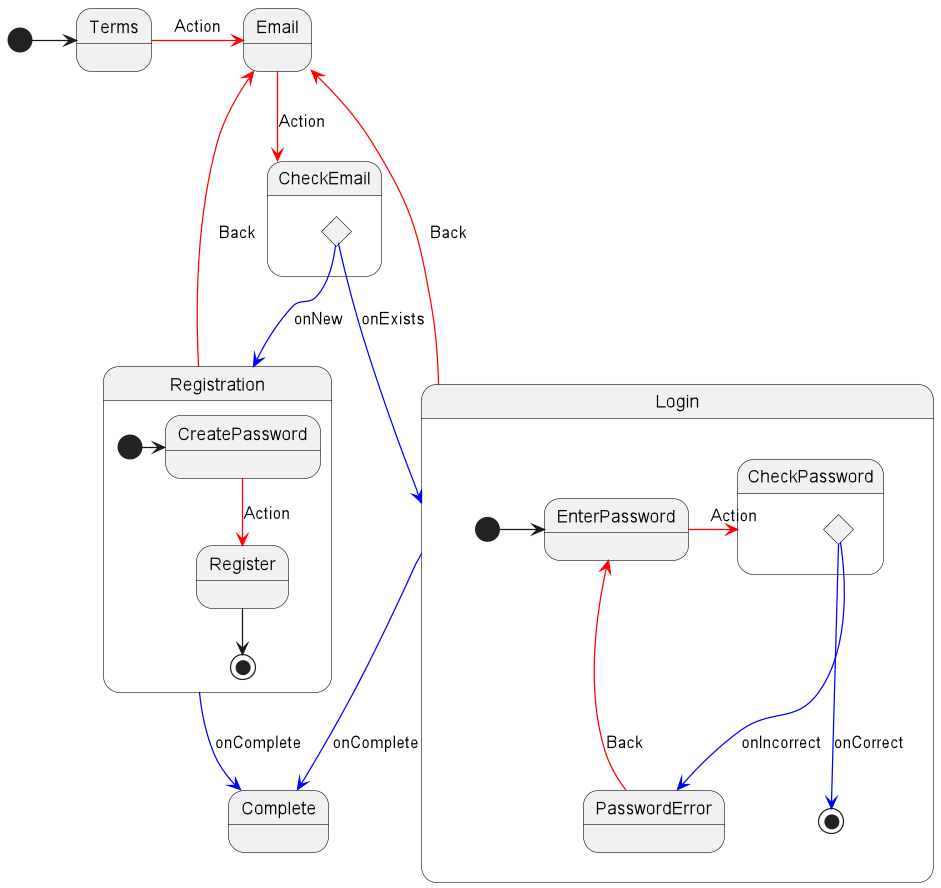
Welcome application state diagram
The project consists of the following modules:
welcome— common flow: preloading, email entry, customer check, complete.commoncore— common abstractions to build application: dispatchers, resources, etc.commonapi— common multi-platform module to connect the main app with modules.login— login flow.commonregister— multi-platform registration logic.register— android view module for registration (separate because I’ve failed to implement it in android source ofcommonregister. See the note above)
Common API
As you could see in the diagram above login and commonregister logic starts after the email is checked and the answer to user’s registration status is obtained. Each feature-module flow starts from password entry screen though different for each one. Each module flow returns to the main flow either:
- when flow completes successfully – transfers to
Complete - when user hits
Back– transfers back to email entry
Let’s define the main flow interaction API then:
| interface WelcomeFeatureHost { | |
| /** | |
| * Returns user to email entry screen | |
| */ | |
| fun backToEmailEntry() | |
| /** | |
| * Authentication complete | |
| */ | |
| fun complete() | |
| } |
Host module interface
We place the definition to the module available to all modules: commonapi and provide the interface through the common state context like this:
| interface LoginContext { | |
| /** | |
| * Flow host | |
| */ | |
| val host: WelcomeFeatureHost | |
| // Other dependencies... | |
| } |
Feature module context
We also need some way to start the feature flow. As soon as we know that each feature starts given a user’s email, let’s have a common interface that will create a startup-state for each feature-module state-machine:
| /** | |
| * Common interface to start feature-flow | |
| */ | |
| interface FlowStarter<G: Any, U: Any> { | |
| /** | |
| * Creates a starting state | |
| * @param email Email to proceed with | |
| */ | |
| fun start(email: String): CommonMachineState<G, U> | |
| } |
Feature-flow starter


Jobs
Module flow
Each module has it’s own sealed system of gesture/view-states:
| Module name | Gestures | UI-states |
|---|---|---|
| welcome | WelcomeGesture | WelcomeUiState |
| login | LoginGesture | LoginUiState |
| commonregister | RegisterGesture | RegisterUiState |
Module gestures and UI-states
Each module is completely independent in terms of gestures and UI states, and we also have a proprietary set of ‘handy abstractions’ for each module: renderers, factories, use-cases, etc. See the source code for more details.
Now that we have all module-flows designed and tested we need to find a way to connect completely heterogeneous systems to a single state flow.
Adopting feature-flows
Given that gesture and view system are bound to state-machine through generics, we need to build some adapters to be able to run the flow within the main application state-flow. Things to do:
- Adapt gestures so they are plugged-in to the
welcomegesture flow. - Adapt view-states so the view-system could display them.
- Somehow run the alien state-flow within the
welcomestate-machine.
Gestures and view-states
To adopt feature-module gestures there are at least two solutions:
- Get rid of sealed systems and inherit the common-api base marker interface for all gestures and view-states. Though simple, the solution is not ideal as we lose the type-safe
whenexhaustive checks when we dispatch gestures in our states. So let’s drop it… - Make a wrapping adapter that wraps the foreign gesture/view-state and unwrap it later when passing them to concrete implementation. Thus we don’t loose compiler support and type-safety. Let’s follow this route.
Gesture adapter:
| sealed class WelcomeGesture { | |
| // Native gestures... | |
| /** | |
| * Login flow gesture | |
| * @property value Login flow gesture | |
| */ | |
| data class Login(val value: LoginGesture) : WelcomeGesture() | |
| /** | |
| * Register flow gesture | |
| * @property value Register flow gesture | |
| */ | |
| data class Register(val value: RegisterGesture) : WelcomeGesture() | |
| } |
Adopting foreign gestures
UI-state adapter:
| sealed class WelcomeUiState { | |
| /** | |
| * Login state wrapper | |
| * @property value Login UI state | |
| */ | |
| data class Login(val value: LoginUiState) : WelcomeUiState() | |
| /** | |
| * Register state wrapper | |
| * @property value Register UI state | |
| */ | |
| data class Register(val value: RegisterUiState) : WelcomeUiState() | |
| } |
Adopting foreign UI state
View implementation
Now let’s build feature and host composables to take advantage of our adapters.
Feature master-view:
| @Composable | |
| fun LoginScreen(state: LoginUiState, onGesture: (LoginGesture) -> Unit) { | |
| // Login screen rendering... | |
| } | |
| @Composable | |
| fun RegistrationScreen(state: RegisterUiState, onGesture: (RegisterGesture) -> Unit) { | |
| // Registration screen rendering... | |
| } |
Feature master-view
Application master-view:
| fun WelcomeScreen(onTerminate: @Composable () -> Unit) { | |
| val model = hiltViewModel<WelcomeViewModel>() | |
| val state = model.state.collectAsState(WelcomeUiState.Loading) | |
| BackHandler(onBack = { model.process(Back) }) | |
| when (val uiState = state.value) { | |
| // Native ui-state rendering... | |
| // Render login screens | |
| is WelcomeUiState.Login -> LoginScreen( | |
| state = uiState.value, | |
| onGesture = { model.process(Login(it)) } | |
| ) | |
| // Render registration screens | |
| is WelcomeUiState.Register -> RegistrationScreen( | |
| state = uiState.value, | |
| onGesture = { model.process(Register(it))} | |
| ) | |
| } | |
| } |
Application master-view
To sum-up:
- We delegate rendering of ui-states to feature composables by unwrapping proprietary states from common view-state system.
- We wrap any feature gesture to master-gesture system and pass it to our model to process.
Adopting foreign machine-state system
The last thing we need to do to be able to run a feature module in our host system is to to run the feature machine-states in our application state machine. Remember we have bound both the gesture system and the ui-state system to both our state-machine and machine-state:
| /** | |
| * Common state machine | |
| * @param G UI gesture | |
| * @param U UI state | |
| */ | |
| interface CommonStateMachine<G: Any, U: Any> : MachineInput<G>, MachineOutput<G, U> | |
| /** | |
| * Common state-machine state | |
| * @param G UI gesture | |
| * @param U UI state | |
| */ | |
| open class CommonMachineState<G: Any, U : Any> |
Base state-machine interfaces
Given that our states has a simple and clear state interface and lifecycle we could encapsulate the feature state-machine logic in our host state with the ProxyMachineState by running a child state-machine inside the host state!
| abstract class ProxyMachineState<PG: Any, PU: Any, CG: Any, CU: Any> : CommonMachineState<PG, PU>() { | |
| /** | |
| * Proxy state machine | |
| */ | |
| private val machine = object : CommonStateMachine.Base<CG, CU>(::init) { | |
| fun doStart() { | |
| start() | |
| } | |
| override fun setUiState(uiState: CU) { | |
| this@ProxyMachineState.setUiState(mapUiState(uiState)) | |
| } | |
| } | |
| override fun doStart() { | |
| machine.doStart() | |
| } | |
| override fun doProcess(gesture: PG) { | |
| mapGesture(gesture)?.let(machine::process) | |
| } | |
| override fun doClear() { | |
| machine.clear() | |
| } | |
| /** | |
| * Creates initial child state | |
| */ | |
| protected abstract fun init(): CommonMachineState<CG, CU> | |
| /** | |
| * Maps child UI state to parent if relevant | |
| * @param parent Parent gesture | |
| * @return Mapped gesture or null if not applicable | |
| */ | |
| protected abstract fun mapGesture(parent: PG): CG? | |
| /** | |
| * Maps child UI state to parent | |
| * @param child Child UI state | |
| */ | |
| protected abstract fun mapUiState(child: CU): PU | |
| } |
Whenever a ProxyMachineState is started it launches it’s internal instance of a state-machine bound to the feature gesture and view systems. It also bridges two incompatible gesture/view systems by wrapping/unwrapping and adopting one system to another by calling two adaptor methods:
mapGesture— maps parent system gesture to child system if it has a relevant mapping (we could returnnullto skip gesture processing).mapUiState— maps child UI-state to parent UI-state system. For example by wrapping a child state to some wrapper like we have done in previous section.
Let’s bring everything together and build a login flow proxy to make things clear:
| /** | |
| * Proxy definition (for readability) | |
| */ | |
| private typealias LoginProxy = ProxyMachineState< | |
| WelcomeGesture, // Host gesture system | |
| WelcomeUiState, // Host ui-state system | |
| LoginGesture, // Feature gesture system | |
| LoginUiState // Feature ui-state system | |
| > | |
| class LoginFlowState( | |
| private val context: WelcomeContext, | |
| private val data: WelcomeDataState, | |
| private val loginComponentBuilder: LoginComponentBuilder | |
| ) : LoginProxy(), WelcomeFeatureHost { | |
| /** | |
| * Should have valid email at this point | |
| */ | |
| private val email = requireNotNull(data.email) { | |
| "Email is not provided" | |
| } | |
| /** | |
| * Creates initial child state | |
| */ | |
| override fun init(): CommonMachineState<LoginGesture, LoginUiState> { | |
| val component = loginComponentBuilder.host(this).build() | |
| val starter = EntryPoints.get(component, LoginEntryPoint::class.java).flowStarter() | |
| return starter.start(email) | |
| } | |
| override fun mapGesture(parent: WelcomeGesture): LoginGesture? = when (parent) { | |
| is WelcomeGesture.Login -> parent.value // Unwraps LoginGesture from host system | |
| WelcomeGesture.Back -> LoginGesture.Back // Translates from one system to another | |
| else -> null // Ignores irrelevant gestures | |
| } | |
| override fun mapUiState(child: LoginUiState): WelcomeUiState = WelcomeUiState.Login(child) | |
| override fun backToEmailEntry() { | |
| Timber.d("Transferring to e-mail entry...") | |
| setMachineState(context.factory.emailEntry(data)) | |
| } | |
| override fun complete() { | |
| Timber.d("Transferring to complete screen...") | |
| setMachineState(context.factory.complete(email)) | |
| } | |
| } |
Login flow proxy
Let’s break down the implemented methods:
init()– creates a starting state for a proxy state-machine. We fetch aFlowStarterinterface from feature’s DI component to create a starting state and initialize the proxy state-machine. The child requires theWelcomeFeatureHostto providebackToEmailEntryandcompletemethods for host interaction, so we implement it here and provide the state instance to component factory. The proxy implementsWelcomeFeatureHostby switching host machine to email or complete states.mapGesture– maps a gesture from the main gesture system to the child system. You may unwrap the gesture we have implemented in the previous section, adopt one system to another as with theBackgesture or discard irrelevant gesture by returningnullfrom your implementation.mapUiState– performs a transition from a child ui-state system to the main one. We just wrap one from another as we designed before.
Switching flows
Now that we have proxy states implemented for both login and registration flows, we use our state factory to create them and switch the host state-machine to the appropriate flow depending on the email check outcome:
| class EmailCheckState( | |
| context: WelcomeContext, | |
| private val data: WelcomeDataState, | |
| private val checkEmail: CheckEmail | |
| ) : WelcomeState(context) { | |
| private val email = requireNotNull(data.email) { | |
| "Email is not provided" | |
| } | |
| override fun doStart() { | |
| setUiState(renderer.renderChecking(data)) | |
| stateScope.launch { | |
| val exists = checkEmail(email) | |
| if (exists) { | |
| setMachineState(factory.loginFlow(data)) | |
| } else { | |
| setMachineState(factory.registrationFlow(data)) | |
| } | |
| } | |
| } | |
| } |
Email check and flow switch
Conclusion
I hope someone finds the article (and the library if you like to take it as-is) helpful in building complex multi-screen applications with multi-module ability. This approach aims to give you as much freedom as possible to implement your logic. Of course, it is not a silver bullet but the flexibility in structuring your app in this pattern plays well in most scenarios. You could combine all your application steps in a single machine-state flow or build separate view-models and inject them to the parts of your navigation library graph. And you could also use any architecture inside your states – simple coroutines to fetch the data, complex RxJava flows or even another MVI library in more complex cases.
The library was created with the multi-platform approach in mind as it contains no concrete platform dependencies and coroutines extensions are optional. So you may create your view logic once and adopt its output to your platform view components.
The full library and sample code are available at GitHub. Have fun!
Thanks to Omolara Adejuwon
This article was originally published on proandroiddev.com on August 22, 2022


