


This article aims to bring some learning while scaling an application, going from zero to more than 150 modules. We will present the pains and challenges encountered during this journey and the evolutionary process of the application (app) and the team in the last five years.
The challenges encountered here are related to building a product aiming to have only a single repository (mono repo) for all the functionalities of the project.
The points of view presented below to describe what happened while leading the creation of Stone’s banking app.
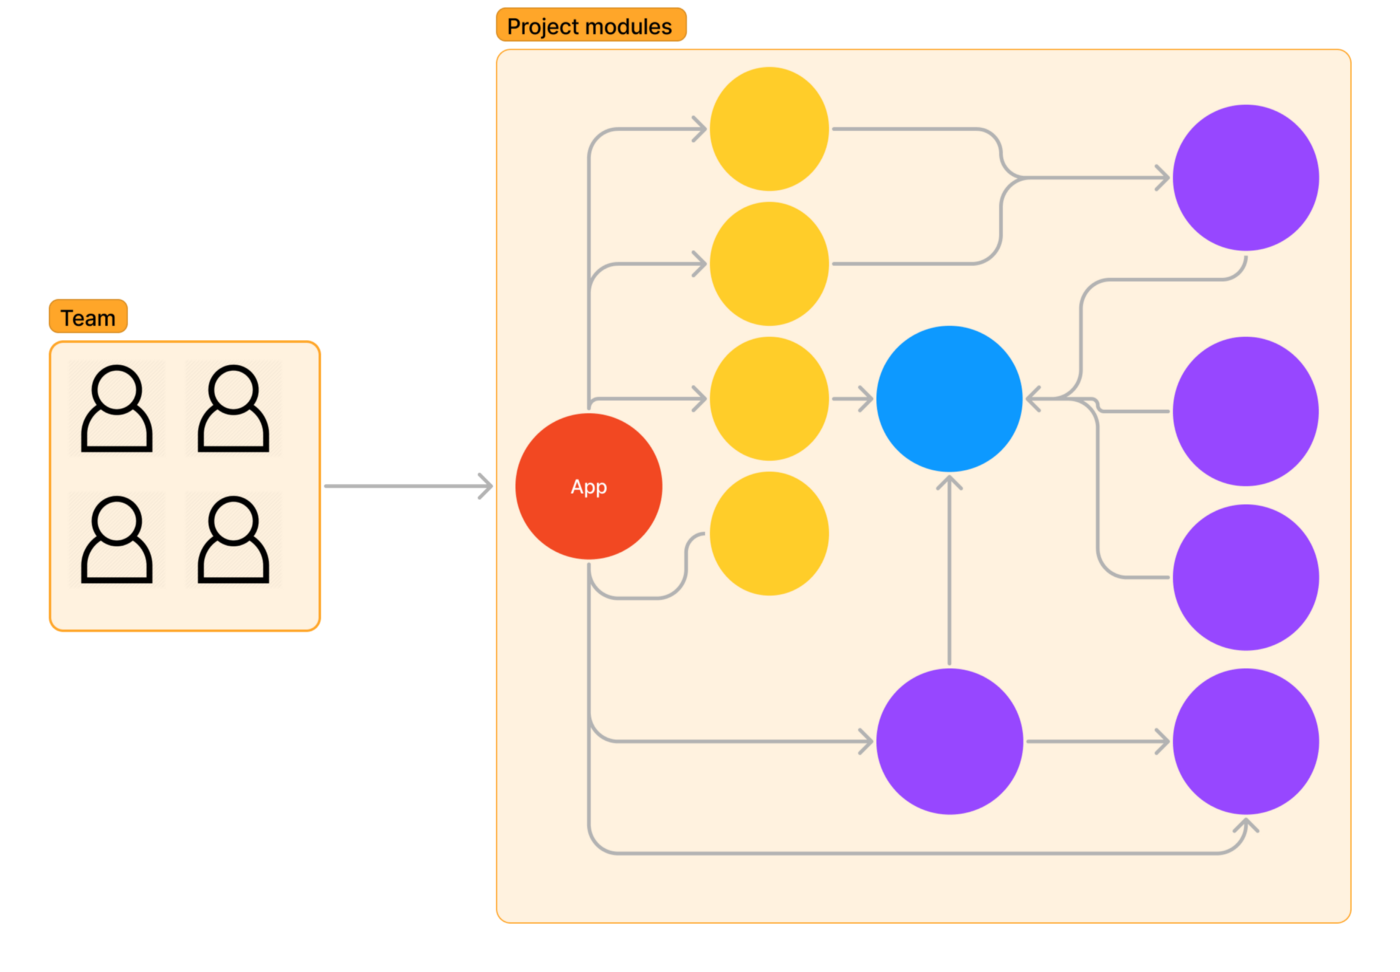
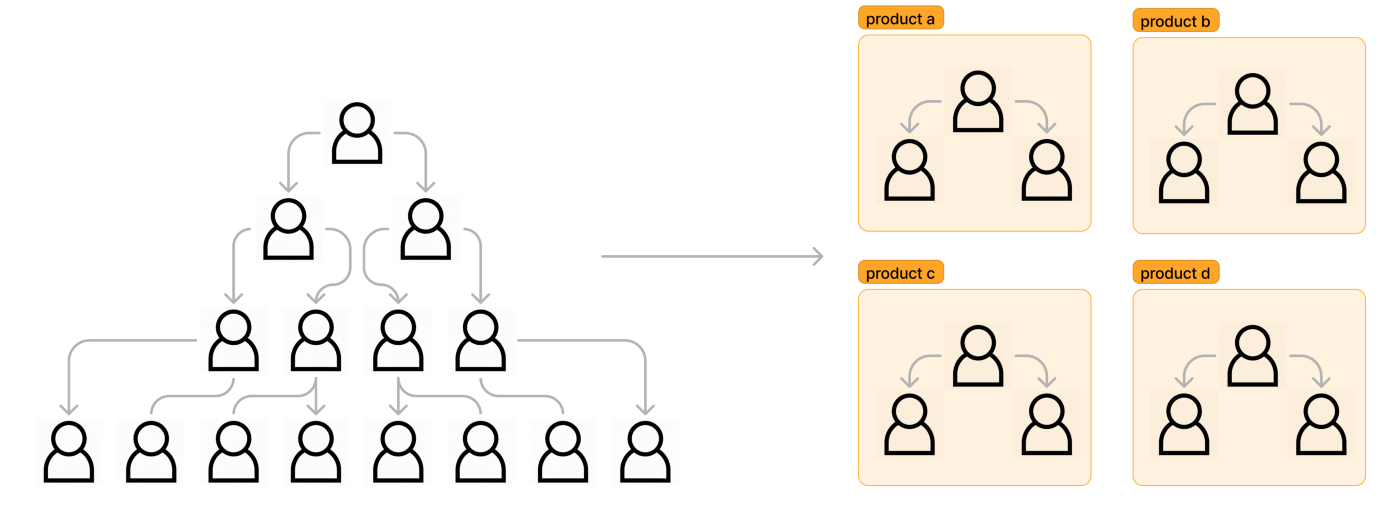
The image above shows how the team organization worked, where the whole team was responsible for all functionalities simultaneously.
Modules go beyond Gradle.
When modularizing an application, one of the goals is to decrease the build time. Therefore, they must have a few dependencies when structuring the project in modules. This way, the Gradle will execute them in parallel, thus optimizing the build time.
Modularizing is one of many things to do to improve build time. Adding some basic and advanced Gradle configurations can help to improve the build time. To learn more about Gradle configurations Tony Robalik and Adam’s content is beneficial. Start with this article here and here.
If the build time improves by applying some of the settings from the above articles, it may not be time to modularize your application so much.
“With this introduction, why do we go beyond Gradle?”
Every project and every company has a different structure that can generate a different code structure. Your code and its form tend to be a reflection of the organization of the company. It is known as Conway’s law.
In short, Conway’s law says that an organization’s structure will reflect in the code creation. It is not a good or bad thing, but it is interesting.
In addition to Gradle, it is very worthwhile to understand how the organization’s structure works, the relationship with the Android team, and how it does product development daily. Furthermore, having an understanding of the structure can facilitate the way modularization comes about.
Be careful about how and which modules you want to create. There is no golden rule on how to do it. The following ideas are influenced by the structure and size of the team as time goes on developing the project.
Modularization in the early days
The project was multi-module from the first day. Four developers formed the team, the application had few lines of code, and the whole team could understand the entire project calmly.
In the beginning, the application’s design defines the use of three modules types:
- Base: modules that generate value for developers, such as all the logic to make a request, utils functions, extension functions, etc. These are the modules represented in purple. For example, the utils module existed to keep all the application’s resources (images, strings, extensions) in one place.
- Feature: module that generates direct value for the customer, that is, an application functionality, represented in yellow.
- Business: module that contains all business rules of all functionalities, represented in blue color in the image
To create a new feature following the structure above, add a new module starting with the word “feature”, then you had to add part of the business rule (domain module). And finally, modify the service module responsible for making requests to the API.
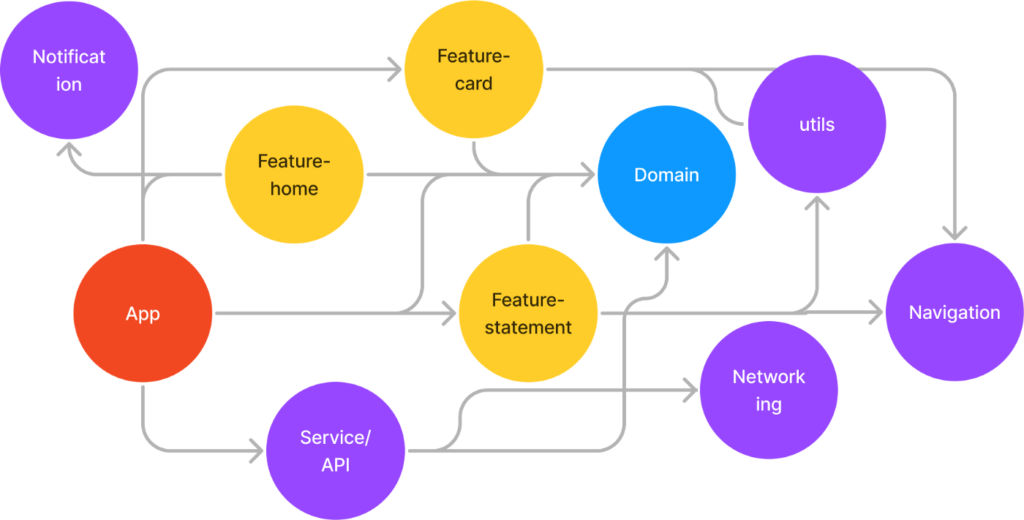
This structure made a lot of sense for the whole team. There were more than ten modules in the application and very few code conflicts, even though the entire team changed parts in common.
The philosophy for structuring the modules as in the drawing above was quite simple: create as many Kotlin modules as possible, so we went with a layered modularization. This kind of structuring separates the code of the same functionality between different modules. So, for example, in the feature module, you would find part of the code related to the screen the user will see; in the domain module, the business rule or how that functionality works; and in the service module, all the code related to the request and response with the server/API.
The structure reflects how the team worked daily since no member had exclusive responsibility for any specific functionality.
Moving forward in time, now with 200,000 lines of code and a bigger team
Two hundred thousand lines of code don’t seem like such a significant number, but remember that the project didn’t use any code-generating libraries like Dagger, nor did it use Kotlin annotation processors (kapt).
The previous section’s modularization structure stayed the same for about three years. Still, in addition to the main project, the team now had five repositories, three different libraries, and one side project to maintain the main project. So, in addition to the 200,000 lines of code in the main project, there were still four smaller code bases to support.
The team had, on average, ten developers contributing daily to the codebase and the main project with just over 70 modules.
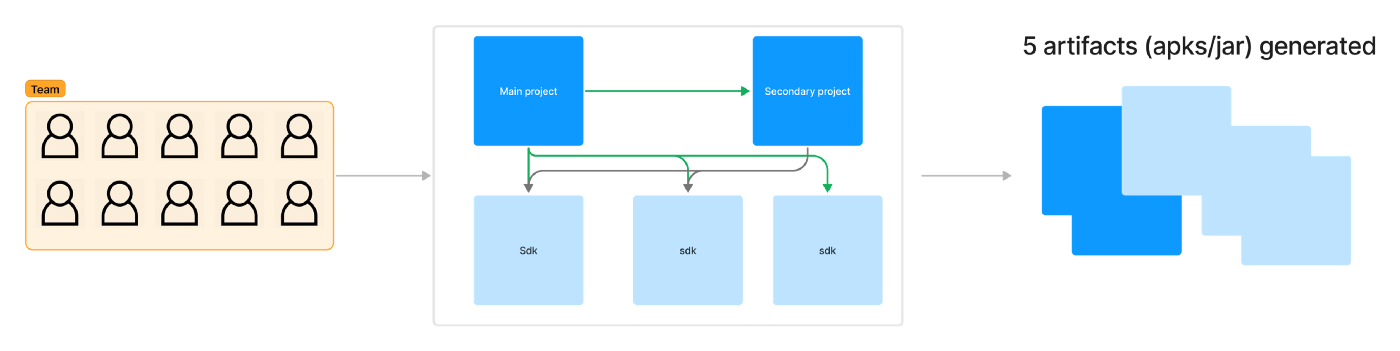
This structure, with several repositories, has created some problems:
- Maintain SDK version. Time lost with CI/CD (continuous integration/ continuous deployment) generating new versions needed for the primary and secondary projects.
- Update configurations, it was necessary to open many pull requests(PR) to keep up-to-date versions of Kotlin, Gradle, and libraries with dependencies in the projects.
- Code repetition and some standard definitions across projects and libraries, so a bug fixed in one repository did not necessarily generate a fix in the other.
This structure impacted the team’s productivity. It was a lot of silly PR to keep things in order.
As a solution, a restructuring was made to have only one repository. However, it took work to do. It took several months of dedication to make small changes and solve the problems found, among them:
- In different Gradle structures, the scripts differed, some in Kotlin and some in Groovy.
- Artifact generation. How to generate a set of different SDKs and projects from a single repository?
- Conflicts between similar abstractions but with different implementations.
- Different versions of Kotlin between projects
- Circular dependency when migrating modules
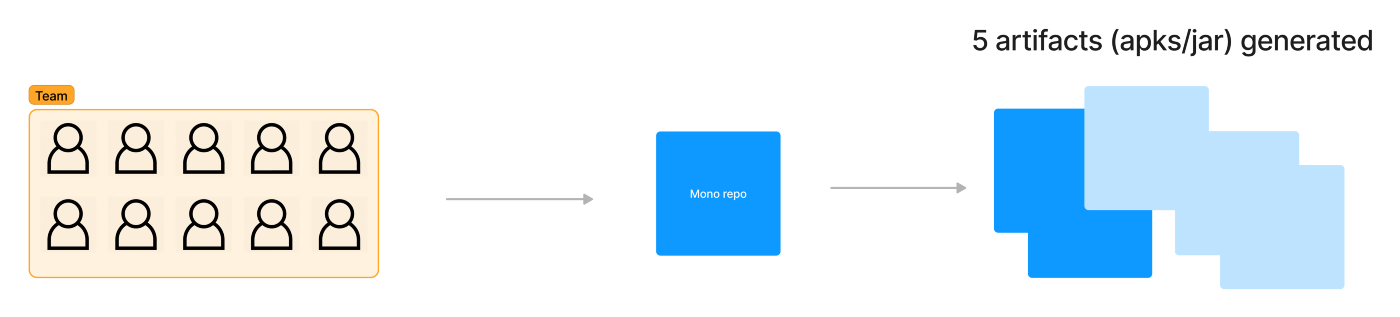
Migrating to the mono repo proved to be a great solution. It significantly has reduced the cost of configuring and updating dependencies. In addition, it positively impacted productivity as it was no longer necessary to pause the development of a feature while waiting for new artifacts from some of the maintained libraries/SDKs.
The migration does not stop the development of new functionality.
If possible, avoid a generic utils module.
After the migration to the mono repo, the utils module showed that it was not a good idea because, at some point, it was the place for any new abstractions defined by the team. It was possible to find all kinds of code even if there was no cohesion between them. Over time almost all other functionality modules depended on utils.
It is much more interesting to create a set of modules with well-defined abstractions used separately in different application parts. So, for example, instead of having utils/threads where threads are a folder of this module, it is much more interesting to create a util-threads module keeping such a module focused on solving or providing only a tiny piece of an abstraction used by the application.
The lesson here is that if you are going to create a module without a good definition, don’t do it, time goes by, and it may be costly to remove or organize this new module in the future.
Build time started to grow. The problem was solved (with money)
Three years had passed, and the team’s computer was still the same. However, despite the modularization, the build time was no longer suitable, and the available equipment could have been better. So the most straightforward and wisest decision was taken to update the tooling available to the team, which solved a good part of the problems.
So, update the team’s computers whenever possible. Demand this from your leader, the team’s productivity increases significantly, and the investment pays itself back quickly for the whole team. Some articles talk about this.
Investigating the build time
When investigating the build time, this talk helped a lot to get an idea of how the project’s modularization could evolve.
Thiago created a sample project to validate what had been learned. It has a considerable amount of modules. It was thought to be this way and seeking to understand and apply some ideas of different modularizations.
Some learning from the research:
- Avoid buildSrc may help. Use included build
- Define a relationship between modules, and focus on a flat module hierarchy. For example, a feature module cannot depend on another feature module, so the depth of your build graph could be better.
- Bring modules that have the same business rule together.
- Follow Gradle’s updates/new features closely.
Actions from learning
A revision was made in the layered structure since several modules were changed, requiring the Gradle to build again instead of using its cache. It had an impact on the time it took to run the application.
An approximation of the code of the same functionality was then made so that the entire business rule was closer and isolated from the other modules. As a result, the functionality modules now consist of a structure as follows:

This way, fewer modules were altered to change or create a feature, allowing for greater reuse of the Gradle cache.
One benefit of this approach is that it became much simpler to understand the code of a feature since they were much closer. It was essential since knowing the project’s code was no longer possible.
The structure has evolved from a layered-only organization to one containing functionality modules and support modules. Networking is an example of support, where the entire retrofit configuration is defined. This module is then used by a feature module which only needs to create the retrofit interface with the endpoints required for the feature.
With this separation, was made a review of the flow of creating a feature. It was seen that there was a lot of code with shared access and that the more isolated such modules could be, the fewer problems there would be, such as, for example, fewer code conflicts and fewer changes breaking features indirectly.
Restructuring the team and how the project turned out
Currently, the project has evolved into a super-app, aiming to facilitate the customer’s access to the most different functionalities available in the company’s products.
To become a super-app, the team took a code base more extensive than the one existing in the application. After joining the two products, all products needed to continue their releases. Given the amount of functionality that now exists, it was necessary to review the team structure. There used to be a model very focused on a hierarchy that changed to a matrix team structure by tribes, squads, etc.
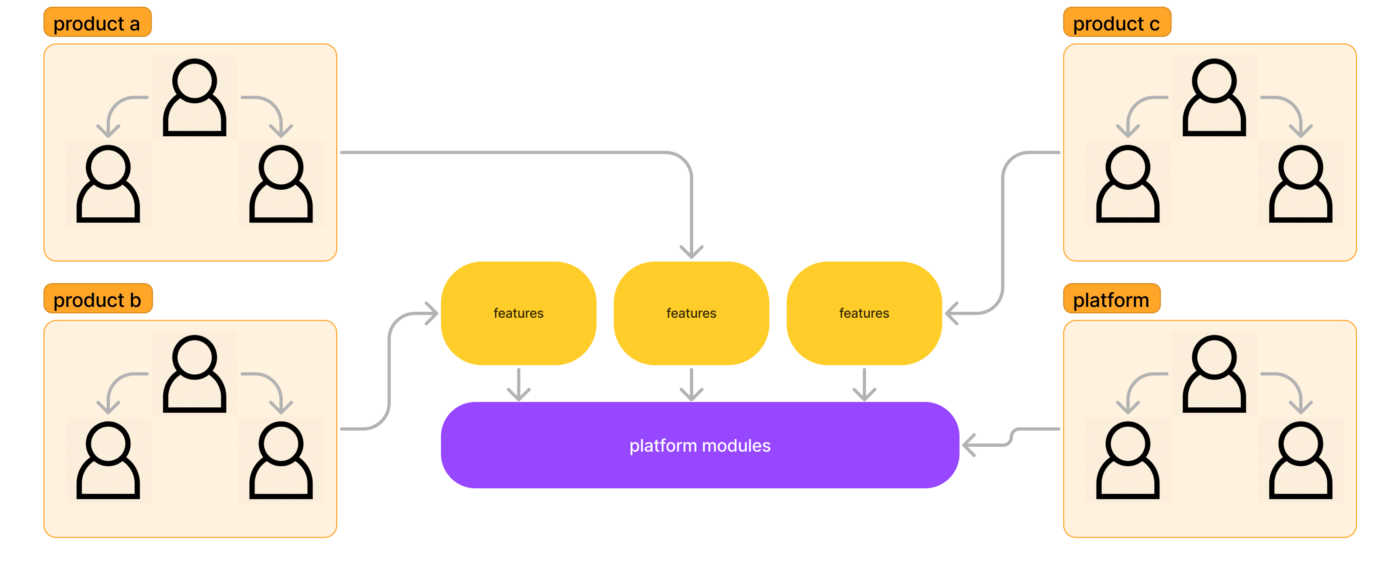
This distributed model allowed improvements to the project organization. For example, besides the teams responsible for customer functionality, a team responsible for the Android platform was created to support feature teams.
To continue with the organization, a division of the various modules of the application was made among the multiple functionalities and platform teams, arriving at the following division:
Legacy Modules: All modules with this nomenclature should cease to exist in favor of a more isolated project structure. For example, the domain module in blue in the initial images should cease to exist since the business rules are part of the feature modules.
There are some legacy modules, and each team is responsible for migrating a piece of this code to the current structure.
Feature Modules: Modules that add value directly to the customer. Each functionality team has a group of modules for which they are responsible.
Platform Modules: Modules that provide the resources to the teams that create custom functionality. For example, all networking logic, security, caching, analytics, di, feature flags, design system, performance, etc.
Support Modules: Modules where several teams still have contact, such as the application’s home page, where there are various product entry points.
Each team is responsible for a different product of the application
OUR VIDEO RECOMMENDATION


Jobs
Improving build time with Focus
With a clear relationship between the different modules, it was possible to add the Focus plugin developed by the Dropbox team. When applied, the Focus plugins show only the module focused depends on it. In addition, Gabriel Souza created a plugin for the android studio on top of Focus to make it easier to use Focus. With it, you have to click on a module, select Focus, and wait for Gradle to update the project.
Adding sample apps to the project
All app projects have an app module with an application plugin applied; when creating a new module in the same project, the android studio will add the library plugin.
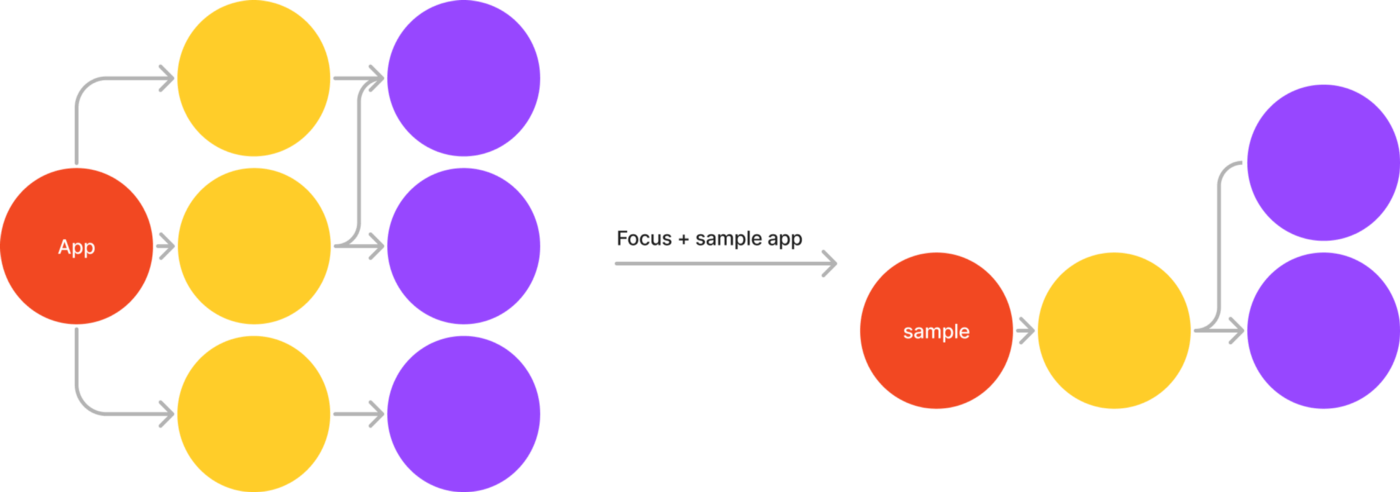
The app module must have a dependency with all other application modules so that when generating an apk, all functionality is present.
The sample app helps build just a piece of the application, so instead of depending on all modules, the sample app will rely on a smaller set of modules, thus making the build time shorter or much shorter.
Since each squad now has a separate module group responsible for, different sample apps have been created throughout the project so that you can build only some of the applications.
Some basic rules considered when creating a sample app:
- It should go through the authentication process in the same way as the app module so that the team works with a user session like the app that goes into production. That is, it has a dependency on the login module.
- Add only the modules you are working on
- Create an activity/view/compose/fragment that is the navigation destination after authentication
- Overwrite the navigation to navigate the new screen created in the above step.
There were two central problems; the first was navigating after finishing the authentication flow and assembling the library graph used for dependency injection (DI). The project uses Kodein.
Automatizing the sample creation helps the adoption by the team. The script performs the following actions:
- Automatically creates the sample app.
- A new class, SampleAppApplication, was created to solve the dependency injection. This class helps to structure the dependency injection for the sample app.
- The generated activity presents a list of buttons that, when clicked, navigate to the functionality in Focus.
Once the script runs, the person adding the sample needs to update the existing navigation list in the SampleAppApplication class that would expect a return of type map<String, Screen>. The implementation would be something similar to the following:
fun listOfEntryPoints() = mapOf(
  "Button Text" to Navigation.Home,
  "Second flow to navigate" to Navigation.CopyAndPaste
)
The screen is part of how navigation works in the project. It is a sealed class where there is a mapping to some screen.
Besides the navigation, it was necessary to define which dependencies the sample app had with other modules. To do this, we just had to update the build.gradle.kts file
dependencies {
    implementation (project(":module-xyz)")
    ...
}
The script is related to the project structure since it is linked with the navigation system of the application and the DI.
Reflecting the team structure in the project
With the project containing such a large amount of modules, an organization was made that made it easy to find your way around the project.
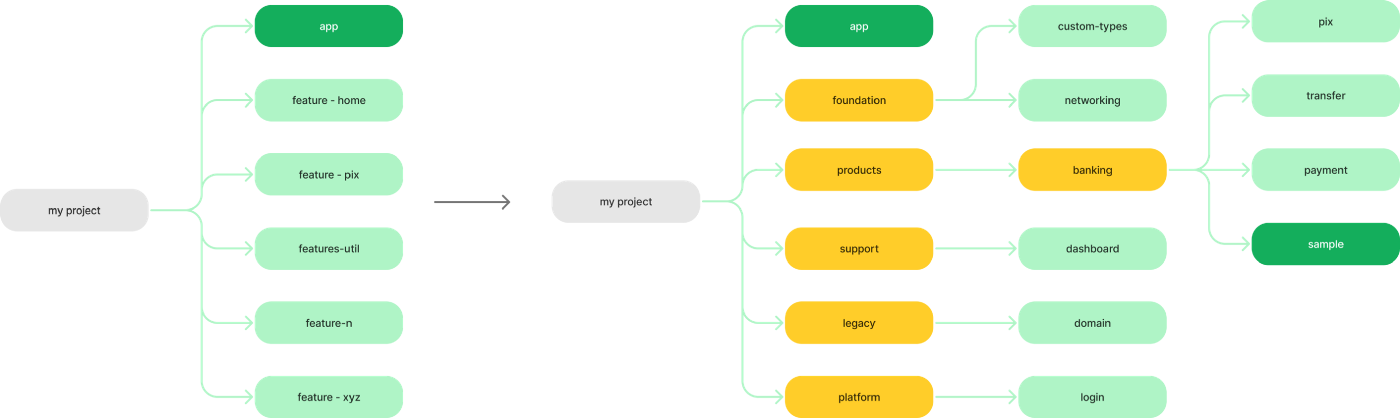
Nowadays, the project structure is similar to the team organization. Where there are several squads in different tribes adding features to the project, so it was natural for the team to say, “I work on the Android project on XYZ product.” So, instead of listing all the modules right at the root of the project (imagine opening the project and trying to find where you are working on one of the 150+ modules listed), it was restructured as shown in the picture below:
This structure has proven flexible in two ways:
- If a tribe’s team grows, there is not such a significant effort to separate a module into two if necessary
- If a module gets too big, it is easy to break it down into smaller modules while keeping the code structure cohesive.
How to break down a large module and maintain cohesion?
For example, Pix is a payment method developed by the Central Bank of Brazil that enables transactions to occur in less than 10 seconds, 24 hours a day, seven days a week — including weekends and holidays.
The Pix module, in the future, will need to be separated into several other modules since there are always some updates from the central bank. With the evolution of this functionality, the structure could be something like this:
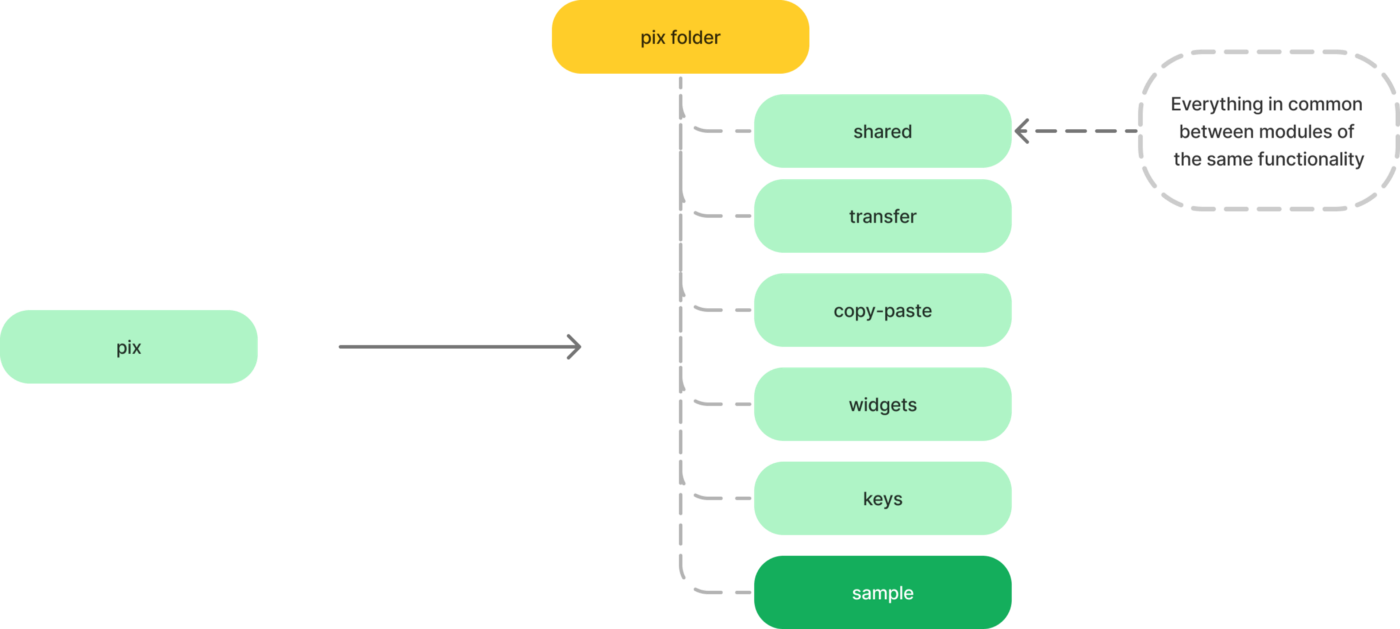
Ideally, modularize to this level only if it is essential or if the module starts to impact build time.
Widget modules aim to isolate pieces of functionality used by other feature modules. For example, the home of the application displays an entry point to access Pix. So instead of depending directly on a constantly changing module that will never be able to use the Gradle cache, the home module becomes dependent on a module with point changes, thus keeping build time healthy.
Defining a structure that aims to keep the dependency between modules as flat as possible is essential. Note that widgets avoid the direct relationship between modules of different features.
The shared module design isolates everything in common with other modules of the same functionality or product. This way, there is no need to create several retrofit interfaces or repeat several templates since they have a common domain.
Shared avoids separation by layer, so such a module contains everything from the user interface to the data input and output layer. Note that Shared avoids a direct relationship between modules of the same feature as in Pix.

Shared and widgets are nomenclatures defined to share code across the project and maintain a clear team understanding of what each module does. The important thing here is to define transparent relationships between modules.
Structuring (creating modules, moving folders, etc.) requires updating the settings.gradle file and all module imports in the build.gradle files that are affected. Keep in mind that this can take a bit of time.
Maintaining the health of the project.
Currently, the project is extensive, and there are adjustments every day. However, a few things can help.
- Remove unused dependencies
- A review of the project structure is healthy
- Check if there is too much depth in the Gradle graph
- Add a readme in the module root describing some of the business rules.
- Prefer composition over inheritance (this project does not have any base class (BaseActivity, BaseFragment, BaseXYZ), this makes modularization easier
In conclusion
Don’t exaggerate the number of modules. Instead, take the time to create good abstractions, even if they are in a single place. They will be helpful in modularization over time.
Avoid exaggerations in your architecture, and remember that the product’s value is not only in the number of modules it has but also in how the application improves the customer’s day-to-day life.
Observe how the project structure should evolve, look at the culture and company structure you are working for, and don’t just look at what is in the development hype.
A technical and business vision will bring benefits and maturity to the project.
If you have questions, you can find me on Mastodon and Twitter, and we can talk there.
Thanks to Leonardo Paixão, Breno Cruz, Allan Hasegawa, and Thiago Oliveira for all the technical reviews and suggestions.
This article was originally published on proandroiddev.com


