

To authenticate with MIFARE DESFire Light cards a pre-shared AES-key is needed. This key needs to be stored safely. On Android the safest place for the key is in the secure hardware of the device using the Android Keystore. The Android Keystore is very restrictive. The key is imported into the keystore together with a list, which specifies which operations are permitted. Since the key can not leave the secure hardware, it can only be used with algorithms available inside the keystore. These features have two challenging consequences. I will discuss how to solve them in the following.
This article will not discuss any details about distributing AES-keys from a server to the devices and importing them into the Android Keystore. This is a quite advanced topic on its own. I will assume you already have that mechanism in place.
MIFARE DESFire Light authentication and the Android Keystore challenge
Let us recap which steps are needed in order to establish encrypted communication. We’re going to look at AuthenticateEV2First only. Which is the default way for authentication with these type of cards. Please refer to the official nxp documentation if you need further details.
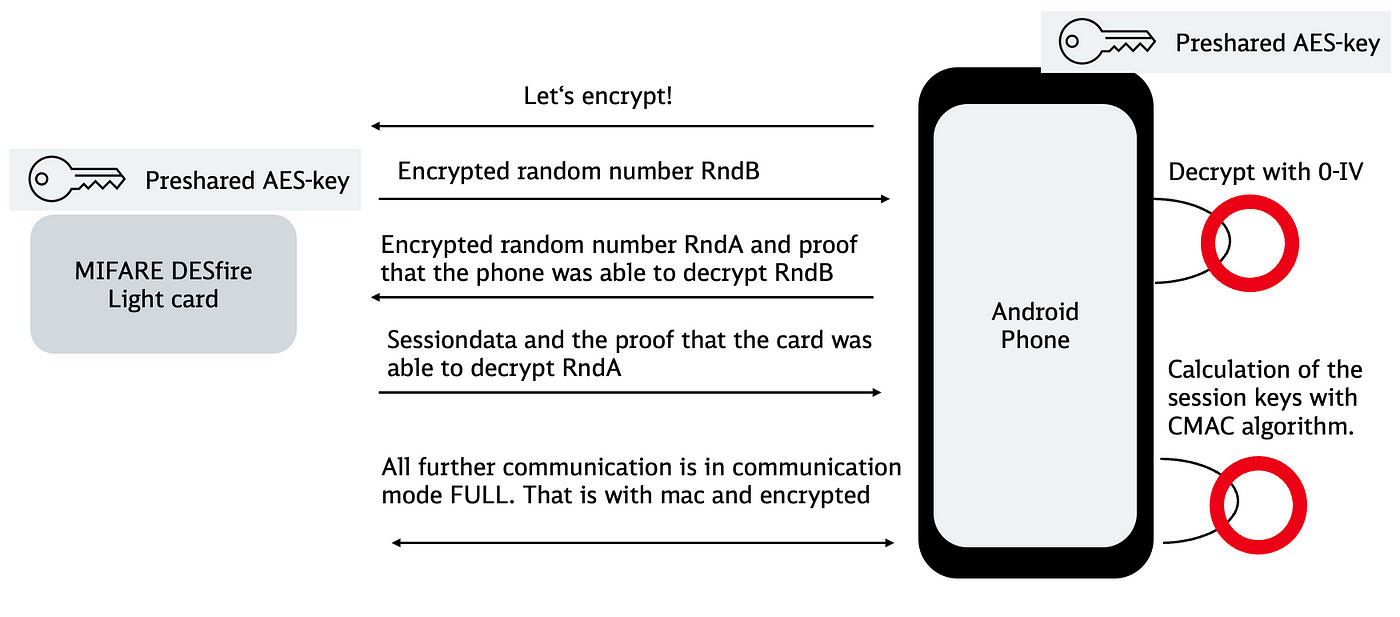
Simplified process to start communication in CommunicationMode.Full
The phone proves to the card that it posesses the AES-key without exposing it and vise versa. The process consists of the following steps:
- The phone initiates authentication and receives a random number RndB, which was encrypted by the card. An AES/CBC cipher is used with the pre-shared AES-key and a fixed zero initialisation vector (IV).
- The phone decrypts RndB and returns the proof, together with an encrypted random number RndA.
- The card proves in turn that it was able to decrypt RndA by returning the proof together with the initial session data.
- With the initial session data the session keys are calculated using a CMAC algorithm. All consecutive communication with the card will be encrypted with these session keys, which mutate with each call.
When going through this process with an Android Keystore key, the first challenge is that an IV set by the caller is not permitted by default but is needed for steps 1 to 3. The second challenge is, that the CMAC algorithm needed for step 4 is not available in the Android Keystore. Let’s look at the two problems one after the other.
Solving the “caller-provided IV not permitted” challenge
The Android Keystore does not permit setting an IV for a cipher by the caller by default. Instead the cipher generates its own IV randomly to make sure same input does not yield same output. Therefore trying to set the zero IV for our AES/CBC cipher will result in an exception like this:
java.security.InvalidAlgorithmParameterException:
  Caller-provided IV not permitted
This is good when you use the key for encryption. But when using it for authentication, it is crucial that the phone and the card do the same steps. Therefore we will allow a caller provided IV for this key.
Distributing secret keys to Android and importing them into the Android Keystore is explained in the Android docs. Roughly, the AES-key is encrypted server-side with a public key created in the Android Keystore. Then the encrypted AES-key, together with its metadata, is sent back to the device in ASN.1 format. On the device the key is imported into the keystore where it is decrypted in turn.
The ASN.1 for the key and its metadata looks like this:
| KeyDescription ::= SEQUENCE { | |
| keyFormat INTEGER, | |
| authorizationList AuthorizationList | |
| } | |
| SecureKeyWrapper ::= SEQUENCE { | |
| wrapperFormatVersion INTEGER, | |
| encryptedTransportKey OCTET_STRING, | |
| initializationVector OCTET_STRING, | |
| keyDescription KeyDescription, | |
| secureKey OCTET_STRING, | |
| tag OCTET_STRING | |
| } |
For our challenge the interesting part is the AuthorizationList. This property is explained in this android reference. There we also find the ASN.1 description of the AuthorizationList itself:
The property which we have to set in order to provide a custom IV is called CALLER_NONCE and is omitted in the documentation, but it is implemented in the android keymaster hal. There we learn that it is enumerated with 7. We also need the block mode, which is enumerated with 4. Here I include it into the ASN.1 definition of the AuthorizationList:
Jobs
Now we have to add this property in our implementation that constructs the ASN.1 bytearray. We add callerNonce only for the AES-key where it is necessary. Providing an IV for a cipher is bad practice as mentioned above. We only enable it for the AES-key used for authentication. Also, you should only set the needed algorithm and block mode to be sure that the key is not used with insecure algorithms. Here ist the snippet:
We use Bouncy Castle to create the bytearray. If you want to understand ASN.1, read this great article. There is, of course, much more code required to create the SecureKeyWrapper, but here we just concentrate on the steps required to communicate with the MIFARE card. After you set the key properties correctly, the encrypted AES-key should be distributed to the devices and imported in the keystore as usual.
Solving the “CMAC algorithm” challenge
The second challenge is, that there is no CMAC algorithm available in the Android Keystore. It is impossible to use an Android Keystore key outside of the Android Keystore (this is the main reason why it is so safe). Therefore we can not use e.g. Bouncy Castles CMAC implementation.
The good news is: the only moment we need the AES-key is when we encrypt something with an AES/CBC/NoPadding cipher. In other words: we can write the Android Keystore compatible CMAC function independent of the key itself:
fun cmac(message: ByteArray, cipher: () -> Cipher): ByteArray
The AES/CBC cipher is available in the Android Keystore, actually we use it in the authentication process. So we just have to implement the rest of the CMAC algorithm ourselves. The original CMAC paper looks very challenging, but luckily there are many implementations already. I refer to the implementation of crypto swift to understand how this works. In the end it boils down to chopping the message into blocksized parts, some bitshifting, encryption and xor’ing. If you implemented the AuthenticateEV2First process up to this point, it’s easy as pancakes.
Wrap up
Finally, we are able to do steps 1 to 3 proving to the card that the phone is authorised to establish encrypted communication. And we are even able to calculate the session keys in step 4 and communicate encrypted in CommunicationMode.Full. All in all it is not easy to implement the process using an Android Keystore key. But in the end it works and the AES-key is as safe as possible!
Thanks to Stefan Schrass and my team at Deutsche Bahn who made this work possible.
This article was originally published on proandroiddev.com on December 16, 2022


