


We have all heard about how modularizing your android app into different modules is beneficial for code maintainability as well as build performance. So in this blog, we are going to talk about how the same is possible for your instrumentation tests.
An android library module as well as an application module can have an androidTest source set in which you can write tests that run on a device as well as a test (unitTest) source set that runs locally on the JVM. You might be tempted to write all your tests on the JVM and use frameworks like Robolectric or use Mocks/Stubs wherever you might need some Android framework dependencies as they are faster and easier to execute. But in your application, you might have a native library that is not compiled for your local JVM machine or you may want to write tests that test the app on an actual device, this is when writing tests inside androidTest source set is needed. Both Developers and QAs in your team can automate the different scenarios in your application by writing tests inside the androidTest source set.
The androidTest source set on an app module can often end up increasing a lot in size having hundreds and even thousands of tests. It might be having a combination of screenshot tests, network tests, end-to-end workflow tests, performance tests, etc… Just generating an android test APK for a new test might take more time than your normal APK. If you also use plugins like Hilt or Dagger, this can become worse. It can also become difficult to decide which tests would work locally without any external factors or which tests depend upon a particular device or dependency. You might even have to introduce new annotations to manage them effectively.
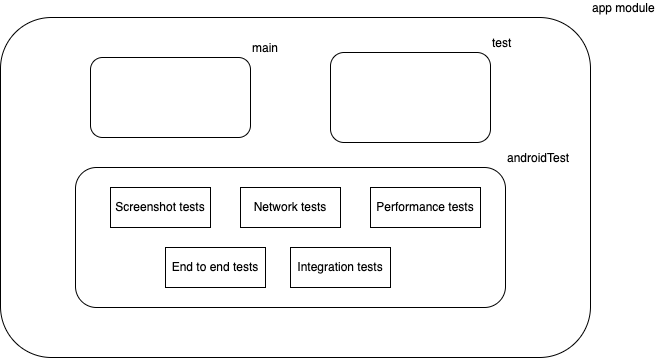
androidTest source set has a lot of different tests
This is when the androidTest code starts becoming difficult to manage.
Splitting test code into modules
To make the test code more maintainable, you can decide to split your android test code into different Gradle modules. One way to do that is to create separate library modules where you would include your app as a dependent module. But doing that is not so straightforward, and you might end up facing weird manifest merging issues. Also, you would be creating completely new library modules where you don’t need either the main or the test (unitTest) source set.
This is where Android Test modules come to the rescue. These are special modules that only contain instrumentation tests and allow you to include the application and well as other library modules as dependencies.
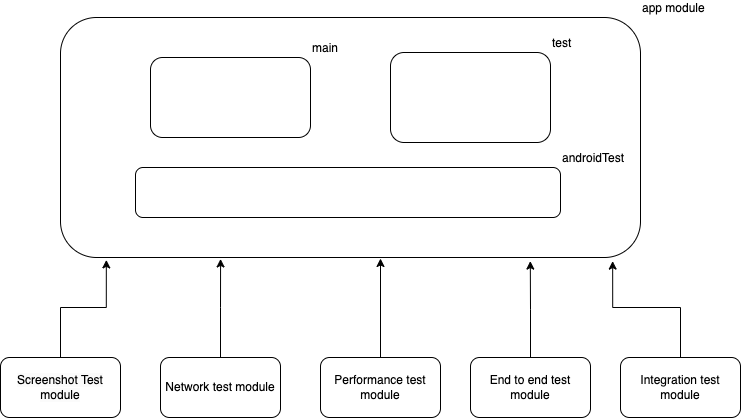
Different test-only modules that depend on your app module
OUR VIDEO RECOMMENDATION


Jobs
Creating an Android Test module
To create an Android test-only module, you need to follow the following steps:
- Create a new module in your project and use the `com.android.test` plugin in that module’s build.gradle file:
plugins {
    // This is a test only module.
    // All the tests inside this would run as Android Instrumentation Tests.
    id 'com.android.test'
}
Note: To create a new module, you can use Android Studio’s templates and start off with a library module as a starting point and then replace
com.android.librarywithcom.android.testplugin in your build.gradle file
2. Specify the project that you wish to test against.
android {
    // Here I am targeting the app module.
    targetProjectPath ':app'

    ....
    // If your app module has different flavors, you will have to declare the same here.
}
3. In your dependencies block, define the different test as well as project dependencies as normal implementation dependencies.
dependencies {

    implementation 'androidx.core:core-ktx:1.7.0'
    implementation 'androidx.appcompat:appcompat:1.5.1'
    implementation 'com.google.android.material:material:1.7.0'
    implementation 'junit:junit:4.13.2'
    implementation 'androidx.test.ext:junit:1.1.5'
    implementation 'androidx.test.espresso:espresso-core:3.5.1'
    implementation project(':app')
}
4. Create your first test like this inside your test-only module.
All the test code should be inside the main source set instead of the androidTest source set.
class ExampleAppInstrumentedTest {

    @get:Rule
    val activityScenarioRule = ActivityScenarioRule(MainActivity::class.java)

    @Test
    fun testAppModuleActivity() {
        Espresso.onView(ViewMatchers.withId(com.example.testonlymodule.R.id.main_activity_view))
            .check(ViewAssertions.matches(ViewMatchers.isDisplayed()))
    }
}
You can run all your instrumentation tests inside such a module by using a Gradle command like this. (Replace the moduleName with the actual module name that you have created)
./gradlew :{moduleName}:connectedDebugAndroidTest
That’s it!
This is how easy it is to set up a test-only module for your instrumentation tests.
For a complete working example of this, you can refer to this repo: https://github.com/shubhamgarg1/TestOnlyModule
You can use Jacoco with these modules to generate code coverage of your application. You can even run these tests using headless emulators using Gradle Managed devices (Minimum AGP version: 7.3.1).
Bonus: Sharing code between different test modules
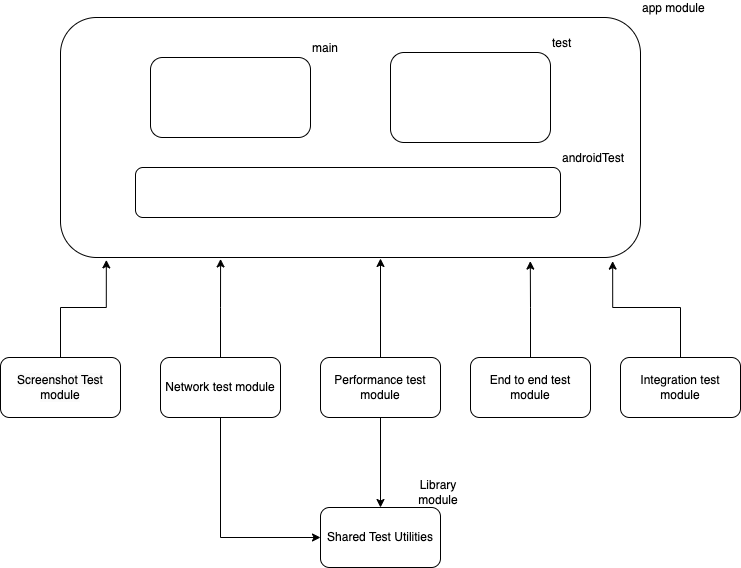
To share code between your different test modules, you can create a shared test module that can be included by all your test modules. The shared test module would need to be a library module as Android does not currently allow you to include test-only modules inside one another.
The same concept is used when you want to share code between your unit test and android Test source sets. Earlier it used to be possible by including the common packages in both the source sets. But with Android Studio Chipmunk, this is no longer possible.
Let’s say there are some shared utilities between network Test and performance test modules, you can create a Share Test Utility module like the below:
Conclusion
So, that’s a wrap on how you can organize your test code using the com.android.test plugin and how it can help your test code be more maintainable and scalable. With this kind of splitting, you can decide to run some test modules after every commit, some test modules once every day, and so on.
This article was originally published on proandroiddev.com on January 14, 2023


