

Now In Android is an open-source Android application that covers Modern Android Development best practices. The project is maintained by the Google Android team.
I propose to continue our tour with the version built with the Koin dependency injection framework. This is a good time to refresh practices, from standard components structure to more advanced cases.
For this article, I propose now to use Koin Annotations instead of Koin DSL to configure all the app’s components injection. This is interesting to see how much it can improve the experience in terms of writing.
Prepare yourself, we have many things to see together 👍 🚀
This article series covers several parts:
Part 1 — Koin setup, application verification, and a first module tour
Part 2 — Common Modules components and feature modules
Part 3 — Get started with Koin Annotations
Part 4— Core & Features Components with Koin Annotations
… more to come 🙂
You can find all the related Koin Annotations sources at this location: https://github.com/InsertKoinIO/nowinandroid/

Features picture from https://github.com/android/nowinandroid
Why use annotations with Koin?
The Koin dependency injection framework uses a Kotlin DSL to declare your components. This is the default way to declare your application components and inject anything from them.
Annotations offer another way to declare things in your code: simply add an annotation on a class to make it declared inside Koin. The developer experience is interesting, as finally instead of opening your configuration file and adding a new component, things will be detected automatically.
The idea is not to reinvent the wheel like existing solutions such as Dagger Hilt but to propose a new great Kotlin developer experience.
Don’t be scared, Koin Annotations are not replacing the Koin DSL. It’s a new complementary way to define things, inside your Kotlin code. The Koin Annotations project consists of an annotation processor powered by Google KSP, allowing you to generate the Koin configuration DSL for you.
DSL vs Annotations? In the end, it’s a matter of taste and workflow preferences.
Google KSP & Koin Annotations — Setup
The first part of the story is to setup the current project with the Google KSP Kotlin plugin, to allow us to use Koin annotations & compiler.
The Koin Annotations project is out since last year: https://blog.kotzilla.io/koin-annotations-1-0-now-stable/
For the NowInAndroid project (aka Nia), the KSP plugin is already configured. We just need to use the alias(libs.plugins.ksp) expression:
 Gradle KSP Plugin
Let’s use it with the following Gradle dependencies:

If you need to setup the KSP plugin from scratch, here you can follow our setup page 👉 https://insert-koin.io/docs/setup/annotations
The code generated by Koin KSP Plugin is really super small (one line per declared component), and easily debuggable, as it’s pure Kotlin/Koin DSL configuration. It was one of our primary requirements: having the compilation impact be super low 🤟
Now, let’s go into our code to use annotations to make our Koin configuration.
Declaring Components with Annotations
To declare a class as a Koin component, add a Koin annotation to this class. Let’s use the @Singleannotation to make our class a singleton:
@Single
class OfflineFirstAuthorsRepository(
    private val authorDao: AuthorDao,
    private val network: NiaNetworkDataSource,
)
OUR VIDEO RECOMMENDATION


Jobs
That’s it! There is no need to specify anything else 👍
All bound types are detected. With our annotation we have the equivalent of the following Koin DSL declaration:
singleOf(::OfflineFirstTopicsRepository) { bind<TopicsRepository>() }
Annotations follow the Koin “semantic”: you will find the same keywords between the DSL and annotations:
@Single— Declare as a singleton, equivalent ofsinglekeyword@Factory— Declare as a factory, equivalent offactorykeyword@KoinViewModel—Declare as an Android ViewModel, equivalent ofviewModelkeyword
The plugin will analyze the constructor and all inherited types. We can also detect if your type is nullable, to generate nullable dependency access (thanks to the question mark operator):
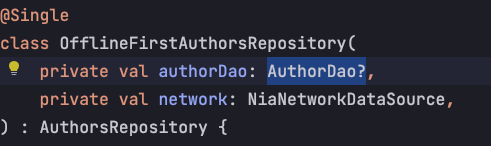
Detecting nullable types in constructors
The plugin also detects if you are using List or Lazy type, to use the right Koin function to retrieve your components.
📖 Check out the Koin documentation for more details: https://insert-koin.io/docs/reference/koin-annotations/definitions
Just add an annotation to your class and there you go. It’s as simple as that 👍
Modules & Component Scan
Koin Definitions are gathered inside a Koin module. To define a Koin module, create a class and annotate it with @Module like this:
@Module
class AuthorKoinModule
You may use the includes parameter to specify what other modules you depend on:
@Module(includes = [DomainKoinModule::class,StringDecoderKoinModule::class])
class AuthorKoinModule
To associate components to your module, you have two possibilities:
- scan for annotated classes — will look at any annotated class in the given package
- annotated module class methods — Any module annotated class function, is considered as a component
To scan components, use the @ComponentScan annotation on your module to scan all definitions for the current package and sub-packages:
@Module
@ComponentScan
class AuthorKoinModule
You can also specify the package you want to scan:
@Module
@ComponentScan("com.google.samples.apps.nowinandroid.feature.author")
class AuthorKoinModule
If you want to declare a definition from a function, you can do this by annotating the function:
@Module
class DatabaseKoinModule {

    @Single
    fun database(context: Context) =
        Room.databaseBuilder(context, NiaDatabase::class.java, "nia-database")
            .build()
}
Then, what to choose? Annotated class or annotated function? 🤔
Adding an annotation on an existing component is super easy and straightforward. But you can need to declare a component within a:
- The instance is created with an API (like Room API builder) or needs an expression
- Class is not accessible to be annotated
Also, it depends on how you prefer to write things. You see how easy it is, to organize yourself with your components.
📖 Check out the Koin documentation for more details: https://insert-koin.io/docs/reference/koin-annotations/modules
Compatible with Graph Verification API
The Koin Annotations are generating your Koin configuration for you, allowing you to focus on your app and less on your tools. The verify API is also available for any generated module, by using the verify() extension on a generated module extension.
// generated Koin content
import org.koin.ksp.generated.*

@Test
fun checkDataKoinModule() {
  DataKoinModule().module.verify(
      extraTypes = listOf(
          Context::class,
      )
  )
}
Mixing DSL & Annotations — Choose the best for you
You can choose DSL or Annotations, and also mix depending on your needs and usage. You are not constrained to working with one solution or another.
Below, the following example is a DSL module including annotated class modules and one DSL module:
val niaAppModule = module {
    // includes Annotated Class modules and DSL modules
    includes(
        JankStatsKoinModule().module,
        DataKoinModule().module,
        // SyncWorker DSL Module
        syncWorkerKoinModule,
        TopicKoinModule().module,
        AuthorKoinModule().module,
        InterestKoinModule().module,
        SettingsKoinModule().module,
        BookmarksKoinModule().module,
        ForYouKoinModule().module
    )
    viewModelOf(::MainActivityViewModel)
}
Let’s continue in part 4
The next part will dive into the core & feature detail of the Nia application. The following Koin Annotations cheat sheet is still up to date, feel free to download it!
Stay tuned 👋
This article was previously published on proandroiddev.com


