

Photo by Daniel McCullough
I wrote recently about the theory behind good Android app architecture. It ended up being my most popular article of all time, and many people were kind enough to say it had helped them.
One of the most common queries was, but what about X? That doesn’t really fit the rules. Which is why I’ve always said:
Learn the principles, don’t blindly follow rules.
This article aims to demonstrate the practical side: to teach Android architecture by example. Most importantly that means showing how various architecture decisions are made. We will encounter situations where there are several possible answers, and in each case we will fall back on the principles rather than rote-learning a set of rules.
So, let’s build an app together.
Introducing the app we’re going to build
We’re going to build an app for planet spotters. It will look something like this:
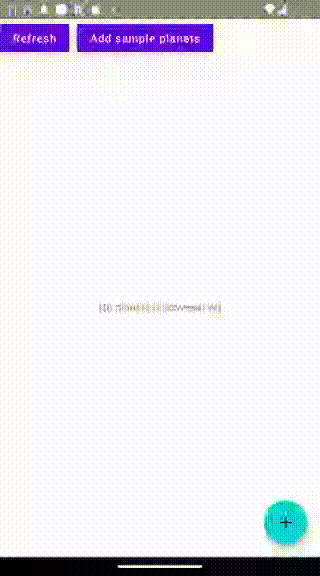
The world’s number 1 app for planet spotters
Our app will have the following features:
- A list of all the planets you’ve previously discovered
- A way of adding a new planet you’ve just discovered
- A way to delete a planet (in case you realise your discovery was actually just a smear on your telescope’s lens)
- A way of adding a few sample planets so the user can see how the app works
It will have an offline data cache as well as online access to a database.
As ever with my walkthroughs, I encourage you to go off-piste: add extra features, consider likely future spec changes, challenge yourself. Here, the learning is in the thought process behind the code, not the code itself. So if you want to get the best from this tutorial, don’t just blindly copy the code.
Here’s the repository we’ll end up with: https://github.com/tdcolvin/PlanetSpotters.
Introducing the architectural principles we’re going to use
We’re going to be informed by SOLID principles, Clean Architecture principles, and Google’s own Modern App Architecture principles.
We’re not going to treat any of these as hard-and-fast rules, because we’re smart enough to build something that fits our app better (in particular, fits better to how we expect it to grow). For example if you follow Clean Architecture religiously, you’ll produce solid, reliable, extensible software, but your code will arguably be over-complicated for a single-purpose app. Google’s principles produce simpler code but are less appropriate if one day the app might be maintained by multiple large dev teams.
We’ll start with Google’s topology, and be informed by Clean Architecture along the way.
Google’s topology looks like this:
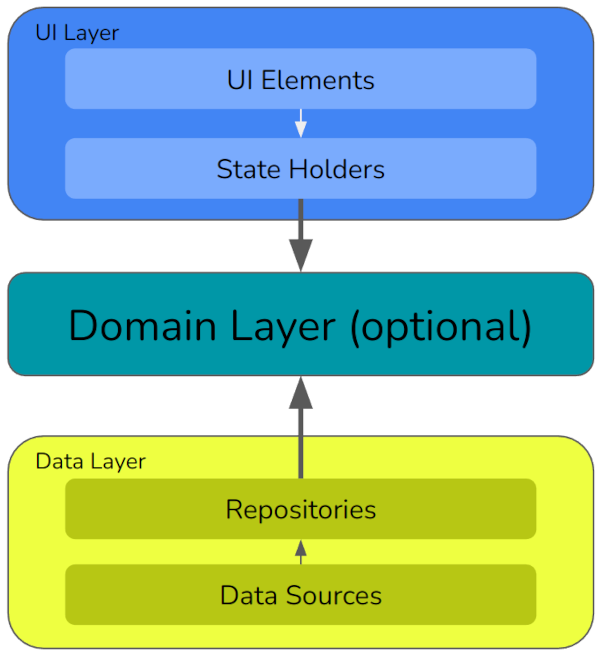
We’re going to be implementing this piece by piece, and my last article has much more depth on each of these sections. But as a brief overview:
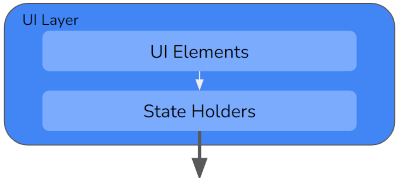
UI layer
The UI layer implements the user interface. It’s split into:
- UI elements, which is all the proprietary code used to draw things on the screen. In Android the main choices are Jetpack Compose (in which case
@Composables go here) or XML (in which case this contains your XML files and resources). - State holders, which is where you implement your preferred MVVM / MVC / MVP / … topology. In this app we’ll use view models.
Domain layer
The domain layer is for use cases which contain high level business logic. For example, when we want to add a planet, an AddPlanetUseCase will describe the set of steps needed to do so. It’s a list of what not how: e.g. we will say “save the Planet object’s data”. That’s a high-level instruction. We won’t say “save it to the local cache”, much less “save it to the local cache using a Room database” — such lower-level implementation details go elsewhere.
Data layer
Google urges us to have a single source of truth for all data in the app; that is, a way of obtaining a definitively “correct” version of the data. That’s what the data layer is going to give us (for all data structures except those describing what the user has just typed in). It’s split into:
- Repositories, which manage types of data. For example we will have a repository for planet data, which will provide CRUD (create, read, update, delete) operations on discovered planets. It will also handle the fact that data is stored in a local cache as well as remotely, selecting the appropriate source for different kinds of operation and managing what happens if the two sources contain different copies of the data. Here we will talk about having a local cache, but we still won’t talk about what third party technology we’ll use to implement it.
- Data sources, which manage the nitty-gritty of how data is stored. When the repository asks to “store X remotely”, it will ask a data source to do so. The data source contains the only the code needed to drive the proprietary technology — perhaps Firebase, or an HTTP API, or something else.
Good architecture allows delayed decisions
At this stage, we know what the app’s features are going to be and some basic ideas about how it will manage its data.
There are some things we haven’t decided on yet. We don’t know exactly how the UI will look or what technology we’re going to use to build it (Jetpack Compose, XML, …). We don’t know what form the local cache will take. We don’t know what proprietary solution we’re going to use for accessing data online. We don’t know whether we’re going to support phones, tablets, or other form factors.
Question: Do we need to know any of the above to draw up our architecture?
Answer: No!
The above are all low-level considerations (in Clean Architecture their code would sit in the very outer ring). They are implementation details as opposed to logic. SOLID’s Dependency Inversion principle tells us that no code should be written to depend on them.
In other words, we should be able to write (and test!) the rest of the app’s code without knowing any of the above. And when we do learn the answers to the above, nothing we’ve already written should have to change.
That means the code production phase can begin before the designers finish designing and before stakeholders have decided on third party technologies to use. So, good architecture allows delayed decisions. (And flexibility to reverse any such decision without causing a massive code fallout).
Our project’s architecture diagram
Here’s a first stab at fitting our planet spotters’ app into Google’s topology.
Data layer
We will have a repository for the Planet data, and two data sources: one for the local cache and one for remote data.
UI layer
There will be two state holders, one for the planets list page and the other for the add planet page. Each page will also have its set of UI elements, written using a technology which can, for now, remain TBD.
Domain layer
There are two perfectly valid ways of architecting our domain layer:
- We could add use cases only where there is repeated business logic. In our app the only repeated logic is where planets are added: it’s needed both when the user adds the list of sample planets, and when they manually enter their own planet details. Hence we would only create one use case: AddPlanetUseCase. In other instances (for example to delete a planet) the state holder would directly interact with the repository.
- We could add use cases for every interaction with the repository, so that there is never any direct contact between state holder and repository. In this case we would have use cases for adding planets, deleting planets and listing planets.
The benefit of #2 is that it follows the rules of Clean Architecture. Personally, I think it’s a bit too heavy for most apps, so I tend to go for #1. And that’s what we’ll do here.
That gives us the following architecture diagram:
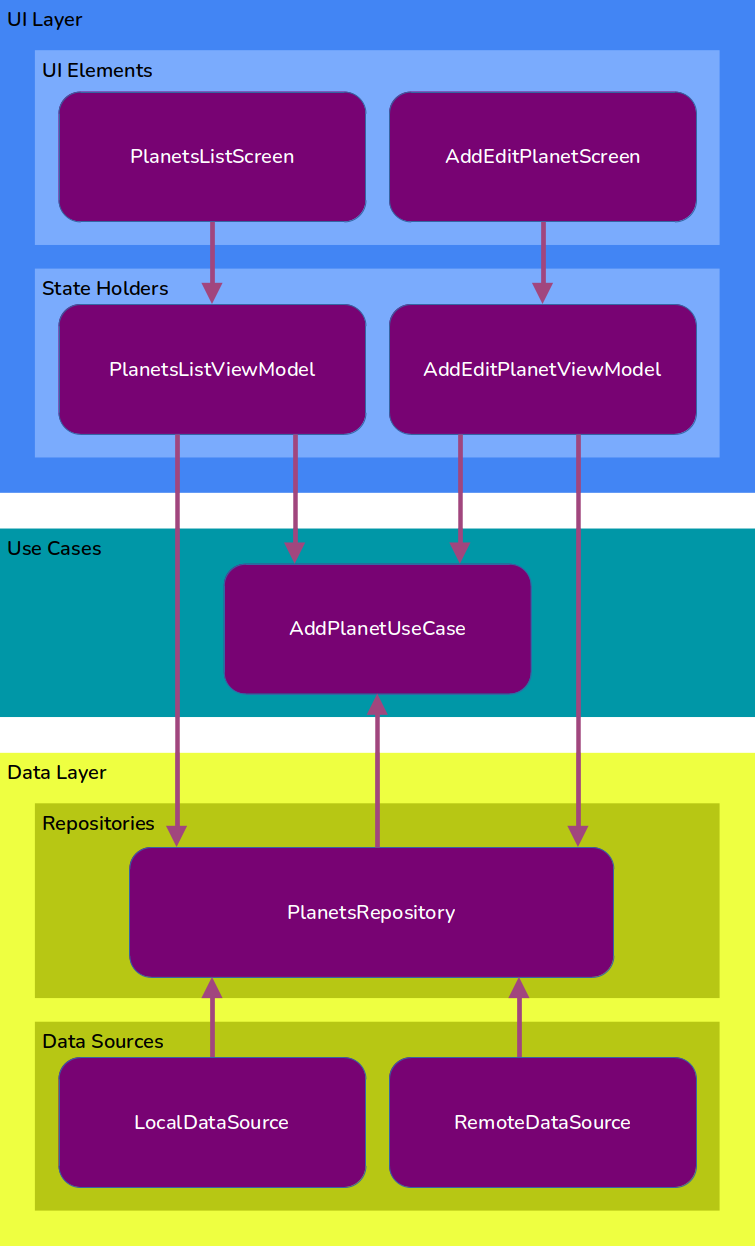 Our app’s architecture diagram
What code should we start with?
The rule is:
Start with high-level code and work downwards.
That means writing out the use cases first, because doing so will tell us what requirements there are on the repository layer. Once we know what will be needed of the repository, we can write out what will be needed of the data sources in order to power it.
Similarly, because the use cases tell us all the actions the users might take, we know everything that’s input from and output to the UI. From that we’ll know what the UI will need to include, so can write the state holders (view models). And with the state holders in place, we will know what UI elements need to be written.
We can of course delay writing the UI elements and the data sources (i.e. all the low-level code) indefinitely, once senior engineers and project stakeholders have agreed the technologies that will be used.
That concludes the theory. Now let’s start building the app. I’ll take you through the decisions we make as we come to them.
Step 0: Create the project
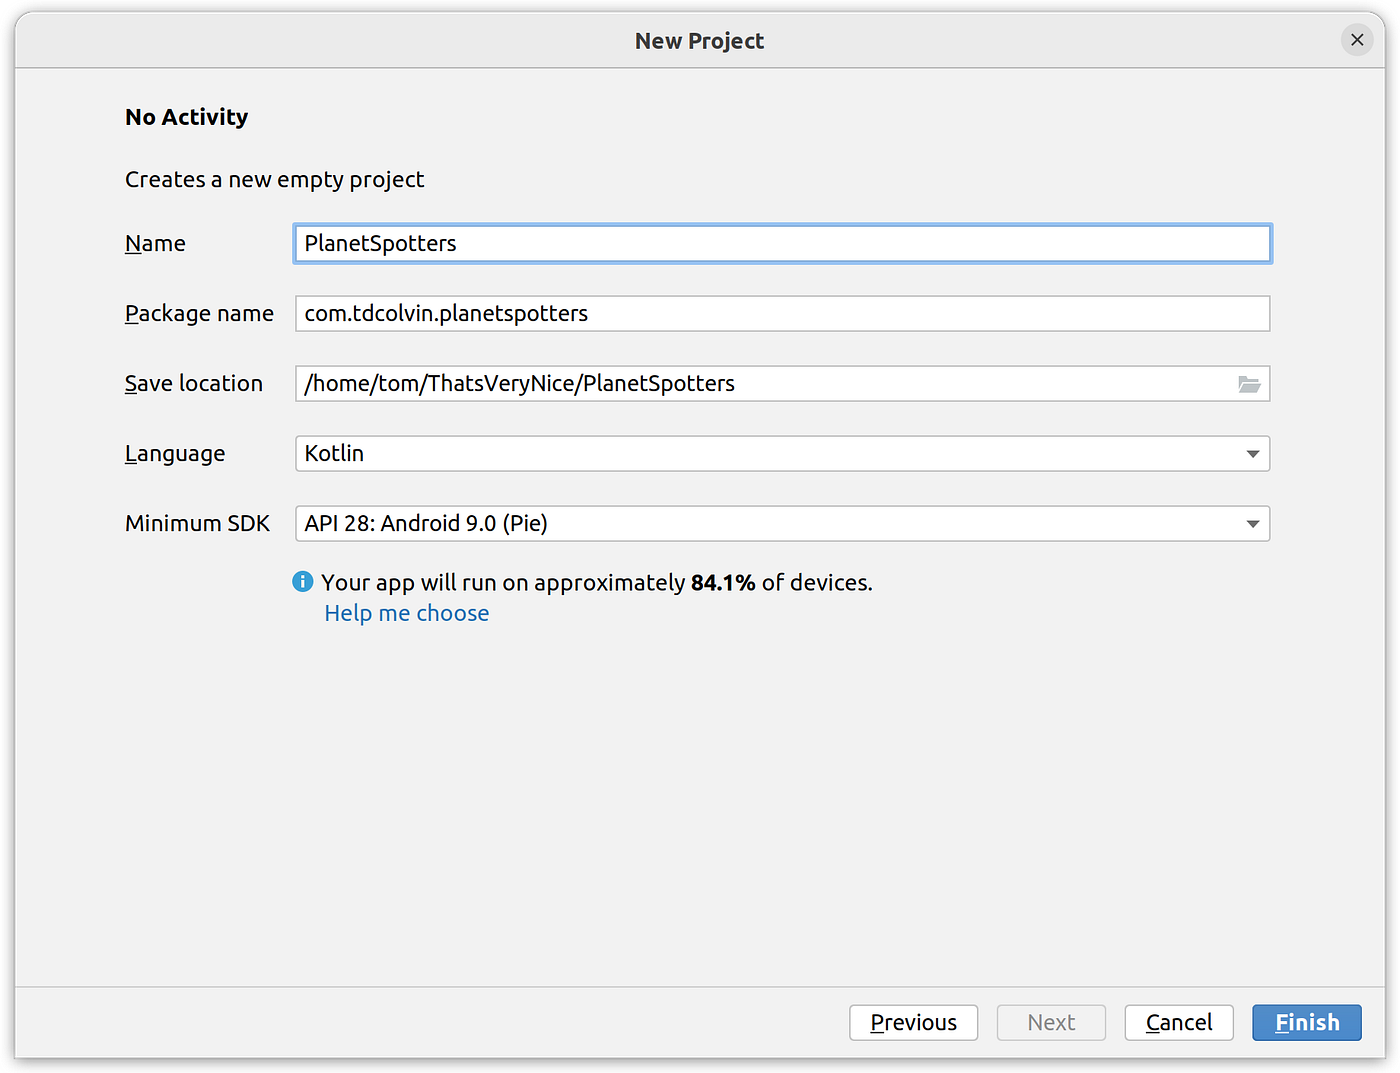
Open Android Studio and create a “No activity” project:
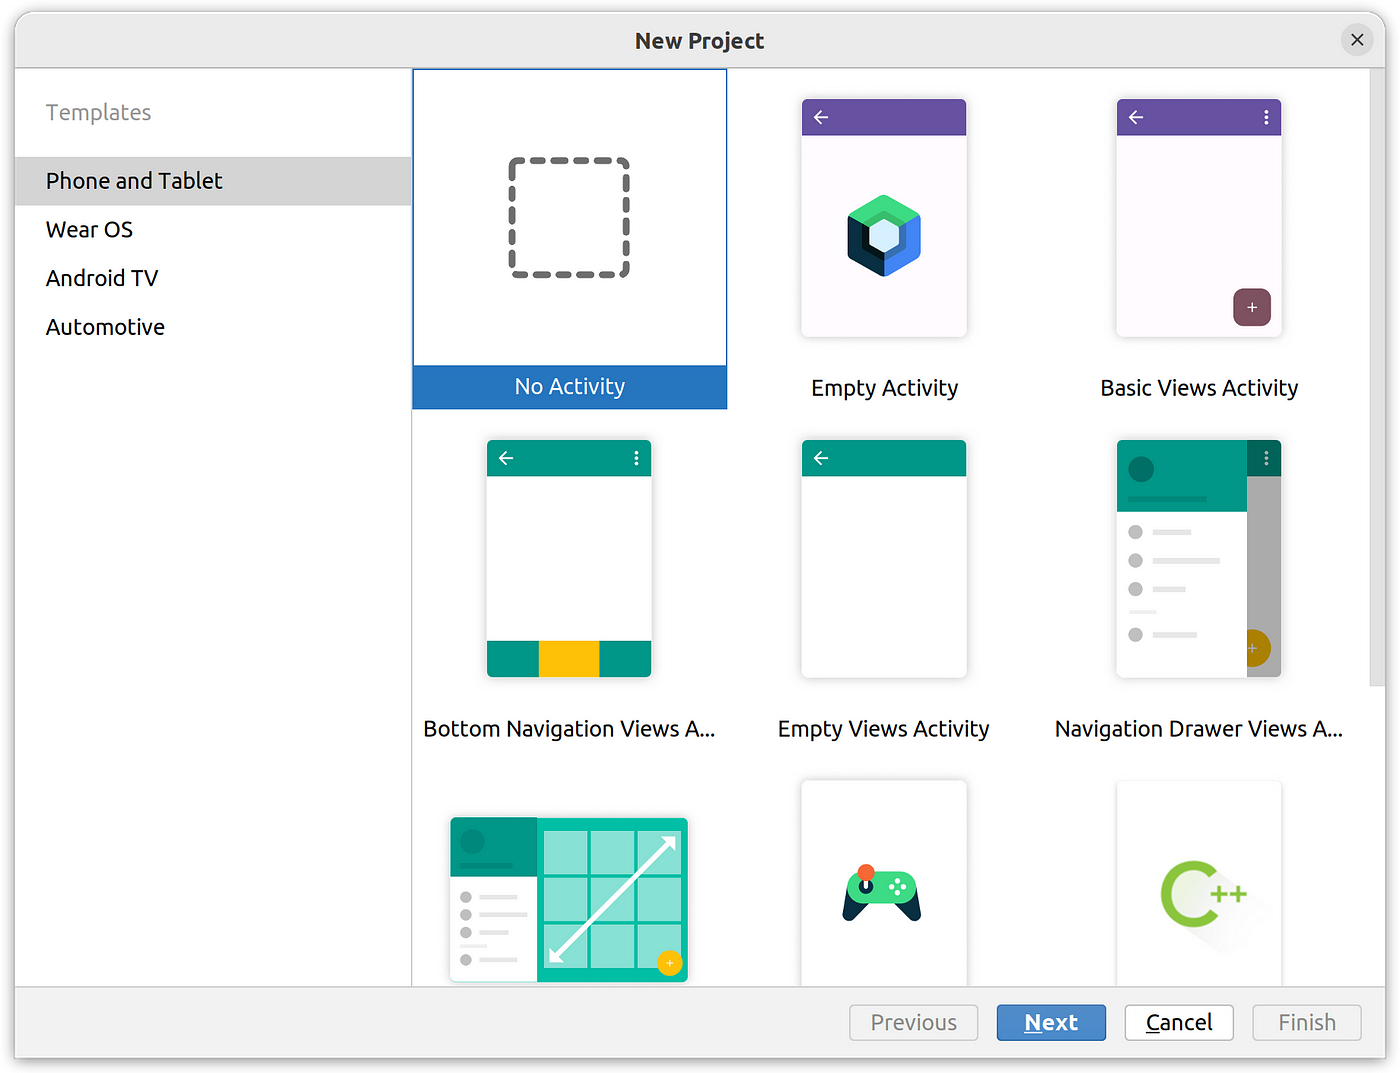 Android Studio “no activity” project
On the next screen, call it PlanetSpotters and leave everything else as-is:
 New project detail window in Android Studio
OUR VIDEO RECOMMENDATION


Jobs
Adding dependency injection
We’re going to need a dependency injection framework, which helps when applying SOLID’s dependency inversion principle. Hilt is my favourite choice here, and happily it’s what Google specifically recommends too.
To add Hilt, add the following to the root Gradle file:
| plugins { | |
| ... | |
| id 'com.google.dagger.hilt.android' version '2.44.2' apply false | |
| } |
And add this to the app/build.gradle file:
| plugins { | |
| id 'kotlin-kapt' | |
| id 'com.google.dagger.hilt.android' | |
| } | |
| android { | |
| ... | |
| compileOptions { | |
| sourceCompatibility JavaVersion.VERSION_17 | |
| targetCompatibility JavaVersion.VERSION_17 | |
| } | |
| kotlinOptions { | |
| jvmTarget = '17' | |
| } | |
| } | |
| dependencies { | |
| implementation "com.google.dagger:hilt-android:2.44.2" | |
| kapt "com.google.dagger:hilt-compiler:2.44.2" | |
| } | |
| // Allow references to generated code | |
| kapt { | |
| correctErrorTypes true | |
| } |
(Note we are setting compatibility to Java 17 here, as required by Kapt which Hilt uses. You’ll need Android Studio Flamingo or above).
Finally, add an override of the Application class which includes a @HiltAndroidApp annotation. That is, create a file in your app’s package folder (here com.tdcolvin.planetspotters) called PlanetSpottersApplication, with the following content:
| package com.tdcolvin.planetspotters | |
| import android.app.Application | |
| import dagger.hilt.android.HiltAndroidApp | |
| @HiltAndroidApp | |
| class PlanetSpottersApplication: Application() |
…And then tell the OS to instantiate it by adding it to your manifest:
| <?xml version="1.0" encoding="utf-8"?> | |
| <manifest xmlns:android="http://schemas.android.com/apk/res/android" | |
| xmlns:tools="http://schemas.android.com/tools"> | |
| <application | |
| .... | |
| android:name=".PlanetSpottersApplication" | |
| ... | |
| /> | |
| ... | |
| </manifest> |
Once we have a main activity we will need to add @AndroidEntryPoint to it. But for now, this completes our Hilt setup.
Finally, we will add support for other useful libraries by adding these lines to app/build.gradle:
dependencies {
    ...

    //Coroutines
    implementation 'org.jetbrains.kotlinx:kotlinx-coroutines-android:1.6.4'

    //viewModelScope
    implementation 'androidx.lifecycle:lifecycle-viewmodel-ktx:2.6.1'
}
Step 1: List everything the user can do and see
This step is needed in preparation for coding the use cases and the repository. Recall that a use case is a single task that the user can perform, described at a high level (what not how).
So let’s begin by writing out those tasks; an exhaustive list of everything that the user can do and see in the app.
Some of these tasks will eventually be coded as use cases. (Under Clean Architecture, in fact, all such tasks must be written as use cases). Other tasks will be accomplished by the UI layer talking directly to the repository layer.
A written spec is necessary here. It doesn’t require a UI design, but if you do have one it certainly aids visualisation.
Here’s our list:
Get a list of discovered planets which updates automatically
Input: Nothing
Output: Flow<List<Planet>>
Action: Request the current list of discovered planets from the repository, required in a form that will keep us updated when something changes.
Get details of a single discovered planet which updates automatically
Input: String — the ID of the planet that we’re getting
Output: Flow<Planet>
Action: Request the planet with the given ID from the repository, asking it to keep us updated when there’s a change
Add/edit a newly discovered planet
Inputs:
- planetId: String? — if non-null, then the ID of the planet to edit. If null, then we are adding a new planet.
- name: String — the name of the planet
- distanceLy: Float — the distance to the planet from Earth (lightyears)
- discovered: Date — the date of discovery
Output: None (success determined by completion with no exception)
Action: Create a Planet object from the inputs, and pass it to the repository (to add to its data sources)
Add some sample planets
Input: none
Output: none (throws on error)
Action: Ask the repository to add three sample planets, with discovery date of the current time: Trenzalore (300 lightyears), Skaro (0.5 lightyears), Gallifrey (40 lightyears).
Delete a planet
Input: String — the ID of the planet to delete
Output: none (throws on error)
Action: Ask the repository to delete the planet with the given ID.
Now that we have this list, we can start coding the use cases and the repository.
Step 2: Code the use cases
From step 1, we have a list of the tasks that the user can perform. And earlier on we decided that, of those tasks, the only one we’ll code as a use case will be ‘add planet’. (We decided to only add use cases where tasks are repeated across different areas of the app).
That gives us one use case to write here: AddPlanetUseCase.
A nice Kotlin-y trick is to put use cases’ logic inside operator fun invoke(…) functions. That allows calling code to “invoke” the class instance as if it were a function, like this:
val addPlanetUseCase: AddPlanetUseCase = …

//Use our instance as if it were a function:
addPlanetUseCase(…)
Here’s our AddPlanetUseCase coded using that trick:
| class AddPlanetUseCase @Inject constructor(private val planetsRepository: PlanetsRepository) { | |
| suspend operator fun invoke(planet: Planet) { | |
| if (planet.name.isEmpty()) { | |
| throw Exception("Please specify a planet name") | |
| } | |
| if (planet.distanceLy < 0) { | |
| throw Exception("Please enter a positive distance") | |
| } | |
| if (planet.discovered.after(Date())) { | |
| throw Exception("Please enter a discovery date in the past") | |
| } | |
| planetsRepository.addPlanet(planet) | |
| } | |
| } |
Here PlanetsRepository is an interface which lists the methods that the repository will have. More about that later (in particular, why we’re creating an interface rather than a class). But for now let’s create it, so our code compiles:
| interface PlanetsRepository { | |
| suspend fun addPlanet(planet: Planet) | |
| } |
And the data type which describes the Planet:
| data class Planet( | |
| val planetId: String?, | |
| val name: String, | |
| val distanceLy: Float, | |
| val discovered: Date | |
| ) |
The addPlanet method (like the invoke function in the use case) is declared as suspend because we know it’ll involve background work. We’ll be adding more methods to this interface later, but for now this is sufficient.
Incidentally, you might question why we’ve bothered creating a use case which is so simple. The answer lies in how it might evolve. In the future it will likely grow to be more complex, and outside code can be isolated from that complexity.
Step 2.1: Test the use cases
We’ve now written the use case but we can’t run it. For one thing, it depends on the PlanetsRepository interface, and we don’t yet have an implementation of that. Hilt won’t know what to do with it.
But we can write tests which provide a faked PlanetsRepository instance, and run it using our testing framework. That’s what you should do at this stage.
Since this is a tutorial on architecture, the specifics of testing is out of scope, so this step is left as an exercise. But note that good architecture design has allowed us to split the components into easily testable parts.
Step 3: Data layer, writing the PlanetsRepository
Remember that the repository’s job is to collate different data sources, manage discrepancies between them, and provide CRUD operations.
Use dependency inversion and dependency injection
According to Clean Architecture and the Dependency Inversion principle (more info in my last article) we want to avoid outside code from depending on code inside the implementation of a repository. That way use cases or view models (for example) can’t be affected by changes in a repository’s code.
That explains why, earlier, we created PlanetsRepository as an interface (rather than a class). The calling code will only depend on the interface, but it’ll receive the implementation via dependency injection. So now we’ll add more methods to the interface and create the implementation of it, which we’ll call DefaultPlanetsRepository.
(Aside: Some dev teams follow the convention of calling the implementation <interface name>Impl; e.g. PlanetsRepositoryImpl. I don’t think that convention helps readability: a class name should tell you why you’re implementing an interface. So I avoid it. But I mention it as it’s quite widely used.)
Use Kotlin Flows to make data available
If you haven’t come across Kotlin Flows yet, stop what you’re doing and read up on them right now. They will change your life.
They provide a “pipeline” of data which changes as new results become available. So long as a caller is signed up to the pipeline, they will receive updates whenever there’s a change. So now our UI can update automatically as the data is updated, for almost no extra effort. Contrast this to the olden days when we had to have a way of manually flagging to the UI that the data had changed.
Other solutions exist such as RxJava and MutableLiveData which do similar, but they are not as flexible or easy to use as Flows.
Add the ubiquitous WorkResult class
The WorkResult class is a common return from a data layer. It allows us to describe whether a particular request was successful or not, and looks like this:
| package com.tdcolvin.planetspotters.data.repository | |
| sealed class WorkResult<out R> { | |
| data class Success<out T>(val data: T) : WorkResult<T>() | |
| data class Error(val exception: Exception) : WorkResult<Nothing>() | |
| object Loading : WorkResult<Nothing>() | |
| } |
Calling code can check whether a given WorkResult is a Success, Error or Loading object (the latter to show it hasn’t yet completed), and therefore determine whether the request succeeded.
Our repository interface
Let’s put all of the above together to work out a specification for the methods and properties that will constitute our PlanetsRepository.
It has two methods for getting planets. The first simply gets a single planet by its ID:
fun getPlanetFlow(planetId: String): Flow<WorkResult<Planet?>>
The second gets a Flow representing the list of planets:
fun getPlanetsFlow(): Flow<WorkResult<List<Planet>>>
These methods are both the single source of truth for their respective data. Each time we’re going to return the data stored in our local cache, since we need to handle these methods being run very often, and local data is faster and cheaper than going to the remote data source. But we’re going to need a method for refreshing that local cache. This will update the local data source from the remote data source:
suspend fun refreshPlanets()
Next we need methods for adding, updating and deleting planets:
suspend fun addPlanet(planet: Planet)

suspend fun deletePlanet(planetId: String)
So our interface now looks like this:
| package com.tdcolvin.planetspotters.data.repository | |
| ... | |
| interface PlanetsRepository { | |
| fun getPlanetsFlow(): Flow<WorkResult<List<Planet>>> | |
| fun getPlanetFlow(planetId: String): Flow<WorkResult<Planet?>> | |
| suspend fun refreshPlanets() | |
| suspend fun addPlanet(planet: Planet) | |
| suspend fun deletePlanet(planetId: String) | |
| } |
Write the data source interfaces as we go
In order to write the class which implements the interface, we need to keep an eye on which methods our data sources will need. Recall that we have two data sources: a LocalDataSource and a RemoteDataSource. We haven’t yet decided which third-party technology to use for either — and we still don’t need to.
Let’s create the interface definitions now, ready for us to add method signatures to as we go:
| package com.tdcolvin.planetspotters.data.source.local | |
| interface LocalDataSource { | |
| //Ready to add method signatures here... | |
| } |
| package com.tdcolvin.planetspotters.data.source.remote | |
| interface RemoteDataSource { | |
| //Ready to add method signatures here... | |
| } |
With those interfaces ready to be filled, we can now write the DefaultPlanetsRepository. Let’s hit those methods one-by-one:
Writing getPlanetFlow() and getPlanetsFlow()
These are both straightforward; we return the data that’s in the local source. (Why not the remote source? Because the local source exists to be a fast, resource-light way of accessing data. The remote source may be always up-to-date, but it’s slow. If we strictly needed the most up-to-date data, then we could use refershPlanets() below before calling getPlanetsFlow().)
| override fun getPlanetsFlow(): Flow<WorkResult<List<Planet>>> { | |
| return localDataSource.getPlanetsFlow() | |
| } | |
| override fun getPlanetFlow(planetId: String): Flow<WorkResult<Planet?>> { | |
| return localDataSource.getPlanetFlow(planetId) | |
| } |
So this depends on getPlanetFlow() and getPlanetsFlow() functions in the LocalDataSource. We’ll add them to the interface now so that our code compiles.
| interface LocalDataSource { | |
| fun getPlanetsFlow(): Flow<WorkResult<List<Planet>>> | |
| fun getPlanetFlow(planetId: String): Flow<WorkResult<Planet?>> | |
| } |
Writing refreshPlanets()
To update the local cache, we get the current list of planets from our remote data source and save it to the local data source. (The local data source can then “notice” the change and emit a new list of planets through the Flow returned by getPlanetsFlow().)
| override suspend fun refreshPlanets() { | |
| val planets = remoteDataSource.getPlanets() | |
| localDataSource.setPlanets(planets) | |
| } |
This requires a new method in each of the data source interfaces, which now look like this:
| interface LocalDataSource { | |
| fun getPlanetsFlow(): Flow<WorkResult<List<Planet>>> | |
| fun getPlanetFlow(planetId: String): Flow<WorkResult<Planet?>> | |
| suspend fun setPlanets(planets: List<Planet>) | |
| } |
| interface RemoteDataSource { | |
| suspend fun getPlanets(): List<Planet> | |
| } |
Notice how all these methods are declared as suspend fun. That passes the responsibility for threading and coroutine context on to the caller.
Writing addPlanet() and deletePlanet()
These functions both follow the same pattern: perform a write operation on the remote data source, and if that’s successful, mirror the change to the local cache.
We expect the remote data source to assign a unique ID to the Planet object once it’s hit the database, so the RemoteDataSource’s addPlanet() function returns an updated Planet object with a non-null ID.
| override suspend fun addPlanet(planet: Planet) { | |
| val planetWithId = remoteDataSource.addPlanet(planet) | |
| localDataSource.addPlanet(planetWithId) | |
| } | |
| override suspend fun deletePlanet(planetId: String) { | |
| remoteDataSource.deletePlanet(planetId) | |
| localDataSource.deletePlanet(planetId) | |
| } |
And after all that, here’s our final data source interfaces:
| interface LocalDataSource { | |
| fun getPlanetsFlow(): Flow<WorkResult<List<Planet>>> | |
| fun getPlanetFlow(planetId: String): Flow<WorkResult<Planet?>> | |
| suspend fun setPlanets(planets: List<Planet>) | |
| suspend fun addPlanet(planet: Planet) | |
| suspend fun deletePlanet(planetId: String) | |
| } |
| interface RemoteDataSource { | |
| suspend fun getPlanets(): List<Planet> | |
| suspend fun addPlanet(planet: Planet): Planet | |
| suspend fun deletePlanet(planetId: String) | |
| } |
We’ll write code that implements these later, but for now, let’s jump to the UI later.
Step 5: State holders, writing the PlanetsListViewModel
Recall that the UI layer consists of UI elements and state holder layers:
At this stage we still don’t know what technology we’re going to use to draw the UI, so we can’t yet write the UI elements layer. But that’s no issue; we can get on with writing the state holders, safe in the knowledge that they won’t have to change once we do decide. More benefits of good architecture!
Writing a spec for the PlanetsListViewModel
The UI will have two pages, one for listing and deleting planets and the other for adding or editing planets. The PlanetsListViewModel powers the former. That means it needs to expose data to the planets list screen’s UI elements, and it has to be ready to receive events from the UI elements when users perform actions.
Specifically, our PlanetsListViewModel needs to expose:
- A Flow describing the current state of the page (crucially, this includes the list of planets)
- A method to refresh the list
- A method to delete a planet
- A method to add some sample planets, to help the user see what the app can do
The PlanetsListUiState object: current state of the page
I find it helpful to contain the entire state of a page in a single data class:
| data class PlanetsListUiState( | |
| val planets: List<Planet> = emptyList(), | |
| val isLoading: Boolean = false, | |
| val isError: Boolean = false | |
| ) |
Note that I’ve defined this in the same file as the view model. It contains simple objects only: no Flows etc, just primitive types, arrays, and simple data classes. Note also how all fields have default values — that will help us later.
(There are some good reasons why you might not even want the Planet object to appear in the above. Clean Architecture purists would point out that it’s too many layer jumps between where Planet was defined to where it’s used. And state hoisting principles tell us to only make available the exact pieces of data we need. For example, right now we only need the Planet’s name and distance, so we should only have those, not the whole Planet object. Personally I think this unnecessarily complicates code and makes future changes harder, but you are free to disagree!)
So, having defined this, we can now create a state variable inside our view model which exposes it:
| package com.tdcolvin.planetspotters.ui.planetslist | |
| ... | |
| @HiltViewModel | |
| class PlanetsListViewModel @Inject constructor( | |
| planetsRepository: PlanetsRepository | |
| ): ViewModel() { | |
| private val planets = planetsRepository.getPlanetsFlow() | |
| val uiState = planets.map { planets -> | |
| when (planets) { | |
| is WorkResult.Error -> PlanetsListUiState(isError = true) | |
| is WorkResult.Loading -> PlanetsListUiState(isLoading = true) | |
| is WorkResult.Success -> PlanetsListUiState(planets = planets.data) | |
| } | |
| }.stateIn( | |
| scope = viewModelScope, | |
| started = SharingStarted.WhileSubscribed(5000), | |
| initialValue = PlanetsListUiState(isLoading = true) | |
| ) | |
| } |
See how the “next” UI state is created depending on different kinds of result just received from the repository?
The scope and started parameters to .stateIn(…)safely constrain the lifecycle of this StateFlow. For more information, see Manual Vivo’s excellent article.
Adding sample planets
To add our 3 sample planets, we repeatedly call the use case we created for this purpose.
| fun addSamplePlanets() { | |
| viewModelScope.launch { | |
| val planets = arrayOf( | |
| Planet(name = "Skaro", distanceLy = 0.5F, discovered = Date()), | |
| Planet(name = "Trenzalore", distanceLy = 5F, discovered = Date()), | |
| Planet(name = "Galifrey", distanceLy = 80F, discovered = Date()), | |
| ) | |
| planets.forEach { addPlanetUseCase(it) } | |
| } | |
| } |
Refresh and deletion
The refresh and deletion functions are structured very similarly to each other, simply calling the appropriate repository function.
| fun deletePlanet(planetId: String) { | |
| viewModelScope.launch { | |
| planetsRepository.deletePlanet(planetId) | |
| } | |
| } | |
| fun refreshPlanetsList() { | |
| viewModelScope.launch { | |
| planetsRepository.refreshPlanets() | |
| } | |
| } |
Step 6: Writing the AddEditPlanetViewModel
The AddEditPlanetViewModel powers the screen used to add a new planet, or edit an existing one.
As we did before — and, in fact, as is good practice for any view model — we’ll define a data class for everything that the UI will display, and a single source of truth for it:
| data class AddEditPlanetUiState( | |
| val planetName: String = "", | |
| val planetDistanceLy: Float = 1.0F, | |
| val planetDiscovered: Date = Date(), | |
| val isLoading: Boolean = false, | |
| val isPlanetSaved: Boolean = false | |
| ) | |
| @HiltViewModel | |
| class AddEditPlanetViewModel @Inject constructor(): ViewModel() { | |
| private val _uiState = MutableStateFlow(AddEditPlanetUiState()) | |
| val uiState: StateFlow<AddEditPlanetUiState> = _uiState.asStateFlow() | |
| } |
In case we’re editing a planet (rather than adding a new one), we want the initial state of the view to represent the current state of that planet.
As is good practice, this screen is only going to be passed the ID of the planet we’re editing. (We don’t pass the whole Planet object — it could get too big and complex). Android’s Lifecycle components gives us a SavedStateHandle from which we can obtain the planet ID and load the Planet object in:
| @HiltViewModel | |
| class AddEditPlanetViewModel @Inject constructor( | |
| savedStateHandle: SavedStateHandle, | |
| private val planetsRepository: PlanetsRepository | |
| ): ViewModel() { | |
| private val planetId: String? = savedStateHandle[PlanetsDestinationsArgs.PLANET_ID_ARG] | |
| private val _uiState = MutableStateFlow(AddEditPlanetUiState()) | |
| val uiState: StateFlow<AddEditPlanetUiState> = _uiState.asStateFlow() | |
| init { | |
| if (planetId != null) { | |
| loadPlanet(planetId) | |
| } | |
| } | |
| private fun loadPlanet(planetId: String) { | |
| _uiState.update { it.copy(isLoading = true) } | |
| viewModelScope.launch { | |
| val result = planetsRepository.getPlanetFlow(planetId).first() | |
| if (result !is WorkResult.Success || result.data == null) { | |
| _uiState.update { it.copy(isLoading = false) } | |
| } | |
| else { | |
| val planet = result.data | |
| _uiState.update { | |
| it.copy( | |
| isLoading = false, | |
| planetName = planet.name, | |
| planetDistanceLy = planet.distanceLy, | |
| planetDiscovered = planet.discovered | |
| ) | |
| } | |
| } | |
| } | |
| } | |
| } |
Notice how we update the UI state using this pattern:
_uiState.update { it.copy( ... ) }
In one simple line, that creates a new AddEditPlanetUiState with values copied from the previous one, and sends it out via the uiState Flow.
Here’s our functions for updating various properties of the planet, using that technique:
| fun setPlanetName(name: String) { | |
| _uiState.update { it.copy(planetName = name) } | |
| } | |
| fun setPlanetDistanceLy(distanceLy: Float) { | |
| _uiState.update { it.copy(planetDistanceLy = distanceLy) } | |
| } |
And finally, we save the planet object using our AddPlanetUseCase:
| class AddEditPlanetViewModel @Inject constructor( | |
| private val addPlanetUseCase: AddPlanetUseCase, | |
| ... | |
| ): ViewModel() { | |
| ... | |
| fun savePlanet() { | |
| viewModelScope.launch { | |
| addPlanetUseCase( | |
| Planet( | |
| planetId = planetId, | |
| name = _uiState.value.planetName, | |
| distanceLy = uiState.value.planetDistanceLy, | |
| discovered = uiState.value.planetDiscovered | |
| ) | |
| ) | |
| _uiState.update { it.copy(isPlanetSaved = true) } | |
| } | |
| } | |
| ... | |
| } |
Step 7: Write the data sources and UI elements
Now that we have our whole architecture in place, we can write the lowest level code. That’s the UI elements and the data sources. For the UI elements we can choose, for example, to support phones and tablets using Jetpack Compose. For the local data source we can write a cache using Room DB, and for the remote data source we can simulate accessing a remote API.
These layers should remain as thin as possible. For example, the UI elements code shouldn’t include any calculations or logic, just purely what’s needed to take the state given by the view model and display it on the screen. Logic is for view models.
For the data sources, just write the minimum code necessary to implement the functions in the LocalDataSource and RemoteDataSource interfaces.
Specific third party technologies (like Compose and Room) are out of the scope of this tutorial, but you can see an example implementation of those layers in the code repo.
Leaving low level to last
Note that we’ve been able to leave these pieces of our app until last. That’s hugely beneficial because it has allowed stakeholders the maximum amount of time needed to make decisions about what third party tech to use, and what the app should look like. And even after we’ve written that code, we can reverse those decisions without affecting any of the rest of the app.
The full code repository is at: https://github.com/tdcolvin/PlanetSpotters.
There was a lot to learn in this tutorial; congratulations for making it to the end. I hope it has been helpful. I don’t have any badges (much less diplomas) to give out — but do feel free (encouraged, even) to make yourself one, and post the result here.
And of course if you have any questions or comments, or if you disagree with something (in fact particularly if you disagree with something), then share it! Leave a response here, I will try to reply to everyone.
Lastly, I’m currently offering a few free sessions per week to help anyone with any aspect of Android development or building an app business. You can book me here: calendly.com/tdcolvin/android-assistance.
Tom Colvin has been architecting software for two decades. He’s co-founder of Apptaura, the mobile app specialists, and available on a freelance basis.
This article was previously published on proandroiddev.com


