

Please do not waste your time by repeating the same code patterns and spend it creating the apps.
Android Studio (and any other IDE developed by JetBrains) provides multiple handy auto-complete shortcuts to fill the declarations, method calls, etc. Some of them are for the keywords in Kotlin / Android specific. Avoid repeating some actions just because you avoid using the context helper in IDE. IDE is here to help you to be more productive.
Built-in templates:
Some pure Kotlin templates:
const—const valvoid, fun0, fun1, fun2— created a function with the required number of parametersifn/inn—if ( … == null)/if ( … != null)todo—// TODO:fixme—//FIXME:
Some Android specific for Jetpack Compose:
comp— creates compose functionpaddp—Modifier.padding(.dp)weight—Modifier.weight()prev— preview compose functionprevCol— creates a collection of compose previews
For surrounding the composable with
Container,ColumnorRow, put pointer at composable, press the Alt+Enter, pick the ‘Surround with Widget’. You can set your own shortcut as you like. I set it up for Alt+i, but it is fully up to you.

You can achieve something similar with ctrl + alt + t, which can even wrap your code into if-else, or try-catch.
There are many more templates, but if you start writing code, they pop up automatically as they are usually obvious. If you begin writing class, or interface, for loop and many others, you will get the context helper to complete the keyword.
However, there is much more space for improvement.
Custom templates
How to add a new template
Programmers are lazy, and I am no exception. I see a lot of programmers trying to find the code snippet somewhere in their code, internet or at some hobby project. If it has a repeating pattern, spend a minute or two to create a template and never repeat writing that chunk of code from scratch every time.
Open Android Studio and go for File → Settings → Editor → Live Templates. By clicking plus in the top right corner, you can add your group of templates or a template to an existing category.
I encourage you to explore all the available templates, because you will find other useful templates other than I named above or you will get inspiration how to easen your work further.
If you add a new Live Template, the context must be defined in the bottom left corner with a yellow warning sign. Feel free to create a template, not only for Kotlin. It can be Java, Dart, Gradle, or anything else.
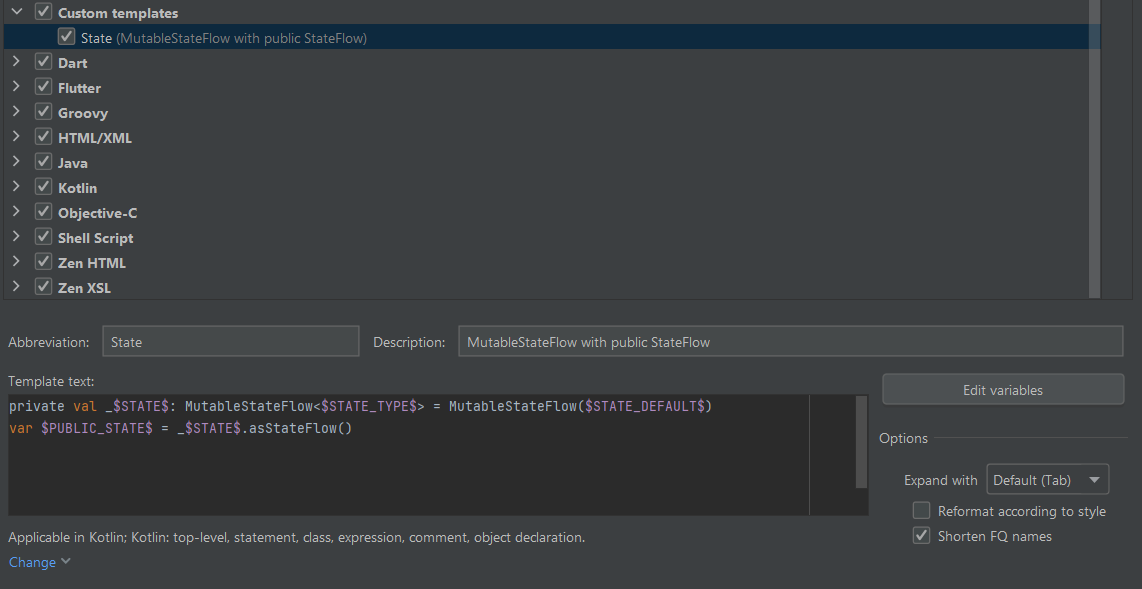 Example of the Live Template
The abbreviation is the text used in your code to invoke the template. It can be anything convenient and memorable for you. I like to keep it plain with the capital beginning letter due to Kotlin’s most of the variables are written by camelCase.
Template text is your field to input the template. Custom inputs can be defined by $…$. If you name them the same, the first input will be shared across other instances. So, if you start to write first $STATE$ as in the example above, it will be replicated across the whole template.
Advanced behaviours
By clicking edit variables, you will get a table with custom inputs from your template. To declare the default value, you can use quotation marks for the input like "defaultValue".
Expression is used for quickly adding more functionality to the custom field. You can add the name of the class, date, user, suggest input or anything. Be aware it cannot be used to modify current input from you, but it can take input from other fields, which are already defined.
$END$ is a special placeholder where the cursor will jump after finishing the template.
Some highlights from expressions:
- blockCommentStart / blockCommentStop
- capitalize / camelCase
- className — to introduce class name
- date — to format the date inside of the comment
- fileName — the name of the file where the template is placed
- methodName — method, where the live template is used
- suggestVariableName — based on input, it will suggest a variable name
- many more
More can be found here with explanations and examples.
Live template variables | IntelliJ IDEA
Template ideas
Here are some ideas which I use often during programming as they are repeating all over the code. Code can be directly placed as a live template into the settings of the Android Studio. Feel free to create customized versions and abbreviations to invoke them.
MutableStateFlow and StateFlow
private val _$StateFlow$: MutableStateFlow<$StateType$> = MutableStateFlow($StateDefault$)
val $StateFlow$ = _$StateFlow.asStateFlow()
HiltViewModel
StateName can use lowerCase name of the ViewModel for MVI architecture.
@HiltViewModel
class $VmName$ViewModel @Inject constructor($Parameters$) : ViewModel() {

    private val _$StateName$State: MutableStateFlow<$StateType$> = MutableStateFlow($StateDefault$)
    val $StateName$State = _$StateName$State.asStateFlow()

}
Scoped Coroutine function to ViewModel
Method, which is scoped to coroutine context defined by a dispatcher. Dispatcher as a variable uses the completeSmart expression to show you, the available dispatcher, as Main, IO or Default.
private fun $MethodName$() = viewModelScope.launch(Dispatchers.$Dispatcher$) {
       Log.i(TAG, "$MethodName$: invoked")
       $END$
}
Module Class with Binds in Hilt
In my code, I reference the interface as a template, so the current implementation and interface have a common name usually. The module is created as a camelCase expression version for the parameter.
@Module
@InstallIn($Component$::class)
abstract class $Module$DI {

    @Binds
    @$Injector$
    abstract fun provides$Module$($ModuleCamelCase$: $Module$): $Module$Template

}
Binds in Hilt
Same as before, but only for one dependency.
@Binds
@$Injector$
abstract fun provides$Module$($ModuleCamelCase$: $Module$): $Module$Template
Module Class with Provides in Hilt
Similar implementation as before for Binds, but now for Provides.
@Module
@InstallIn($Component$::class)
object $Module$DI {

    @Provides
    @$Injector$
    fun provides$Module$($ModuleCamelCase$: $Module$): $Module$Template = $END$
}
Provides in Hilt
@Provides
@$Injector$
fun provides$Module$($ModuleCamelCase$: $Module$): $Module$Template = $END$
OUR VIDEO RECOMMENDATION


Jobs
ApplicationContext shorcut can be useful for
@ApplicationContext context: Contextin terms of Hilt usage.
Definition of Dao for Room database
I implement all of the basic information, but sometimes there is no need for all of them.
@Dao
interface $Type$Dao {
    @Query("SELECT * FROM $Type$")
    fun getAll(): List<$Type$>

    @Query("SELECT * FROM $Type$ WHERE id = :id")
    fun getById(id: Int): $Type$?

    @Insert(onConflict = OnConflictStrategy.REPLACE)
    fun addItem(item: $Type$)

    @Update(onConflict = OnConflictStrategy.REPLACE)
    fun updateItem(item: $Type$)

    @Delete
    fun deleteItem(item: $Type$)
}
Test class for unit testing
Whole initialisation of the test class with mockito rule for future mock implementation. The first test is just to make sure, the tested unit is properly instantiated and the second one is placed for the test.
@RunWith(JUnit4::class)
class $TestClassName$Test {

    @get:Rule
    val mockitoRule: MockitoRule = MockitoJUnit.rule()

    @Before
    fun setUp() {

    }

    @After
    fun tearDown() {

    }

    @Test
    fun `Initial test`() {
        val sut: $TestModule$ = $TestModule$($Parameters$)
    }

    @Test
    fun `$TestDescription$`() {
        // ARRANGE
        val sut: $TestModule$ = $TestModule$($Parameters$)
        $END$
        // ACTION
        // CHECK
    }
}
Single unit test
@Test
fun `$TestDescription$`() {
  // ARRANGE
  val sut: $TestModule$ = $TestModule$($Parameters$)
  $END$
  // ACTION
  // CHECK
}
Mock creation
@Mock
private var $variable$: $variableType$
Conclusion
To export templates and keep them for other computer or share them with other people, you can go to File → Manage IDE Settings → Export Settings. The same goes for importing.
It may take a while to get used to some shortcuts. It takes some time to set up too. However, it can become a new habit, which will save you tons of time in future.
If you like the article, do not forget to clap for it and subscribe for more content. Thanks!
More articles:
Resources:
This article was previously published on proandroiddev.com


