


Throughout most of my career, I have tried to avoid everything about Gradle as much as possible. For me, it was always just a tool that I used to add dependencies, define new modules, change versions and build projects.
In 2020–2022, I worked on the platform team, where improving the Android developer experience was a top priority. During that time, I had the opportunity to gain some insights into how Gradle works.
In this article, I will share a brief overview of caching in Gradle and address any confusion you may have about it.
Input/Action/Output or where it all starts
In a nutshell, caching signifies that “something from a previously executed operation can be reused without re-execution.” However, before we explore how Gradle achieves this, let’s take a moment to discuss functional programming.
If you’re familiar with it, you’ve likely come across the concept of pure functions. Apart from the absence of side effects, one of the key benefits of pure functions is their ability to consistently produce the same output for the same input. Such functions are often referred to as deterministic.

A good use case is the acclaimed Jetpack Compose, where it is possible to avoid recomposition (action) if the input data hasn’t changed.
Well, Gradle is not an exception.
In Gradle, we can say that a build involves a sequence of steps (tasks) that transform source code into a final product.
So, such tasks actually have an input, action, and output and they can be deterministic.
What can an input be for the tasks?
Literally anything, like:
- Gradle scripts, kts scripts
- Env-params, Gradle params
- Java version (Used by default in JavaCompile)
- Source code: Classes and their content

Tasks also can use other tasks outputs as their input.
What can an output be for the task?
It also can be anything. For instance, for a JavaCompile task, it’s a folder with compiled bytecode.
Gradle does as much as it can to re-use task outputs if inputs haven’t changed, to not re-run its action. And this concept applies to several caching layers. But wait a minute… does Gradle have multiple caching layers? This is where the most interesting part begins.
Caching layers in Gradle
Briefly, the cache can be divided into two main types: Local and Remote. The Local cache further consists of three subtypes: cache stored in RAM, cache stored within project files, and cache stored outside the project. The Remote cache, stored on a remote server, replicates several subcategories found in the Local cache.
Let’s explore it:
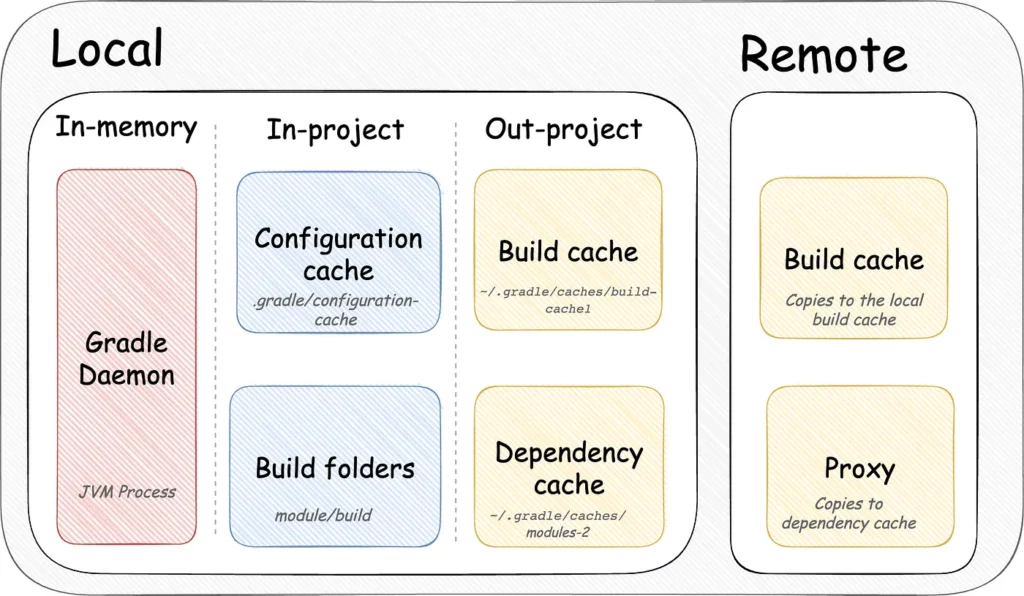
1. In-memory cache
This cache is implemented in the Gradle daemon: it is a long-running process that speeds up builds by caching project information, like task input and output files. It runs as a daemon so it can avoid the overhead of starting a new JVM process each time.
There is one more cool part about it — depending on installed JVM (Hotspot from openjdk supports this), it can optimize runtime code on the fly, which makes execution for the subsequent builds faster.
The decision to use the daemon depends on the environment. It is generally recommended to keep the daemon enabled both locally and on CI.
However, the daemon’s stability on the CI is highly sensitive to factors such as whether your build agents are exclusively used for Android builds or not, which plugins you use, and how global process state is impacted. That’s why it may be challenging to enable it on CI.
2. In-project cache
Configuration
Before Gradle decides what to build, it collects meta-information from each module in the project. This phase is called configuration.
For instance, In my previous project with over 1k modules, the configuration phase could take 2 mins. And it’s not even a build, which is frustrating.
The configuration cache is a feature that can significantly reduce the configuration time.
It works on the same input/output principle we explored.
Although it’s not enabled by default yet, and may be challenging to introduce, it’s highly recommended for large projects. Configuration cache reduced this time from 2 minutes to a few seconds.
Modules build folder
After the configuration phase is finished, the execution phase takes place, where Gradle launches a sequence of tasks. Gradle will analyze every input for each task and will compare it with the most recent run, information of which is stored in {projectFolder}/.gradle/version/executionHistory/executionHistory.bin to detect whether it’s possible to reuse a cache which is stored in build folders of each module.
And If inputs for the particular task aren’t changed, it will reuse the output from the build folder.
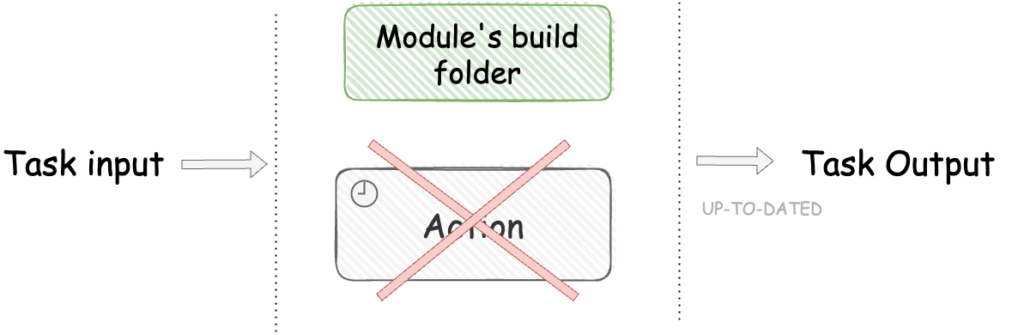
It’s important to know that such cache is short-term and can be invalidated if the input of your next build tasks has changed or if the ./gradlew clean command is run.
3. Out-of-project cache
It stores in the $GRADLE_USER_HOME/.gradle/, which is a user folder by default.
Dependency cache
The dependency cache is located in ~/.gradle/caches/modules-2 and stores jars (source jars if requested), aars, and poms files for third-party dependencies. These files are not fetched each build.
For stability (you won’t get performance benefits), using a proxy for Maven repositories can be a good idea because it can prevent disruptions in the event of downtime. For example, in 2022 Jitpack was down for almost two days, which could have caused work to be paralyzed for many engineers. Technically, maven proxy is something which is stored information, that’s why it’s included in this article as one of the remote cache layer.
Build cache
By default, the build cache is located in ~/.gradle/caches/build-cache1
Although such a cache is stored locally, it also can be replicated remotely.
Compared to the cache from modules build folders, the main advantage of the build cache is that it lives longer and stores previous output results as well. If the cache from build folders cannot be used, Gradle will check if it is possible to fetch the changes from the build cache. If not, Gradle will try to download the remote build cache and copy it to the local build cache directory and then to the module’s build cache.
It is important to note that the build cache is not enabled by default. To enable it, you need to add org.gradle.caching=true to gradle.properties.
The content of the build cache may seem confusing at first, as it stores hash values like 3748f79fa4230cfba17f559fee3220fb(also known as cache keys).
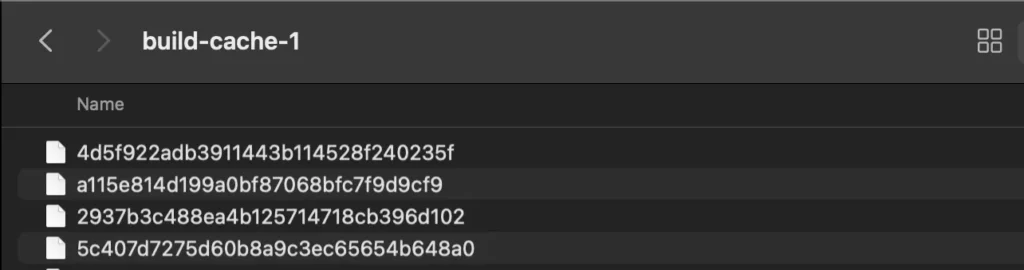
Let’s find out what these values represent.
If there is no cache in the modules build folders, Gradle must calculate hashes for all inputs and use these hashes to compute a final cache key for the task.
For instance, here is how JavaCompile task can look:
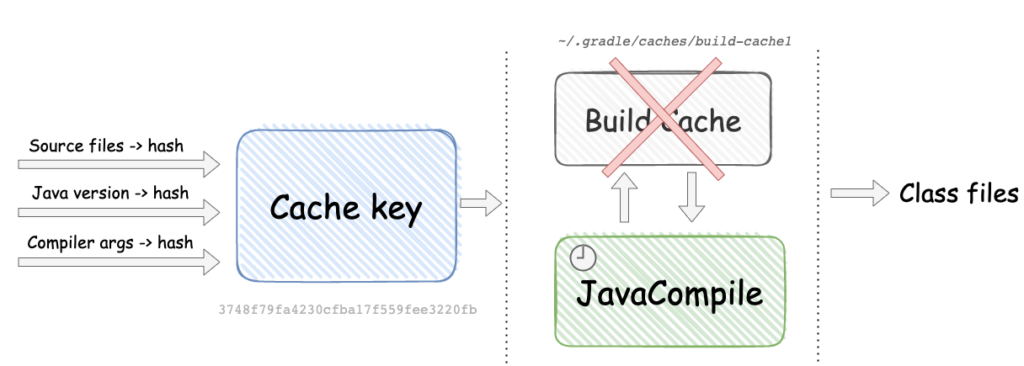
If the build cache is available, it will be used to contribute to the module build folders for future builds.
All cache keys in the build cache are actually compressed output files associated with inputs. You can decompress these files to view the output of the tasks, including compiled bytecode. To profile how Gradle generates input hashes and final cache keys, you can add the –Dorg.gradle.caching.debug=true flag when running the desired tasks.
Build cache in action
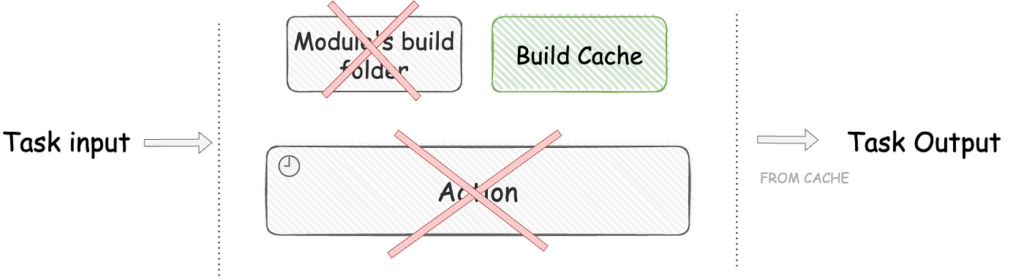
When you launch any Gradle task, it can have an outcome, which can tell us how this task was performed.
Let’s play with it to see the output. (For demo purposes I use just an empty Android project with MainActivity)
./gradlew assembleDebug

# Everything is executed
BUILD SUCCESSFUL in 9s
35 actionable tasks: 35 executed
During the first build, all tasks are executed without any optimizations. However, if we run the same tasks again without making any changes, we may see a different outcome.
./gradlew assembleDebug

# Cache from modules build folder has been used.
# It's an incremental build, which is ~9x time faster on my laptop
BUILD SUCCESSFUL in 1s
35 actionable tasks: 35 up-to-date
Let’s clean and build again:
# Clean modules build folders
./gradlew clean

# Modules build folders are invalidated
BUILD SUCCESSFUL in 1s
2 actionable tasks: 2 executed

# Build 1
./gradlew assembleDebug

# Everything is executed
BUILD SUCCESSFUL in 7s
35 actionable tasks: 35 executed


# Build 2
./gradlew assembleDebug

# Incremental build
BUILD SUCCESSFUL in 1s
35 actionable tasks: 35 up-to-date
Now, let’s try to change and revert something in MainActivity and then revert the change:
# Change something in MainActivity, then build
./gradlew assembleDebug

# Not everything is re-executed!
BUILD SUCCESSFUL in 2s
35 actionable tasks: 4 executed, 31 up-to-date

# Revert changes back, and build
./gradlew assembleDebug

# Not everything is re-executed!
BUILD SUCCESSFUL in 2s
35 actionable tasks: 4 executed, 31 up-to-date
We can see that in both cases, some of the tasks were executed. Here is where Build cache can help us. Let’s add org.gradle.caching=true to gradle.properties and run the same scenarios again:
# Clean build folders
./gradlew clean
BUILD SUCCESSFUL in 1s
2 actionable tasks: 2 executed

# Warm-up
./gradlew assembleDebug
BUILD SUCCESSFUL in 8s
35 actionable tasks: 35 executed

# Change something in MainActivity, then build
./gradlew assembleDebug
BUILD SUCCESSFUL in 2s
35 actionable tasks: 4 executed, 31 up-to-date

# Revert changes: Build cache applied
./gradlew assembleDebug
BUILD SUCCESSFUL in 1s
35 actionable tasks: 1 executed, 3 from cache, 31 up-to-date
We can see that now that some tasks are able to use a build cache and have a label FROM CACHE: It calls “cache hit”.
By default, tasks are not cacheable. It’s up to the author whether to turn the cache on or not. In some projects, cache (and especially remote cache) can be beneficial. In others, download times can be longer rather than compilation.
Most of the main tasks, like JavaCompile and Test are cacheable. AGP (Android Gradle Plugin) also supports it for some tasks, like AndroidLintAnalysisTask, R8Task, etc.
Remote Build Cache
Even when using a local build cache, fetching new changes from a VCS can still cause tasks to be re-run. A remote build cache, which is stored on a separate server, can help to alleviate this problem. However, the effectiveness of a remote cache will depend on various factors.
Choosing the Right place for contribution
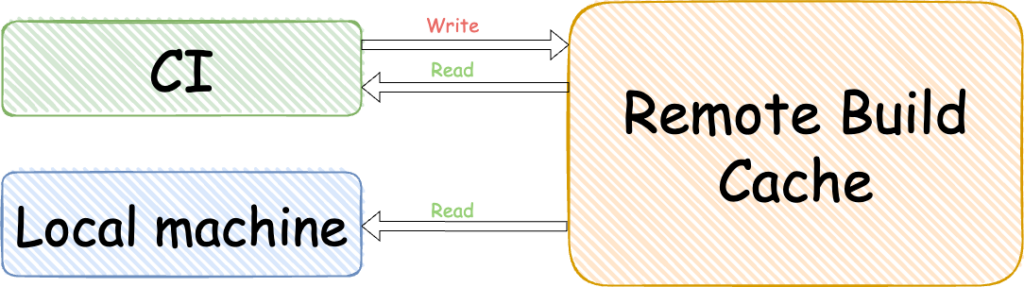
While allowing local machines to contribute to a remote cache may seem beneficial, it can actually cause the cache to grow significantly in size. It is more practical to have some of the CI configurations as a contributor, and local machines as read-only.
However, it is important to ensure input consistency between local and CI environments, which can be challenging with multiple build types and flavors.
How to contribute from the CI
CI could contribute a build cache to be consumed by CI builds and by Local builds. Ideally, we’d like to increase a cache-hit for both consumers.
Even though we can just enable writing by pushing if isCI = true, I would not recommend that approach. Instead, you could create allowlist of CI configurations, ensuring more control over what goes into the cache and preventing it from growing uncontrollably.
Increase cache-hit for local builds
You can create a special CI configuration that launches only when main VCS is updated. You can start with only primitive scenarios, like assembling, which should target debug builds. This way the cache will be populated after each pull request is merged, but not immediately.
Increase cache-hit for CI
If you have a lot of unit tests & integration tests, it’s pragmatic to include contributions from the verification configurations: assembling, lint, unit tests/integration tests. This way, the cache may be populated during the verification, which means that the cache may be delivered to the local consumers faster. Also, if the build has failed, re-verification will run faster.
P.S. If you don’t have a build queue, you would need to keep this approach together with the special CI configuration described above, to prevent builds merged at the same time to produce inputs that won’t be cached.
Preventing cache misses and negative savings
We can see that now that some tasks are able to use a build cache and have a label FROM CACHE: It calls “Cache hit”.
Cache misses happen when we expect to have FROM CACHE label, but have the whole task re-run. The main reason for this is a dynamic input or output. You can check such scenarios by running the same Gradle task multiple times or running locally and on the CI.
Most popular reasons — using Timestamps/UUID/etc in BuildConfig, using absolute path instead of relative one either in input or in output, or different Java versions.
Also, sometimes you can have a case when the execution of a particular task is cheaper rather than downloading and copying its cache. This case is called negative saving: Unfortunately, there are a lot of pre-built tasks with these issues. Eventually, they will be fixed, but in the meantime I’d advise to use a few plugins to help: android-cache-fix-gradle-plugin fixes most problems, and and gradle-doctor, can highlight and prevent some issues, like ensuring JAVA_HOME is set and matches IDE’s JAVA_HOME
Also, one of the reasons can be updates of critical dependencies such as Kotlin, AGP, Gradle and kapt & KSP related dependencies, as they can produce new cache misses, which negatively affects build time. Don’t merge such changes unless you measured them and confirmed that there are no negative impacts.
You can use Gradle-profiler to just check a build time or validation scripts from Gradle Enterprise, which is designed to highlight issues that prevent work avoidance.
Conclusion
- Task execution is expensive to run even if you optimize everything. Work avoidance is a way to go
- Gradle has a Runtime cache (Gradle Daemon), In-project cache (configuration, project build folder), and Out-of-project cache (build & dependencies)
- In Gradle, cache keys are not calculated for the cache in Modules Build Folders. Instead, information is stored in the
executionHistory.binfile, located in{projectFolder}/.gradle. - Gradle calculates cache keys for Build Cache. If it’s found, it will be uncompressed and copied to the Modules Build Folders where they will be utilized for subsequent builds.
- Build cache can be replicated remotely. To get the most benefit from a remote build cache, it is important to keep inputs consistent between local machine and CI, and be accurate with core changes and measure their impact
- Build cache stability requires maintenance. You need to be careful before you merge critical changes, like
Gradle update/APG/Kotlin/Kapt/KSP/etc
Thank you to Dmitry Voronin and Jameson Williams for the detailed review of this article and feedback!
This article was previously published on proandroiddev.com


