

Source: This image is generated by generative AI via bing
In today’s world, every app is connected to the internet. And as we all know, network conditions are not always stable. As part of a good user experience, developers should test their apps for flaky and slow networks to see how they behave under these conditions.
Existing ways…
Emulating Slow Network
You can emulate a slow network by changing the network mode in your device setting for your physical devices as in the image below. (Left side is for emulator and right side is for physical device)
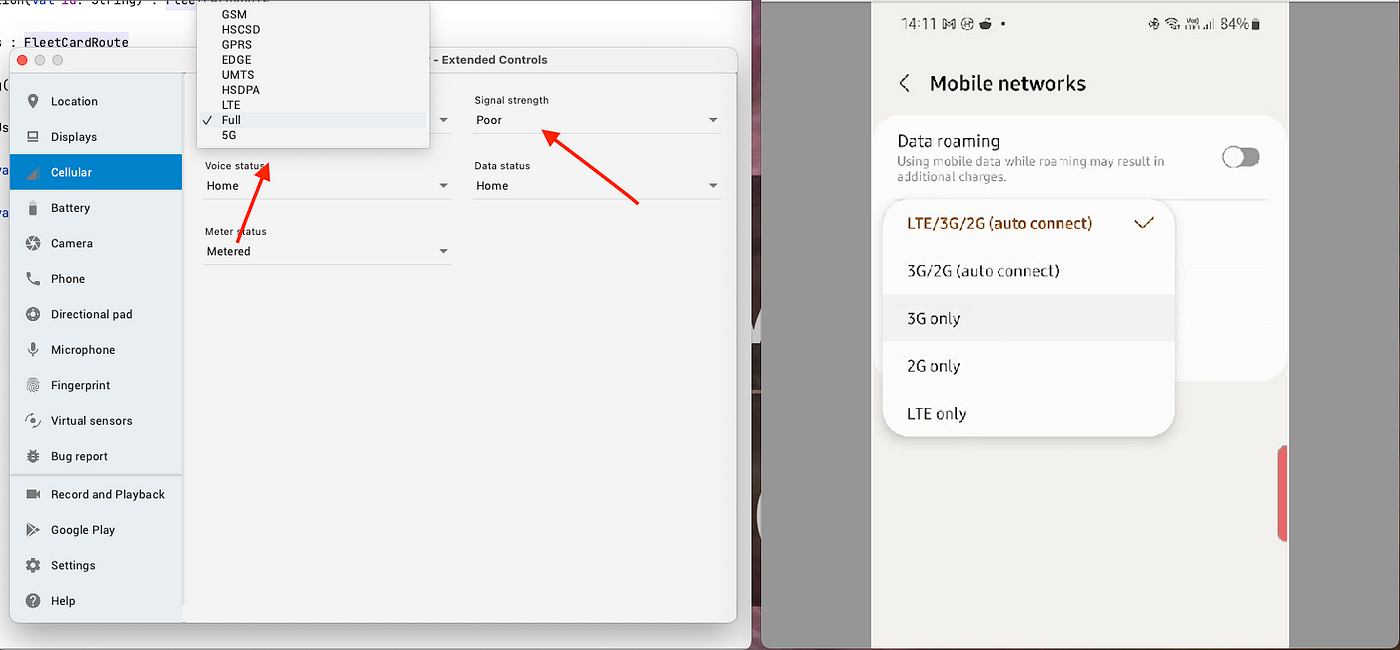 Source: Author’s development machine and phone
But there are few cons with this
- It alters your whole device network. Especially if you are testing on physical device then after every-time of testing you have to make sure you changing back the settings to normal otherwise it affects your other apps on device. Now this is a hassle
- It can only emulate slow networks, but still cannot emulate flaky networks
Charles/ProxyMan
With Charles and ProxyMan, you can also emulate slow network and also set custom response for specific endpoints. But there are some cons with this as well
- You have to keep your device connected to your development machine for testing. Again a hassle if you have to configure setting multiple times during testing
- You still cannot emulate flaky network with this
- You can mock the response of endpoints for limited number of endpoints for ProxyMan
- Charles is paid
Introducing Flaker…

Features
- Sluggish Network: Flaker and its companion app gives you easy Delay feature which enables to emulate slow network. You configure the Delay as per your use case
- Flaky Network: Flaker and its companion app gives Fail Percentage and Variance Percentage with which you can simulate flaky network
- Focussed Impact: Flaker is designed to impact only your app’s network conditions, leaving your device’s overall network functionality undisturbed. This means you can test and fine-tune your app’s performance without affecting your entire device’s connectivity.
With Flaker library, a developer can easily
- Simulate slow and sluggish network.
- Simulare Flaky networks
When you add Flaker as library to your project, flaker install as companion app for your application. You can easily configure the network conditions through this companion app.

Source: Author’s phone
OUR VIDEO RECOMMENDATION


Jobs
Major highlight for using flaker, you can configure the network conditions which affects ONLY your app. Unlike the other ways, it does not affect your device network and you don’t need to keep your phone connected to development machine
What are Fail percentage and Variance percentages?
- Fail Percentage: It enables you to set the percentage for your network requests failure which would be made by your app
- Variance Percentage: Network variance is a measure of how much the latency of a network connection varies over time. It is a measure of the unpredictability of a network connection. A higher network variance indicates that the latency of the network connection is more variable, which can lead to performance problems for applications that are sensitive to latency. With Variance percentage, you can set a percentage for Network variance as per your use case for your app
Installation and Setup
- Add
mavenCentral()to repositories in yourbuild.gradlefile.
repositories {
     mavenCentral()
}
- Add the following dependency to your
build.gradle
dependencies {
     debugImplementation("io.github.rotbolt:flaker-android-okhttp:${latest_version}")
     releaseImplementation("io.github.rotbolt:flaker-android-okhttp-noop:${latest_version}")
}
- Add the following statement to your app’s onCreate method.
class MainApplication: Application() {
       override fun onCreate() {
           super.onCreate()
           FlakerAndroidOkhttpContainer.install(this)
       }
   }
- Then in your okhttp client builder, add the following interceptor.
val client = OkHttpClient.Builder()
        .addInterceptor(FlakerInterceptor.Builder().build())
        .build()
- Flaker uses a default Fail Response if you don’t give one. But if you want you can configure the fail response as well like below
val flakerFailResponse = FlakerFailResponse(
        httpCode = 500,
        message = "Flaker is enabled. This is a flaky response.",
        responseBodyString = "Test Failure"
    )
     val flakerInterceptor = FlakerInterceptor.Builder()
        .failResponse(flakerFailResponse)
        .build()
That’s it. Now upon installing your app, a companion app flaker will be installed on your device. You can use this app to configure the network conditions for your app. Thats how easy it is to setup and use the flaker.
How does Flaker work?
Flaker is highly modularised library and here is the following module structure

Source: rotbolt.github.io/Flaker
Explaining each module could be out of scope of this article, for that I would recommend to go its documentation or github library. But here I would like your drive your notice to main working modules.
- flaker-okhttp-core: This is the main module which contains the above said
FlakerInterceptorThis module targets the applications which uses okhttp in their Android library which is the case for most application now a days - flaker-ktor-core: This is module to target the apps which use
ktoras their networking library for their app. Since ktor is multiplatform library so flaker-ktor-core will also support on Android and iOS both. [This module is still under construction 🚧] - flaker-data: It basically contains the user configuration for network conditions and logs the network request made by the app using FlakerInterceptor for easy visibility on your companion app like below.
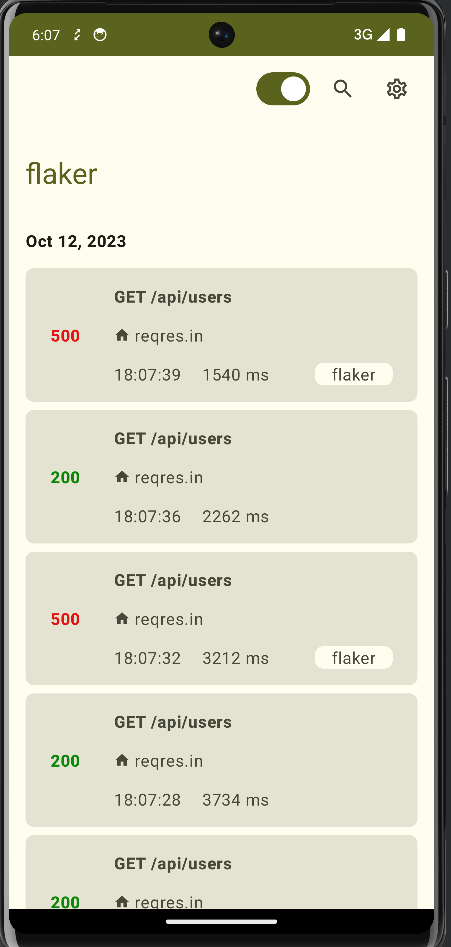
Source: Author’s phone
- flaker-android-okhttp: This is the end user dependency which includes the
flaker-okhttp-coreand the companion app which gets installed with your app
How does the FlakerInterceptor work?
Now this is the most interesting part as this is the part which does the main job.
Internally FlakerInterceptor uses something called retrofit-mock . This retrofit-mock gives you the ability to mock the responses and gives you the class NetworkBehaviour which gives you the ability to configure the fail percentage and network variance as below
val networkbehavior = NetworkBehavior.create();
behavior.setDelay(2000, TimeUnit.MILLISECONDS);
behavior.setFailurePercent(50);
behavior.setVariancePercent(50);
Now what flaker does is it takes the required details like network delay, network variance and fail percentage from its companion app set by the user (as shown in the picture above) and apply these network behaviours while intercepting your network requests.
Wait still how does it simulate the flaky network?
While intercepting, flaker checks the configuration from flaker-data module. If a user set the flaker to enable then flaker intercept the network request according to the network behaviour set in configuration.
if (flakerPrefs.shouldIntercept) {
    val behavior = NetworkBehavior.create()
    behavior.setDelay(flakerPrefs.delay.toLong(), TimeUnit.MILLISECONDS)
    behavior.setFailurePercent(flakerPrefs.failPercent)
    behavior.setVariancePercent(flakerPrefs.variancePercent)
    val calculatedDelay = behavior.calculateDelay(TimeUnit.MILLISECONDS)
    delay(calculatedDelay)

    if (behavior.calculateIsFailure()) {
        val flakerInterceptedResponse = your configured fail response
        return@runBlocking flakerInterceptedResponse
    }
Regarding flakiness, flaker using NetworkBehaviour calculate the whether this request should be a failure or not using the method calculateIsFailure() which takes your fail percentage and variance percentage to calculate the failure and based on that flaker returns a failed response (which is also configurable).
So thats how easy flaker makes you easy to configure the flaky network situations via easy to use companion app and configure the various network situations through sliders and button clicks.
Limitations
Well flaker currently is in its early stages, and like any other library, it also has its limitations
- It does not support flaky network for WebSockets
- It does not support flaky network for Streaming
Way Ahead and Future Roadmap…
Currently Flaker only works on Android app, but Flaker has been made Multiplatform in mind and has been developed with Kotlin Multiplatform only to support both Android and iOS.
Support for iOS is still being worked on, so stay tuned and follow me for the updates.
Thank you
Further reads
This article was previously published on proandroiddev.com


