

Pagination plays a crucial role in building industrial applications. We don’t want to load large amounts of data in one go, that’s why we read them in certain pages. Through this, we want to provide infinite scrolling behaviour to our users without hampering their user experience.
For Android, Google has provided a very efficient Paging library, which we can use in our apps by following certain steps. In this article we are going to discuss Paging 3 and how we can modify Paged Data without altering the data source.
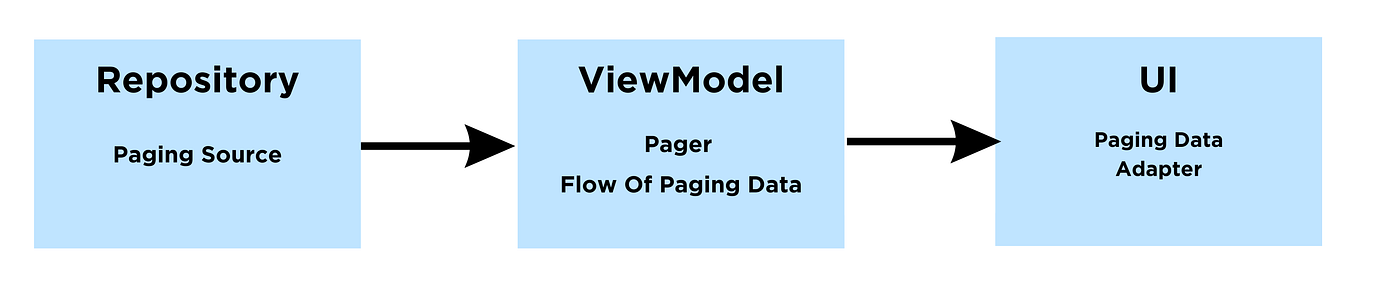
Let’s first see how we can implement Paging 3 following MVVM architecture in our apps.
1. Setup a Paging Source in the data layer
class CustomDataPagingSource :PagingSource<Int, T>() {

    override fun getRefreshKey(state: PagingState<Int, T>): Int? {
        return state.anchorPosition?.let { anchorPosition ->
            state.closestPageToPosition(anchorPosition)?.prevKey?.plus(1)
                ?: state.closestPageToPosition(anchorPosition)?.nextKey?.minus(1)
        }
    }

    override suspend fun load(params: LoadParams<Int>): LoadResult<Int, T> {

        val position = params.key ?: 0
        return try {
            val data = // get data from API
            val nextKey = if (data.isEmpty()){
                null
            }else{
                position + 1
            }

            LoadResult.Page(
                data = data,
                prevKey = if (position == 0) null else position - 1,
                nextKey = nextKey
            )
        }catch (e:Exception){
            return LoadResult.Error(e)
        }
    }
}
This class will be our PagingSource, as we will be making API calls and passing the data items in form pages from here only.
2. Create a data stream using Pager
suspend fun getNewsList(country: String): Flow<PagingData<T>> {
  return Pager(
      config = PagingConfig(
          pageSize = 20 // page-size,
          enablePlaceholders = false
      ),
      pagingSourceFactory = {
          CustomDataPagingSource()
      }
  ).flow
}
Before, displaying the Page Result on to the UI, we need to convert them into a data stream, i.e.; a flow using a Pager, which needs a page size and the PagingSource.
3. Define a recyclerview adapter which extends PagingDataAdapter
class CustomDataAdapter:PagingDataAdapter<T, CustomDataAdapter.ViewHolder>(TDataComparator) {

    // Define TComparator as a DiffUtil Comparator

    inner class ViewHolder :RecyclerView.ViewHolder(){
        fun bind(data:T?, position:Int){}
    }

    override fun onCreateViewHolder(parent: ViewGroup, viewType: Int): ViewHolder {
        val binding = // inflate from binding
        return ViewHolder(binding)
    }

    override fun onBindViewHolder(holder: ViewHolder, position: Int) {
        holder.bind(getItem(position),position)
    }
}
Now, our recyclerview adapter will be a little different here, as it will need PagedData<T> instead of List<T>. The rest of the things like ViewHolders or DiffUtil will work the same as a normal recyclerview.
4. Manage UI states using the PagingDataAdapter
OUR VIDEO RECOMMENDATION


Jobs
pagingDataAdapter.loadStateFlow.collectLatest { loadState->
   // handle screen state using loadState
}

viewmodel.pagedData.observe(viewLifecycleOwner, { data ->
    pagingDataAdapter.submitData(viewLifecycleOwner.lifecycle, data)
})
To set the PagedData in the adapter, we have an inbuilt function called submitData(), which is bound to the current fragment’s or activity’s lifecycle along with the PagedData.
To manage the UI states on our screen, like the Loading State, Error State, etc, we can use loadStateFlow from the paging data adapter, which simply consumes the current states of the adapter based on the type of data set in it.
Here, every data we receive is in the form of a PagedData<T> instead of List<T>. Now, there might be some cases, where we need to update items on our screen based on some user actions like removal or insertion of one or more items.
PagedData<T> is different from List<T>, it means we can’t just modify list to see our changes in action.
To solve this, one approach can be updating the data in the data source only. For example, we add a layer of local DB as well (ROOM). Then from the PagingSource, we need to update our local DB, and we always read data on UI from the local DB only.
This can work somewhat, but it would be a lot of extra work, just for some minor user actions.
The other approach can be if we define some actions on our own and modify the data stream according to that. So, now instead of updating the complete data source, we just need to update the data stream.
Let’s implement this..

Let’s define some user actions first.
sealed class Actions() {
    data class Remove(val item: T) : Actions()
    data class Insert(val item: T) : Actions()
}
We have assumed, there will be two actions as of now. Remove() will remove a particular item from the list and Insert() will add one at the bottom.
Now, update the viewModel as follows:
// an state flow to maintain user actions
private val modifications = MutableStateFlow<List<Actions>>(emptyList())

// function to read pagedData stream
fun fetchCustomData() {
    modifications.value = emptyList() // reset the actions
    repository.getDataFlow()
        .cachedIn(viewModelScope)
        .combine(modifications) { pagingdata, modifications ->
            modifications.fold(pagingdata) { paging, actions ->
                applyActions(paging, event)
            }
        }
        .onEach {
            _pagedData.value = it
        }
        .launchIn(viewModelScope)
}

// function to apply user actions on paging data
private fun applyActions(
    pagingData: PagingData<T>,
    actions: Actions
): PagingData<T> {
    return when (actions) {
        is Actions.Remove -> {
            pagingData
                .filter { actions.item != it }
        }

        is Actions.Insert -> {
            // to add item at bottom
            pagingData.insertFooterItem(actions.item)

            // to add item at top
            pagingData.insertHeaderItem(actions.item)
        }

        else -> {
            pagingData
        }
    }
}

// function which will apply user action
fun onApplyActions(actions: Actions) {
    modifications.value += actions
}
Here, we have tracked the user actions in state flow. While receiving the flow of data from the repository, we have added a combined operator to return an updated flow and used fold operator which will perform the applyEvents() operation on the incoming flow.
Now, we can apply Actions on the pagedData from UI as follows:
viewModel.onApplyAction(Actions.Insert(it.data)) //to insert an item

viewModel.onApplyAction(Actions.Remove(it.data)) //to remove an item
And since we using DiffUtil, we don’t need to notify the adapter explicitly.
By incorporating the above, one can easily implement Paging 3 in their apps and play with the PagedData seamlessly.
Conclusion
In this article, we’ve explored the implementation of Paging 3 in Android applications with a focus on the MVVM architecture. We began by implementing the Paging 3 first, then we saw how we can modify PagedData without altering the data source by introducing user actions like item insertion and removal, allowing for a more seamless and responsive user experience.
That’s it for today, see you in the next one.
Let’s connect: LinkedIn, Twitter
This article was previously published on proandroiddev.com


