

If you’re looking to publish and consume your Android, Java or Kotlin libraries securely, AWS CodeArtifact offers a robust solution. CodeArtifact is a fully managed artifact repository service by Amazon Web Services (AWS), providing a centralized location to store, organize, and share software packages.
Storage
Using AWS CodeArtifact incurs no upfront fees or commitments. You are billed solely based on your usage. The cost of storing artifacts in CodeArtifact is determined by the size of your artifact storage (in GB) and the duration of storage within the month.
Requests
Charges for requests made to CodeArtifact remain consistent across all request types. Each asset downloaded by CodeArtifact from public artifact repositories (such as npm registry, Maven Central, PyPI, NuGet.org, etc.) contributes to the request count. The charge rate is determined by the volume of requests. Cost is $0.05 per 10,000 requests.
As part of the AWS Free Usage Tier, you get the first 2GB of storage and first 100,000 requests of CodeArtifact usage for free every month.
Before Setup
Before setting up an Android, Java or Kotlin library to be published, a CodeArtifact repository with adequate permissions is required to be created on AWS console.
Setting up CodeArtifact requires these steps.
Steps:
- Setup your Artifact Repository on AWS console
- Install and configure AWS CLI
- Android code integration to pull & push libraries
Generate Token:
- Generate and Refresh the CodeArtifact Token
- Common issues using GetAuthorizationToken API and possible fixes
Step 1: Setup your Artifact Repository on AWS
Before you begin, ensure that you have an AWS account. If not, you can easily create one on the AWS official page https://aws.amazon.com/.
Sign in into your AWS console, navigate to the IAM dashboard. You can find IAM under the “Security, Identity, & Compliance” section. In the IAM dashboard, you will see an overview of IAM. Here you can manage users, groups, roles, and policies. In the IAM dashboard, click on “Users” in the left-hand navigation pane. Click on the “Add user” button.
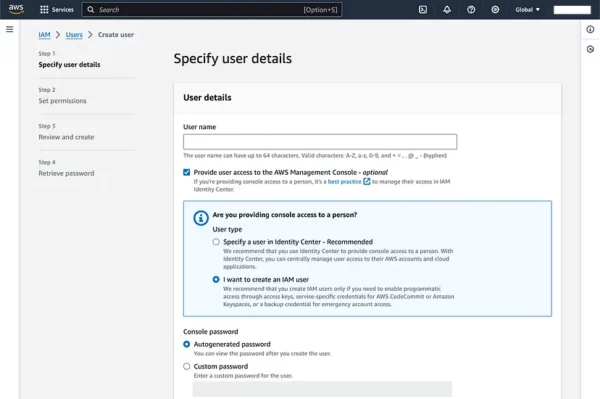
Set permissions by attaching policies (either existing policies or create custom ones).
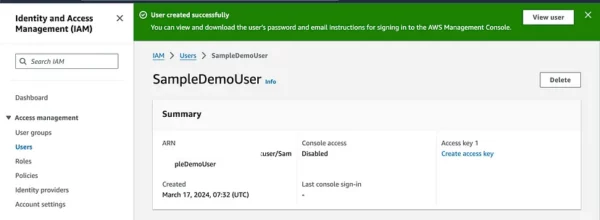
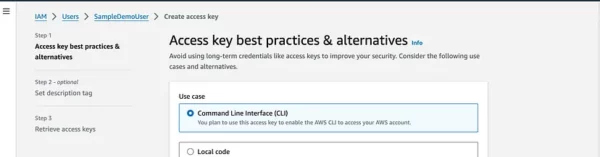
After creating the user, navigate to the users section and click on the newly created user. Click on the “Create access key” link on the right side to create a user’s Access Key ID and Secret Access Key and choose usecase for Command Line Interface (CLI). Make sure to download or copy these credentials as they are required for programmatic access.
Create Repository and Domain with required permissions
In the AWS Management Console, use the search bar at the top or navigate to “Developer & Tools” and select “CodeArtifact.”
In the CodeArtifact dashboard, click on the “Create repository” button.
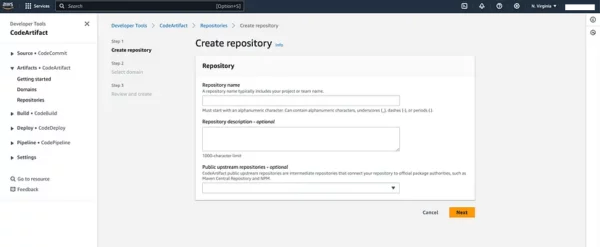
Fill in the required information:
- Repository name: Enter a unique name for your repository.
- Domain: Choose an existing domain or create a new one.
- Domain owner: Choose either “AWS” or “External.”
CodeArtifact domains simplify the administration of numerous repositories. It helps to set permissions across multiple repositories owned by various AWS accounts. Within a domain, an asset is stored only once, even if it is accessible from multiple repositories.
Note: An IAM user account is required to use CodeArtifact or call the GetAuthorizationToken, Root users are not allowed to call GetAuthorizationToken API.
Permissions & policies
It is required to give both Domain and Repository permissions for listing, create, delete, update on CodeArtifact and sts:GetServiceBearerToken required for token generation.
Note: You need to apply permissions directly to both Repository and Domain to gain full access to creating and updating artifacts.
Apply or Edit domain policy
To edit policy, navigate to the CodeArtifact dashboard, choose the domain for which you want to grant permissions, If the domain is not created, then create a new one and apply policy. In the domain details page, there is an “Edit domain policy” button.
It shows a page that allows you to edit policy, this is an AWS Identity and Access Management (IAM) policy written in JSON format, specifically for managing permissions related to AWS CodeArtifact.
{
    "Version": "2012-10-17",
    "Statement": [
        {
            "Sid": "ContributorPolicy",
            "Effect": "Allow",
            "Principal": {
                "AWS": "arn:aws:iam::444455556666:root"
            },
            "Action": [
                "codeartifact:CreateRepository",
                "codeartifact:DeleteDomain",
                "codeartifact:DeleteDomainPermissionsPolicy",
                "codeartifact:DescribeDomain",
                "codeartifact:GetAuthorizationToken",
                "codeartifact:GetDomainPermissionsPolicy",
                "codeartifact:ListRepositoriesInDomain",
                "codeartifact:PutDomainPermissionsPolicy",
                "sts:GetServiceBearerToken"
            ],
            "Resource": "arn:aws:codeartifact:eu-east-1:12345678910:domain/repository_name"
        }
    ]
}
Apply or Edit repository policy
To edit or apply repository policy, navigate to the CodeArtifact dashboard, choose the repository for which you want to grant permissions. In the repository details page, there is a “Edit domain policy” button.
{
    "Version": "2012-10-17",
    "Statement": [
        {
            "Effect": "Allow",
            "Principal": {
                "AWS": "arn:aws:iam::12345678910:root"
            },
            "Action": [
                "codeartifact:ReadFromRepository",
                "codeartifact:PublishPackageVersion",
                "codeartifact:PutPackageMetadata",
                "codeartifact:TagResource",
                "codeartifact:UntagResource",
                "codeartifact:Get*",
                "codeartifact:List*",
                "codeartifact:Describe*"
            ],
            "Resource": "arn:aws:codeartifact:eu-east-1:12345678910:domain/repository_name"
        }
    ]
}
Selecting Upstream repositories
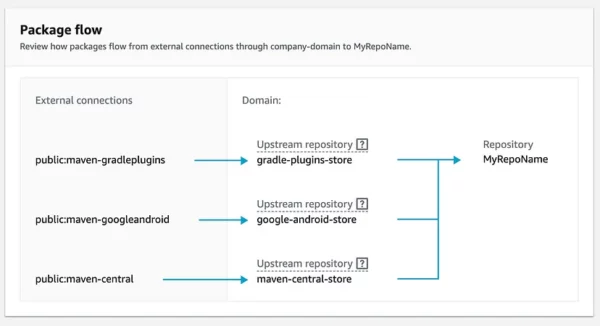
When you create a CodeArtifact repository, you have the option to configure upstream repositories. Upstream repositories are external repositories that your CodeArtifact repository can proxy and from which it can fetch artifacts. This is useful when you want to cache and manage dependencies from external sources, ensuring faster and more reliable builds.
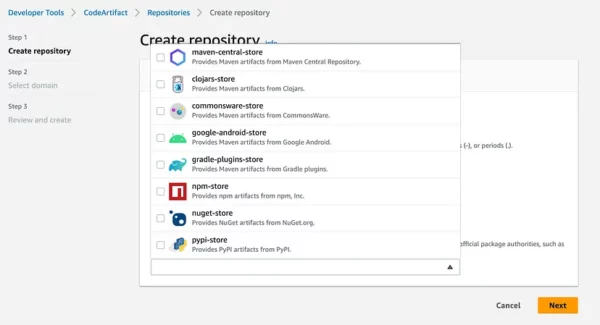
If you are creating an Android repo, it would commonly require maven-central-store , google-android-store and gradle-plugins-store
Alternatively, domain and repositories can be created from the AWS CLI:
# create domain
aws codeartifact create-domain --domain some-domain-name

# create repo
aws codeartifact create-repository
  --domain my-domain
  --repository REPO_NAME
  --description "My CodeArtifact Repository"

# to set upstream repositories
aws codeartifact update-repository
  --domain my-domain
  --repository REPO_NAME
  --upstreams repositoryName=UPSTREAM_REPO_NAME,domainName=UPSTREAM_DOMAIN_NAME,displayName=UPSTREAM_REPO_DISPLAY_NAME,repositoryType=Maven
UPSTREAM_REPO_NAME: Name of the upstream repository.UPSTREAM_DOMAIN_NAME: Domain name of the upstream repository.UPSTREAM_REPO_DISPLAY_NAME: Display name for the upstream repository.repositoryType: Specify the repository type (e.g.,NPM,Maven,PyPI, etc.).
To setup your Android, Java or Kotlin project after an AWS repository has been created, navigate to your AWS console and then CodeArtifact, under Repositories, click on “View Connection Instructions” button. This should open up a dialog to Choose a package manager client. Select Gradle as the package manager.
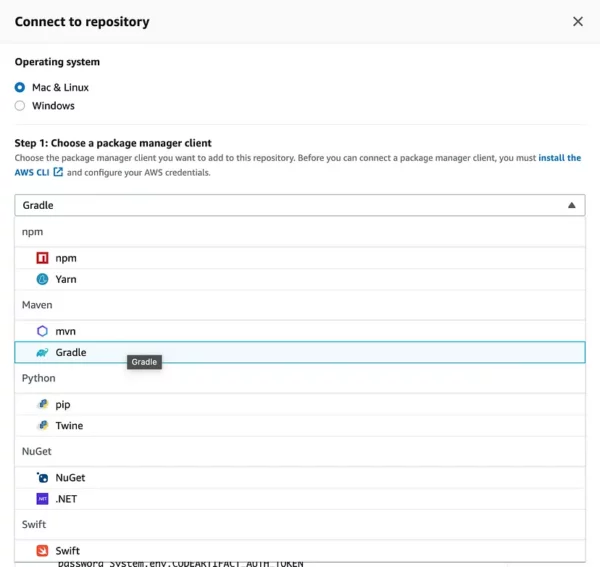
It shows a dropdown to select a configuration method to copy the push and pull code snippet to update your repository.
Step 2: Install and configure AWS CLI
- Download AWS CLI (Command Line Interface) depending on the Operating System that you use, whether Windows, Linux or macOS.
Windows:
Download the AWS CLI MSI Installer for Windows from AWS and run the installer, open Command Prompt or PowerShell to verify that AWS CLI has been installed correctly. You can do this by running the aws — version command:
aws --version
Linux:
sudo apt update                        # For Debian/Ubuntu
sudo apt install python3 python3-pip   # For Debian/Ubuntu
sudo pip3 install awscli               # Install awscli using pip3
aws --version                          # Verify installation and version
macOS:
Quickest way is to download the MacOS PKG installer or use Homebrew.
brew install awscli        # Install awscli using Homebrew
aws --version              # Verify installation and version
Configure AWS CLI
Configuring the AWS Command Line Interface (CLI) involves setting up your AWS credentials, region, and other options.
Run the aws configure command which prompts to enter AWS access key ID, secret access key, region and output or directly set the required info.
aws configure set aws_access_key_id <ACCESS_KEY_ID>
aws configure set aws_secret_access_key <SECRET_ACCESS_KEY>
aws configure set region <REGION>  // eu-west-1, eu-north-1 etc
aws configure set output <OUTPUT>  // text, json or table
AWS Configure list
To verify that your credentials are truly set, use the aws configure list command.
aws configure list
      Name                    Value             Type    Location
      ----                    -----             ----    --------
   profile                <not set>             None    None
access_key     ****************ABCD      shared-credentials-file
secret_key     ****************WXYZ      shared-credentials-file
    region                us-east-1      config-file    ~/.aws/config
Profiles
When using AWS configure, a default profile named “default” is created.
We can also have multiple profiles. Utilising multiple profiles enables separation of projects or roles, each with distinct permissions. For instance, separate profiles can be created for personal and work projects, with tailored permissions for specific tasks. Profile switching facilitates easy management of credentials and permissions for various tasks, enhancing organization and security. An example of creating a “work” profile is provided below.
aws configure --profile work set aws_access_key_id <ACCESS_KEY_ID>
aws configure --profile work set aws_secret_access_key <SECRET_ACCESS_KEY>
aws configure --profile work set region <REGION>
aws configure --profile work set output <OUTPUT>
You can view or edit your AWS profile by:
MacOS & Linux
nano ~/.aws/config
Alternatively, you can use Vim, TextEdit or Cat command.
Windows
type %USERPROFILE%\.aws\config
Or you can use Notepad or any Text Editor, PowerShell or Git Bash (if Git is installed).
[profile work]
region = us-east-1
output = json
[default]
region = eu-west-1
output = json
Step 3: Android code integration to pull & push
To pull or push libraries from your repository, your Library build.gradle should be modified to contain publishing url, username and password to fetch the repository. The url consist of <Domain>, <Domain-owner>, <Region> and <Repository-name>.
https://<DOMAIN>-<DOMAIN-OWNER>.d.codeartifact.<REGION>.amazonaws.com/maven/<REPOSITORY-NAME>/
Note: The url must end with forward slash to be able to connect to repository.
Groovy:
// Plugins: "com.android.library" for Android library
// Plugins: "java-library" for Java/Kotlin library

plugins {
    id 'com.android.library'
    id 'maven-publish'
}

publishing {
  publications {
      mavenJava(MavenPublication) {
          groupId = '<groupId>'
          artifactId = '<artifactId>'
          version = '<version>'
      }
  }
  repositories {
      maven {
          url 'https://<DOMAIN>-<DOMAIN-OWNER>.d.codeartifact.<REGION>.amazonaws.com/maven/<REPOSITORY-NAME>/'
          credentials {
              username "USERNAME"
              password System.env.CODEARTIFACT_AUTH_TOKEN
          }
      }
  }
}

// Optional: set a Java version
configure(JavaPluginExtension) {
    sourceCompatibility = JavaVersion.VERSION_1_8
    targetCompatibility = JavaVersion.VERSION_1_8
}
Dependencies section
Once the above configuration is added, project dependencies section in your app build.gradle must be updated to fetch for library using <groupId> <artifactId> and <version>
dependencies {
    implementation '<groupId>:<artifactId>:<version>'
}
Publish Android library to CodeArtifact
You must have AWS CLI installed & configured for publish to work.
Publish
To build & publish your Android Project: Open a terminal and run the following command to build your Android project:
./gradlew :<your_library>:assembleRelease
Publish the artifacts to CodeArtifact using the following command:
./gradlew publish
Ensure that you have configured the maven-publish plugin in your project’s build.gradle file.
Verify files uploaded to CodeArtifact
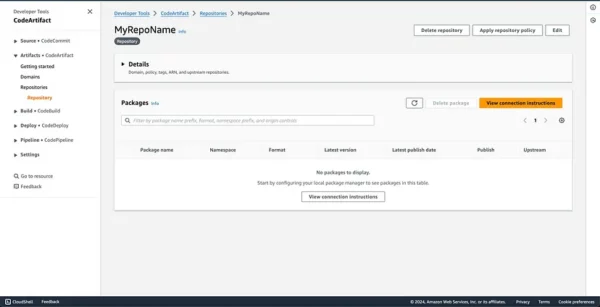
Go to the CodeArtifact console, navigate to your repository to verify that your files are successfully published.
For publishing a library with .aar file
To publish a library with .aar files, add the path to your custom library under publications in the gradle setup and specifically include aar in dependencies implementation section.
Groovy:
publications {
      mavenJava(MavenPublication) {
          groupId = '<groupId>'
          artifactId = '<artifactId>'
          version = '<version>'
          from components.java // Use if creating a Java or Kotlin Library
          artifact(file('custom-library.aar')) // .aar file
      }
}
Dependencies
If dependencies with .aar files are not fetched by default, append the string to your dependency import to force import.
dependencies {
    implementation '<groupId>:<artifactId>:<version>@aar'
}
And that’s it, you’re done with publishing!
Fetching plugins
Fetch plugins only If you have requirements to cache and manage dependencies from external sources.
When you create a CodeArtifact repository, you also have the option to configure upstream repositories. Upstream repositories are external repositories that your CodeArtifact repository can proxy and from which it can fetch dependencies. This is useful when you want to cache and manage dependencies from external sources, ensuring faster and more reliable builds. Your custom library might have external dependencies, this is useful in such cases.
To fetch plugins, add a pluginManagement block, it must appear before any other statements in settings.gradle.
Note: Under pluginManagement { } block, properties or methods from outside the block cannot be utilized within it. It necessitates self-containment.
pluginManagement block:
pluginManagement {
    repositories {
        maven {
            name 'my_repo'
            url 'https://<DOMAIN>-<DOMAIN-OWNER>.d.codeartifact.<REGION>.amazonaws.com/maven/<REPOSITORY-NAME>/'
            credentials {
                username 'aws'
                password System.env.CODEARTIFACT_AUTH_TOKEN
            }
        }
        google()
        mavenCentral()
        gradlePluginPortal()
    }
}
If your Gradle settings requires a dependencyResolutionManagement block, then you need to add it there as well.
dependencyResolutionManagement {
    repositories {
        maven {
            url 'https://<DOMAIN>-<DOMAIN-OWNER>.d.codeartifact.<REGION>.amazonaws.com/maven/<REPOSITORY-NAME>/'
            credentials {
                username 'aws'
                password System.env.CODEARTIFACT_AUTH_TOKEN
            }
        }
        google()
        mavenCentral()
    }
}
Step 4: Generate and Refresh the CodeArtifact Token
To generate a token, copy the CodeArtifact authorization token command to fetch token and run it on the terminal. Using the export keyword, the token should be stored on your environment variable.
macOS or Linux:
export CODEARTIFACT_AUTH_TOKEN=`
aws codeartifact get-authorization-token
  --domain your_domain
  --domain-owner 111122223333
  --region us-east-1
  --query authorizationToken
  --output text
  --profile default`
Windows (using default command shell):
for /f %i in ('aws codeartifact get-authorization-token --domain your_domain --domain-owner 111122223333 --query authorizationToken --output text --profile default') do set CODEARTIFACT_AUTH_TOKEN=%i
Windows PowerShell:
$env:CODEARTIFACT_AUTH_TOKEN = aws codeartifact get-authorization-token --domain your_domain --domain-owner 111122223333 --query authorizationToken --output text --profile default
Saving the generated token
The generated token can be saved and used in your project, there are 2 options of saving. You can save the token into a gradle.properties file or a text file using the echo command on macOS and Linux:
Option 1: Save into gradle.properties:
Using this method if you have the file privileges to override the contents of gradle.properties.
echo "codeartifactToken=$CODEARTIFACT_AUTH_TOKEN" > ~/.gradle/gradle.properties
You can retrieve the saved token in build.gradle using:
Groovy:
publishing {
  repositories {
      maven {
          url 'https://<DOMAIN>-<DOMAIN-OWNER>.d.codeartifact.<REGION>.amazonaws.com/maven/<REPOSITORY-NAME>/'
          credentials {
              username "USERNAME"
              password project.properties['codeartifactToken']
          }
      }
  }
}
Option 2. Save into a separate file
If you do not want to modify the gradle.properties file.
echo "codeartifactToken=$CODEARTIFACT_AUTH_TOKEN" > file.txt
You can retrieve the saved token in your Library’s build.gradle.
Groovy:
// retrieve the saved token
def props = new Properties()
file("file.txt").withInputStream { props.load(it) }

publishing {
  repositories {
      maven {
          url 'https://<DOMAIN>-<DOMAIN-OWNER>.d.codeartifact.<REGION>.amazonaws.com/maven/<REPOSITORY-NAME>/'
          credentials {
              username "USERNAME"
              password props.getProperty("codeartifactToken")
          }
      }
  }
}
Refreshing CodeArtifact token
CodeArtifact auth token default validity period of 12 hours
Authorization tokens for CodeArtifact have a default validity period of 12 hours. However, these tokens are customizable, with a range between 15 minutes and 12 hours. Once the specified lifetime elapses, a new token must be obtained.
Therefore for a seamless process, it requires a refresh mechanism of generating the tokens before a build or generating and storing tokens at interval.
Option 1: Refresh token on each run
Use this if you prefer to generate a new auth token at every run, token would be used as immediately generated and not stored in any file system.
Groovy:
publishing {
  // generate and use token on the fly
  def codeartifactToken = "aws codeartifact get-authorization-token --domain my_domain --domain-owner 111122223333 --query authorizationToken --output text --profile profile-name".execute().text
  repositories {
      maven {
          url 'https://<DOMAIN>-<DOMAIN-OWNER>.d.codeartifact.<REGION>.amazonaws.com/maven/<REPOSITORY-NAME>/'
          credentials {
              username "USERNAME"
              password codeartifactToken
          }
      }
  }
}
Kotlin:
import java.io.BufferedReader
import java.io.InputStreamReader

configure<PublishingExtension> {
    // generate and use token on the fly
    val processBuilder = ProcessBuilder(
        "aws",
        "codeartifact",
        "get-authorization-token",
        "--domain", "your_domain",
        "--domain-owner", "111122223333",
        "--region", "us-east-1",
        "--query", "authorizationToken",
        "--output", "text",
        "--profile", "profile-name"
    )
    processBuilder.redirectErrorStream(true)
    val process = processBuilder.start()
    val codeArtifactToken = when (process.waitFor()) {
        0 -> {
            val reader = BufferedReader(InputStreamReader(process.inputStream))
            val output = reader.readText().trim()
            reader.close()
            output
        }
        else -> "noCodeArtifactToken"
    }
    repositories {
        maven {
            url = "https://<DOMAIN>-<DOMAIN-OWNER>.d.codeartifact.<REGION>.amazonaws.com/maven/<REPOSITORY-NAME>/"
            credentials {
                username = "USERNAME"
                password = codeArtifactToken
            }
        }
    }
}
Option 2: Cache expiry time & Refresh token
We can check if a token requires refreshing, whether due to it being the initial request or having expired. If necessary, a refresh token function generates a new token.
Kotlin DSL:
import java.io.BufferedReader
import java.io.InputStreamReader

buildscript {
  ext {
     cachedToken = null
     tokenExpiryTime = 0L
  }
}

configure<PublishingExtension> {
  publications {
    // configure publish extensions
  }
  repositories {
    maven {
       // configure repositories
    }
  }
}

// Declare nullable variables for the cached token and its expiry time
var cachedToken: String? = null
var tokenExpiryTime: Long = 0

// Function to fetch token if needed
fun refreshToken(): String? {
    val currentTime = System.currentTimeMillis()

    return if (cachedToken == null || currentTime >= tokenExpiryTime) {
        // If token is null or expired, generate a new one
        cachedToken = generateToken()
        // Set the expiry time for the token (12 hours from current time)
        tokenExpiryTime = currentTime + (12 * 60 * 60 * 1000)
        cachedToken // Return the fetched token
    } else {
        // If token is still valid, return the existing token
        cachedToken
    }
}

fun generateToken(): String {
  // generate token code
}
Option 3: Setup a crontab on macOS or Linux to refresh token
Use the Crontab Unix-based tool to periodically refresh tokens by creating a generateToken.sh file and running it at intervals.
# Run generate token script daily at 9AM
0 9 * * * /path/to/generateToken.sh
So * * * * * means every minute of every hour of every day of every month and every day of the week.
*  *  * * *
│  │  │ │ └───── day of the week (0 - 7, both 0 and 7 represent Sunday)
│  │  │ └─────── month (1 - 12)
│  │  └───────── day of the month (1 - 31)
│  └──────────── hour (0 - 23)
└─────────────── minute (0 - 59)
Step 5: Common issues using GetAuthorizationToken API and possible fixes
While setting up AWS CLI with credentials, you may encounter some errors in the process. I have documented some of those common errors below.
— 401 error on publish command
* What went wrong:
Execution failed for task ':Your_library:publishMavenJavaPublicationToMavenRepository'.
> Failed to publish publication 'mavenJava' to repository 'maven'
   > Could not PUT '<Full Repository URL>'.
   > Received status code 401 from server: Unauthorized
Fix: confirm all credentials are correct such as url, username and token. Regenerate token if token has expired.
— Permission error for root user
If you get this error message, this indicates GetAuthorizationToken API is being called on a root user, you need to configure your AWS credentials to use IAM user credentials. Root users cannot call GetServiceBearerToken.
An error occurred (AccessDeniedException) when calling the
GetAuthorizationToken operation: User: arn:aws:iam::12345678910:root
is not authorized to perform: sts:GetServiceBearerToken
on resource: arn:aws:iam::12345678910:root
Fix: configure your AWS credentials to use IAM user credentials.
— Permission error for IAM user
If you get this error message, it indicates that the IAM user username does not have the necessary permissions to perform the codeartifact:GetAuthorizationToken action on the specified resource (arn:aws:codeartifact:eu-west-1:12345678910:domain/repo).
An error occurred (AccessDeniedException) when calling the
GetAuthorizationToken operation: User: arn:aws:iam::12345678910:user/username
is not authorized to perform: codeartifact:GetAuthorizationToken on
resources: arn:aws:codeartifact:eu-west-1:12345678910:domain/repo with
an explicit deny in an identity-based policy
Fix: update the IAM Domain Policy by including the codeartifact:GetAuthorizationToken action on the specified resource.
{
    "Effect": "Allow",
    "Action": "codeartifact:GetAuthorizationToken",
    "Resource": "arn:aws:codeartifact:eu-west-1:12345678910:domain/repo"
}
— ExpiredTokenException error
If you get this error message “ExpiredTokenException” in AWS CLI, it indicates that the security token used for authentication in the request has expired. AWS security tokens typically have a limited lifespan for security reasons, and when they expire, they can no longer be used to authenticate requests.
An error occurred (ExpiredTokenException) when calling the
GetAuthorizationToken operation: The security token included in the
request is expired.
Fix: you will need to obtain a new security token and use it for authentication. Update your AWS CLI configuration with the new credentials. You can do this using the aws configure command or by directly editing the AWS CLI configuration file located typically at ~/.aws/config or ~/.aws/credentials.
Sources
- Use CodeArtifact with Gradle
- AWS CodeArtifact authentication and tokens
- CodeArtifact Repository Policies
Follow me on
- X/Twitter: @tosinmath
This article is previously published on proandroiddev.com


