


This article consists of 3 parts:
- Part 1 — Introduction
- Part 2 — Cipher
- Part 3 — Android Keystore (You are here)
Welcome to the last part of our Android Crypto API. Please make sure to take a look at the previous parts for a better understanding. The ones who did, great job! Now let’s finish what we have started once and for all.
– Android Keystore and TEE
– Revealing Android Keystore — Initialization
– Generating Secure Keys with KeyGenerator
– Encrypting our data
– Additional Info
– Further resources and gists
– Conclusion
Android Keystore and TEE
Previously, we used SecretKeySpec to generate our key. We created a key material, which is an array of bytes, and passed it to SecretKeySpec which constructs a key from it.
But is it that secure?
Let’s remember what issues we have encountered in the previous part. First of all — key material length. We should always give a precise key length (16/24/32). Otherwise, our app crashes with the message InvalidKeyException: Unsupported key size. Second is that we are the ones who generate the key material. Let’s be honest, it’s not that secure, and if someone obtains that key material, they can create the same key.
Even though we perform key wrapping and generate random key material for the second key, we still need to handle our first key. Besides, the key generally lives in a non-secure environment, i.e., Android OS, and there’s a chance that the OS or our app can be compromised. As you see, this approach is not that much secure.
Here comes the Android Keystore system that offers secure storage for our keys. It operates within a Trusted Execution Environment (TEE) provided by Trusty OS. It is in an isolated environment within the device’s processor or chipset (SoC), i.e. decoupled from the device’s operating system.
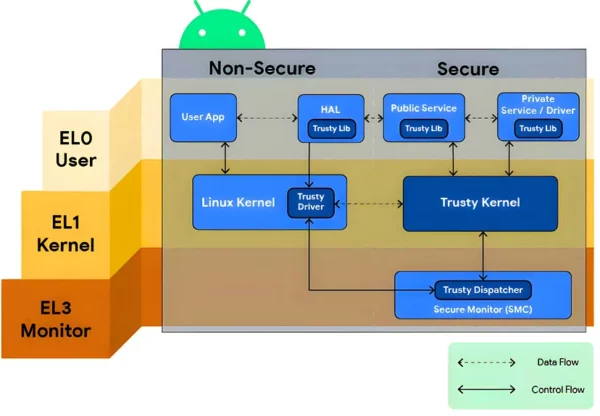
Thus it protects our keys and key material against extraction and unauthorized access. Key material never enters the application process. Even if an attacker manages to access our keys, they won’t be able to extract their key material.
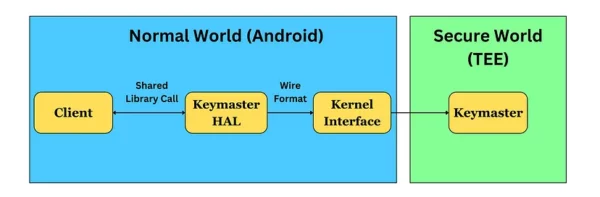
We won’t dive deep into the above diagram, but just you know — this keymaster module is intended to keep our cryptographic keys safe. It runs in a TEE, which is completely separate from the Android OS. The Keymaster TA (trusted application), which is also called Hardware-backed Keystore, provides all the secure Keystore operations and has our key material. To protect the key material, the keys are encrypted with a hardware-derived key inside TEE. It doesn’t expose key materials outside the trusted environment. Instead, it just exposes so-called key “blobs”, i.e., wrapped (encrypted) keys. Wrapping, unwrapping, and all that stuff is done inside the Keymaster TA.
Revealing Android Keystore — Initialization
The encryption and decryption part is generally the same as in our previous code. The difference is in how we generate the key. This time, let’s make it a little cleaner and create an interface for encryption/decryption.
interface CipherManager {
    @Throws(Exception::class)
    fun encrypt(inputText: String): String

    @Throws(Exception::class)
    fun decrypt(data: String): String
}
Again, consider working directly with ByteArrays.
Let’s create the implementation class and define some constants.
class CipherManagerImpl : CipherManager {

    @Throws(Exception::class)
    override fun encrypt(inputText: String): String {
        TODO("Not yet implemented")
    }

    @Throws(Exception::class)
    override fun decrypt(data: String): String {
        TODO("Not yet implemented")
    }

    companion object {
        private const val ANDROID_KEY_STORE = "AndroidKeyStore"
        private const val AES_ALGORITHM = KeyProperties.KEY_ALGORITHM_AES
        private const val BLOCK_MODE = KeyProperties.BLOCK_MODE_CBC
        private const val PADDING = KeyProperties.ENCRYPTION_PADDING_PKCS7
        private const val TRANSFORMATION = "$AES_ALGORITHM/$BLOCK_MODE/$PADDING"
    }
}
Using this approach you can have other implementations too. In the constants sections everything is like before despite ANDROID_KEY_STORE, which is the provider name we pass to get our Keystore instance.
private val keyStore = KeyStore.getInstance(ANDROID_KEY_STORE).apply {
    load(null) // With load function we initialize our keystore
}
Generating Secure Keys with KeyGenerator
KeyGenerator is a class, well it’s obvious that it’s a class for generating cryptographic keys. However, it’s used for symmetric key generation. To generate asymmetric keys you should take a look at KeyPairGenerator which generates a pair of public and private keys.
private val keyAlias = "aes_key_alias" // TODO - Should be secure

@Throws(Exception::class)
private fun createKey(): SecretKey {
    @Throws(Exception::class)
    private fun createKey(): SecretKey {
        val keyGenParameterSpec = KeyGenParameterSpec.Builder(
            keyAlias,
            KeyProperties.PURPOSE_ENCRYPT or KeyProperties.PURPOSE_DECRYPT
        )
            .setBlockModes(BLOCK_MODE)
            .setEncryptionPaddings(PADDING)
            .setUserAuthenticationRequired(false)
            .setRandomizedEncryptionRequired(true)
            .build()

        return KeyGenerator.getInstance(AES_ALGORITHM).apply {
            init(keyGenParameterSpec)
        }.generateKey()
    }
}
Before creating our KeyGenerator we create a KeyGenParameterSpec. In simpler words, it’s a class using which we customize the key generation by passing different parameters to it. Let’s analyze it line by line.
You can use it for both
KeyGeneratorandKeyPairGenerator, but only since API 23+. Before that, forKeyPairGeneratoryou should have usedKeyPairGenParameterSpec. We do not have symmetric keys until API 23.
We utilize the KeyGenParameterSpec.Builder to build our KeyGenParameterSpec. That Builder requires two arguments: an alias name and a purpose. Threat the alias name as a unique identifier assigned to the generated key within the Android Keystore. Later we’ll use it to get our key from the Keystore.
Notice how we don’t need to manually generate any key material. Isn’t that perfect? In case of
SecretKeySpecif someone obtains the key material, they can generate the same key in their devices and use it. But in Android Keystore the key material never enters the application process. Even if someone gets our alias, they can’t create the same key on their devices because the key material will be different. Still, consider keeping your alias somewhere safe 🙂
Let’s continue. The second parameter of KeyGenParameterSpec.Builder means for what purpose we use our key. Simply just pass PURPOSE_ENCRYPT or PURPOSE_DECRYPT.
Next, we invoke multiple builder methods. We specify our block mode and padding. Let’s talk a little about the other two functions:
setUserAuthenticationRequired(false) — This method is used to specify whether user authentication is required to use the key. When set to true, it means that the key can only be used after the user has been authenticated through methods like a PIN, password, or biometric authentication (e.g., fingerprint or face recognition). By default, the key is authorized to be used regardless of whether the user has been authenticated. So we actually don’t need this function in the scope of this article. I wrote it just to let you know that there’s a such thing too.
setRandomizedEncryptionRequired(true) — According to docs: Sets whether encryption using this key must be sufficiently randomized to produce different ciphertexts for the same plaintext every time. But didn’t we already get a different ciphertext each time using a random IV? Well, that’s not the case with Android Keystore. What if someone uses some fixed value instead of randomly generating the IV? To prevent such cases, the Android Keystore provider is not allowing the use of custom IV values. This function indicates whether you can use your own IV or not.
However, even passing false to this function we will get java.security.InvalidAlgorithmParameterException: Caller-provided IV not permitted exception. Cipher automatically generates a random IV each time under the hood.
All the functions of
KeyGenParameterSpec.Builder you can find here.
Lastly, we get our KeyGenerator instance, initialize it by passing our KeyGenParameterSpec as an argument, and call generateKey(). The key is being securely stored in the Android Keystore System.
Later, to perform encryption/decryption, we should check if that key already exists.
@Throws(Exception::class)
private fun getOrCreateKey(): SecretKey {
    val existingKey = keyStore.getEntry(keyAlias, null) as? KeyStore.SecretKeyEntry
    return existingKey?.secretKey ?: createKey()
}
We retrieve our key via its alias and use, if it exists, otherwise, we create a new one.
Jobs
Encrypting our data
Time to do some encryption.
@Throws(Exception::class)
override fun encrypt(inputText: String): String {
    val cipher = Cipher.getInstance(TRANSFORMATION)
    cipher.init(Cipher.ENCRYPT_MODE, getOrCreateKey())

    val encryptedBytes = cipher.doFinal(inputText.toByteArray())
    val iv = cipher.iv

    val encryptedDataWithIV = ByteArray(iv.size + encryptedBytes.size)
    System.arraycopy(iv, 0, encryptedDataWithIV, 0, iv.size)
    System.arraycopy(encryptedBytes, 0, encryptedDataWithIV, iv.size, encryptedBytes.size)
    return Base64.encodeToString(encryptedDataWithIV, Base64.DEFAULT)
}
It’s so similar to what we’ve seen in part 2. When we initialize our Cipher, for the second param we pass our generated key. But we are not passing our IV as we did in the previous part. As mentioned earlier, Cipher handles random IV generation under the hood (considering our block mode). Later we can retrieve that IV from it. The functions here are similar to the ones we used before. If it’s not clear, refer to the step-by-step explanations provided in the previous part.
Similarly, the decrypt function looks like this:
@Throws(Exception::class)
override fun decrypt(data: String): String {
    val encryptedDataWithIV = Base64.decode(data, Base64.DEFAULT)
    val cipher = Cipher.getInstance(TRANSFORMATION)
    val iv = encryptedDataWithIV.copyOfRange(0, cipher.blockSize)
    cipher.init(Cipher.DECRYPT_MODE, getOrCreateKey(), IvParameterSpec(iv))

    val encryptedData = encryptedDataWithIV.copyOfRange(cipher.blockSize, encryptedDataWithIV.size)
    val decryptedBytes = cipher.doFinal(encryptedData)
    return String(decryptedBytes, Charsets.UTF_8)
}
For decryption, we should pass the IV ourselves. First, we extract it from our encrypted data and then pass an IvParameterSpec in the init function.
Let’s test it 🙂

Additional Info
* You can delete your key entry by its alias name using
deleteEntry()function. If the entry cannot be removed a KeyStoreException will be thrown.
keyStore.deleteEntry(keyAlias)

// Under the hood it is implemented this way
public final void deleteEntry(String alias) throws KeyStoreException
* If you want to encrypt your shared preferences, use EncryptedSharedPreferences from the Android Security library (part of Android Jetpack). You can encrypt both keys and values.
* If you want to encrypt your Room DB, one way is to perform it manually with the above steps. Before persisting them in a DB, you can encrypt them and then only persist. For objects, you can serialize them with JsonSerializer or Gson, then encrypt and persist in your DB. Another way is to use SQLCipher. It is an open-source library using which you can encrypt your SQLite database files via AES-256 encryption algorithm.
* At the moment of writing this article, AndroidX does not provide a library for encrypting or decrypting Datastore. So if you use it, you can find third-party libraries in Github, but mostly you should do it manually. You can write extensions over Datastore
editandmapfunctions, serialize objects, encrypt them, and persist. Make sure to implement proper exception handling.
Conclusion
Congratulations on reaching the end! In this final part, our main focus has been on the Android Keystore System. We briefly introduced the Android Keystore and Trusted Execution Environment, emphasizing their importance. We then delved into the key generation process using the KeyGenerator class and highlighted the differences when generating keys via SecretKeySpec. We then proceeded to encryption and decryption. We have also included some additional information and added all the code in the resources section, feel free to explore. If there are some points you couldn’t understand, don’t hesitate to ask them in the comments section. I hope you have enjoyed reading this article series and learned many new things. Thank you.
This article is previously published on proandroiddev.com


