

Posted by: Eakurnikov
Hi everyone! We (Kaspresso Team and AvitoTech) are back with more about automated Android testing. Previously published articles you may find here, here and here. This article is an overview and comparison of tools for writing UI tests.
We’ll get started with a quick refresher on what the testing process usually looks like. Let’s call the entity that interacts with the application the “client.” Clients usually have several interfaces available to interact with the application, including API, REST API, CLI, GUI, etc. But while APIs may be used by client programs, humans use GUI.
Application behavior expectations are described in the specification. The goal of testing is to verify that the behavior of the application conforms to the specification.
To address this issue, a set of use cases or test cases is written containing sequences of steps that result in the product achieving the desired state. Thus, application testing is the process of passing all test cases.
As regards manual testing, this is the process of a person passing the test case. If testing is automated, then software clients interact with the application instead of people. In this case, the test case itself (implemented in the programming language) is also called a test.
To implement tests and run them automatically, you need a testing framework (JUnit, Cucumber), including:
- Assertions — a set of functions for test checks.
- A mechanism to create fixtures for sharing data between tests. The generally accepted definition of a fixture is the fixed state of the environment in which tests are executed.
- A runner to run tests.
Runners are responsible for:
- preparing the environment
- creating the test set
- running tests
- receiving results of completed tests
- preparing test completion reports
- collecting statistics
Despite the fact that runners come with the framework, more advanced third-party runners can also be used. Runners, their features for Android testing, and how to choose the best one (Avito test runner, Marathon, Spoon, Fork) are all extensive topics that deserve separate articles, so we’ll only focus here on tests themselves.
If the test has direct access to the application API, then the GUI interface needs software adapters (drivers).
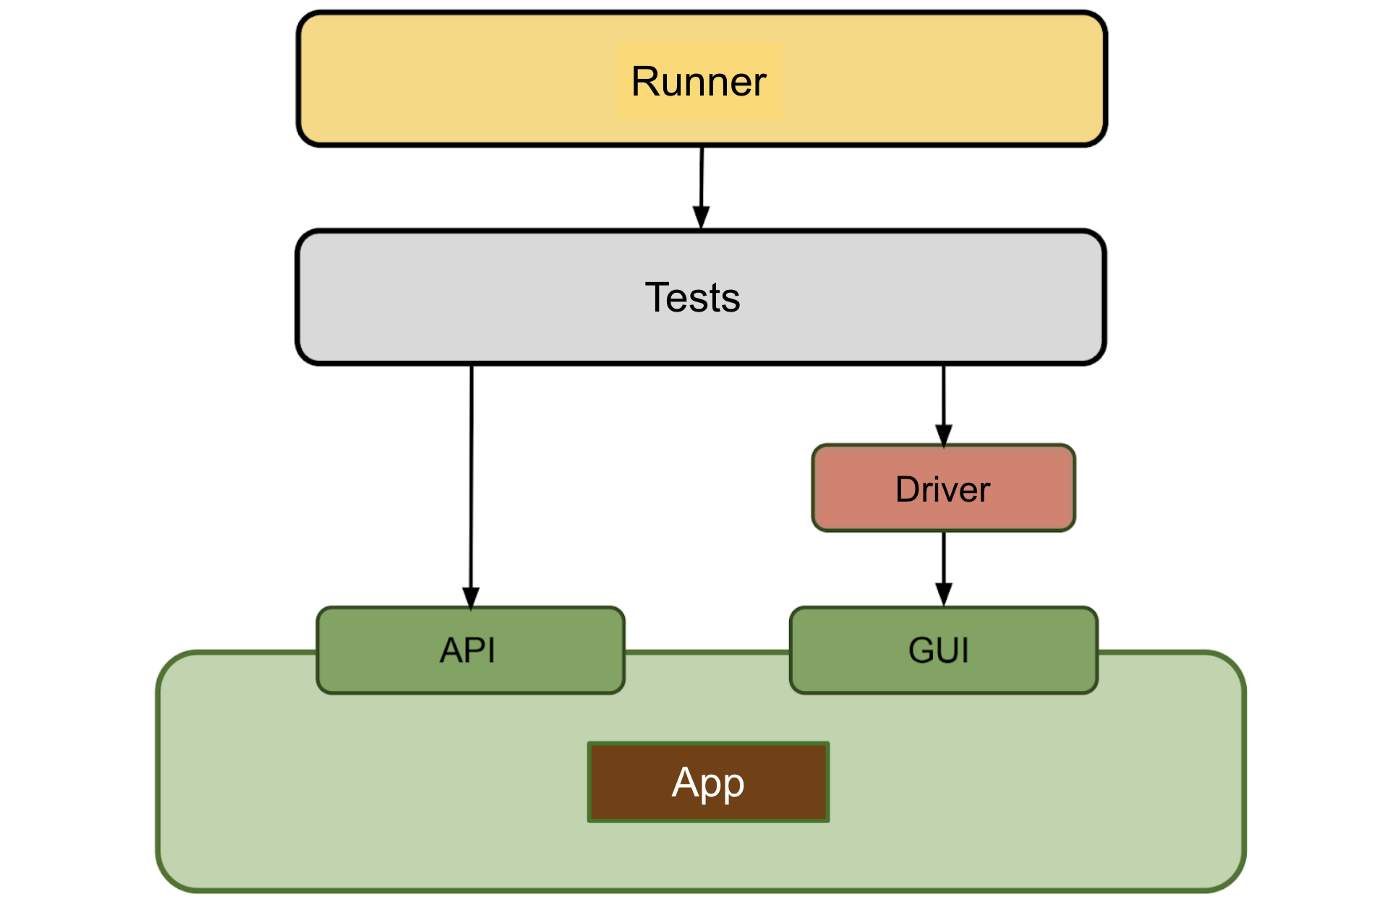
Tests that address GUI drivers are called UI tests. As opposed to unit tests, they’re executed on real devices or emulators running the corresponding mobile operating system.
GUI drivers are the most complex component of the entire testing stack. They solve basic, low-level tasks. When you give a GUI driver (Espresso, UiAutomator) the command to “click the button,” it processes your command, interacts with the application, and processes a click on the element.
Working with the driver API directly from the test has a number of disadvantages:
- The functionality of the driver is limited — tests require additional logging, data validation, waiting, and repeating unsuccessful actions.
- The driver API isn’t conducive to writing easily readable and maintainable test code.
- It’s often required to abstract and unify access to several drivers at once.
Driver wrappers are used to resolve such issues, for example, Kakao or Kaspresso. These wrappers can vary greatly depending on the task at hand. Some of them are just syntactic sugar, while others are rather thick layers responsible for a lot of complex operations.
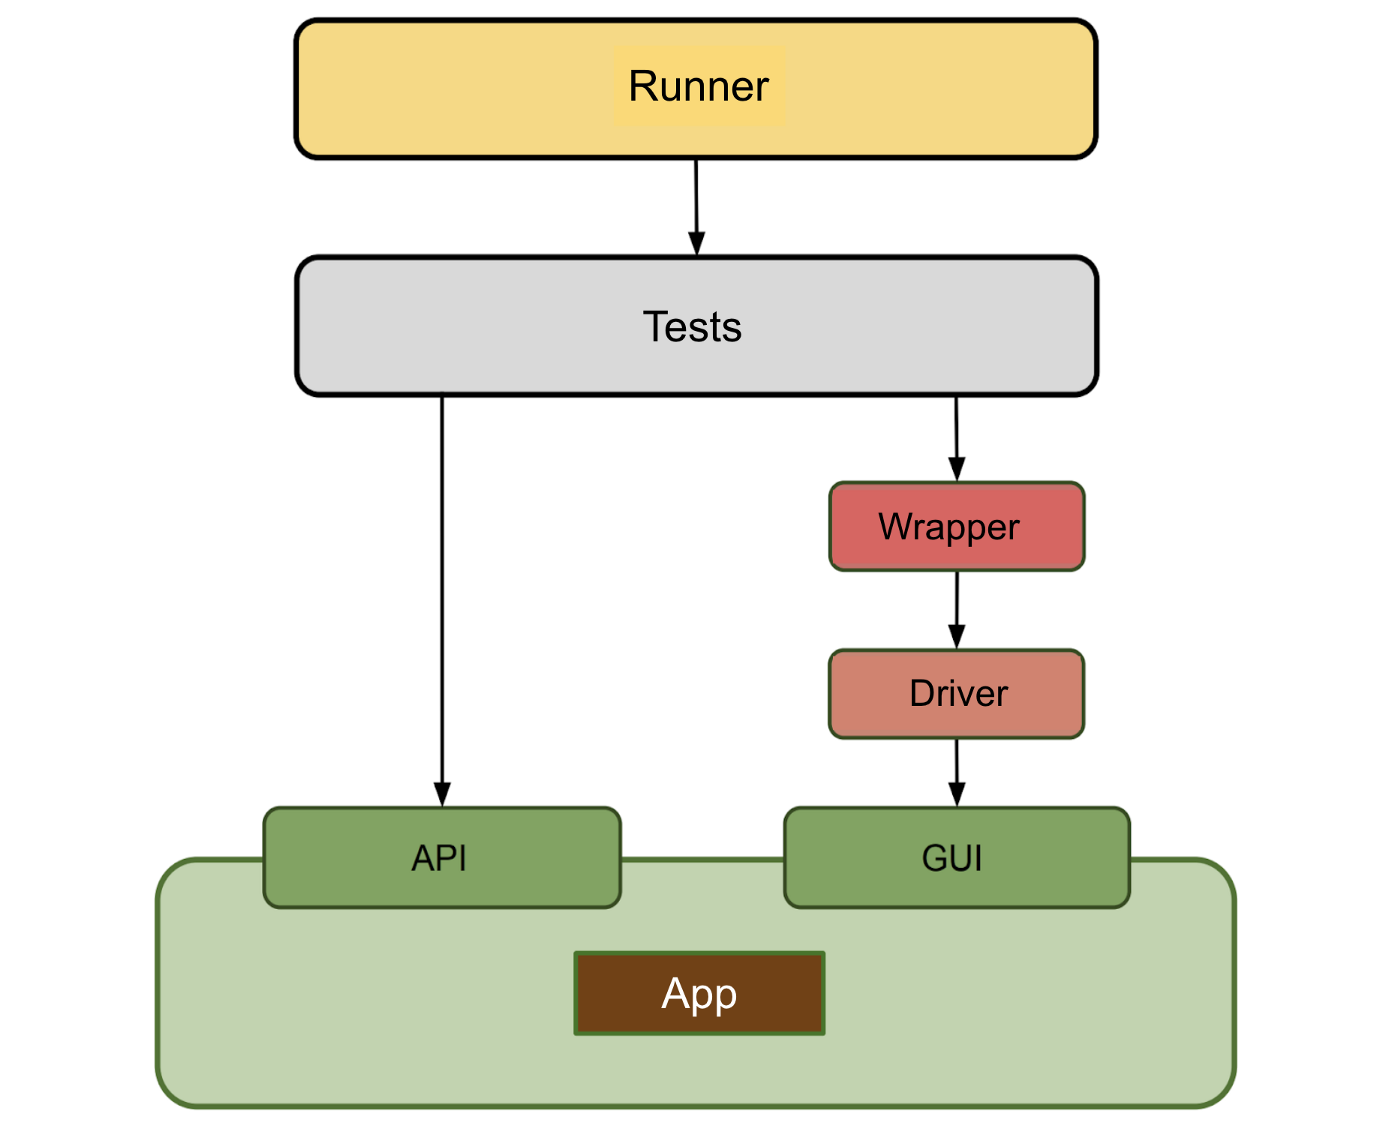
In this article, we’ll be talking about drivers and wrappers, and exploring the most popular of them.
Drivers
Android-land has four common drivers:
- Espresso
- UiAutomator
- Robotium
- Selendroid
All of them run on Android Instrumentation Framework, the underlying Android API for interacting with the system. The most popular are Espresso and UiAutomator, both of which are developed and supported by Google. They can be easily used simultaneously in the same test. Now we’ll take a closer look at both.
UiAutomator
UiAutomator has come with Android SDK since API version 16. As a GUI driver, it’s used to search for interface elements on the device screen and emulate various actions, such as clicks, touches, swipes, text input, and visibility checks. It doesn’t have a recorder to record tests, but it does provide a utility for viewing the screen tree structure (Ui Automator Viewer).
UiAutomator helps write tests using the black box model. It lives in its own process and works without access to the application source code. In other words, when a test uses it, it can interact with almost any application, including system applications. This paves the way to do all sorts of things, for example:
- dial numbers and make calls
- send and read text messages
- interact with notifications
- manage network settings and geolocation
- take screenshots
How UiAutomator works
It’s powered by AccessibilityService on the inside, a service that makes it easier for the disabled to use mobile devices. AccessibilityService knows exactly what’s on the screen at any given time and how to interact with what it sees. It accomplishes this by building a virtual tree of components of the viewed screen, in the nodes of which are AccessibilityNodeInfo objects. These nodes contain meta information about their respective View: class name, coordinates or displayed text.
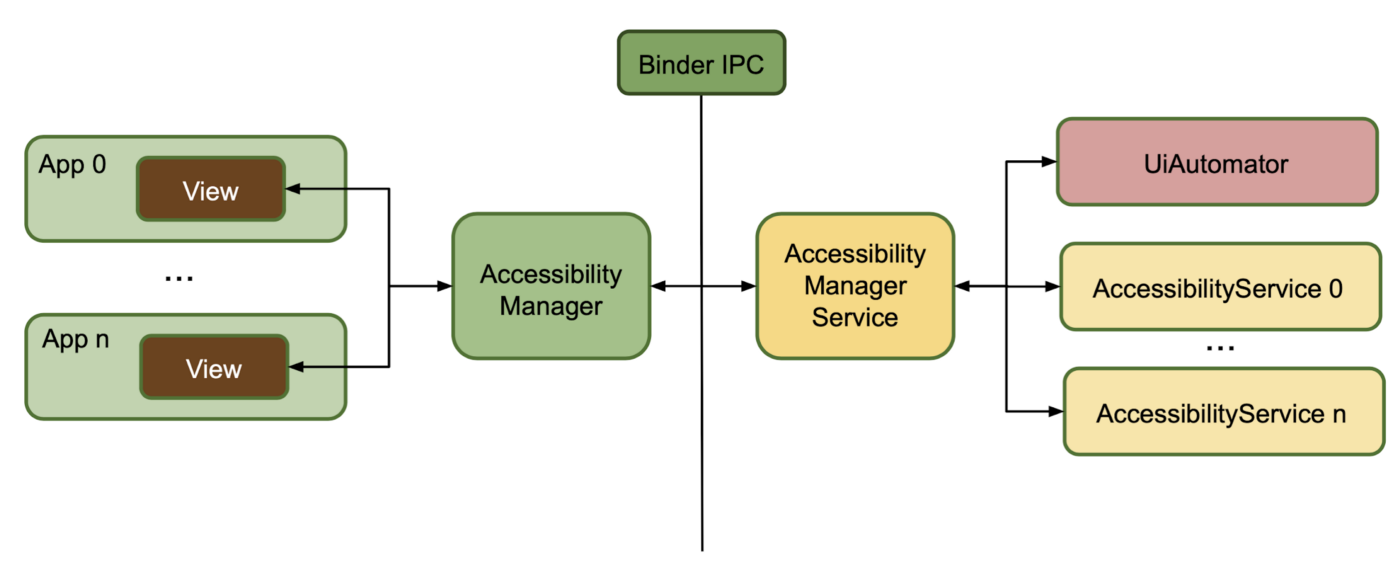
Every View has an AccessibilityEventSource interface, and uses Binder IPC to notify the system AccessibilityManagerService of every action executed with it, for example, clicks or changes of focus. AccessibilityManagerService transfers this data to every currently active AccessibilityService, as well as UiAutomator during tests, which update their virtual component tree. Commands are sent the same way in the opposite direction from AccessibilityService and UiAutomator to the displayed interface elements of any application in the system. If the interface element does not inherit View, then it needs to implement a series of methods independently to be part of this scheme.
If you’re looking for more detailed insights into how UiAutomator works, check out this UI Automator deep diving (RU) presentation.
UiAutomator cons:
- Its complex, universal operation mechanism using Binder IPC is far from ideal. In order to perform an action, UiAutomator waits for the application to reach a consistent state. It waits for a time slot to appear when no events will be received from the system. This method of operation leads to instability and slow command execution, and can often even result in long delays or the test coming to a complete stop.
- Interface elements that aren’t inheritors of View or are rendered using OpenGL or Unity, are invisible to UiAutomator if the developers don’t take special actions in advance. That means, for example, UiAutomator may run into issues when interacting with mobile games.
Thus, the most appropriate use scenario for UiAutomator doesn’t involve testing product applications, but rather interacting with third-party or system applications. Espresso is better suited for working with product applications.
Espresso
Espresso is another official UI testing framework from Google, but tests using it follow the white box model. Espresso supports Android API version 10 and later, but was released much more recently. The framework includes a recorder to record tests.
For all intents and purposes, Espresso is the industry leader and standard. Its success can be attributed to the fact that it ensures higher test speed and stability compared to competitors.
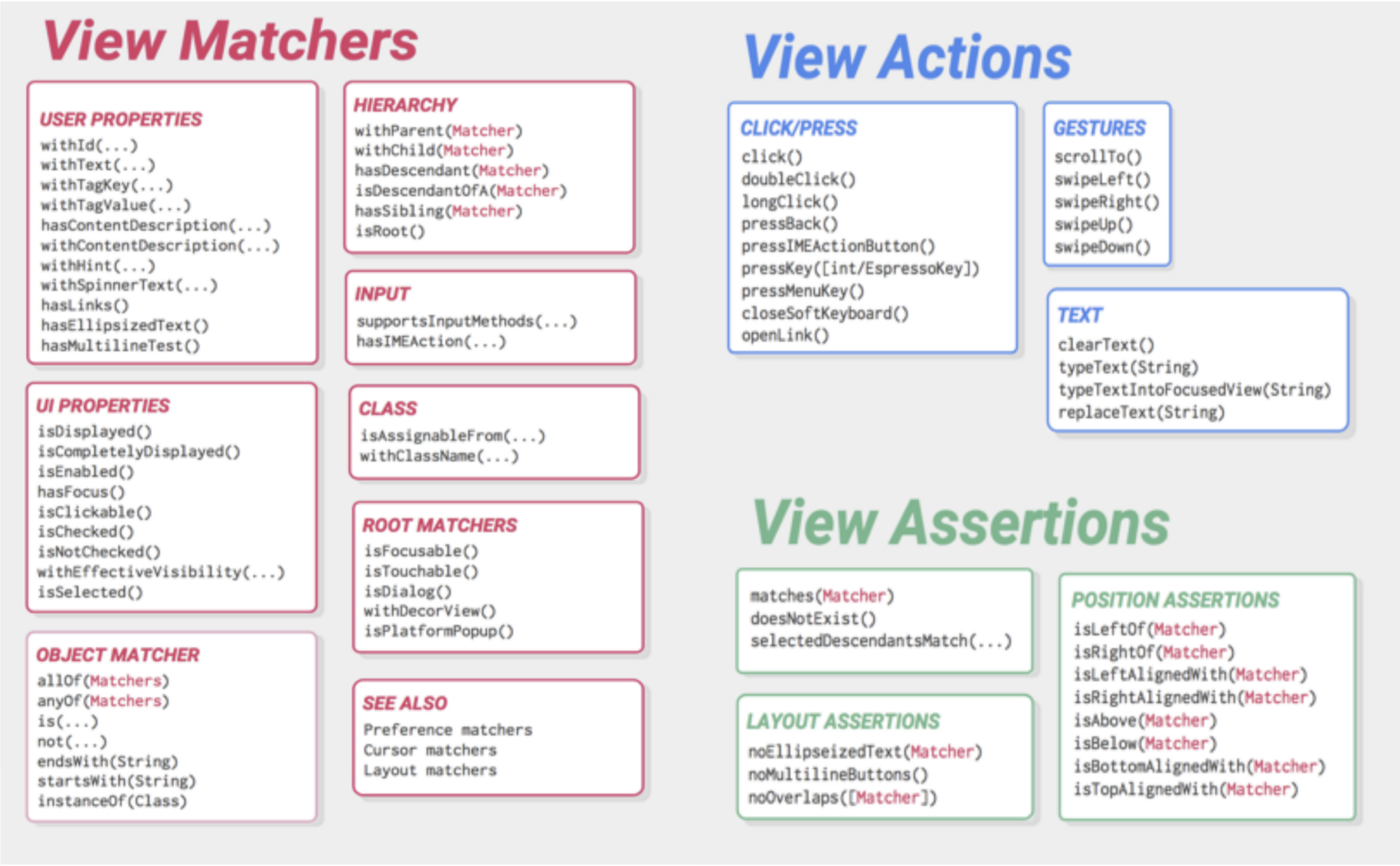
Espresso handles a low-level task — it finds the required element on the screen according to the specified parameters (ViewMatcher), and executes an action with it (ViewAction) or performs a check (ViewAssertion).
OUR VIDEO RECOMMENDATION


Jobs
Espresso syntax is based on the Hamcrest framework. It’s built on the use of nested matcher hierarchies, which are entities that describe the requirements for an object (for Espresso — interface elements). Nested matchers are used when specifying search parameters for an element on the screen, as well as in checks as a description of the properties an element should have. The fact that these matchers are nested often makes test code difficult to read and maintain.
| @Test | |
| public void espressoTest() { | |
| onView(allOf(allOf(withId(R.id.label_bf_hotelname), | |
| isDescendantOfA(withId(R.id.custom_view_trip_review))), | |
| isDescendantOfA(withId(R.id.contentView)))) | |
| .check(matches( | |
| withEffectiveVisibility(Visibility.VISIBLE) | |
| )); | |
| } |
The stability and speed of tests in Espresso are thanks to its internal structure, as all Espresso commands are executed in the same process in which the application being tested is running. Actions and checks are mapped and put into the message queue of the application’s main thread. Then they’re executed only when the application is ready, i.e. its main thread is waiting for user input (idle state).
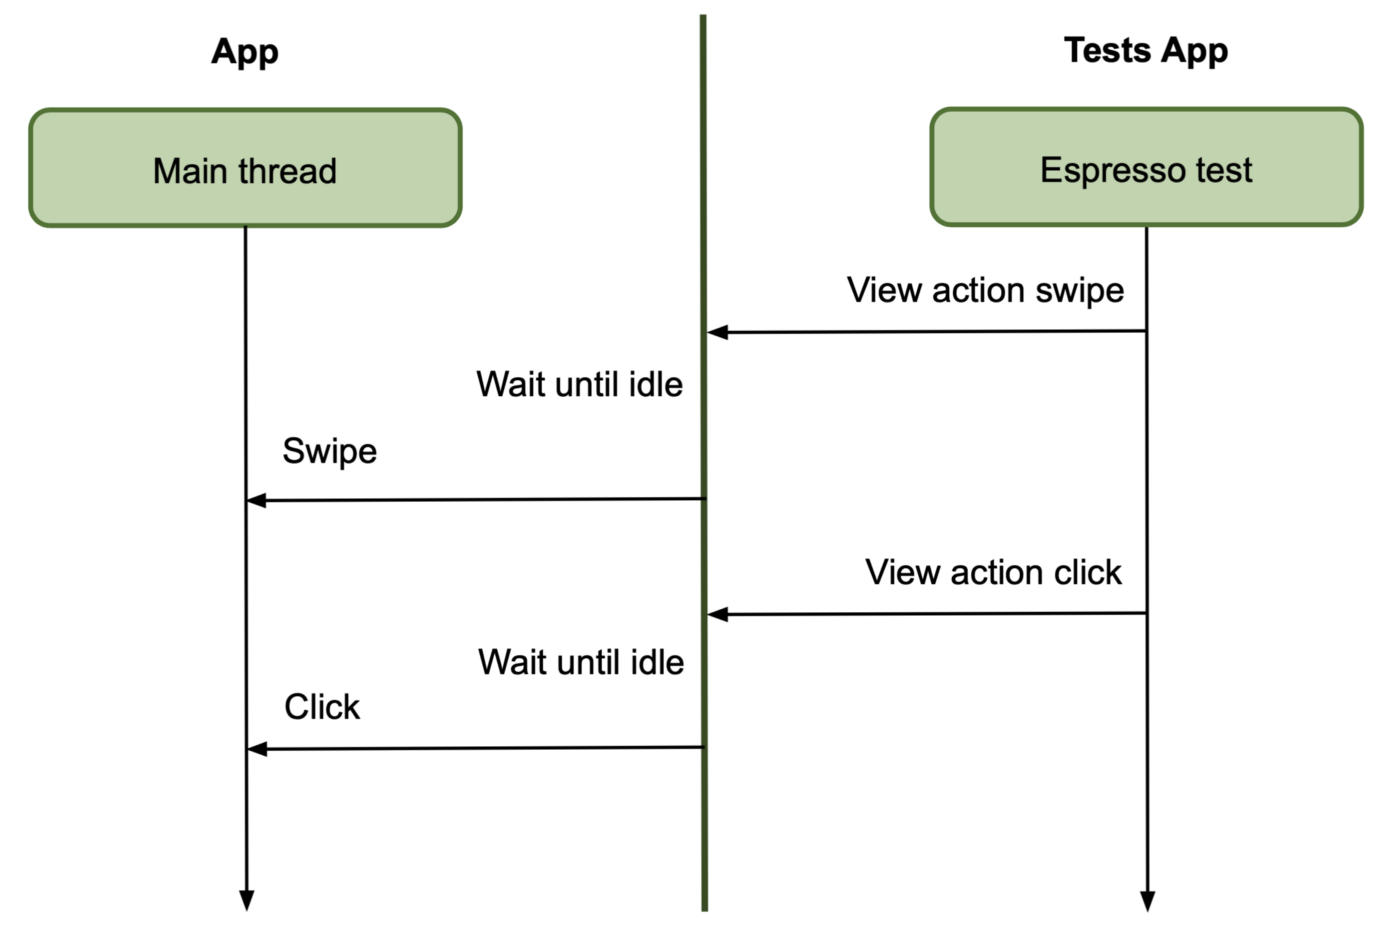
Verifying this is easy: just check out what’s under the hood, for example, the check method of the ViewInteraction class. The ViewAssertion object passed as an argument will be called on the main thread after waiting for idle.
| public ViewInteraction check(ViewAssertion viewAssertion) { | |
| // (...) | |
| runSynchronouslyOnUiThread(new Callable<Void>() { | |
| @Override | |
| public Void call() { | |
| uiController.loopMainThreadUntilIdle(); | |
| // (...) | |
| viewAssertion.check(...) | |
| } | |
| }); | |
| } |
Thus, Espresso has the following cons:
- It requires access to the source code of the application being tested.
- It can’t see anything outside the process of the application being tested, nor interact with other applications. For example, it’s only possible to make a call if the application being tested is the dialer. Don’t expect Espresso to be able to click on a notification. During testing, you’ll probably have to use UiAutomator.
- The way Espresso API is built isn’t conducive to writing clean and readable test code. You’ll have to handle this some other way.
- Espresso has stability issues with complex asynchronous interfaces and lists.
If you’re okay with finding solutions to these issues on your own, or if they don’t matter in your case, then Espresso is a great tool for fast, stable tests.
Robotium and Selendroid
Robotium and Selendroid were fairly popular until Espresso and UiAutomator were released. But now their user numbers are way lower and development speeds have plummeted as well. Both tools can only work with a single application being tested, but they don’t require access to the source code and work well on emulators and real devices alike.
Robotium can be used to test applications on Android API 8+ (but WebView support is only available with API 15), and tests for it are written in Java. It also includes the Robotium Recorder plugin for IntelliJ IDEA and Android Studio.
Selendroid supports a limited list of API versions: 10 to 19. It supports the WebDriver protocol, and has an Inspector utility for viewing element hierarchies and recording simple record-and-playback tests.
If you’re starting to implement autotests from scratch, we don’t see any real reason to use Robotium or Selendroid.
Robolectric
Even though Robolectric doesn’t exactly conform to the structure we described earlier, it still deserves a mention. It isn’t an integration test framework, and you can’t use it to test the interaction of Android components or write UI tests. However, Robolectric lets you write custom JUnit-based unit tests using the Android API. It mocks part of Android SDK, providing the user with shadow objects. Robolectric handles tasks like inflate view, loading resources, and lots of others with native C implementation on Android devices. Therefore, Robolectric lets users write tests with dependencies on Android, but run them on a desktop JVM instead of an emulator or real device. This significantly speeds up the process of building, starting and running tests.
To be continued…
We will continue to dive into the world of Android UI testing in the following articles, and in the second part we will talk about driver wrappers.
Thanks for reading.
Authors: eakurnikov, Eugene Matsyuk
Tags: Android, AndroidDev, Kaspresso, Espresso, Testing
View original article at:

Originally published: July 05, 2021


