

Posted by: Pavlo Stavytskyi
Kotlin Symbol Processing (KSP) is a new API from Google for creating lightweight Kotlin compiler plugins that do annotation processing.
The benefit of KSP is that it provides an idiomatic way of processing Kotlin code by understanding Kotlin-specific features, such as extension functions, local functions, declaration-site variance, and others. According to its creators, annotation processors that use KSP can run up to 2x faster compared to KAPT.
In this tutorial, we will go through each step of creating annotation processors with KSP, so that you will have an understanding of how to use it for your needs. No prior experience with annotation processing is required.
You can find the complete source code for this tutorial below.
What will our processor do?
We will create a processor that will generate a function for each Kotlin interface annotated with @Function where all its properties are converted to function arguments.
For example, for the code snippet below.
| @Function(name = "myAmazingFunction") | |
| interface MyAmazingFunction { | |
| val arg1: String | |
| val arg2: Map<String, List<*>> | |
| } |
Our processor will generate the following Kotlin function.
| fun myAmazingFunction( | |
| arg1: String, | |
| arg2: Map<String, List<*>> | |
| ) { | |
| println("Hello from myAmazingFunction") | |
| } |
In this tutorial we will be focusing on generating function signatures, so their bodies will be pretty simple — just printing some message.
Project structure
We will create a Gradle project that consists of the following modules.
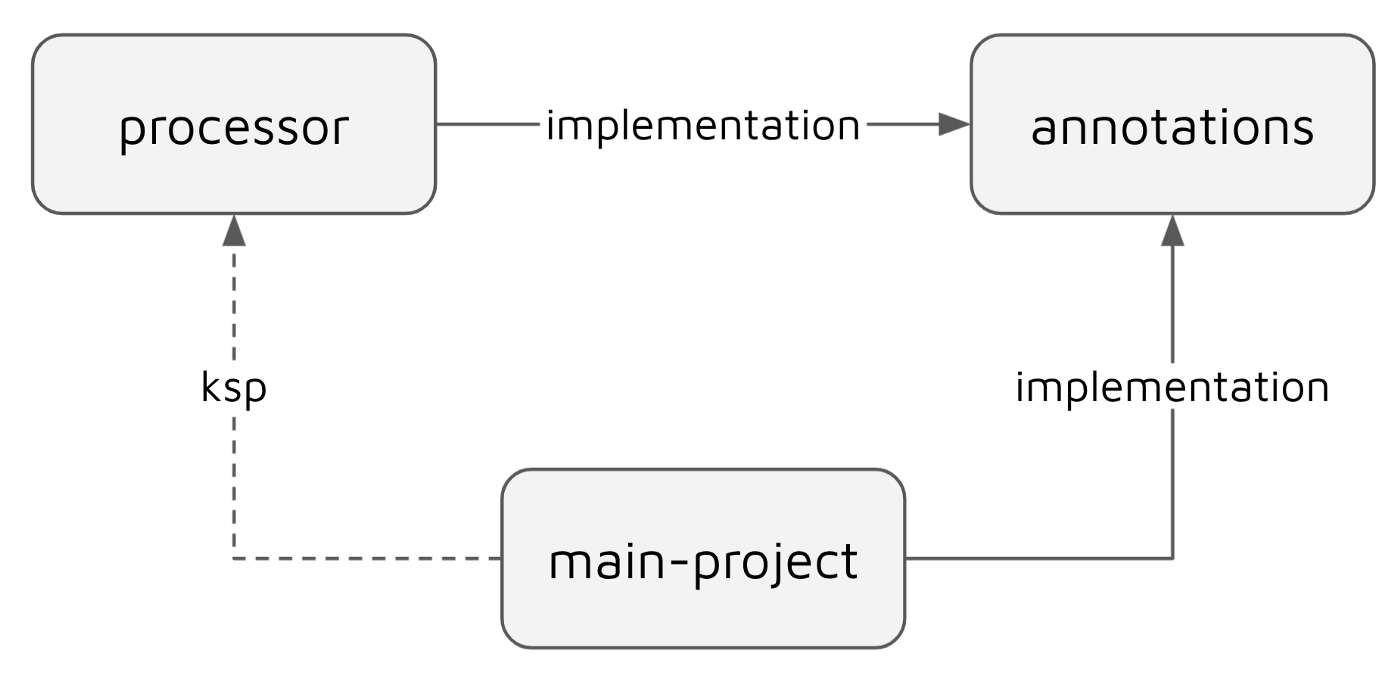
- processor — is our Kotlin symbol processor.
- annotations —includes annotations that our processor will use.
- main-project — is the test project where we will apply our processor.
Project setup overview
In this section, we will do an overview of the Gradle project setup, so that it is ready to work with KSP.
First, you need to create an empty Gradle JVM project using either CLI or IntelliJ IDEA.
Make sure you’re using Gradle of version 7 or above in this tutorial. In order to update Gradle in your project, run this command from its root directory:
./gradlew wrapper --gradle-version=7.1.1
Alternatively, you can clone the GitHub repository and use start directory as your project root. It contains the basic project setup that will get you ready for work with symbol processing.
We will need 3 Gradle modules described in the previous section. Their build.gradle.kts files should have the following configuration.
annotations
This is the simplest module that requires only Kotlin language configuration.
| // annotations/build.gradle.kts | |
| plugins { | |
| kotlin("jvm") | |
| } |
processor
This is the most important module of the project. It should depend on the annotations module as well as ksp-api artifact.
| // processor/build.gradle.kts | |
| plugins { | |
| kotlin("jvm") | |
| } | |
| dependencies { | |
| implementation(project(":annotations")) | |
| implementation("com.google.devtools.ksp:symbol-processing-api:1.6.20-1.0.5") | |
| } |
main-project
This module is the consumer of our processor that will help to see the code generation in action.
| // main-project/build.gradle.kts | |
| plugins { | |
| kotlin("jvm") | |
| id("com.google.devtools.ksp") | |
| } | |
| dependencies { | |
| implementation(project(":annotations")) | |
| ksp(project(":processor")) | |
| } |
Finally, we need to specify versions of Kotlin and KSP plugins in the pluginManagement section of settings.gradle.kts file (in the root project directory). After that, specify the list of repositories for the project in the dependencyResolutionManagement section.
| // settings.gradle.kts | |
| pluginManagement { | |
| plugins { | |
| id("com.google.devtools.ksp") version "1.6.20-1.0.5" | |
| kotlin("jvm") version "1.6.20" | |
| } | |
| repositories { | |
| gradlePluginPortal() | |
| google() | |
| } | |
| } | |
| dependencyResolutionManagement { | |
| repositoriesMode.set(RepositoriesMode.FAIL_ON_PROJECT_REPOS) | |
| repositories { | |
| google() | |
| mavenCentral() | |
| } | |
| } | |
| rootProject.name = "ksp-sample" | |
| include(":annotations") | |
| include(":processor") | |
| include(":main-project") |
Now, everything is ready for the most interesting part.
Creating the processor
Step 1
In order to create the processor, we must implement a SymbolProcessorinterface.
Under the processor/src/main/kotlin/com/morfly directory create a FunctionProcessor class that implements SymbolProcessor interface.
| package com.morfly | |
| class FunctionProcessor( | |
| private val codeGenerator: CodeGenerator, | |
| private val logger: KSPLogger, | |
| private val options: Map<String, String> | |
| ): SymbolProcessor { | |
| override fun process(resolver: Resolver): List<KSAnnotated> { | |
| // leave it blank for now | |
| } | |
| } |
A SymbolProcessor interface requires us to implement a process function. This will be the place where we will have all the processing logic. Let’s leave it blank for now.
Step 2
We must also create a class that implements SymbolProcessorProviderinterface. This class is responsible for instantiating the processor.
Under the processor/src/main/kotlin/com/morfly directory create a FunctionProcessorProvider class that implements SymbolProcessorProvider.
| package com.morfly | |
| class FunctionProcessorProvider : SymbolProcessorProvider { | |
| override fun create(environment: SymbolProcessorEnvironment): SymbolProcessor { | |
| return FunctionProcessor( | |
| codeGenerator = environment.codeGenerator, | |
| logger = environment.logger, | |
| options = environment.options | |
| ) | |
| } | |
| } |
As you can see, the FunctionProcessor takes 3 constructor arguments:
codeGenerator: CodeGenerator— entity that is responsible for creating files with the code generated by the processor.logger: KSPLogger— logger that performs.. well.. logging for the processor.options: Map<String, String>— a collection of key-value options that are passed to the processor. We will see how it works later in this tutorial.
All these arguments are taken from the SymbolProcessingEnvironmentinstance that is provided for us by KSP in FunctionProcessorProvider.create function.
Step 3
Finally, we need to register the processor we’ve just created.
Create a processor/src/main/resources/META_INF/servies directory and put there a file with the following name: com.google.devtools.ksp.processing.SymbolProcessorProvider.
Open it and register the processor provider by adding its fully qualified name:
com.morfly.FunctionProcessorProvider
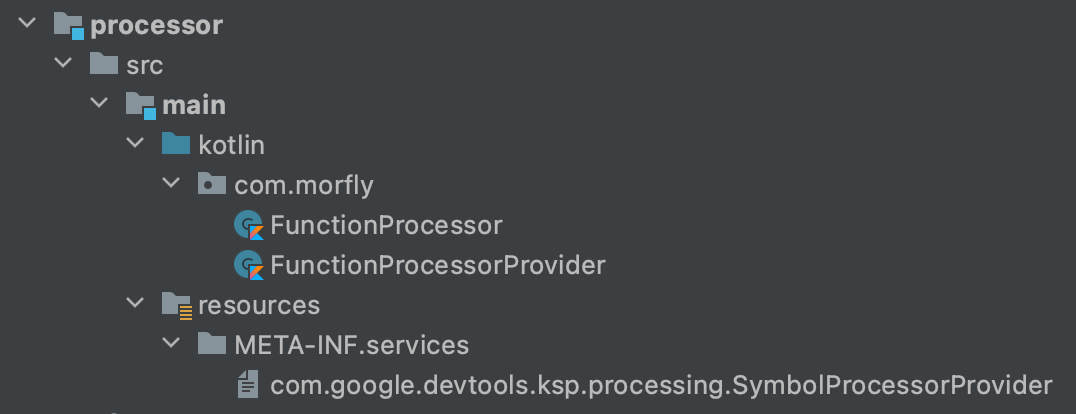
Here is the structure of the processor Gradle module so far:
Creating the annotation
We need to create a custom @Function annotation, so that our processor will resolve all symbols annotated with it.
Under the annotations/src/main/kotlin/com/morfly directory create a Function.kt file with the following code:
| package com.morfly | |
| @Target(AnnotationTarget.CLASS) | |
| annotation class Function(val name: String) |
Now, we are ready to implement the processor.
Implementing the processor
Let’s go back to the FunctionProcessor class and add some logic to it’s process function.
| class FunctionProcessor(...) : SymbolProcessor { | |
| override fun process(resolver: Resolver): List<KSAnnotated> { | |
| val symbols = resolver | |
| .getSymbolsWithAnnotation("com.morfly.Function") | |
| .filterIsInstance<KSClassDeclaration>() | |
| if (!symbols.iterator().hasNext()) return emptyList() | |
| } | |
| } |
In the snippet above, we are using resolver to retrieve all the class declarations annotated with our annotation com.morfly.Function.
In case there are no symbols that can be processed — exit.
Note. Since symbols is a Sequence but not List we don’t know its size in advance. That is why we use its iterator in order to check if its empty or not.
Now, let’s continue implementing the proceess function with the code below.
| class FunctionProcessor(...) : SymbolProcessor { | |
| override fun process(resolver: Resolver): List<KSAnnotated> { | |
| ... | |
| val file: OutputStream = codeGenerator.createNewFile( | |
| // Make sure to associate the generated file with sources to keep/maintain it across incremental builds. | |
| // Learn more about incremental processing in KSP from the official docs: | |
| // https://kotlinlang.org/docs/ksp-incremental.html | |
| dependencies = Dependencies(false, *resolver.getAllFiles().toList().toTypedArray()), | |
| packageName = "com.morfly", | |
| fileName = "GeneratedFunctions" | |
| ) | |
| file += "package com.morfly\n" | |
| } | |
| } |
All our functions will be generated into a single file under the com.morflypackage. Using codeGenerator we generate a file that could be found at build/generated/ksp/main/kotlin/com/morfly/GeneratedFunctions.kt
When we create a new file using createNewFile it returns an instance of type OutputStream to which we will append all the file content.
Let’s implement a += operator for OutputStream, for convenience. In FunctionProcessor class above the process function, add the following code.
| class FunctionProcessor(...) : SymbolProcessor { | |
| override fun process(resolver: Resolver): List<KSAnnotated> { | |
| ... | |
| val file: OutputStream = codeGenerator.createNewFile( | |
| // Make sure to associate the generated file with sources to keep/maintain it across incremental builds. | |
| // Learn more about incremental processing in KSP from the official docs: | |
| // https://kotlinlang.org/docs/ksp-incremental.html | |
| dependencies = Dependencies(false, *resolver.getAllFiles().toList().toTypedArray()), | |
| packageName = "com.morfly", | |
| fileName = "GeneratedFunctions" | |
| ) | |
| file += "package com.morfly\n" | |
| } | |
| } |
Finally, complete process implementation by adding the final piece of code:
| class FunctionProcessor(...) : SymbolProcessor { | |
| operator fun OutputStream.plusAssign(str: String) { | |
| this.write(str.toByteArray()) | |
| } | |
| override fun process(resolver: Resolver): List<KSAnnotated> { ... } | |
| } |
This is the most important part where we traverse the symbol tree using our custom Visitor that we will create further.
Don’t forget to close OutputStream and return symbols that can’t be processed during the current round. KSP will try to run them through another round later.
Here is the complete process function implementation:
| class FunctionProcessor(...) : SymbolProcessor { | |
| override fun process(resolver: Resolver): List<KSAnnotated> { | |
| val symbols = resolver | |
| .getSymbolsWithAnnotation("com.morfly.Function") | |
| .filterIsInstance<KSClassDeclaration>() | |
| if (!symbols.iterator().hasNext()) return emptyList() | |
| val file: OutputStream = codeGenerator.createNewFile( | |
| dependencies = Dependencies(false), | |
| packageName = "com.morfly", | |
| fileName = "GeneratedFunctions" | |
| ) | |
| file += "package com.morfly\n" | |
| symbols.forEach { it.accept(Visitor(file), Unit) } | |
| file.close() | |
| val unableToProcess = symbols.filterNot { it.validate() }.toList() | |
| return unableToProcess | |
| } |
Creating a Visitor
We still have one compilation error, as Visitor(file) is unresolved currently. Let’s implement it.
In order to traverse and visit each symbol, we must implement a KSVisitorwith 2 generic type arguments, D and R.
| interface KSVisitor<D, R> { | |
| fun visitNode(node: KSNode, data: D): R | |
| fun visitClassDeclaration(classDeclaration: KSClassDeclaration, data: D): R | |
| fun visitPropertyDeclaration(property: KSPropertyDeclaration, data: D): R | |
| // ~20 more functions | |
| } |
The visitor contains a function for each type of symbol, where D is data that is getting passed or accumulated through visiting each symbol, while R is a result that each visit must return.
We will not pass the data D or return results R during the traversal for our processor. Therefore, we will use KSVisitor<Unit, Unit>.
Moreover, we don’t need to implement all the available visiting functions. Luckily, there is a KSVisitorVoid that contains empty implementations for each of the visiting functions, so we will override only those that we need.
Inside the FunctionProcessor class below the process create a Visitorclass that extends KSVisitorVoid.
| class FunctionProcessor(...) : SymbolProcessor { | |
| ... | |
| inner class Visitor(private val file: OutputStream) : KSVisitorVoid() { | |
| override fun visitClassDeclaration(classDeclaration: KSClassDeclaration, data: Unit) { | |
| } | |
| override fun visitPropertyDeclaration(property: KSPropertyDeclaration, data: Unit) { | |
| } | |
| override fun visitTypeArgument(typeArgument: KSTypeArgument, data: Unit) { | |
| } | |
| } | |
| } |
We are passing file as a constructor argument, so that we will be able to do a code generation while visiting symbols. The inner modifier is used to have an access to properties of the FunctionProcessor such as KSPLoggerand others.
We need to override only 3 visitor functions that we will work with: visitClassDeclaration, visitPropertyDeclaration and visitTypeArgument.
OUR VIDEO RECOMMENDATION


Jobs
First launch
Let’s try to run the processor and see it in action. Of course, it won’t do too much useful work for now, but at least we can verify if everything is configured correctly.
Under the main-project/src/main/kotlin/com/morfly create a Main.kt file with the following code.
| package com.morfly | |
| @Function(name = "myAmazingFunction") | |
| interface MyAmazingFunction | |
| fun main() { | |
| println("Hello World!") | |
| } |
Run the program using the main function.
Open main-project/build/generated/ksp/main/kotlin/com/morfly directory. If everything is done correctly, it should contain a GeneratedFucnctions.ktfile with the specified package statement.
package com.morfly
How to work with a Visitor?
Before implementing the Visitor class let’s see why and how do we need to use visitors while working with KSP.
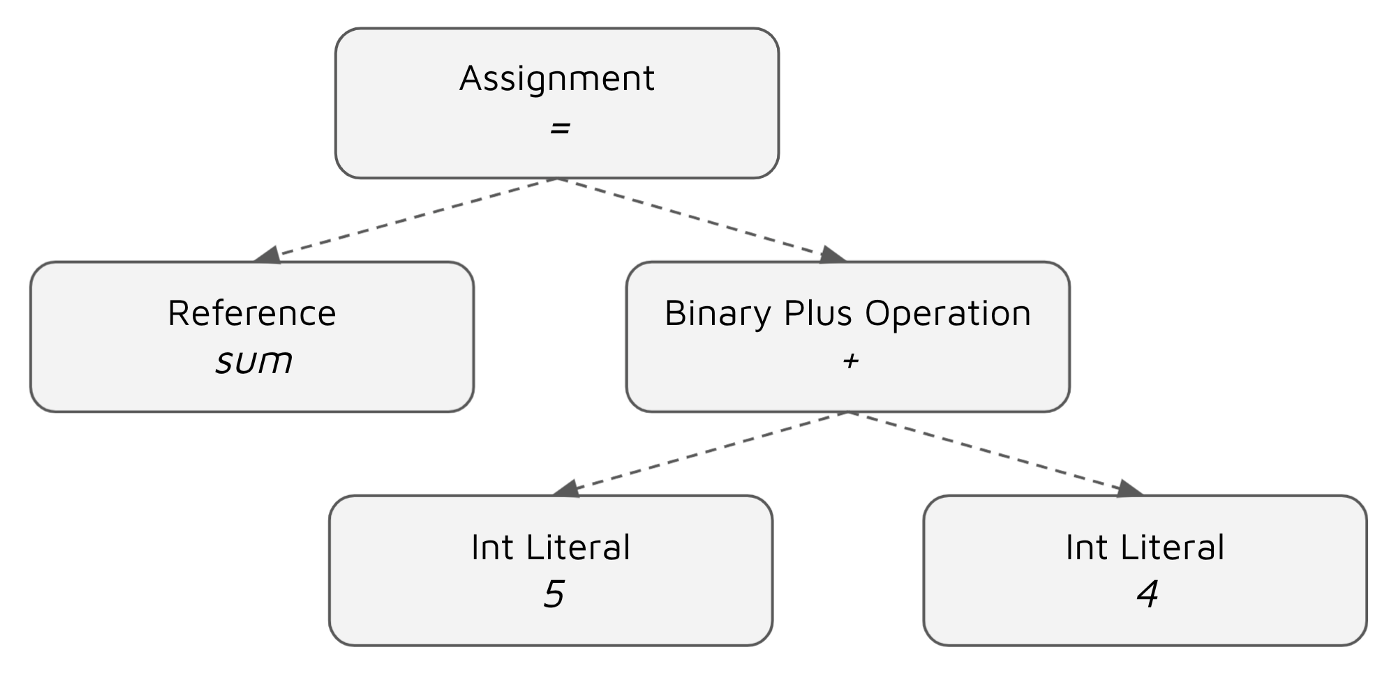
Let’s step aside from Kotlin for a moment and take a look at a simple code snippet of some abstract programming language where we assign the result of addition to the variable.
sum = 5 + 4
In the beginning, the language compiler or interpreter sees the code as a string. Therefore, it needs to convert it to something more meaningful.
The parsing process starts with a lexer that deconstructs the code into a bunch of components called tokens: sum, =, 5, +, 4.
After that, a parser comes into action where its goal is to organize tokensinto a meaningful data structure and order, according to the language grammar. As the output, it produces an abstract syntax tree that will be used by further compilation stages.
Based on this, the example above can be represented with the following syntax tree, where each node is represented by the specific class.
Now, if we go back to Kotlin and the symbol processing API in particular, we can see that it operates with similar concepts.
Let’s consider an example of the interface, that our processor is going to process:
| @Function(name = "myAmazingFunction") | |
| interface MyAmazingFunction { | |
| val arg1: String | |
| val arg2: Map<String, List<*>> | |
| } |
We can split it into the following list of components: MyAwesomeFunction, arg1, String, arg2, Map, String, List, *.
If we turn them into a tree data structure, it will look like the diagram below.
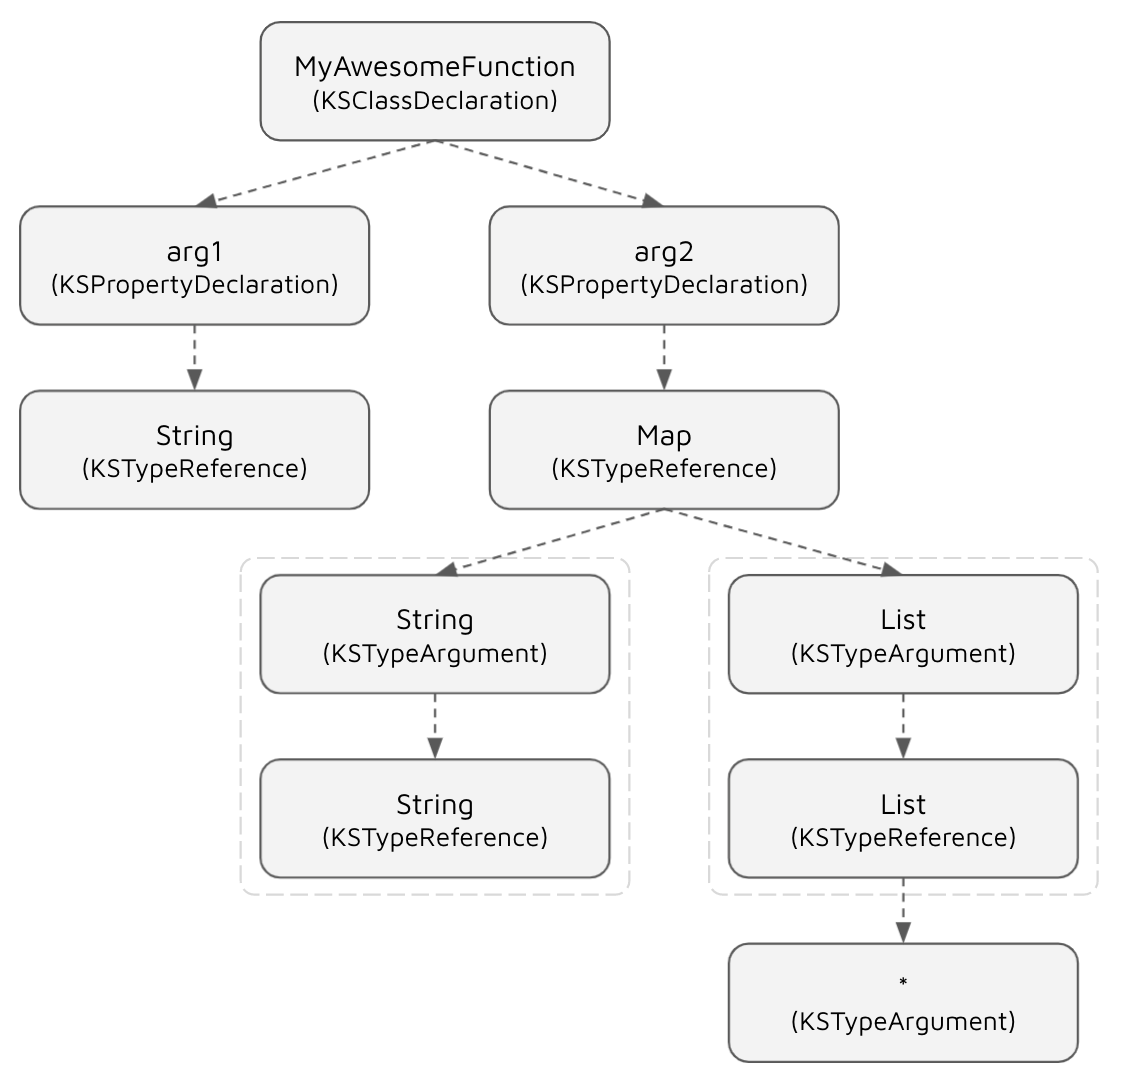
This is not the complete tree, as in practice each node would have more children. However, these are the nodes, that will be sufficient for our processor.
Each node of the symbol tree in KSP implements the base KSNode interface.
| interface KSNode { | |
| ... | |
| fun <D, R> accept(visitor: KSVisitor<D, R>, data: D): R | |
| } |
The KSNode itself implements a visitor pattern by having accept function that takes KSVisitor as an argument.
Basically, what this function does, it calls back the visitor’s visit function with the right argument type. Let’s see the KSPropertyDeclarationImpl class from KSP source code as an example.
| class KSPropertyDeclarationImpl(...) : KSPropertyDeclaration, ... { | |
| ... | |
| override fun <D, R> accept(visitor: KSVisitor<D, R>, data: D): R { | |
| return visitor.visitPropertyDeclaration(this, data) | |
| } | |
| } |
This is how, inside theFunctionProcessor.process function, we’ve started symbol processing using our custom Visitor.
symbols.forEach { it.accept(Visitor(file), Unit) }
Therefore, by knowing the structure of the tree, we can traverse all nodesthat we need using a visitor pattern.
Implementing code generation
All the code generation logic of our processor will be implemented inside Visitor class.
Step 1. Processing class declarations
Our processor needs to work with the annotated interfaces. In KSP, interface declaration is represented with a KSClassDeclaration type. Therefore, we start processing with visiting class declarations.
Go to visitClassDeclaration method of a Visitor and add the implementation code.
| override fun visitClassDeclaration(classDeclaration: KSClassDeclaration, data: Unit) { | |
| if (classDeclaration.classKind != ClassKind.INTERFACE) { | |
| logger.error("Only interface can be annotated with @Function", classDeclaration) | |
| return | |
| } | |
| // Getting the @Function annotation object. | |
| val annotation: KSAnnotation = classDeclaration.annotations.first { | |
| it.shortName.asString() == "Function" | |
| } | |
| // Getting the 'name' argument object from the @Function. | |
| val nameArgument: KSValueArgument = annotation.arguments | |
| .first { arg -> arg.name?.asString() == "name" } | |
| // Getting the value of the 'name' argument. | |
| val functionName = nameArgument.value as String | |
| } |
In general KSClassDeclaration describes all types of classes such as class, data class, interface and others. Therefore, we need to make sure, that the annotated class is actually an interface by checking the classKindproperty. Otherwise, we will stop processing.
Next, we need to get @Function annotation from the class declaration. In Kotlin, interfaces may be annotated with multiple annotations, as we know. Therefore, we need to find the right one by its name.
Next, we need to get the information from annotation arguments. In our example, we need to find out the name of the generated function by identifying the value of the name argument of the annotation.
After that, we can do the actual generation.
Continue implementing visitClassDeclaration function with the code below.
| override fun visitClassDeclaration(classDeclaration: KSClassDeclaration, data: Unit) { | |
| ... | |
| // Getting the list of member properties of the annotated interface. | |
| val properties: Sequence<KSPropertyDeclaration> = classDeclaration.getAllProperties() | |
| .filter { it.validate() } | |
| // Generating function signature. | |
| file += "\n" | |
| if (properties.iterator().hasNext()) { | |
| file += "fun $functionName(\n" | |
| // Iterating through each property to translate them to function arguments. | |
| properties.forEach { prop -> | |
| visitPropertyDeclaration(prop, Unit) | |
| } | |
| file += ") {\n" | |
| } else { | |
| // Otherwise, generating function with no args. | |
| file += "fun $functionName() {\n" | |
| } | |
| // Generating function body | |
| file += " println(\"Hello from $functionName\")\n" | |
| file += "}\n" | |
| } |
First, we need to identify all the properties that annotated interface has. These will be the arguments of a generated function.
Then, we start generating the signature of the function by delegating argument generation to the visitPropertyDeclaration function.
Finally, when the function signature is generated, we add a simple body that prints Hello from <function_name> message.
Step 2. Processing property declarations
Let’s see how visitPropertyDeclaration is implemented.
| override fun visitPropertyDeclaration(property: KSPropertyDeclaration, data: Unit) { | |
| // Generating argument name. | |
| val argumentName = property.simpleName.asString() | |
| file += " $argumentName: " | |
| // Generating argument type. | |
| val resolvedType: KSType = property.type.resolve() | |
| file += resolvedType.declaration.qualifiedName?.asString() ?: run { | |
| logger.error("Invalid property type", property) | |
| return | |
| } | |
| // Generating generic parameters if any. | |
| val genericArguments: List<KSTypeArgument> = property.type.element?.typeArguments ?: emptyList() | |
| visitTypeArguments(genericArguments) | |
| // Handling nullability. | |
| file += if (resolvedType.nullability == Nullability.NULLABLE) "?" else "" | |
| file += ",\n" | |
| } |
For each property, we need to simply generate function arguments in a format argName: ArgType.
While argName part is straightforward, just getting simpleName property from the property declaration, the ArgType part requires considering 2 additional steps.
Firstly, we not only need to generate the argument type but also make sure it is imported to the file. This means that we need to have the fully qualified name of the type. This can be done in two ways:
- Using import statement:
import com.package.ArgType. - Using the fully qualified name of the type each time we use it:
argName: com.package.ArgType.
We will use the second option as it is easier to implement. We won’t need to go back and forth between the import declarations and places in the code where the type is used, during the code generation.
So, how do we get the fully qualified name of the type?
If we use KSPropertyDeclaration.type, we get the object of type KSTypeReference . However, in order to get the information about the type, KSTypeReference must be resolved by calling resolve function that returns the object of the type KSType.
So, when you have an object of type KSType, we can get the fully qualified name by using the code below.
resolvedType.declaration.qualifiedName?.asString
Note. The resolve operation is expensive in terms of computation as the KSP will need to go and find the place where the type is declared. So, it must be used carefully.
Secondly, we must handle cases when the type has generic parameters such as ArgType<String> . This requires us to implement additional functionality.
Step 3. Processing generic type arguments
For each argument type that we resolve in visitPropertyDeclaration we must separately resolve its generic arguments that are declared between angle brackets < >.
In the Visitor class between visitPropertyDeclaration and visitTypeArgument functions declare a helper function called visitTypeArguments (plural) that takes the list of type arguments.
| fun visitPropertyDeclaration(...) { ... } | |
| private fun visitTypeArguments(typeArguments: List<KSTypeArgument>) { | |
| if (typeArguments.isNotEmpty()) { | |
| file += "<" | |
| typeArguments.forEachIndexed { i, arg -> | |
| visitTypeArgument(arg, data = Unit) | |
| if (i < typeArguments.lastIndex) file += ", " | |
| } | |
| file += ">" | |
| } | |
| } | |
| fun visitTypeArgument(typeArgument: KSTypeArgument, ...) { ... } |
The function above will set up formatting for generic type arguments block and iterate through each one by calling visitTypeArgument function.
Let’s start implementing the visitTypeArgument function.
| override fun visitTypeArgument(typeArgument: KSTypeArgument, data: Unit) { | |
| when (val variance: Variance = typeArgument.variance) { | |
| STAR -> { | |
| file += "*" | |
| return | |
| } | |
| COVARIANT, CONTRAVARIANT -> { | |
| file += variance.label // 'out' or 'in' | |
| file += " " | |
| } | |
| INVARIANT -> { | |
| // do nothing | |
| } | |
| } | |
| } |
When working with generics in Kotlin we must also consider a concept in generics called variance. (see the official Kotlin docs to learn more).
There are 4 variance types that we must consider:
- star —
Type<*>(we just generate*symbol instead of argument type) - covariant —
Type<outOtherType>(we addoutbefore the actual type) - contravariant —
Type<inOtherType>(we addinbefore the actual type) - invariant —
Type<OtherType>(just add the argument type itself)
After we handled the type variance, we must identify the actual type of the generic argument.
| override fun visitTypeArgument(typeArgument: KSTypeArgument, data: Unit) { | |
| ... | |
| val resolvedType: KSType? = typeArgument.type?.resolve() | |
| file += resolvedType?.declaration?.qualifiedName?.asString() ?: run { | |
| logger.error("Invalid type argument", typeArgument) | |
| return | |
| } | |
| // Generating nested generic parameters if any | |
| val genericArguments: List<KSTypeArgument> = typeArgument.type?.element?.typeArguments ?: emptyList() | |
| visitTypeArguments(genericArguments) | |
| // Handling nullability | |
| file += if (resolvedType?.nullability == Nullability.NULLABLE) "?" else "" | |
| } |
We apply the same approach as we used to define the property type. First, we resolve KSTypeReference, and then get the fully qualified name from KSType:
resolvedType?.declaration?.qualifiedName?.asString()
Don’t forget to make the argument type nullable by adding ?, if needed.
Finally, we must handle the nested argument types such as Type<OtherType<OtherType>>.
This is a pretty straightforward task as we have all the necessary components for it already implemented. Just call visitTypeArguments(plural) inside visitTypeArgument function for its nested argument types and it will do the work recursively.
Running the processor
This is all we need to implement our processor. Now we can run it and see how it works.
Open main-project/src/main/kotlin/com/morfly/Main.kt file and replace its contents with the code below.
| package com.morfly | |
| @Function(name = "functionWithoutArgs") | |
| interface FunctionWithoutArgs | |
| @Function(name = "myAmazingFunction") | |
| interface MyAmazingFunction { | |
| val arg1: String? | |
| val arg2: List<Int?> | |
| val arg3: List<Map<String, *>> | |
| } | |
| fun main() { | |
| functionWithoutArgs() | |
| myAmazingFunction( | |
| arg1 = "value", | |
| arg2 = listOf(1, 2, null), | |
| arg3 = listOf(mapOf("key1" to "value1")) | |
| ) | |
| } |
We are almost there…
By default, your IDE knows nothing about the code generated with KSP. In order to help it to recognize generated files, open main-project/build.gradle.kts and add the code below somewhere in the file.
| // main-project/build.gradle.kts | |
| ... | |
| kotlin.sourceSets.main { | |
| kotlin.srcDirs( | |
| file("$buildDir/generated/ksp/main/kotlin"), | |
| ) | |
| } |
By adding this configuration, we explicitly marked a directory with the generated code as a Kotlin source directory.
Note. Don’t forget to sync Gradle changes.
Now, run the main function in the main-project/.../Main.kt file.
To verify, that the code generation was done successfully, open
main-project/build/generated/ksp/.../GeneratedFunctions.kt file and verify its contents.
| package com.morfly | |
| fun functionWithoutArgs() { | |
| println("Hello from functionWithoutArgs") | |
| } | |
| fun myAmazingFunction( | |
| arg1: kotlin.String?, | |
| arg2: kotlin.collections.List<kotlin.Int?>, | |
| arg3: kotlin.collections.List<kotlin.collections.Map<kotlin.String, *>>, | |
| ) { | |
| println("Hello from myAmazingFunction") | |
| } |
Congratulations, we just finished implementing the main functionality of our Kotlin Symbol Processor!
Passing arguments to the processor
Now, when the primary job for creating our symbol processor is done, let’s take look at one more interesting feature of KSP.
It is possible to pass arguments to the symbol processor in order to configure its behavior. Let’s try it with our processor.
Let’s implement a feature, where all generic type parameters of each function argument, will be replaced with star-projections by our processor.
For example, for the annotated interface that has properties with generic arguments…
| @Function(name = "myAmazingFunction") | |
| interface MyAmazingFunction { | |
| val arg1: List<Int>, | |
| val arg2: Map<String, List<String>> | |
| } |
We will generate function arguments where their generic type arguments are replaced with *.
| fun myAmazingFunction( | |
| arg1: List<*>, | |
| arg2: Map<*, *>, | |
| ) { | |
| println("Hello from myAmazingFunction") | |
| } |
To do this we need to add a small change to our processor.
Open processor/.../FunctionProcessor.kt file. Go to the Visitor.visitTypeArgument function and add the following code at the very beginning of the function.
| override fun visitTypeArgument(typeArgument: KSTypeArgument, data: Unit) { | |
| if (options["ignoreGenericArgs"] == "true") { | |
| file += "*" | |
| return | |
| } | |
| // the rest of the code | |
| ... | |
| } |
If you remember, we have passed an options: Map<String, String>argument to the FunctionProcessor class constructor.
We can check if it has an option named ignoreGenericArgs and check if it equals to "true".
Note. KSP supports only String values for the options, that is why we check if the option is equal to "true" string instead of boolean true.
Now, open main-project/build.gradle.kts file and pass the argument to our processor.
| // main-project/build.gradle.kts | |
| ... | |
| ksp { | |
| arg("ignoreGenericArgs", "true") | |
| } |
Note. Don’t forget to sync Gradle changes.
Now, run the main function in the main-project/.../Main.kt file. Open
main-project/build/generated/ksp/.../GeneratedFunctions.kt file and verify its contents.
| package com.morfly | |
| fun functionWithoutArgs() { | |
| println("Hello from functionWithoutArgs") | |
| } | |
| fun myAmazingFunction( | |
| arg1: kotlin.String?, | |
| arg2: kotlin.collections.List<*>, | |
| arg3: kotlin.collections.List<*>, | |
| ) { | |
| println("Hello from myAmazingFunction") | |
| } |
As you can see, all the generic parameters were replaced with star projections.
That’s it. In this tutorial, we went through each step required for creating custom Kotlin symbol processors. As you can see KSP is a powerful API that allows creating annotation processors by handling Kotlin-specific features such as declaration-site variance and others.
You can practice with KSP by extending the processor we’ve just created. For example, try to add functionality that allows specifying the return type of the generated function. This can be done by marking one of the properties of the annotated interface with the new custom annotation — @Returns.
You can find the complete source code for this tutorial below.
Morfly/ksp-sample |
 |
Tags: Kotlin, Ksp, Annotation Processing, Annotation Processor, Code Generation
View original article at:

Originally published: July 20, 2021


