Implement your first synchronized scrolling in Android
Ever wondered how to implement a synchronizer between Android’s
RecyclerView and TabLayout? What are the use cases of such on mobile devices? We’ll be discussing just that.
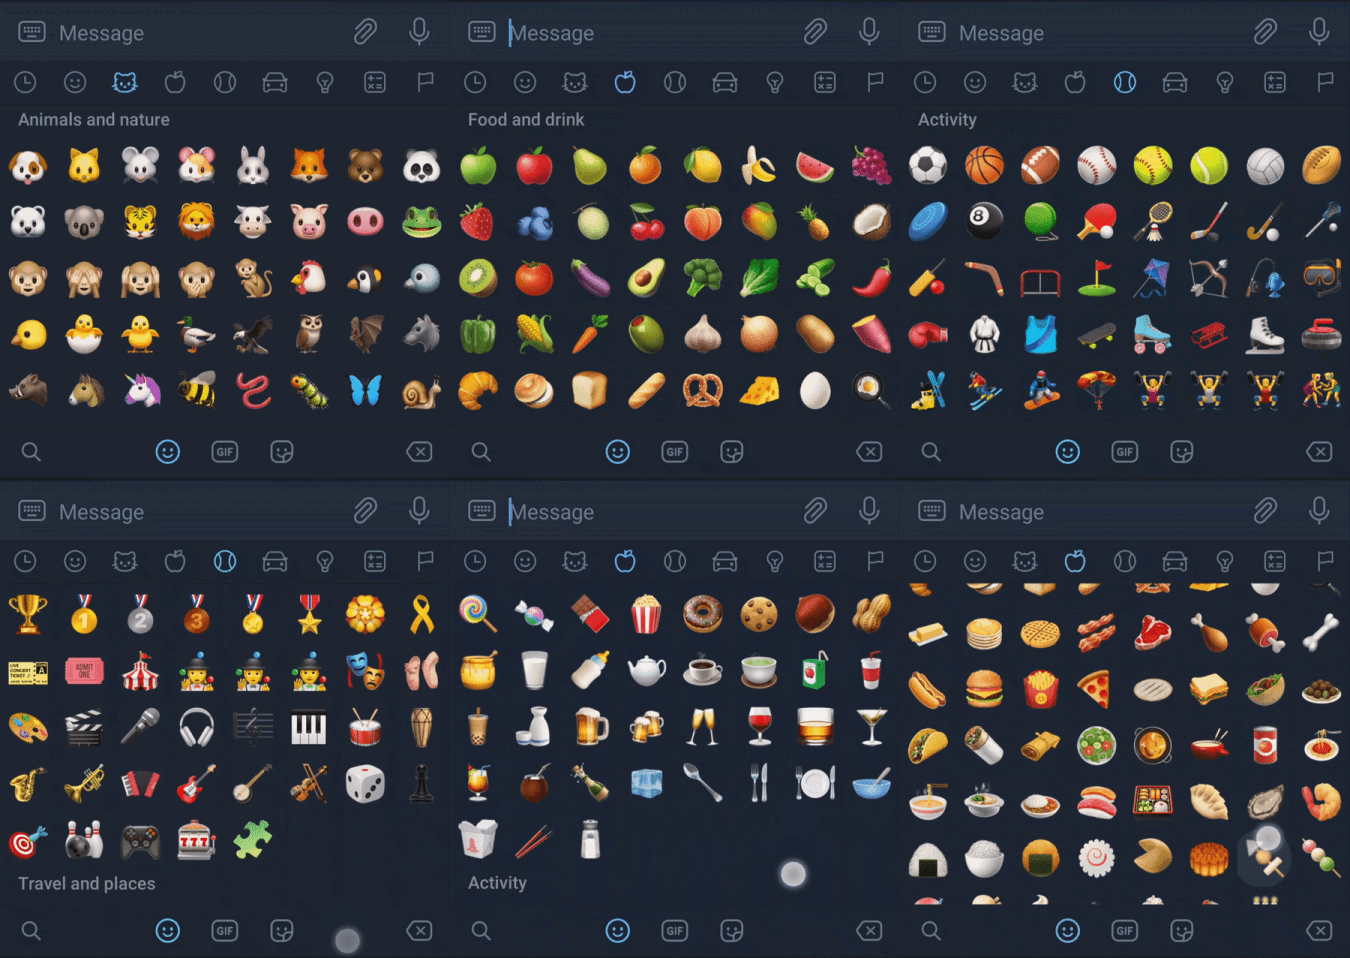
Most common case is when you’re trying to show a list of categories, each category has it’s own body, and that body has to be synchronized with an item of a TabLayout. This has been implemented in many today’s apps really, like Telegram in their emoji’s section for example.

Telegram’s emoji section synchronization
As I’m working on an app, this synchronization had to be implemented, so I searched for a good way to implement it, but I haven’t really found any good library or a built-in ways to sync, so I decided to build my own synchronizer, and now I’m publishing it as an open source library.
The behavior we want from the synchronizer is that as you scroll through the RecyclerView’s items, the corresponding TabLayout items will be selected automatically, and vice-versa; when pressing on a TabLayout item, we want the RecyclerView to scroll to the corresponding item to view. Simple.. right? Well you might be surprised how easy it’ll be.

Let’s make a sample app to demonstrate the synchronization.
Prerequisites:
- You have a good knowledge of RecyclerView and how it works, and how nesting RecylerViews work.
- Understands the concept of TabLayout.
- Kotlin; since this tutorial is written in Kotlin.
Follow these steps:
1- Make some models in order to display them as items in the RecyclerView:
We’ll be making an Item class that will have a simple String field:
| class Item(val content: String) { | |
| } |
And a Category class that will be nesting a list of items:
| class Category(val name: String, vararg item: Item) { | |
| val listOfItems: List<Item> = item.toList() | |
| } |
And therefore, our example list is going to be initialized like this:
| private val categories = mutableListOf( | |
| Category( | |
| "Category 1", | |
| Item("Item 1"), | |
| Item("Item 2"), | |
| Item("Item 3"), | |
| Item("Item 4"), | |
| Item("Item 5"), | |
| Item("Item 6") | |
| ), | |
| ... | |
| ... | |
| ... | |
| Category( | |
| "Category 5", | |
| Item("Item 1"), | |
| Item("Item 2"), | |
| Item("Item 4"), | |
| Item("Item 5"), | |
| ), | |
| ) |
And now we have a list of categories, each category has a list of items.
2- Create your xml file that contains your TabLayout and RecyclerView:
| <?xml version="1.0" encoding="utf-8"?> | |
| <androidx.constraintlayout.widget.ConstraintLayout xmlns:android="http://schemas.android.com/apk/res/android" | |
| xmlns:app="http://schemas.android.com/apk/res-auto" | |
| xmlns:tools="http://schemas.android.com/tools" | |
| android:layout_width="match_parent" | |
| android:layout_height="match_parent" | |
| tools:context=".ui.MainActivity"> | |
| <com.google.android.material.tabs.TabLayout | |
| android:id="@+id/tabLayout" | |
| android:layout_width="match_parent" | |
| android:layout_height="wrap_content" | |
| android:elevation="8dp" | |
| app:layout_constraintEnd_toEndOf="parent" | |
| app:layout_constraintStart_toStartOf="parent" | |
| app:layout_constraintTop_toTopOf="parent" | |
| app:tabIndicatorAnimationMode="elastic" | |
| app:tabMode="scrollable" /> | |
| <androidx.recyclerview.widget.RecyclerView | |
| android:id="@+id/recyclerView" | |
| android:layout_width="0dp" | |
| android:layout_height="0dp" | |
| android:nestedScrollingEnabled="true" | |
| android:orientation="vertical" | |
| app:layoutManager="androidx.recyclerview.widget.LinearLayoutManager" | |
| app:layout_constraintBottom_toBottomOf="parent" | |
| app:layout_constraintEnd_toEndOf="parent" | |
| app:layout_constraintStart_toStartOf="parent" | |
| app:layout_constraintTop_toBottomOf="@id/tabLayout" | |
| tools:listitem="@layout/item_category" /> | |
| </androidx.constraintlayout.widget.ConstraintLayout> |
3- Initialize your RecyclerView and TabLayout adapters with their data:
| override fun onCreate(savedInstanceState: Bundle?) { | |
| super.onCreate(savedInstanceState) | |
| setContentView(R.layout.activity_main) | |
| initViews() | |
| initTabLayout() | |
| initRecycler() | |
| } | |
| private fun initViews() { | |
| tabLayout = findViewById(R.id.tabLayout) | |
| recyclerView = findViewById(R.id.recyclerView) | |
| } | |
| private fun initTabLayout() { | |
| for (category in categories) { | |
| tabLayout.addTab(tabLayout.newTab().setText(category.name)) | |
| } | |
| } | |
| private fun initRecycler() { | |
| recyclerView.adapter = CategoriesAdapter(this, categories) | |
| } |
The number of tabs will be equal to the number of categories we have initialized.
4- Add the library’s dependencies:
We will be using my library I used in my development app.
Add the maven central repository in root build.gradle:
| allprojects { | |
| repositories { | |
| ... | |
| mavenCentral() | |
| } | |
| } |
Add dependency of the synchronizer library in your app’s build.gradle:
| dependencies { | |
| implementation 'io.github.ahmad-hamwi:tabsync:1.0.1' | |
| } |
Job Offers
5- Create a TabbedListMediator object and pass the required parameters:
- The first two parameters are the RecyclerView and TabLayout that you wish to be synced.
- The third parameter is a list of indices of the RecyclerView items that you wish to be syncing with tabs.
| override fun onCreate(savedInstanceState: Bundle?) { | |
| super.onCreate(savedInstanceState) | |
| setContentView(R.layout.activity_main) | |
| initViews() | |
| initTabLayout() | |
| initRecycler() | |
| initMediator() // NEW | |
| } | |
| private fun initMediator() { | |
| TabbedListMediator( | |
| recyclerView, | |
| tabLayout, | |
| categories.indices.toList() | |
| ).attach() | |
| } |
Call attach on the mediator object to start syncing.
Note: that the third parameter must not provide a list of size of more than the tabs count of the TabLayout.
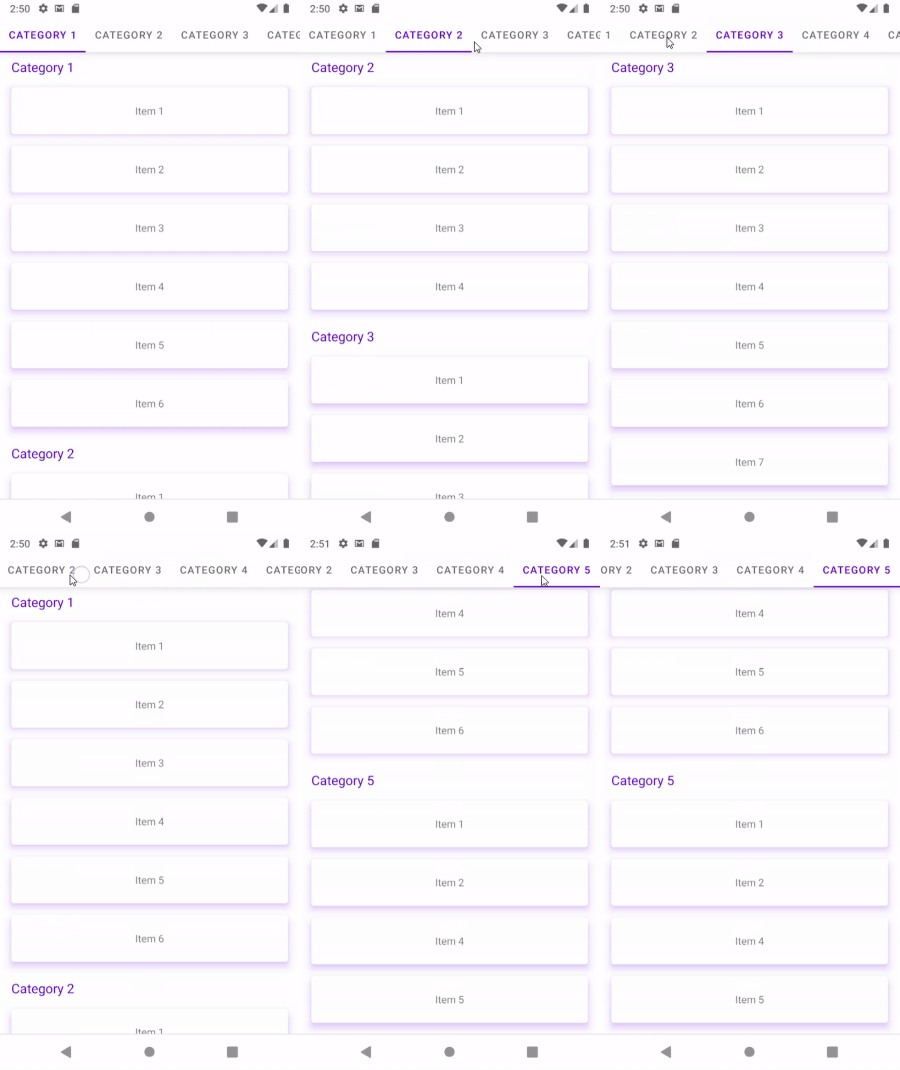
And the results are:

TabSync in action!
You may find it more smooth to look at if it smooth scrolls to the required destination, and for that case, you can add a fourth parameter to the constructor for smooth scrolling:
| private fun initMediator() { | |
| TabbedListMediator( | |
| recyclerView, | |
| tabLayout, | |
| categories.indices.toList(), | |
| true // NEW | |
| ).attach() | |
| } |
Results with smooth scroll on:

TabSync with smooth scroll flagged
And that’s about it! Told you it will be easy!
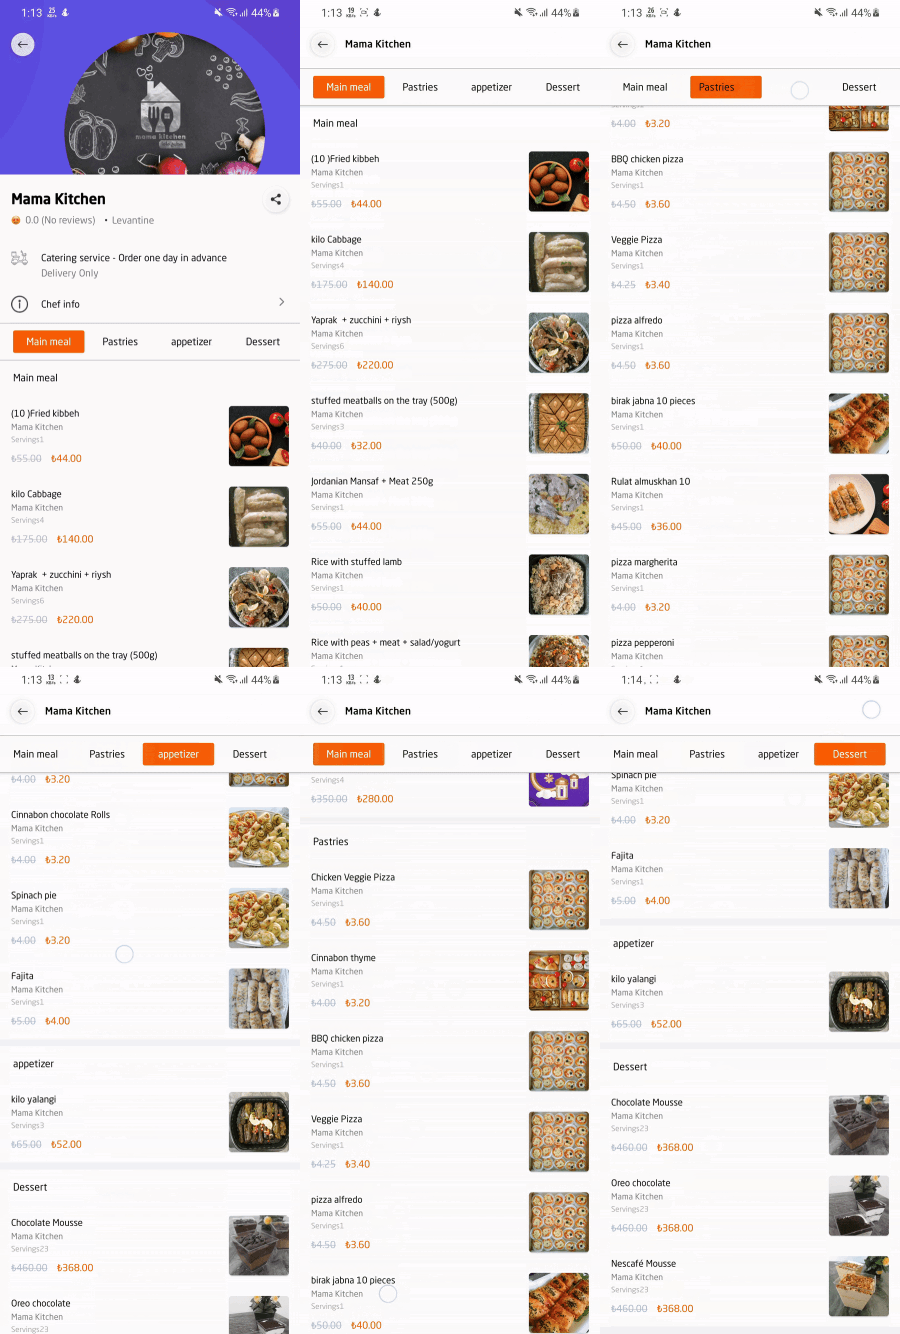
Here’s a preview of our in-production app FoodVibes:

FoodVibes’s implementation of TabSync
Check out the GitHub repository of the library for the full code of the example, and other public methods provided by the library that you would probably need during your usage of this library, like re-attaching on certain scenarios, detaching to stop syncing, and more.
If you found this library useful, don’t forget to give the repo a star that would be much appreciated 😉
You can follow me on LinkedIn too:
Thanks for reading, and happy coding!


