

In my previous story, I’ve talked about why I believe we can strongly improve the UI State management between the View and ViewModel on Android, by using aModel-View-Intent (MVI) architecture with the help of a Finite State Machine (FSM):
Managing the UI State by using a Finite State Machine and MVI architecture
In this story, I’ll guide you through the steps needed to upgrade this solution to the Kotlin Multiplatform Mobile (KMM) universe, where one can benefit from a common source, containing MVI+FSM, so that both platforms – Android and iOS -, can inherit its benefits making them only responsible for platform dependent implementations: the UI/UX.
Before we start, I’ll assume the reader has basic knowledge about KMM, how to setup a project, how to create common code, how to request platform specific implementations (expect/actual), and have read my previous article.
Platform prerequisites
Android:
Jetpack Compose and Flow (Job).
iOS:
SwiftUI and Combine (Publishers & Subscription).
Common prerequisites
After creating a new KMM project, we need to make sure we can use our FSM and MVI implementations.
FSM:
Tinder’s State Machine is not yet upgraded to be used as a multiplatform library, but luckily there’s a pull request (PR) with that implementation, which is quite simple actually. Until this PR is accepted and published, one option is to copy StateMachine.kt and add it to our project in the shared module.
note: If you wonder why can’t we take advantage of JitPack service, there’s an issue about it.
MVI:
Orbit Multiplatform library – you can guess it by its name -, is already multiplatform-ready. Orbit also provides us with a swift-gradle-plugin to generate .swift helper classes so we don’t have to worry about how things work under the hood. To listen for state changes we just consume an ObservableObject inside a View and the Combine/Flow communications and lifecycles are automatically managed for us.
note: at the time of writing, the authors are in the process of updating it for newer Kotlin versions. Right now it doesn’t work with versions starting from 1.6.0.
This plugin does the code generation heavy-lifting for us, but I believe we gain from knowing what’s happening behind the curtains, that’s why I’ll guide you through the logic of creating those classes. In the end, we’re not strictly dependent on it.
ViewModel:
To take advantage of a shared lifecycle scope – to launch a coroutine that will be cancelled when the ViewModel is cleared -, I’ll use IceRock’s moko-mvvm library ViewModel (dev.icerock.moko:mvvm-core:${latest-version}) as the parent class of our shared ViewModel (instead of the Android’s one).
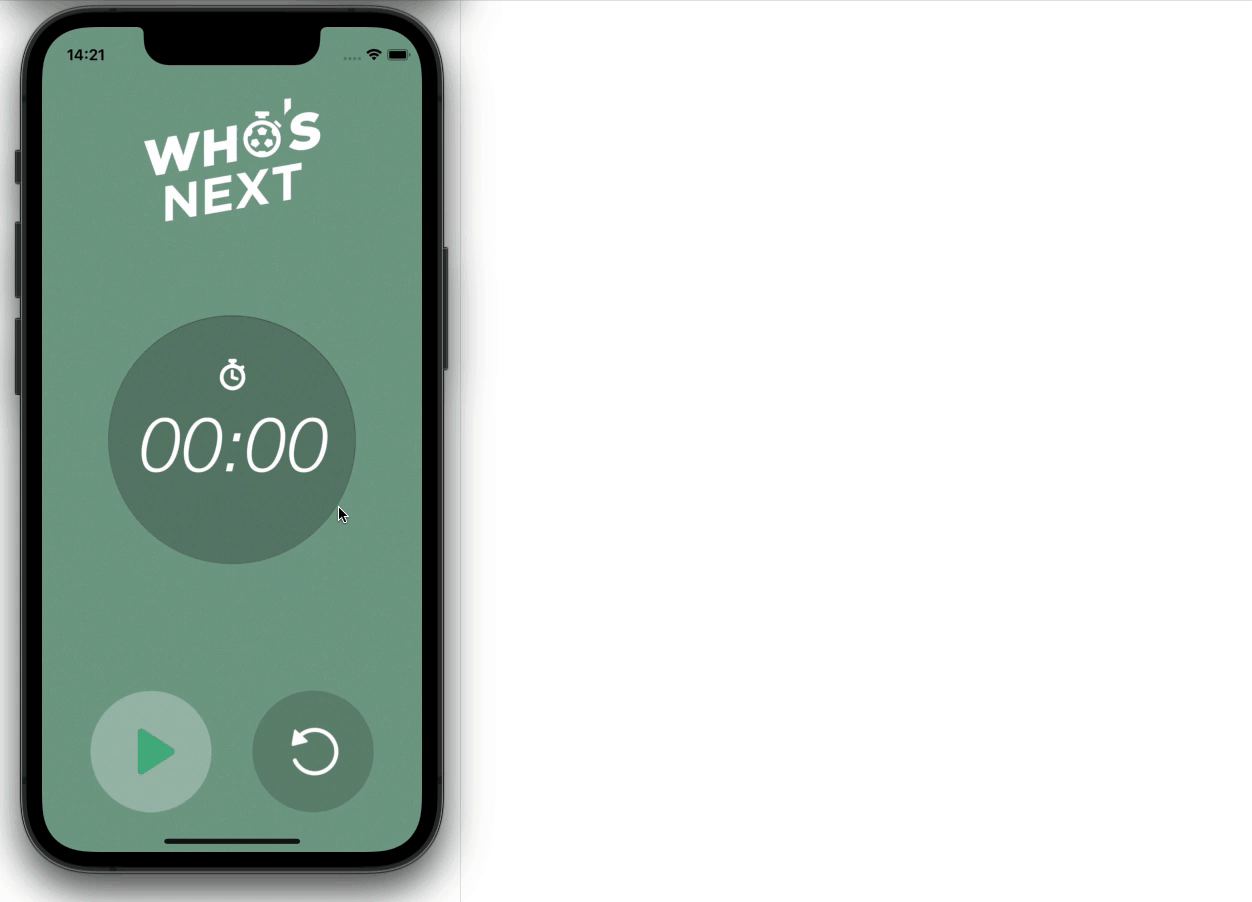
Who’s Next?!
I’ll be using the same project I’ve used in the previous article to illustrate this journey. As you can see below, the output is the same, and that’s because we’re taking advantage of the same business logic and architectural implementation – written, tested and validated once – leaving only the UI creation for each platform to implement. The beauty of KMM.

Android
iOS (screen recording with the simulator lags the animations)
Migration
Android UI’s it’s already done, we don’t need to change it.
The next steps are:
- Sharing the FSM+MVI architecture and the ViewModel;
- Handle Flow’s and Publisher’s lifecycles;
- Consume state changes on iOS.
All the FSM and MVI code will be moved to the commonMain folder inside the shared module:
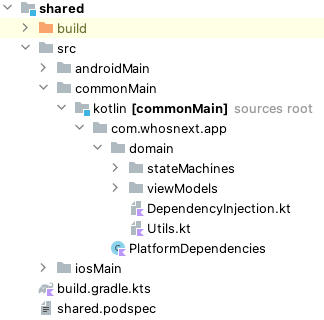
shared module
Sharing the ViewModel
Koin will help us with this task. First, we need to create a class where we’ll define the expect “rules”:
| expect fun platformModule(): Module | |
| object DependencyInjection { | |
| fun initKoin(appDeclaration: KoinAppDeclaration) { | |
| startKoin { | |
| appDeclaration() | |
| modules(commonModule(), platformModule()) | |
| } | |
| } | |
| internal fun commonModule() = module { ... } | |
| } |
commonMain
This class lives inside commonMain’s folder and it also contains the dependency injection initiation logic. Next, we need to create one for each platform with its actual implementation:
| actual fun platformModule() = module { | |
| viewModel { TimerViewModel() } | |
| } |
androidMain
| actual fun platformModule() = module { | |
| factory { TimerViewModel() } | |
| } | |
| object ViewModels : KoinComponent { | |
| fun timerViewModel() = get<TimerViewModel>() | |
| } |
iosMain
They are very similar, but on iOS’s implementation, we need to expose a getter for the ViewModel. On Android, Koin offers handy getViewModel extensions.
Architecture shared ✅
OUR VIDEO RECOMMENDATION


Jobs
Exposing a Job for a Publisher
To consume state emissions from our shared code we use Kotlin Flows, but we need to bridge the gap between them and the Swift Combine Publishers. The following code was based on the very enlightening article from John O’Reilly. It will help us achieve it and handle the Publisher’s lifecycle on the iOS side.
We start by creating an extension function that returns a background Job given a Flow:
| fun Flow<*>.subscribe( | |
| onEach: (item: Any) -> Unit, | |
| onComplete: () -> Unit, | |
| onThrow: (error: Throwable) -> Unit | |
| ): Job = | |
| this.onEach { onEach(it as Any) } | |
| .catch { onThrow(it) } | |
| .onCompletion { onComplete() } | |
| .launchIn(CoroutineScope(Job() + Dispatchers.Main)) |
iosMain
Next, inside iosApp, we need to create a Subscription that will hold the Flow and Job instances to manage the subscribe and cancel logic for us:
| import Combine | |
| import shared | |
| struct FlowPublisher<T: Any>: Publisher { | |
| public typealias Output = T | |
| public typealias Failure = Never | |
| private let flow: Kotlinx_coroutines_coreFlow | |
| public init(flow: Kotlinx_coroutines_coreFlow) { | |
| self.flow = flow | |
| } | |
| public func receive<S: Subscriber>(subscriber: S) where S.Input == T, S.Failure == Failure { | |
| subscriber.receive(subscription: FlowSubscription(flow: flow, subscriber: subscriber)) | |
| } | |
| final class FlowSubscription<S: Subscriber>: Subscription where S.Input == T, S.Failure == Failure { | |
| private var subscriber: S? | |
| private var job: Kotlinx_coroutines_coreJob? | |
| private let flow: Kotlinx_coroutines_coreFlow | |
| init(flow: Kotlinx_coroutines_coreFlow, subscriber: S) { | |
| self.flow = flow | |
| self.subscriber = subscriber | |
| job = SubscribeKt.subscribe( | |
| flow, | |
| onEach: { item in if let item = item as? T { _ = subscriber.receive(item) }}, | |
| onComplete: { subscriber.receive(completion: .finished) }, | |
| onThrow: { error in debugPrint(error) } | |
| ) | |
| } | |
| func cancel() { | |
| subscriber = nil | |
| job?.cancel(cause: nil) | |
| } | |
| } | |
| } |
Bridge between Flow and Publisher
All items received by the Flow will be forward to the subscriber. Also, when Flow‘s onComplete is called the subscriber will also complete. Consequently cancel() will be invoked and it will clear the subscriber and cancel the job.
If you remember, our MVI architecture is tied to the viewModelScope which means that when the ViewModel is cleared so it will the Flow and the Publisher.
Lifecycle handled ✅
Before continue to the next step, let’s add this handy extension:
| public extension Kotlinx_coroutines_coreFlow { | |
| func asPublisher<T: AnyObject>() -> AnyPublisher<T, Never> { | |
| (FlowPublisher(flow: self) as FlowPublisher<T>).eraseToAnyPublisher() | |
| } | |
| } |
The ObservableObject
The final step of this migration is exposing the UI State as a Published variable. To do so we’ll create a wrapper class that conforms with the ObservableObjectprotocol. That class will contain an instance from the shared ViewModel to expose it’s state and public methods:
| import SwiftUI | |
| import Combine | |
| import shared | |
| public class TimerViewModelObservableObject : ObservableObject { | |
| private var wrapped: TimerViewModel | |
| @Published private(set) var state: TimerUiState | |
| init(wrapped: TimerViewModel) { | |
| self.wrapped = wrapped | |
| state = wrapped.stateFlow.value as! TimerUiState | |
| (wrapped.stateFlow.asPublisher() as AnyPublisher<TimerUiState, Never>) | |
| .receive(on: RunLoop.main) | |
| .assign(to: &$state) | |
| } | |
| deinit { | |
| wrapped.onCleared() | |
| } | |
| func settingTime() { | |
| wrapped.settingTime() | |
| } | |
| func setTime(seconds: Int32) { | |
| wrapped.setTime(seconds: seconds) | |
| } | |
| //ramaining public functions... | |
| } |
ObservableObject wrapper
The following extension will become also quite handy:
| public extension TimerViewModel { | |
| func asObservableObject() -> TimerViewModelObservableObject { | |
| return TimerViewModelObservableObject(wrapped: self) | |
| } | |
| } |
ObservableObject extension
And to consume states in the View:
| import SwiftUI | |
| import shared | |
| struct TimerView: View { | |
| @StateObject private var viewModel = ViewModels().timerViewModel().asObservableObject() | |
| @State private var currentProgress: Float = 0.0 | |
| var body: some View { | |
| ZStack { | |
| //... | |
| CircularProgressView(progress: $currentProgress) | |
| if(viewModel.state.isRestarting) { | |
| //... | |
| } | |
| } | |
| .onReceive(viewModel.$state, perform: { new in | |
| currentProgress = new.progress | |
| }) | |
| } | |
| } | |
| struct CircularProgressView: View { | |
| @Binding var progress: Float | |
| //... | |
| } |
Now that we have the @Published var state at our disposal to be consumed we can choose to do it as a StateObject or ObservedObject. This example also illustrates two use-cases where we can query the state properties directly by viewModel.state.something or through a @State var when we need that property to behave like a State.
iOS consuming state changes ✅
The final step of this migration is completed.
Conclusions
In this article, we’ve learned how to migrate a platform working architecture into a KMM project in order to take advantage of its code-sharing philosophy. We’ve also deep-dived inside Orbit Multiplatform’s library swift-gradle-plugin and understood what classes are being generated, their purpose and how they work together.
I won’t be sharing Who’s Next!? project for now, but rest assured, I’ve created Expressus – a Kotlin Multiplatform Coffee Machine:
This project contains all the logic discussed in both of my articles and includes a little bonus 😉, take a look for yourself.
As always, I hope you find this article useful, thanks for reading.
🎉 Featured in Android Weekly #515 & Kotlin Weekly #299
This article was originally published on proandroiddev.com on April 19, 2022


