

Hello everyone!
We are continuing our series of articles about Kaspresso.
This is the first article from the advanced section, where we’ll talk about the details and nuances of the Kaspresso feature implementation.
If we compare the existing automation frameworks, the execution of ADB commands is often considered an advantage for Appium. But this is absent in Espresso and UI Automator.
 image from https://habr.com/ru/post/594017/
We tried to fix this in our Kaspresso framework and added an ADB Server, which is what we’ll be talking about.
So, let’s go. Espresso and UI Automator are the basis of Kaspresso, meaning that If we had switched out from Appium we would have lost our significant feature: interaction with the device via ADB.
So that raises the question: Why do we need ADB when passing tests? The answer is, ADB is not limited to only performing standard commands such as installing applications, downloading any files from the device, or installing system settings, but also many others.
For example, the engineers at Google made a command — adb emu, which works only with emulators. This command initiates a Telnet service on the emulator allowing you to manage the internal state of the device and do non-standard things such as:
- geo position setting;
- simulation of touching a fingerprint scanner;
- unstable internet connection;
- phone calls;
- sending sms;
- and many others.
This is all of the above — a complete emulation of system calls. In the application, you do not need to try to simulate the absence of the internet, because thanks to ADB, the system shows how this will happen on a real device.
So, we made sure that this is the real deal. Continuing.
Why is it possible to use adb in Appium, but not in Espresso?
The testing scheme using Appium looks like this:
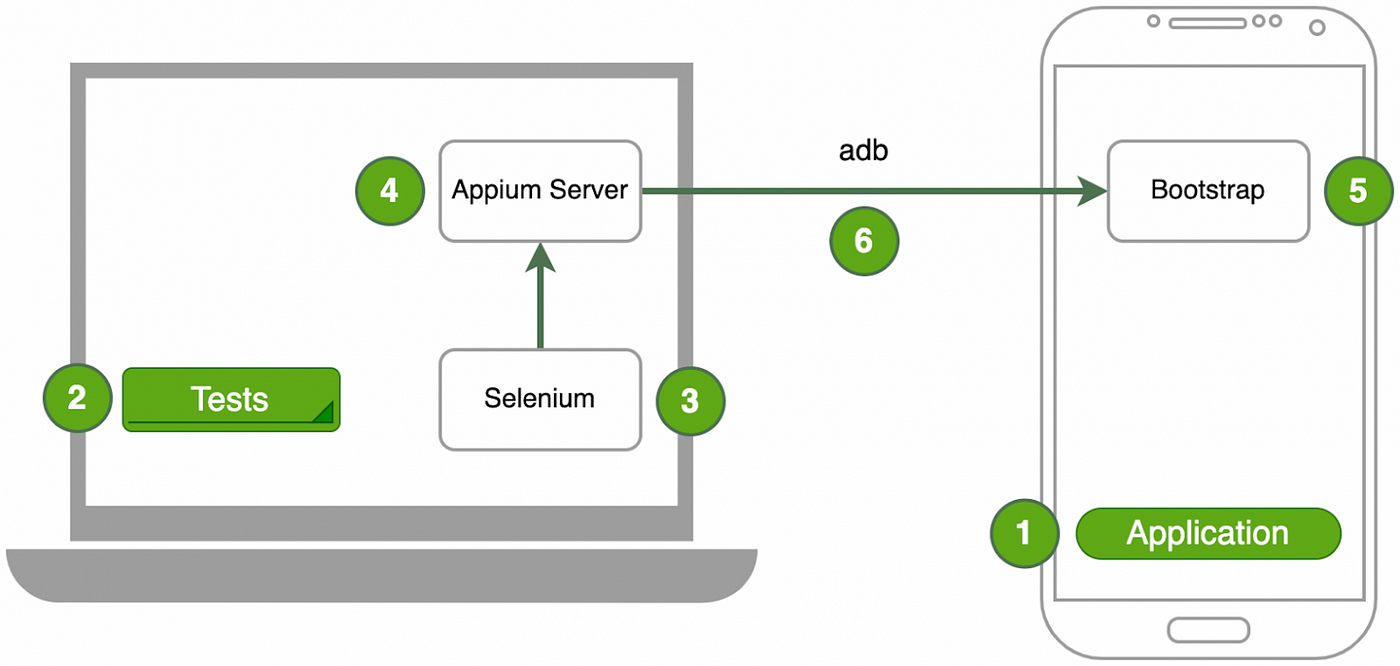
- The application that we are testing is installed on the device.
- The UI tests that we have covered our application are placed on the computer.
- Selenium is started.
- Selenium starts Appium Server.
- Appium Server installs Bootstrap on the device.
- Bootstrap communicates with Appium Server via ADB.
So, while tests are running, the computer and the mobile device communicate via ADB continuously. This allows us to use ADB in the tests we need.
What happens when we write tests using the Espresso framework?
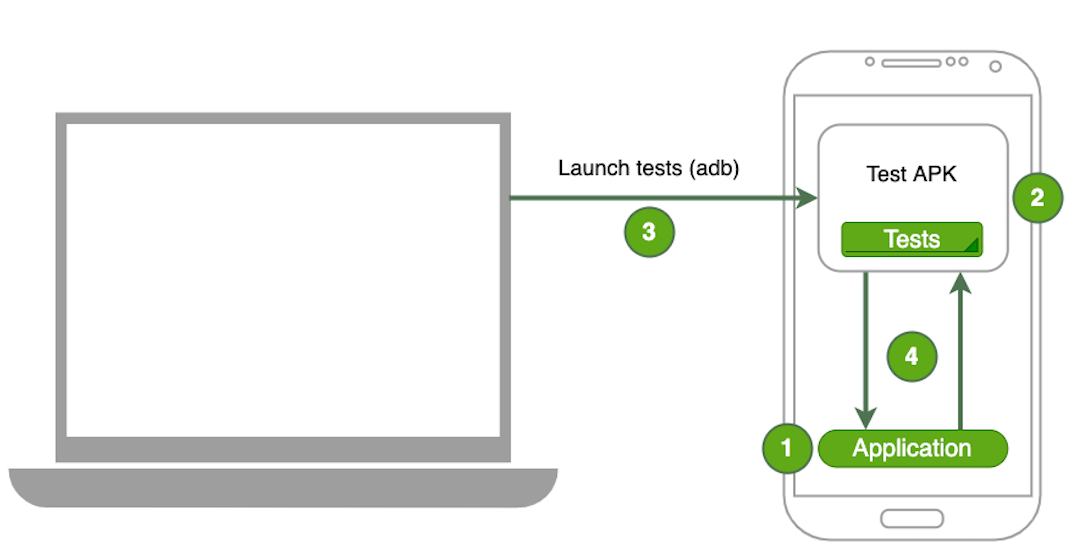
- The application that we are testing is installed on a mobile device.
- The test APK with tests is installed on the mobile device.
- The Run tests command is received from the computer via ADB.
- The application and the Test APK communicate with each other.
As we can see in this scheme, after running the tests, the computer does not participate in the process in any way, everything happens exclusively on the device’s side. Thus, we came to the conclusion that ADB cannot be used.
How can we compensate for the loss?
There was a moment of epiphany — to send an “Execute ADB command” action right from the test.
We had researched the documentation and found that a virtual router with a number of addresses starts on all emulators, one of such addresses being 10.0.2.2.
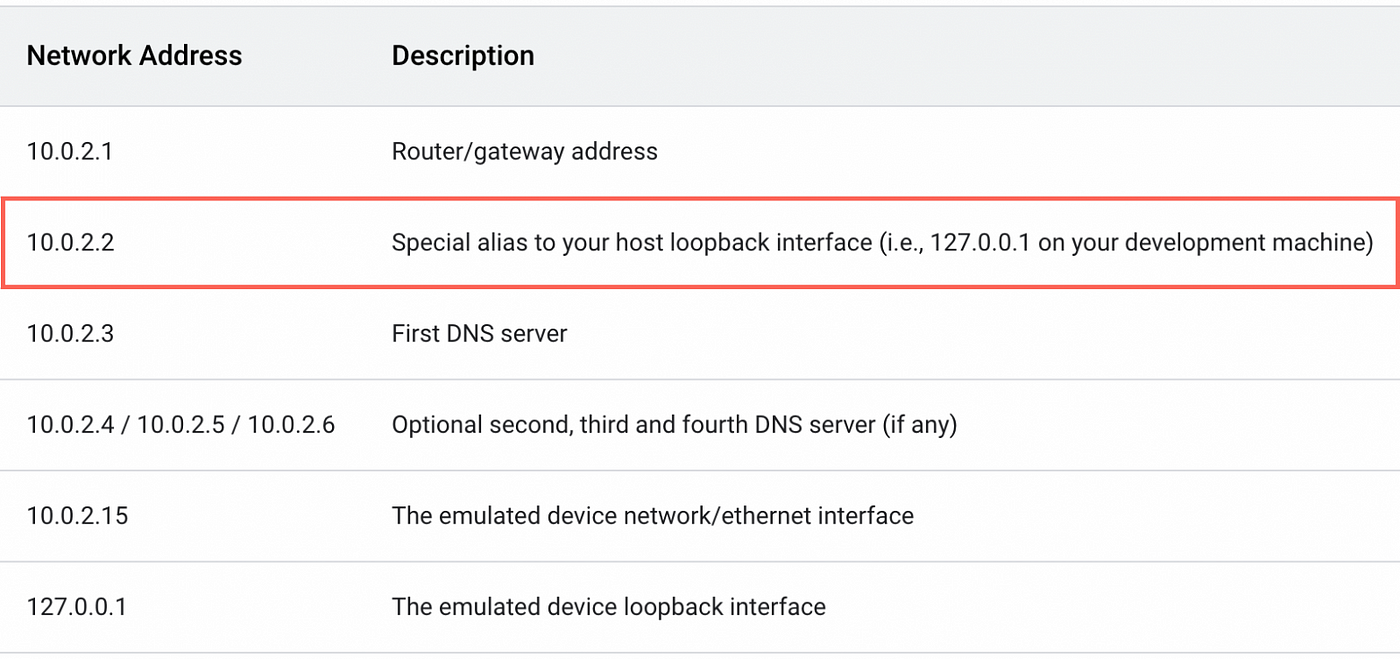
If you access the emulator through the 10.0.2.2 IP address, it will access your computer’s localhost. As soon as we discovered this, we tried to create a server through the Flask framework.
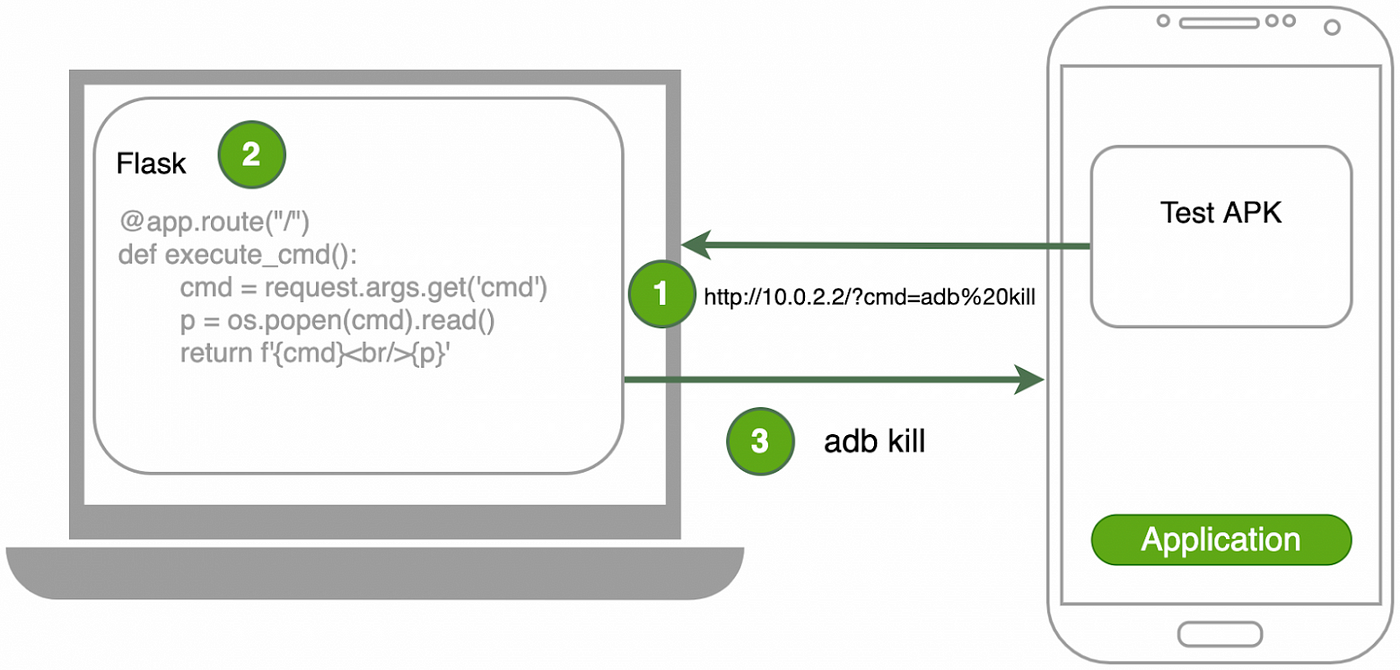
How we’ve imagined the interaction scheme:
OUR VIDEO RECOMMENDATION


Jobs
- On the device side, the application communicates through
http://10.0.2.2address, where the ADB command is specified in thecmdparameter. - On the computer side, a server running as the
localhostprocesses the request. - The ADB command specified in cmd is executed on the computer side.
We wrote the first tests, the ADB commands reached the computer, and the latter executed them. We were happy until…
 image from https://habr.com/ru/post/594017/
We did not encounter the “Turn off the internet” line in the test case
 image from https://habr.com/ru/post/594017/
Why was this happening?
As we well know, Android is based on Linux OS. So, if we have a scenario where Wi-Fi and mobile network are enabled, we can interact with the shell and retrieve information about active interfaces.
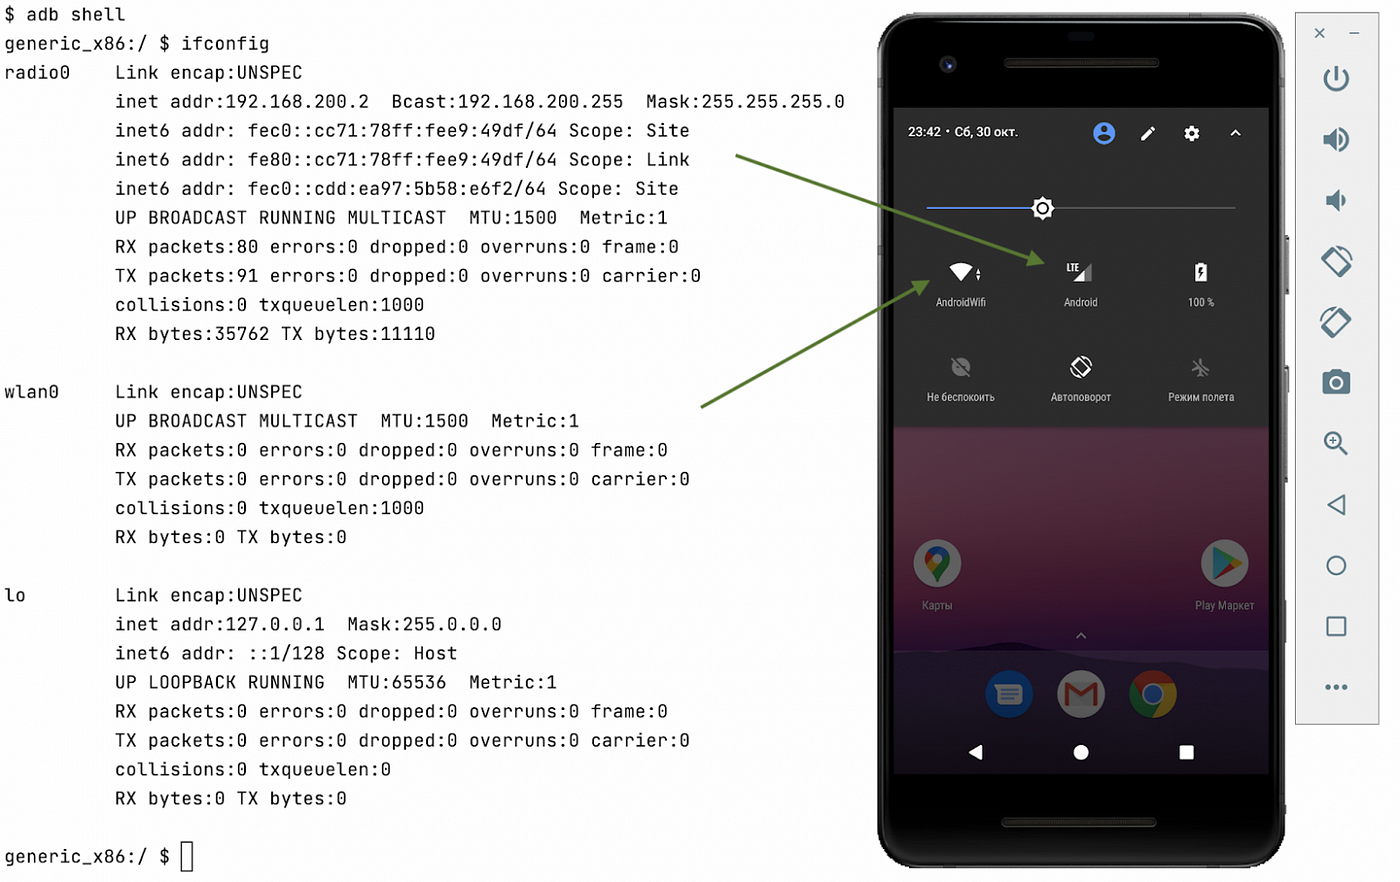
So, in addition to localhost, we have Wi-Fi [wlan0] and mobile data [radio0] interfaces.
But, as soon as we turn on the Airplane Mode button, the situation gets much worse.
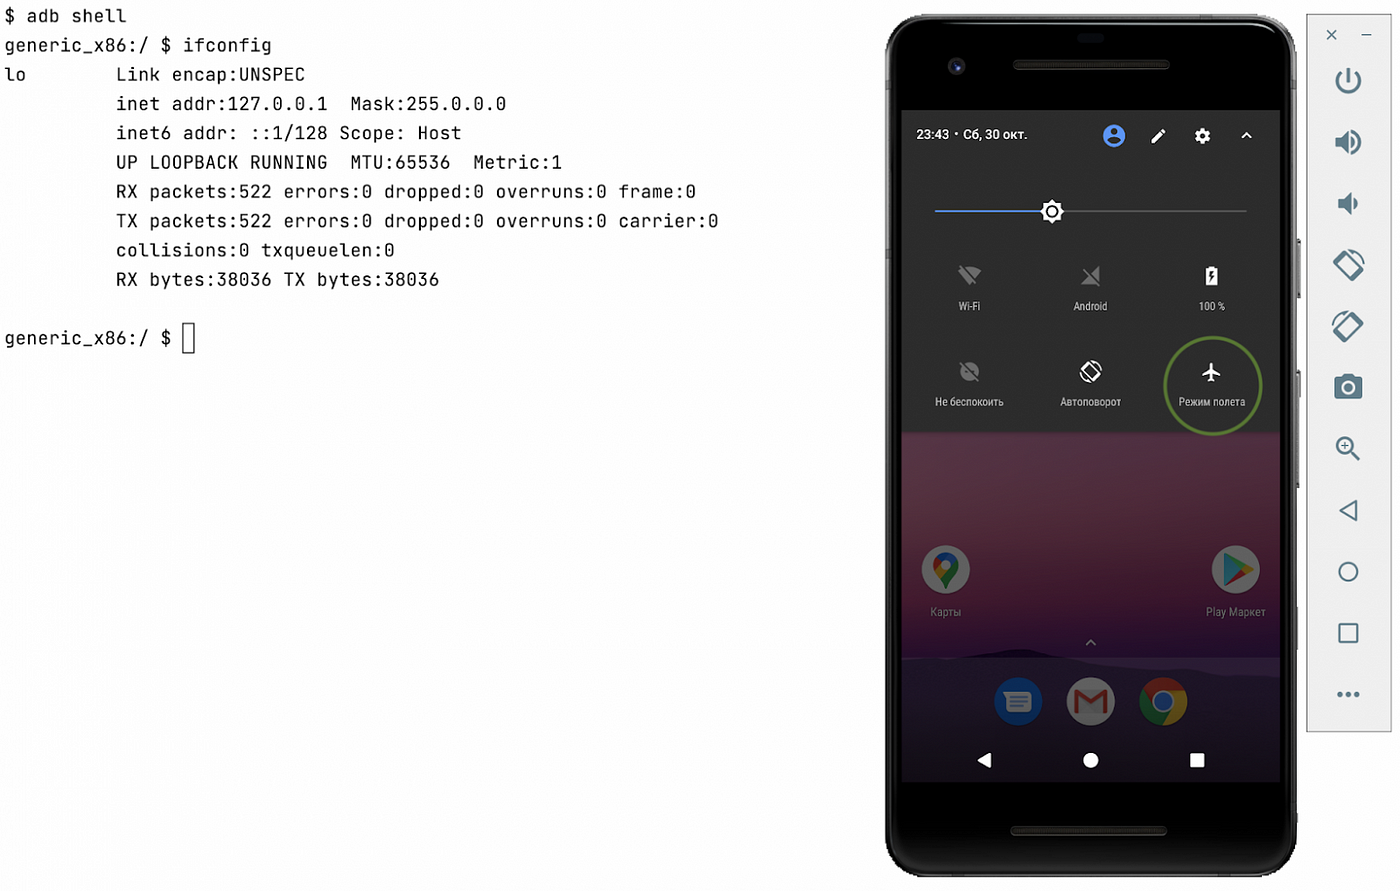
We lose the necessary interfaces, and those few remaining don’t allow us to work with a virtual router installed on emulators. We came to the conclusion that we had lost the important feature.
We turned to the documentation again and found a curious thing — port forwarding.
It works as follows:
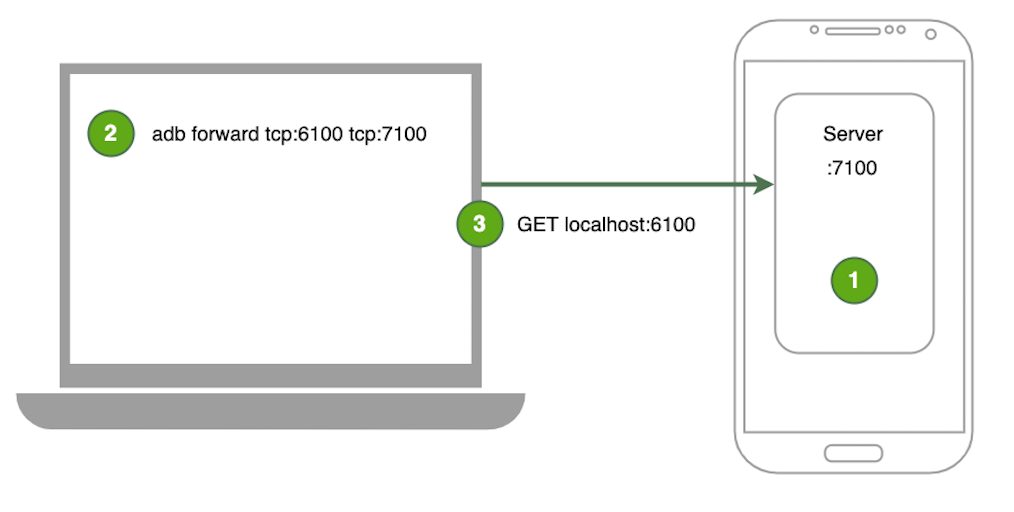
- The server is started on the device, as in this example, on the 7100 port.
- The command adb forward tcp:6100 tcp:7100 is executed on the computer side.
- We connect the computer to the specific
localhostaddress on port :6100 and get access to the server that was created on the mobile device.
What’s noteworthy is that port forwarding works in the complete absence of internet: ports are routed through whatever the emulator’s connection is. For example, if the device is connected via USB, the ports will be routed via USB; if connected via Wi-Fi, they will be routed via Wi-Fi. And it doesn’t matter which interfaces on the device are active at the moment.
Also, in contrast to the forward command, the adb reverse command exists. It allows you to make an HTTP request to the device’s localhost from the application placed on the device, but actually connect to the computer. That is, it does exactly the opposite.
However, this command has a limitation: it only works with Android 5.0. This didn’t suit us at all, as we had to test it on devices below Android 5.0.
The final scheme used in Kaspresso
Briefly about the main idea: we began starting adbserver-desktop.jar on the computer side. This is a client which helps manage connected devices. Kaspresso tests are executed on the devices. So the pair adbserver-desktop.jar on the computer side and Kaspresso on the device side ensure workflow for the scheme below:
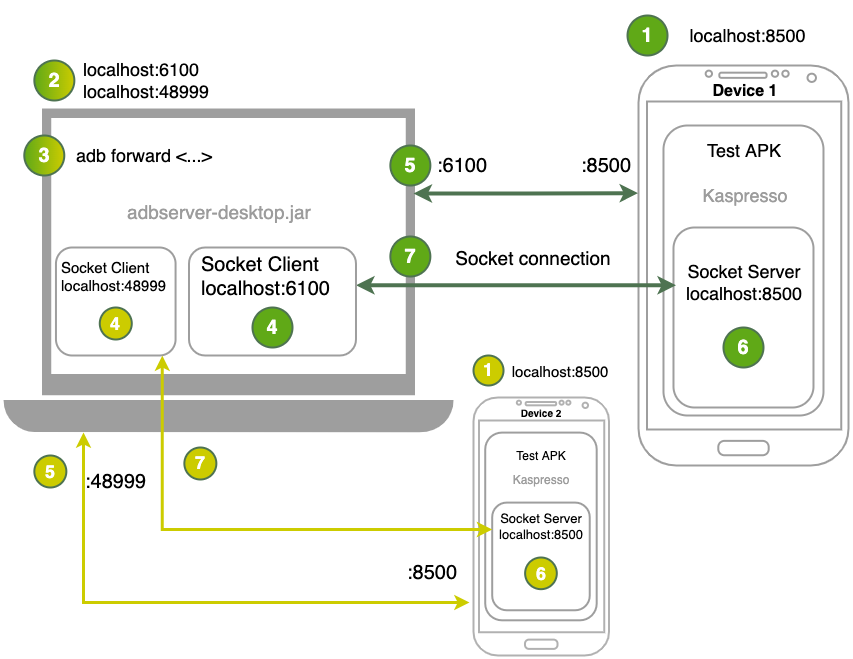
- We select the port of the device. There will always be one connection on the device side, so we can always set the same port. Let it be: 8500.
- There can be multiple connections to the computer since multiple devices can be connected to it at the same time. A unique free port from the range 6000..49000 is created for each connection. For example, we connect two devices, and select ports :6100 and :48999 for them respectively.
- On the computer, we push ports to each device using the commands:
adb -s device1 forward tcp:6100 tcp:8500
adb -s device2 forward tcp:48999 tcp:8500 - We create socket clients with the addresses localhost:6100 and localhost:48999 on the computer side. Just in case, a reminder that a socket connection between the client and the server occurs if the client and the server are placed at the same address. That is, the created clients are waiting for the start of socket servers at the localhost:6100 and localhost:48999 addresses as mentioned above.
- And now here comes the main trick. We have pushed ports :6100 and :48999 of the computer to port :8500 devices. This means that the created socket clients are actually waiting for the server at the localhost:8500 address on the device’s side, and not at the localhost:6100 and localhost:48999 addresses on the computer’s side.
- On each device, we start the socket server with the localhost:8500 address.
- We establish a socket connection on the device at the localhost:8500 address , where there is both a client and a server. At the same time, we remember that the socket client is physically located on the computer side (localhost:6100 and localhost:48999). Further communication takes place via a socket connection. It may happen that we may need to run an ADB command on the device. In this case, we inform the computer about that fact and transmit a string in the channel. The computer physically executes this command with the indication of the device and sends a response via the channel — a string with the status.
When the commands have been executed, the feedback comes from the server. Due to that fact, synchronicity is added to the scheme. And it’s also useful, for example, when we need to transfer large files, because we get feedback after executing the command.
Summary: Now we can execute ADB commands in Kaspresso if the device is connected to the computer in any way (via Wi-Fi, Bluetooth, or USB).
That’s it for now. Stay tuned!
Thanks to Руслан Мингалиев and Eugene Matsyuk
This article was originally published on proandroiddev.com on July 14, 2022


