

Before understanding the Strategy Design pattern one should appreciate what design patterns are and why we need them in the first place.
Design patterns are the solutions to the common problems in software design.
Aren’t they great as they are the solutions to common problems? Does this mean they are the silver bullet and can be anywhere directly?
The answer is No, they can’t. In the real world, you will have to learn and take inspiration from these solutions to solve your problem but they do help you with shaping your solution.
The intent and the approach of a design pattern help you to solve the problem at hand as you may or may not have to modify the design pattern to reach the solution.
Now coming to Strategy Design Pattern, what is it and why do we need it?
Strategy Design Pattern is a pattern with which we encapsulate a family of algorithms and makes them interchangeable.
The strategy pattern is based on a very important design principle that is, identify the aspects that vary and separate them from what remains the same.
So, what does this mean?
Let’s take 3 different problem statements and solve them using the strategy pattern.
- Sorting Algorithm (Domain Layer)
- Multiple Data Source (Data Layer — Fake/Local/Remote)
- OnClick Listener Strategy (UI Layer — Single/Multiple)
1. Sorting Algorithm
In this problem statement, we have two or more sorting algorithms and we can decide which one to use based on the user’s input.
For simplicity, let’s say we have two algorithms, bubble sort and merge sort.
| fun main() { | |
| val numbers = arrayOf(4, 56, 12, 79, 25, 2) | |
| sort("Bubble", numbers) | |
| } | |
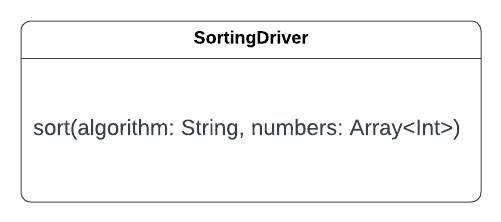
| fun sort(algorithm: String, numbers: Array<Int>) { | |
| if (algorithm == "Bubble") { | |
| println("Numbers are sorted using Bubble sort.") | |
| // bubble sort algorithm | |
| } else if (algorithm == "Merge") { | |
| println("Numbers are sorted using Merge sort.") | |
| // merge sort algorithm | |
| } else { | |
| throw IllegalArgumentException() | |
| } | |
| } |
The above code is a simple implementation of how we can use a different sorting algorithm based on the user’s input.
If you notice carefully, when we want to add/remove sorting algorithms, we’d have to update the else-if ladder to accommodate the changes.
So, I can say that the else-if ladder block is the piece of code that varies.
As per the principle, we have to encapsulate what varies.

| fun main() { | |
| val numbers = arrayOf(4, 56, 12, 79, 25, 2) | |
| sort("Bubble", numbers) | |
| } | |
| fun sort(algorithm: String, numbers: Array<Int>) { | |
| when (algorithm) { | |
| "Bubble" -> bubbleSort(numbers) | |
| "Merge" -> mergeSort(numbers) | |
| else -> throw IllegalArgumentException() | |
| } | |
| } | |
| fun bubbleSort(numbers: Array<Int>) { | |
| println("Numbers are sorted using Bubble sort.") | |
| } | |
| fun mergeSort(numbers: Array<Int>) { | |
| println("Numbers are sorted using Merge sort.") | |
| } |
Now, when we have to add/remove any algorithm, we’ll add another statement to the when block and add the method containing the sorting algorithm.
The last refactoring made our code look better but didn’t solve the initial issue, we still have to update the when block to run the selected algorithm.
Upon evaluating the methods of the algorithms, you notice that they are pretty much the same as they both take an array of numbers as an input, have a body with the implementation of the algorithm, and have no return type.
This means that we can extract the methods into an interface, say SortStrategy, and each implementation of the interface will have the respective sorting algorithm.
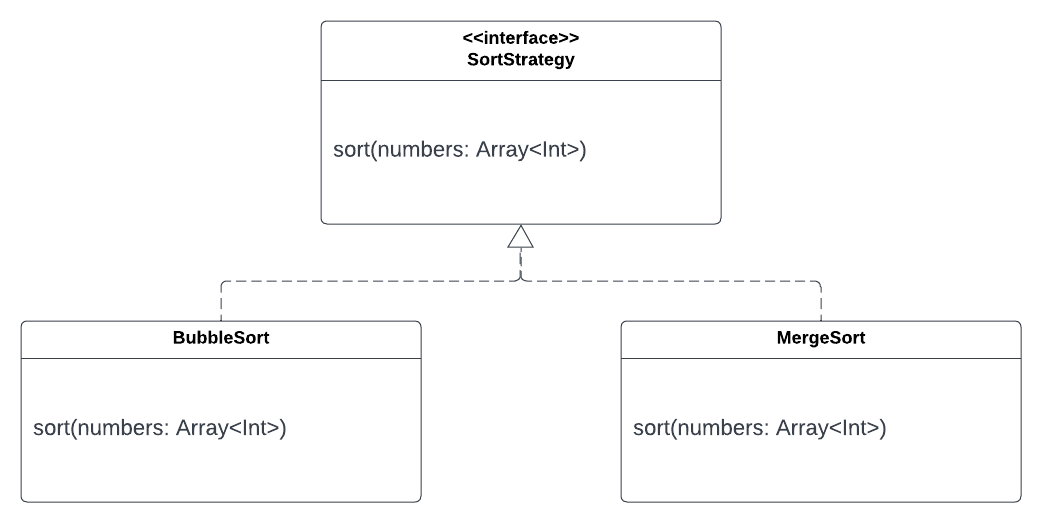
| interface SortStrategy { | |
| fun sort(numbers: Array<Int>) | |
| } | |
| class BubbleSortStrategy : SortStrategy { | |
| override fun sort(numbers: Array<Int>) { | |
| println("Numbers are sorted using Bubble sort.") | |
| } | |
| } | |
| class MergeSortStrategy: SortStrategy { | |
| override fun sort(numbers: Array<Int>) { | |
| println("Numbers are sorted using Merge sort.") | |
| } | |
| } |
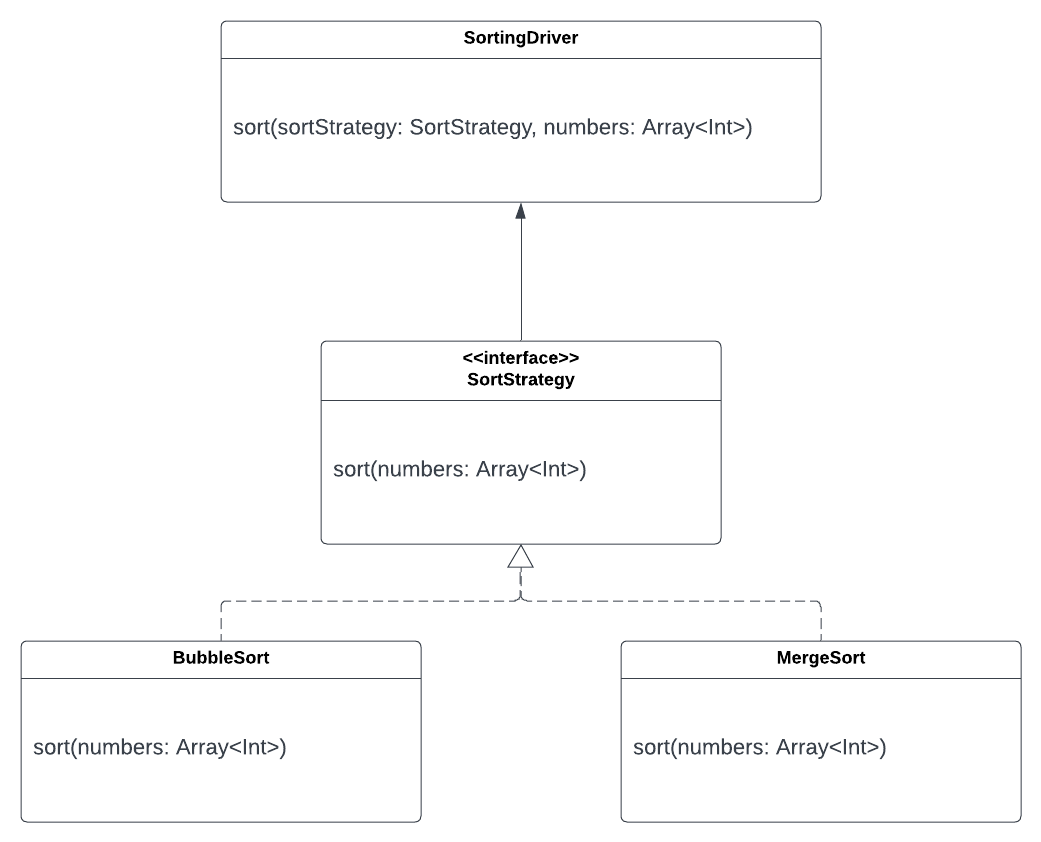
We can use this interface and pass it as an argument to the sort method in the driver.
| fun main() { | |
| val numbers = arrayOf(4, 56, 12, 79, 25, 2) | |
| sort(BubbleSortStrategy(), numbers) // Output: Numbers are sorted using Bubble sort. | |
| sort(MergeSortStrategy(), numbers) // Output: Numbers are sorted using Merge sort. | |
| } | |
| fun sort(sortStrategy: SortStrategy, numbers: Array<Int>) { | |
| sortStrategy.sort(numbers) | |
| } |
OUR VIDEO RECOMMENDATION


Jobs
Using the interface we have completely removed the conditional statements to select the sorting algorithm that will be used to sort the numbers.
Suppose we want to add/remove a sorting algorithm, say Insertion Sort, we can implement the SortStrategy interface with the Insertion Sort algorithm and pass it to the sort method.
Now, we are passing the sorting algorithm along with the numbers to sort them.
We have encapsulated the family of algorithms, here sorting algorithms, and made them interchangeable.
Bonus🎉: We have used all the SOLID principles in the above example.
2. Multiple Data Sources
In this problem statement, we have a repository that is responsible for saving the user data and we want to test the repository.
A simple UserRepositorywith the save method would look like this.
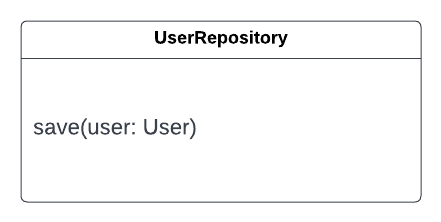
| class UserRepository { | |
| fun save(user: User) { | |
| // save the user by making an api call. | |
| } | |
| } |
Since the API call to save the user is right inside the repository, it is difficult to test the code in isolation with the fake or mocked results of the API call. This means that we cannot test the UserRepository properly.
In the above example, the code inside the save()is what varies, actual API call for the real data and mocked/fake implementation for testing.
This means that the code inside the save() method is what varies.
Now, that we have identified the part that varies, we have to encapsulate it and make it interchangeable.
Let’s create an interface UserDataSourcethat encapsulates the variable block of code.

| interface UserDataSource { | |
| fun save(user: User) | |
| } | |
| class RemoteUserDataSource : UserDataSource { | |
| override fun save(user: User) { | |
| println("Calling save in remote data source.") | |
| } | |
| } | |
| class FakeUserDataSource : UserDataSource { | |
| override fun save(user: User) { | |
| println("Calling save in fake data source.") | |
| } | |
| } |
Now, we can use these data sources in the UserRepositoryand the implementation of the data source will define its behavior.

| class UserRepository( | |
| private val userDataSource: UserDataSource | |
| ) { | |
| fun save(user: User) { | |
| userDataSource.save(user) | |
| } | |
| } |
The driver method would be
| fun main() { | |
| val user = User("Abhishek Saxena") | |
| val fakeUserDataSource = FakeUserDataSource() | |
| val userRepositoryWithFakeDataSource = UserRepository(fakeUserDataSource) | |
| userRepositoryWithFakeDataSource.save(user) // Calling save in fake data source. | |
| val remoteUserDataSource = RemoteUserDataSource() | |
| val userRepositoryWithRemoteDataSource = UserRepository(remoteUserDataSource) | |
| userRepositoryWithRemoteDataSource.save(user) // Calling save in remote data source. | |
| } |
Using strategy pattern we can easily swap between the various data sources, remote and fake.
This approach can even be used when you don’t have the APIs ready but want to work with local data sources. Simply create an implementation with the local or hard-coded data and name it as LocalUserDataSourceand pass it to the UserRepositoryuntil the APIs are ready.
3. OnClick Listener Strategy
In this problem statement, we have a button in the UI and we want to dynamically set the number of times the user needs to click the button to execute the operation.
Possible number of clicks
- None (Button is disabled)
- Single
- Multiple times (# of clicks can be fixed or random within a range)
Let’s mock a button.

The operation we want to execute when the button is clicked
| fun operation() { | |
| println("Operation Executed") | |
| } |
The driver to show click operation and set up button without Strategy Pattern would be
As you can see the button with a single click is pretty straightforward and we can easily create as many as we want. Still, the buttons with multiple clicks aren’t that easy to create as we’ll have to replicate the logic for multiple clicks every time we want to create such a button.
What if we want to create a button with multiple clicks but the number of clicks should be random in a range of numbers?
This would add more complexity while creating a button that was already difficult in the first place.
So, we can say that the part that varies in this problem statement is the number of clicks required to execute the operation.
To solve this, we will create OnClickStrategy and have multiple implementations for different numbers of clicks.
- Zero
- One
- Many
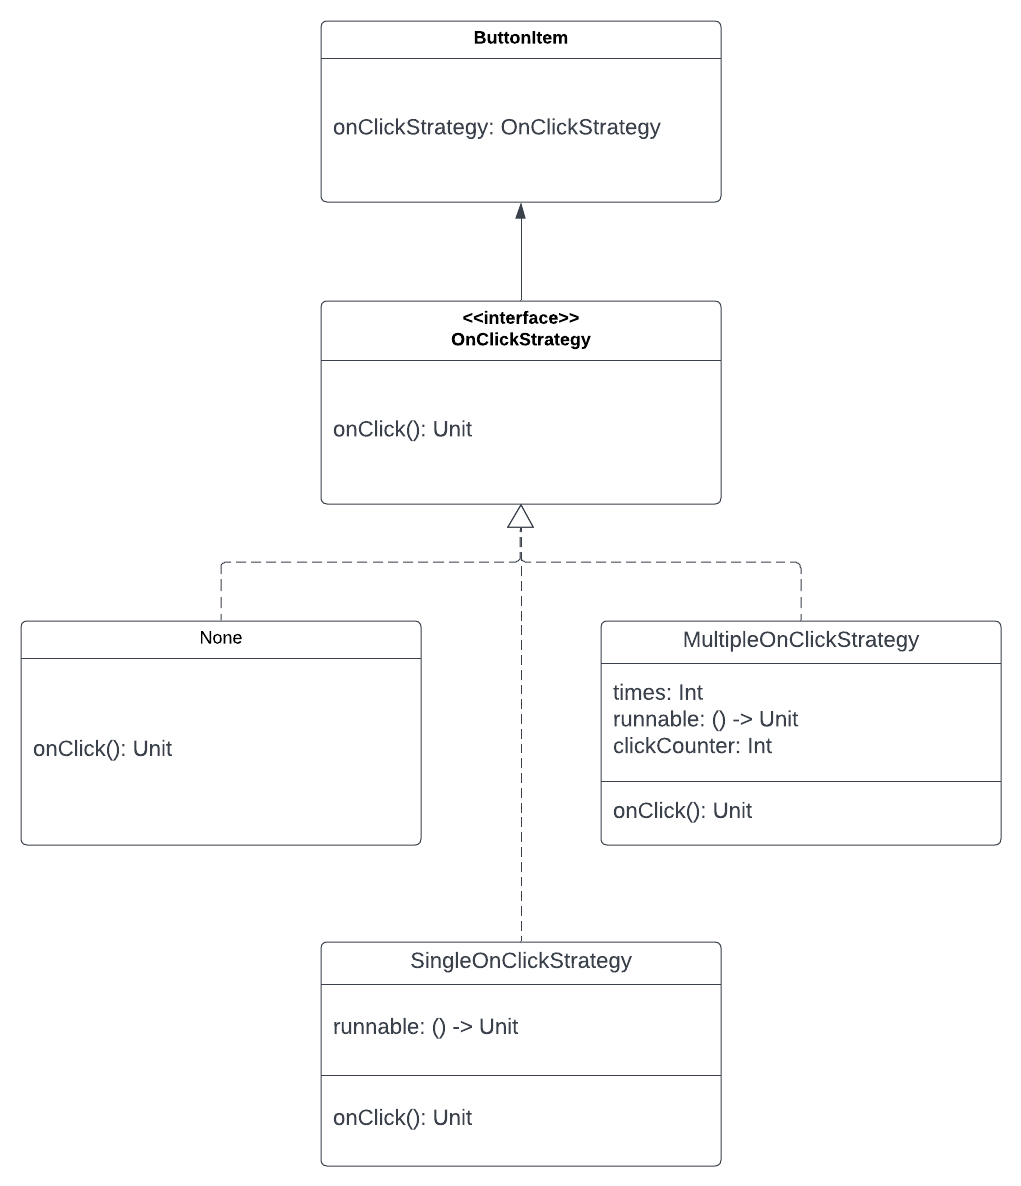
| interface OnClickStrategy { | |
| fun onClick() | |
| object None : OnClickStrategy { | |
| override fun onClick() = Unit | |
| } | |
| } |
SingleOnClickStrategy
| class SingleOnClickStrategy( | |
| private val runnable: () -> Unit | |
| ) : OnClickStrategy { | |
| override fun onClick() = runnable() | |
| } |
MutlipleOnClickStrategy
| class MultipleOnClickStrategy( | |
| private val times: Int, | |
| private val runnable: () -> Unit | |
| ) : OnClickStrategy { | |
| private var clickCounter = 0 | |
| override fun onClick() { | |
| incrementClickCounter() | |
| if (clickCounter == times) { | |
| resetClickCounter() | |
| runnable() | |
| } | |
| } | |
| private fun incrementClickCounter() { | |
| clickCounter++ | |
| } | |
| private fun resetClickCounter() { | |
| clickCounter = 0 | |
| } | |
| } |
We would also need a ButtonItemto hold the strategy for the button
Let’s assume that you’re using a component-based UI framework – Flutter, React, or Android’s Jetpack Compose.
I am using Android’s Jetpack Compose for this example but the same can be replicated in the other frameworks.
UIButton composable
The ViewModel and the Screen composable
| class ViewModel { | |
| val noClickButtonItem = ButtonItem() // Button with OnClickStrategy.None | |
| val singleClickButtonItem = ButtonItem(onClickStrategy = SingleOnClickStrategy(runnable = ::operation)) | |
| val multipleClickButtonItem = | |
| ButtonItem(onClickStrategy = MultipleOnClickStrategy(times = 3, runnable = ::operation)) | |
| } | |
| @Composable | |
| fun HomeScreen(viewModel: ViewModel) { | |
| // The user's click behavior is mocked in the `also` block. | |
| UIWithButton(viewModel.noClickButtonItem).also { | |
| it.click() // No Output | |
| } | |
| UIWithButton(viewModel.singleClickButtonItem).also { | |
| it.click() // Output: Operation Executed | |
| } | |
| UIWithButton(viewModel.multipleClickButtonItem).also { | |
| it.click() | |
| it.click() | |
| it.click() // Output: Operation Executed | |
| } | |
| } |
Note: the user’s click behavior is mocked using the also block.
We have used multiple strategies for the buttons on the UI and these strategies can be added to any button on the screen without duplicating the code for the onClick behavior.
What’s next🤔?
- How you can use the Strategy Design Pattern in your existing code?
- How can you make UI components more customizable with the Strategy Design Pattern? (Refer to problem statement #3 for hints)
Conclusion
The Strategy Design Pattern is very strong and useful. It can be used anywhere as we used it in the domain layer, data layer as well as UI layer. The implementation of this pattern adheres to the SOLID principles and helps developers to write maintainable, reusable, and flexible code.
How do you solve a similar problem in your project? Comment below or reach out to me on Twitter or LinkedIn.
Thank you very much for reading the article. Don’t forget to 👏 if you liked it.
This article was originally published on proandroiddev.com on August 02, 2022


