

Hey everyone, I want to share more of Kotlin Multiplatform Mobile Content since it is much more stable now. I am building this side project as a learning knowledge-sharing example and will focus on something other than the UI/UX.
The main goal is to give you an overall understanding of the project. I will be sharing a step-by-step hands-on project that will help you understand the basics of the KMM.
Environment Setup
1. Install Kotlin Multiplatform Mobile Plugin [Link]
We first need to add this Kotlin Multiplatform Mobile Plugin, which will do the heavy lifting and set up the project for us. I will be using Android Studio: Hedgehog, jdk 17 and Xcode. After adding the plugin restart Android Studio and click on create new project. It would be great if you could use kdoctor which ensures that all required components are properly installed and ready for use. If something is missed or not configured, KDoctor highlights the problem and suggests how to fix the problem.
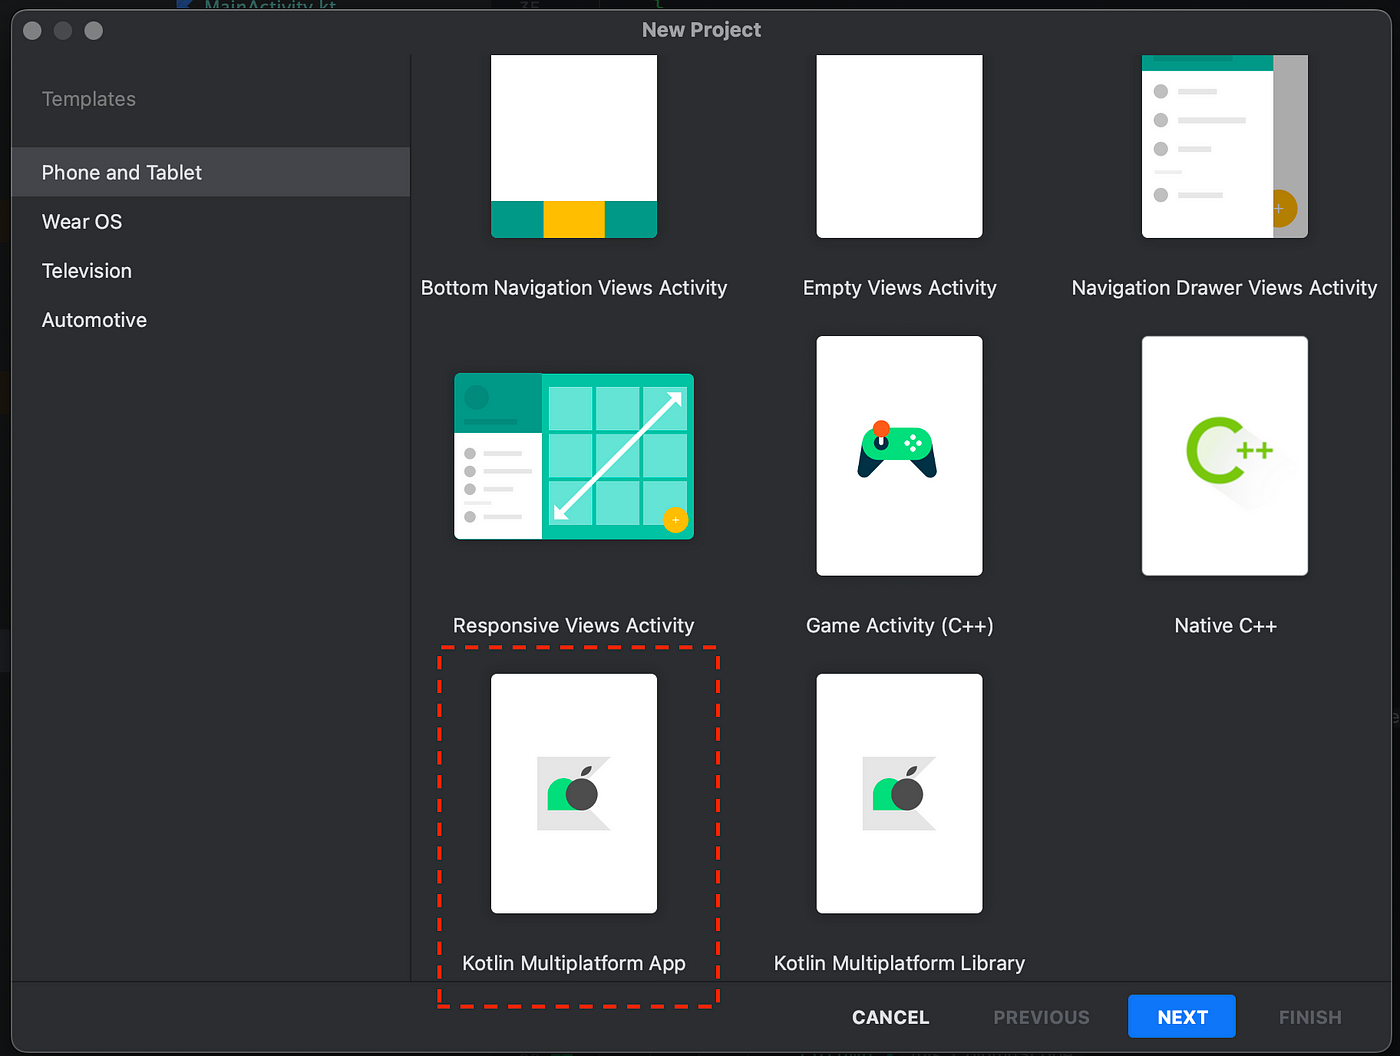
2. Project Creation
- Now you will find a new template in this section select
Kotlin Multiplatfrom Appand click on next.
- Next, give the name of your app in our case
Animax, you can change the package name and minimum SDK version according to your need and click on next. - Finally, I will advise you to keep everything be same just change the iOS framework distribution to
CocoaPods Dependency Manger (Must do this) and click on finish. - Wait for a good amount of time 🙂
3. Starting Up and Basic Overview
After you are done with the Gradle setup you will have a project structure which you must be familiar with. Think of it as a multimodule project, you will have modules for androidApp, iosApp and shared.
As the name suggests the shared will have the logic and the shareable portion of the application, the network, the local database and their respective implementation. The shared module can be further divided into androidMain, iosMain and commonMain. androidMain and iosMain contain the Android and iOS-specific implementation we will discuss more of it when we dive into the coding.
Background Context
Before we start coding we need to understand how the data flows in a KMM App. In this example, we are trying to build an app which makes an API call and renders the details on the screen. So we can divide the app into two phases, the Data Transaction Layer and the UI Rendering Layer.

- The UI Rendering Layer is simply a dumb layer on the respective platform which just renders the data and is not aware of where the data is coming from, we will be using Jetpack Compose and Swift on this layer.
- The Data Transaction Layer will mostly focus on how to access the required data, from API, local database or common business logic. It also focuses on platform-specific implementation like determining which implementation of the function to take based on the platform the user is using.
Kotlin Official Site
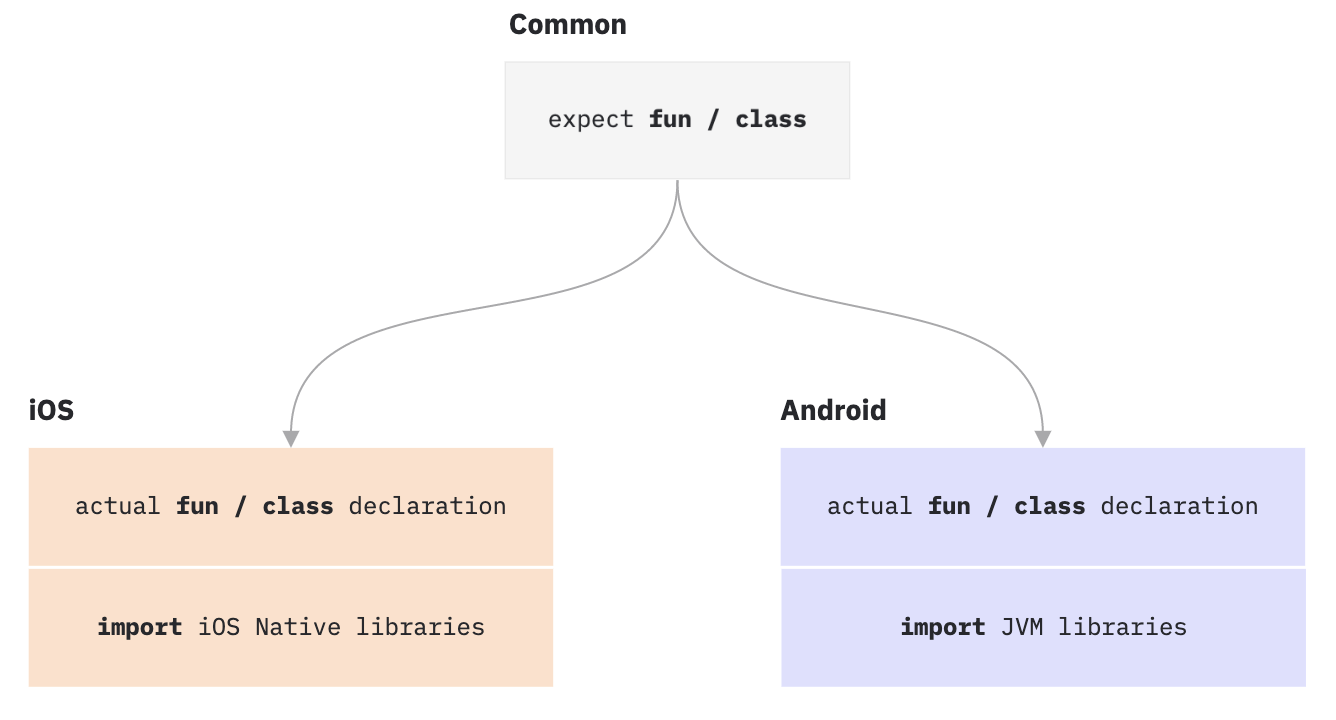
We will use the special keywords expectand actualin a scenario where there will be different implementations based on the platform, in this instance the API Client. With this technique, the anticipated declaration is defined commonMain, and platform source sets are required to supply the actual declaration that matches the expected declaration. The compiler makes sure that every declaration in the common module marked with the expectkeyword has the matching declarations in all platform modules tagged with the actualkeyword.
The shared module is imported as a part of the dependency in both build.gradle.kts and Podfile
Building KMM App 🚀
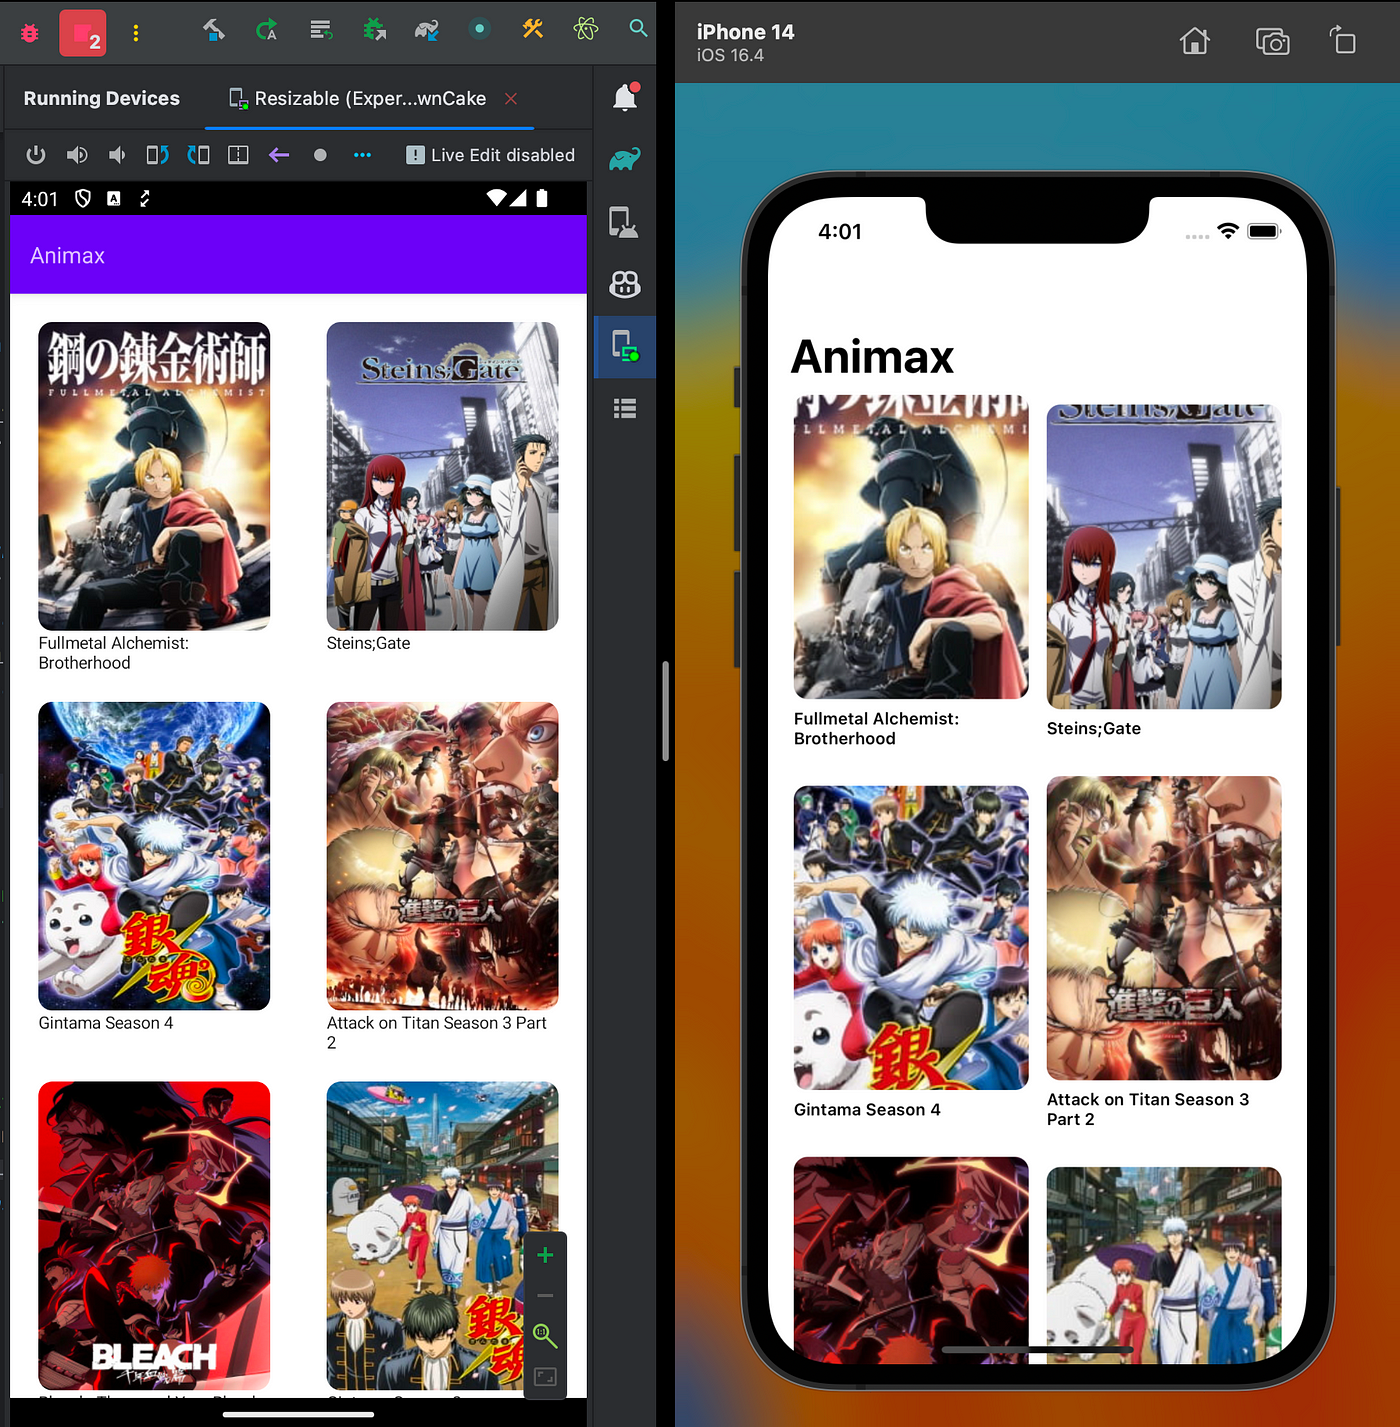
Will be building a simple app which will make an API call and rending the image. Here is the project, you can check out the code here.
The Open API that we will be using for getting the anime response.
OUR VIDEO RECOMMENDATION


Jobs
- Dependencies Setup: We will start by adding dependencies to the
commonMaininbuild.gradle [code preview]. We will add platform-specific, dependencies toandroidMainandiosMainin this case, we have added the dependency for Ktor client.
//Common Dependencies with go under commonMain
val commonMain by getting {
            dependencies {
                implementation("io.ktor:ktor-client-core:$ktorVersion")
                implementation("org.jetbrains.kotlinx:kotlinx-coroutines-core:1.7.3")
                implementation("org.jetbrains.kotlinx:kotlinx-serialization-json:1.5.0")
                implementation("io.ktor:ktor-client-content-negotiation:$ktorVersion")
                implementation("io.ktor:ktor-serialization-kotlinx-json:$ktorVersion")
            }
        }

//Adding Android Specific client
val androidMain by getting {
            dependencies {
                implementation("io.ktor:ktor-client-okhttp:$ktorVersion")
            }
        }

//Adding iOS Specific client
val iosMain by creating {
            dependsOn(commonMain)
            iosX64Main.dependsOn(this)
            iosArm64Main.dependsOn(this)
            iosSimulatorArm64Main.dependsOn(this)
            dependencies {
                implementation("io.ktor:ktor-client-darwin:$ktorVersion")
            }
        }
- API Client Setup: Making API Client will be simple. We have already discussed
expectkeyword which provides us with the required platform-specific implementation [code preview]. In this casehttpClient() is expected to return a platform-specificHttpClientinstance, which is further user to add configuration, regarding JSON formatting. We will be usingnetworkClientto make API calls in the later state.
/*
  File Name: NetworkClient.kt
  Location: shared/src/commonMain/kotlin/com.debanshu.animax
*/

expect fun httpClient(config: HttpClientConfig<*>.() -> Unit = {}):HttpClient

val networkClient:HttpClient = httpClient {
    install(ContentNegotiation){
        json(Json {
            prettyPrint = true
            isLenient = true
            ignoreUnknownKeys = true
        })
    }
}
We will now make the actual function to implement the httpClient() under these specified locations mentioned below, this is the actual platform-specific implementation of how the client object is created.
/*
  File Name: OkhttpNetworkClient.kt
  Loaction: shared/src/androidMain/kotlin/com.debanshu.animax
*/
actual fun httpClient(config: HttpClientConfig<*>.() -> Unit)= HttpClient(OkHttp){
    config(this)
    engine {
        config {
            retryOnConnectionFailure(true)
            connectTimeout(0,TimeUnit.SECONDS)
        }
    }
}
/*
  File Name: DarwinNetworkClient.kt
  Loaction: shared/src/iosMain/kotlin/com.debanshu.animax
*/
actual fun httpClient(config: HttpClientConfig<*>.() -> Unit)= HttpClient(Darwin) {
    config(this)
    engine {
        configureRequest {
            setAllowsCellularAccess(true)
        }
    }
}
- Building API call Setup: We will be following a bit of Clean architecture here, by dividing each use case. In our cases, we have only one use case i.e., to get popular anime. To make it extendable we will make an abstract
BaseUsecaseand then we can simply implement it asGetTopAnimeUsecase. We will also put model cases hereTopAnimeResponseis a model class insideshared/src/commonMain/kotlin/com.debanshu.animax/model[code preview]
/*
  File Name: BaseUseCase.kt
  Loaction: shared/src/iosMain/kotlin/com.debanshu.animax/usecase
*/
abstract class BaseUseCase<REQUEST,RESPONSE> {
    @Throws(Exception::class)
    abstract suspend fun execute(request: REQUEST):RESPONSE
}
/*
  File Name: GetTopAnimeUseCase.kt
  Loaction: shared/src/iosMain/kotlin/com.debanshu.animax/usecase
*/
class GetTopAnimeUseCase : BaseUseCase<Unit, TopAnimeResponse>() {
    override suspend fun execute(request: Unit): TopAnimeResponse {
        val response= networkClient.get("https://api.jikan.moe/v4/top/anime")
        return response.body()
    }
}
- Building UI: We will not focus much on this as it is not the focus of the current tutorial, we will just understand how we can access the shared code in our native UI. For both Android and iOS
GetTopAnimeUsecaseis the direct way to access and trigger the function. This is obviously not the ideal way to access the data in the app, but it is for demonstration purposes.
/*
For Android
Location: androidApp/src/main/java/com.debanshu.animax.android/MainActivity.kt
*/
.....
var animeList by remember {
        mutableStateOf(emptyList<Anime>())
    }
    LaunchedEffect(true) {
        scope.runCatching {
            GetTopAnimeUseCase().execute(Unit)
        }.onSuccess { remoteAnime ->
            animeList = remoteAnime.data
        }.onFailure {
            Log.d("Failed", "Network error")
        }
    }
....

/*
For iOS
Loaction: iosApp/iosApp/ContentView.swift
*/
.....
 GetTopAnimeUseCase().execute(request: KotlinUnit()){ topAnimeRespose, error in
                guard let animeList = topAnimeRespose?.data else {return}
                DispatchQueue.main.async {
                    self.topAnimeList=animeList
                }
            }
.....
Finally, we are done with a basic example of Kotlin Multiplatform Mobile✨.
For any doubts and suggestions, you can reach out on my Instagram, or LinkedIn. Follow me for Kotlin content and more. Happy Coding!
I will well appreciate one of these 👏
Recent Posts
This article was previously published on proandroiddev.com


