

Unlock the potential of these advanced techniques to elevate your smartwatch app design and functionality to new heights.

If you’re developing an application for WearOs you’ve surely come across the Scaffold showing the TimeText():

What if you wanted to put custom text instead of time, and maybe not at the top but with a specific starting angle?
Well, then in that case the guide is made just for you! and is made in Jetpack Compose!
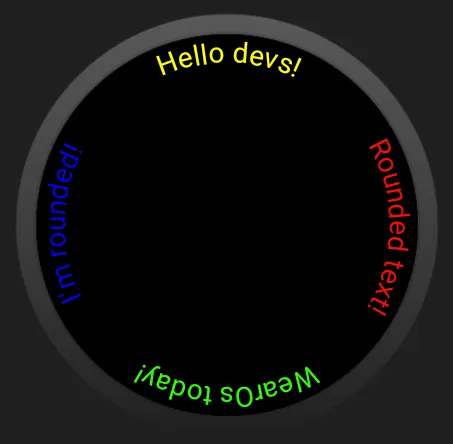
To achieve the effect you see above, thus being able to create your custom curved text at the position of your choice, in Jetpack Compose, you can take advantage of the CurvedLayout with the curvedText.
1. As first make sure you have the dependencies in your module:
implementation("androidx.wear.compose:compose-material:1.2.1")
  implementation("androidx.wear.compose:compose-foundation:1.2.1")
2. Then, create the composable function that allows you to write the text :
@Composable
private fun MyCoolCurvedText(anchor: Float, color: Color, text: String) {
    CurvedLayout(
        anchor = anchor,
        anchorType = AnchorType.Center,
        modifier = Modifier.fillMaxSize(),
    ) {
        curvedRow(
        ) {
            curvedText(
                text = text,
                style = CurvedTextStyle(
                    fontSize = 14.sp,
                    color = color
                )
            )
        }
    }
}

//required imports:
//import androidx.wear.compose.foundation.AnchorType
//import androidx.wear.compose.foundation.CurvedLayout
//import androidx.wear.compose.foundation.CurvedTextStyle
//import androidx.wear.compose.foundation.curvedRow
//import androidx.wear.compose.material.curvedText
Of course, you can customize it to your liking, and put in more items according to your needs
3. Use it inside your UI
class MainActivity : ComponentActivity() {
    override fun onCreate(savedInstanceState: Bundle?) {
        super.onCreate(savedInstanceState)
        setContent {
            Box(Modifier.fillMaxSize()) {
                MyCoolCurvedText(
                    anchor = 0f,
                    color = Color.Red,
                    text = "Rounded text!"
                )
                MyCoolCurvedText(
                    anchor = 90f,
                    color = Color.Green,
                    text = "WearOs today!"
                )
                MyCoolCurvedText(
                    anchor = 180f,
                    color = Color.Blue,
                    text = "I'm rounded!"
                )
                MyCoolCurvedText(
                    anchor = 270f,
                    color = Color.Yellow,
                    text = "Hello devs!"
                )
            }
        }
    }
}
And there you have it!
If you are interested in more WearOs Jetpack Compose Android tips let me know in the comments!
My advice is to always follow the official guidelines and clean code writing guidelines.
If you like my article, please don’t forget to click 👏👏👏 to recommend it to others 👏👏👏.
Feel free to ask questions, make comments, or propose a better solution. Don’t forget to follow me on Twitter and GitHub!
This article was previously posted on proaandroiddev.com


