


Ever felt like your coding routine could use a boost? IDEs offer a range of tools to make software development a breeze, from compiling and debugging to editing applications and beyond. However, it’s easy to miss out on some game-changing features. In this article, I’ll introduce you to four valuable editor-based tools in Android Studio/IntelliJ IDEA that might not be widely known among developers. Let’s explore these tools together and see how they can enhance your development experience.
Most of the features introduced here are also available in IntelliJ IDEA. In fact, They belong to IntelliJ IDEA!
1. Live Templates
https://miro.medium.com/v2/resize:fit:750/format:webp/1*2rH1zyHJG3owHxpsjVN9mw.gif
You’ve probably noticed that when you type main in a top-level Kotlin file and hit Tab, Android Studio inserts fun main() {} into your file. Similarly, typing comp results in the insertion of @Composable fun FUNCTION_NAME() {} giving you the flexibility to specify a name for your composable function. Live Templates enables us to do that, allowing us to effortlessly insert common code snippets by simply using an abbreviation. Generally, Live Templates supports three types of templates:
- Simple templates: These contain only fixed plain texts. For instance,
soutinsertsprintln()in a Kotlin file. - Parameterized templates: These include variables that are replaced either by user inputs or automatically calculated values by the IDE. For example, using
logdinside a function calledonCreateinsertsLog.d(TAG, "onCreate: ")and allows you to enter your desired log message. Here, the enclosing function name is automatically inserted by the IDE. - Surround templates: These wrap a block of selected code with the text you’ve specified. For example, you can create a live template to wrap the selected code inside a
try/catchblock. You can view the list of available Surround Templates by selecting a block of code and pressingCMD+Option+Jon macOS orCtrl+Alt+Jon Windows.
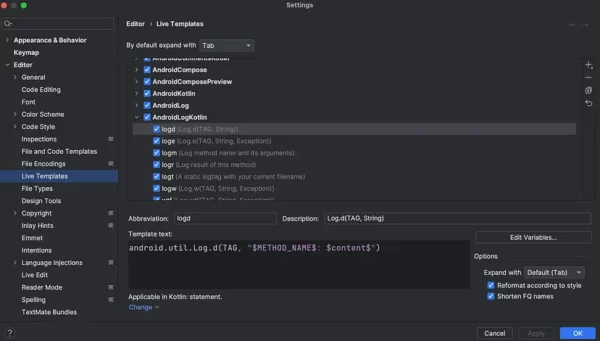
Now, let’s customize one of the available live templates to see how it works. As explained in the Parameterized Templates section, typing logd inside a function results in the insertion of Log.d(TAG, "FUNCTION_NAME: "). Personally, I use a custom tag when debugging and I want to tailor it to my preference. To do so:
- Navigate to Setting | Editor | Live Template. Here, you’ll find a comprehensive list of available live templates grouped by category. feel free to view, edit, remove existing ones, or add new ones. Based on the language you use (Java or Kotlin), expand the AndroidLog or AndroidLogKotlin category and click on the
logditem.
- Here you can view or edit all settings of the live template, such as the abbreviation key, description text, applicable context(for example, Kotlin, Java, etc.) and the template text. Two parameters are used here. Click on the Edit Variables button to observe how these parameters are replaced.
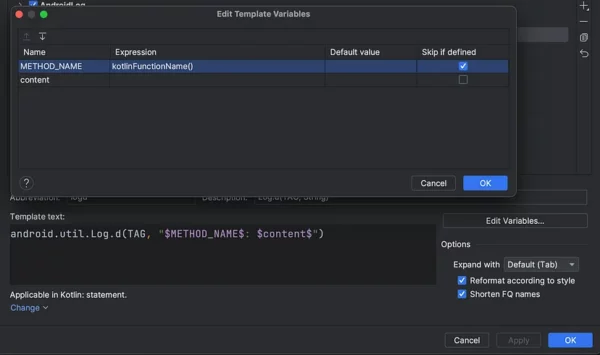
- You can see that the
METHOD_NAMEparameter is replaced by the result ofkotlinFunctionName()function, which returns the name of the enclosing function, and thecontentparameter is replaced by the user input, allowing us to insert our desired log message. Feel free to introduce additional parameters if needed. - Now that you are well-acquainted with the live template, let’s customize it according to our preferences. Simply replace the
TAGtext in the Template Text section withMY_CUSTOM_TAGand setLog.d(“MY_CUSTOM_TAG”, String)as the description for the template. The result should look like this:
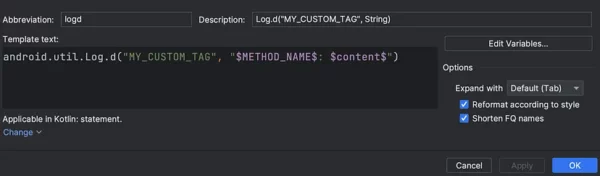
- Click on the OK button to save the changes. From now on, whenever you type
logdin a Kotlin function, our customized template will be inserted.
This example showcases just one of the many use cases for this tool. I recommend exploring the default live templates for inspiration and consider creating new ones or modifying existing ones to suit your needs. For a more in-depth exploration, covering predefined variables, variable editing, creating surround templates, and more, refer to the official website.

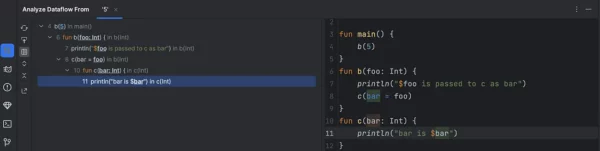
Imagine you find yourself in a top-level function, orchestrating the execution by calling other functions and passing data as arguments. You’re curious about how this passed data ripples through these functions — whether they use the parameter themselves or delegate it to others. Conversely, picture yourself in a nested function that receives parameters, and you’re eager to unravel the origin of the provided values. This is where the Analyze Data Flow tool steps in, making this exploration process a breeze. It empowers you to effortlessly trace the consumers and producers of specific data.
Let’s delve into a simple example to illustrate the functionality of this tool:
fun main() {
    b(5)
}
fun b(foo: Int) {
    println("$foo is passed to c as bar")
    c(bar = foo)
}
fun c(bar: Int) {
    println("bar is $bar")
}
Suppose you’re in the main function and wish to understand how the passed value 5 is utilized downstream. Instead of navigating through each called function conventionally, let’s leverage the Analyze Data Flow tool:
- Place the caret before the expression
5and from the main menu, select Code | Analyze Code | Data Flow from Here. Alternatively, use the Find Action window (as I do) or a custom shortcut for quicker access.
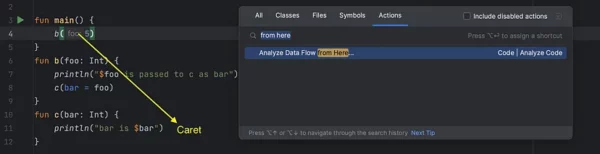
- A dialog prompts you to specify the analysis scope. Choose from options such as the whole project, current module, current file, or a custom scope. Specify your preference or leave it as is, then click
Analyze
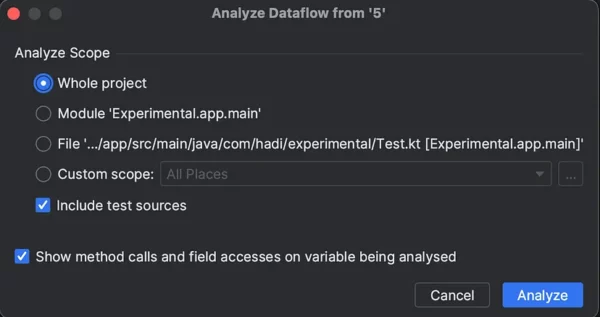
- The Analyze Dataflow From tool window appears, displaying the result of the analysis. Here, you can observe all usages of the passed parameter, understand how they treat it, and click on the usages to navigate to the respective lines of code.
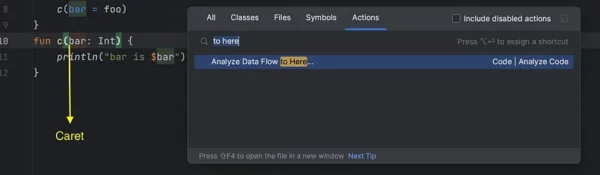
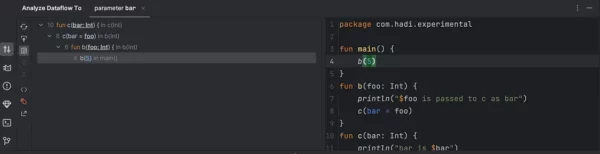
Conversely, if you find yourself within the c function and wish to unravel the sources of values for the bar parameter, as well as the specific values provided, adopt a similar approach. Instead of opting for Data Flow from Here, select Data Flow to Here.
Define the scope, and then click on the Analyze button. You’ll observe that ultimately, the bar parameter originates from the main function.
This feature is incredibly powerful, revealing the tree structure of the workflow. It allows for improvements as needed. In scenarios like Jetpack Compose, with many nested composable functions, this tool can be a lifesaver. You can execute the analysis on the state of ViewModels to see how the view uses them and how the ViewModel sets values for them. For more information about this tool, refer to the official website.
OUR VIDEO RECOMMENDATION


Jobs
3. Refactoring Tools

Refactoring is a crucial practice in software development, involving the restructuring of existing code to improve readability, understandability, and maintainability. In the past, developers undertook this task manually, ensuring changes didn’t introduce bugs. However, modern Integrated Development Environments (IDEs), such as Android Studio, provide a variety of automated refactorings, streamlining the developer’s workflow and making the process both safe and efficient.
Let’s explore the concept through a practical example. Consider the following code, generating a list of students with random scores and printing the top three based on their scores:
fun main() {
    printTop3Students()
}

data class Student(val name: String, val score: Int)

fun printTop3Students() {
        (1..50)
        .map {
            Student("ST_$it", (Random.nextDouble() * 100).toInt())
        }
        .sortedByDescending { it.score }
        .take(3)
        .forEachIndexed { index, student ->
            val rank = index + 1
            println("${student.name} achieved the $rank rank with a score of ${student.score}.")
        }
}
Let’s apply a series of refactorings step by step:
Introduce Parameter
The initial code creates the students list inside the printTop3Students function, which may hinder its reusability. To address this, we’ll take the students list as a parameter from the call site. First select the list creation expression and press Ctrl + T in macOs and Ctrl + Alt + Shift + T in Windows to open the list of available refactorings for the selected item.
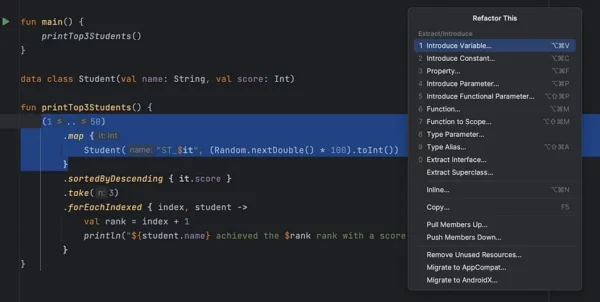
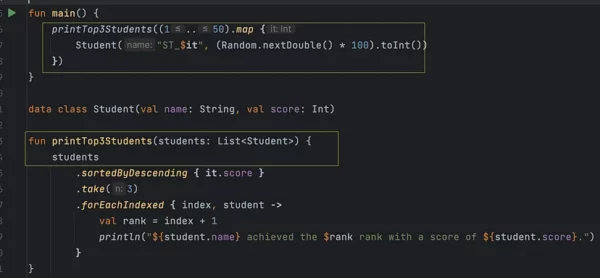
Select Introduce Parameter from the list, or opt for alternative methods such as using a keymap or right-clicking on the item and choosing it from the Refactor section. Assign a meaningful name for the parameter, and observe how Android Studio seamlessly incorporates the students parameter into the printTop3Students function, automatically passing the students list from the call site.
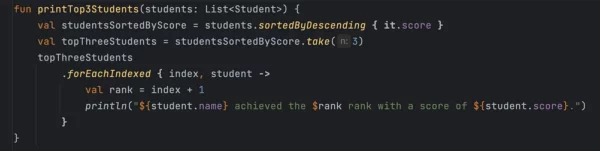
Introduce Variable
I want to make the code more readable by storing the sorted students in a variable. To achieve this, just select the expression and choose Introduce Variable from the refactoring list. Give it a name that makes sense. I’ll do the same thing with the take function. After these two tweaks, our printTop3Students function looks like this:
Extract Function/Method
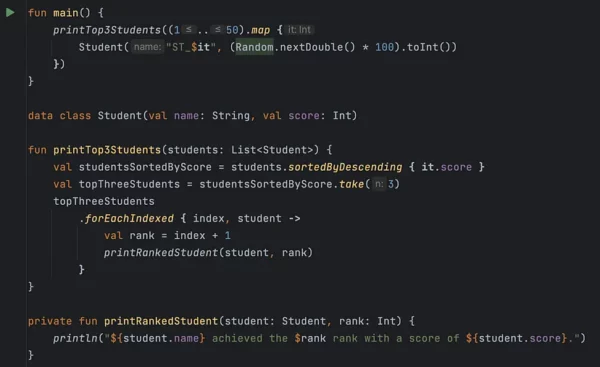
Printing a student’s name along with their rank appears to be a distinct function to me, and I’d like to create one for it. To do so, select the print expression and, from the refactoring list, opt for Extract Function/Method, specifying a name for it. Now, our final code looks like this:
We can continue refining the code, but I think the current state adequately explains the idea. These refactorings tools can save a considerable amount of time in your daily coding tasks, and I highly recommend mastering them for enhanced efficiency. For a comprehensive list of available refactorings and additional tips, please refer to the official website.
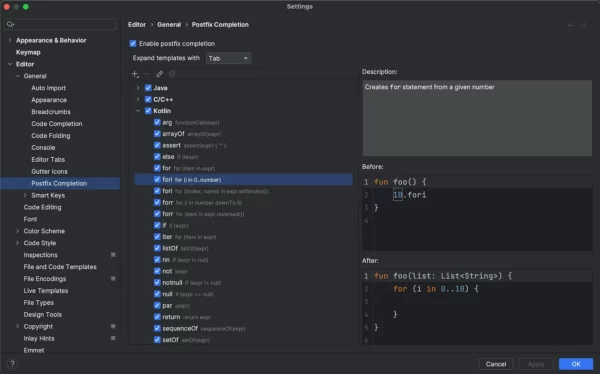
4. Postfix Completion

The Postfix Completion feature simplifies the process of wrapping template code around a recently typed expression. For example, typing .val after an expression and pressing Tab or Enter transforms it into val [name] = expression, allowing you to specify a name for the new variable. Similarly, typing .if changes to if (expression) {}, and typing .fori after an integer expression converts to for (i in 0..expression). In this context, val, if, and fori serve as postfix keys.
To explore a comprehensive list of predefined templates, along with their descriptions, navigate to Settings | Editor | General | Postfix Completion. As of writing this article, you can only edit postfixes of available templates by right-clicking on them. Unfortunately, modifying or deleting their functionality is not supported.
If you’re keen on creating custom templates for supported languages, refer to this article, which provides insights into creating custom templates for GO. The process is similar for other languages as well.
IDEs are loaded with a variety of handy features ready to elevate your programming skills in any scenario. Throughout this article, we’ve explored some editor-based tools, unveiling their potential with practical examples to enhance user-friendliness.
Hope you enjoyed the read! If any of these tools were new to you, drop me a line and let me know. For more articles and updates, follow me on Medium. Feel free to connect with me on LinkedIn and explore my projects on GitHub.
Happy coding!🚀
This blog is previously posted on proandroiddev.com


