


I know there are plenty of articles about flow and channelFlow, often highlighting that channelFlow uses Channel behind the scenes. But what does this actually mean for mobile developers? When does the distinction truly matter? Can we have the same behavior with flow without the use of a Channel, and what unique capabilities does ChannelFlow offer that we cannot achieve with regular Flow?
The key to this question lies in understanding the core concept of Channel. Conceptually, Channel and Flow serve different purposes. Channels facilitate communication between coroutines, while Flows are more about efficient data production and distribution.
ChannelFlow leverages Channel for its operations, making it a powerful tool in scenarios that involve complex data processing or require concurrent data emissions from multiple coroutines. However, what is it exactly?
Consider a real-life scenario where applications form a connected network, discovering nearby apps (devices) via Bluetooth or LAN while simultaneously receiving information about devices nearby from a remote server. In such a case, each application might need to emit data from three different sources that operate independently and continuously.
val nearbyDevices = channelFlow {
    launch {
        send(LANHelper.discoverConnectableHosts())
    }

    launch {
        send(BluetoothHelper.discoverConnectableDevices())
    }

    launch {
        send(NetworkHelper.getRegisteredDevices())
    }
}

// At the place you need the data
nearbyDevices.collect { data ->
    // Do something
}
All three sources live in their own coroutine and emit values into the same channel, which can be consumed without additional tricks.
Is it possible to have similar behavior with a simple Flow? Yes, you may split network requests and Bluetooth discovery into several different flows and then combine data with a special function.
fun networkDataFlow() = flow {
    emit(LANHelper.discoverConnectableHosts())
}

fun bluetoothDiscoveryFlow() = flow {
    emit(BluetoothHelper.discoverConnectableDevices())
}

fun registeredDevicesNearbyFlow() = flow {
    emit(NetworkHelper.getRegisteredDevices())
}

// At the place you need the data
merge(
    networkDataFlow(),
    bluetoothDiscoveryFlow(),
    registeredDevicesNearbyFlow()
) { networkData, bluetoothData, registeredDevices ->
    // React to the data
}.collect { combinedData ->
    println(combinedData)
The difference so far is more on the architecture level.
Using both on such simple applications will work the same if you do not have high-speed emissions.
The performance of Flow is an important thing also. I found a good article which describes many cases of Flow and ChannelFlow usage and also provides some performance data.
One year later, from the article times, I repeated the test on Pixel 7a (10 times each flow and then calculated the average time for each run) and got similar results (so there is no optimization happened… hehe).
flow
1000      -> 0.012513591
10000     -> 0.091140584
100000    -> 0.411128418
1000000   -> 8.215107670
10000000  -> 40.605143168
100000000 -> 403.867435622

channelFlow
1000      -> 0.040344645
10000     -> 0.300058228
100000    -> 12.407572719
1000000   -> 106.307522798
10000000  -> 310.608283640
I stopped waiting after an hour of calculations :)
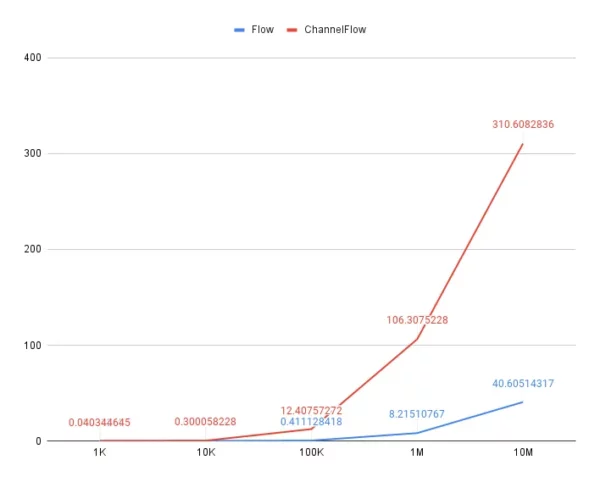
As you can see, channelFlow is more than three times slower than basic Flow on 1000 emissions, and this difference grows in a geometrical progression.
But… Is this the case for mobile development? If an app produces a hundred thousand calculations per second and emits them for consumption, probably something is wrong. In the test, a primitive type has been used, but using actual objects will increase the time. One thing is to emit the value, but it also needs to be consumed at a similarly fast pace. Otherwise, we will see performance degradation across the app.
Let me know if you work on an app on mobile which uses high-speed emission Flows. I would gladly understand how it works in depth. It feels that in the case when you need to produce or process a massive stream of data on a mobile phone, you will want to have better control over the stream of objects, memory usage, etc.
Here is what happens on a smaller scale from 25 to 1000 emitted values. I added a slight delay simulating network requests, 10 ms, which makes a difference.
Here is the code from the article I mentioned with added delay:
val time = measureNanoTime {
    channelFlow {
        for (i in 1..count) {
            send(i)
            delay(10)
        }
    }.collect {}
}
The Results…
Jobs
flow
25   -> 0.270430624
50   -> 0.558355266
75   -> 0.859869426
100  -> 1.187430339
250  -> 3.382514854
500  -> 6.320075401
750  -> 10.442842698
1000 -> 13.770569424

channelFlow
25   -> 0.276624023
50   -> 0.591518759
75   -> 1.06053414
100  -> 1.362990153
250  -> 3.417985678
500  -> 7.18098564
750  -> 11.00395154
1000 -> 14.33561907
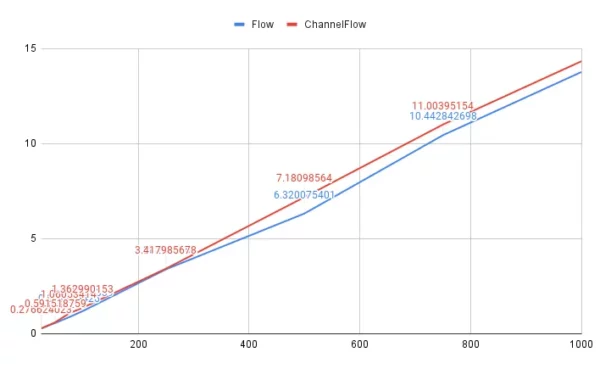
The difference is observable and it is above the threshold level for emissions of more than 100 per second.
I found a good example when channelFlow is really cool. It came to my mind when I tried to find what we cannot do with Flow.
suspend fun launchAdditionalProducer(scope: ProducerScope<String>) {
    scope.launch {
        repeat(5) { index ->
            delay(50)
            scope.send("Message $index from Main Additional Producer")
        }
    }
}

fun mainFlow() {
    val channel = channelFlow {
        launch {
            repeat(20) { index ->
                delay(100)
                send("Message $index from Main Producer")
                if (index == 2) {
                    launchAdditionalProducer(this@channelFlow)
                }
                if (index >= 5) {
                    cancel()
                }
            }
        }
        launch {
            repeat(20) { index ->
                delay(33)
                send("Message $index from Secondary Producer")
            }
        }
    }
    CoroutineScope(Dispatchers.Default).launch {
        channel.collect { value ->
            println(value)
        }
    }
}
In this example, the code runs channelFlow with two coroutines, which emit values. When the first coroutine emits “2”, a new coroutine launches and starts producing values. At “5”, the first “Main producer” cancels, and an additional producer will be cancelled together with the main coroutine.
19:03:53.254  I  Message 0 from Secondary Producer    <- Secondary producer ~3 times faster than Main producer
19:03:53.289  I  Message 1 from Secondary Producer
19:03:53.322  I  Message 0 from Main Producer
19:03:53.325  I  Message 2 from Secondary Producer
19:03:53.359  I  Message 3 from Secondary Producer
19:03:53.394  I  Message 4 from Secondary Producer
19:03:53.424  I  Message 1 from Main Producer
19:03:53.429  I  Message 5 from Secondary Producer
19:03:53.464  I  Message 6 from Secondary Producer
19:03:53.504  I  Message 7 from Secondary Producer
19:03:53.525  I  Message 2 from Main Producer  <-- Additional coroutine launches
19:03:53.538  I  Message 8 from Secondary Producer
19:03:53.572  I  Message 9 from Secondary Producer
19:03:53.577  I  Message 0 from Main Additional Producer
19:03:53.606  I  Message 10 from Secondary Producer
19:03:53.626  I  Message 3 from Main Producer
19:03:53.628  I  Message 1 from Main Additional Producer
19:03:53.641  I  Message 11 from Secondary Producer
19:03:53.676  I  Message 12 from Secondary Producer
19:03:53.681  I  Message 2 from Main Additional Producer
19:03:53.711  I  Message 13 from Secondary Producer
19:03:53.728  I  Message 4 from Main Producer
19:03:53.733  I  Message 3 from Main Additional Producer
19:03:53.745  I  Message 14 from Secondary Producer
19:03:53.781  I  Message 15 from Secondary Producer
19:03:53.792  I  Message 4 from Main Additional Producer
19:03:53.815  I  Message 16 from Secondary Producer
19:03:53.837  I  Message 5 from Main Producer <- Main producer and Additional coroutine get cancelled.
19:03:53.852  I  Message 17 from Secondary Producer
19:03:53.889  I  Message 18 from Secondary Producer
19:03:53.924  I  Message 19 from Secondary Producer
This is probably the most important moment. ChannelFlow allows developers not only to produce data asynchronously from different sources but also gives full control over how coroutines’ lifecycles should look independently from each other. In the case of ChannelFlow, you can balance your load on the hardware flexibly in runtime. Flow, at the same time, utilizes a default concurrency and asynchronous management engine protected from a developer.
So, why use Flow instead of ChannelFlow by default?
- It’s faster on high-speed emissions.
- You do not overthink the behavior of your data streams.
- Its behavior and lifecycle are the same as any other default implementation in Kotlin. If you see
flow {}, you know that all of them behave the same.ChannelFlow, at the same time, is a signal to you that there could be complex logic or a structure of coroutines which produce a single stream of data. - Potentially harder to test.
Please let me know how do you use ChannelFlow and why. Thanks!
This blog is previously published on proandroiddev.com


