


Compose Multiplatform opens a world of possibilities for developers, allowing them to build native-looking experiences for both Android and iOS with a single codebase. Integrating authentication into such apps can seem daunting, In this article, we will delve into the integration of Firebase REST API Authentication with Compose Multiplatform, exploring the steps and benefits of this powerful combination.
Why Firebase REST API for Authentication ?
We have seen that there are multiple Firebase SDK available for Android, iOS & Web Platform, but there is no stable SDK for Compose Multiplatform. And I have seen various examples of Compose Multiplatform that uses REST API to showcase their use cases. So to use a single code base and target multiple platform, I preferred to use Firebase REST API for authentication.
Prerequisites:
- Android Studio or IntelliJ IDEA with Compose Multiplatform plugin.
- Xcode to run iOS App.
- A Firebase project.
- Firebase Authentication enabled in your project.
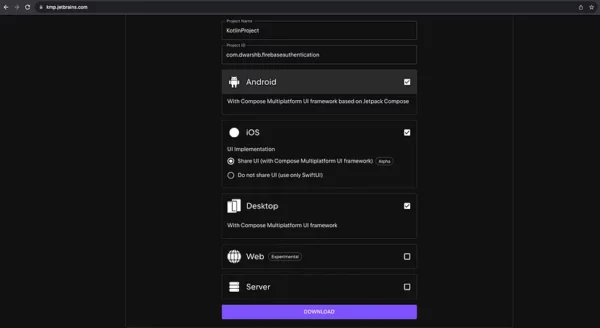
Step 1: Create a Compose Multiplatform project
You can use Kotlin Multiplatform Wizard to create a Compose Mutliplatform project as it allows us to select a platform which we are targeting. For this project we will be selecting Android, iOS & Desktop platforms. Once the platforms are selected, we can download and open the project in our preferable IDE.
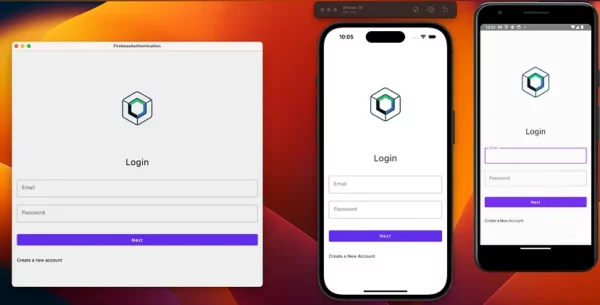
Step 2: Create UI for Authentication
In this project, we are targeting only Email/Password Authentication as a beginning, So in composeApp/src/commonMain/kotlin/authentication/AuthenticationView.kt file you will find a UI which includes Login & SignUp view.
| import androidx.compose.animation.AnimatedVisibility | |
| import androidx.compose.animation.core.tween | |
| import androidx.compose.animation.fadeIn | |
| import androidx.compose.animation.fadeOut | |
| import androidx.compose.foundation.layout.* | |
| import androidx.compose.foundation.text.ClickableText | |
| import androidx.compose.foundation.text.KeyboardOptions | |
| import androidx.compose.material.Button | |
| import androidx.compose.material.OutlinedTextField | |
| import androidx.compose.material.Text | |
| import androidx.compose.runtime.* | |
| import androidx.compose.ui.Alignment | |
| import androidx.compose.ui.Modifier | |
| import androidx.compose.ui.graphics.Color | |
| import androidx.compose.ui.text.AnnotatedString | |
| import androidx.compose.ui.text.TextStyle | |
| import androidx.compose.ui.text.font.FontWeight | |
| import androidx.compose.ui.text.input.ImeAction | |
| import androidx.compose.ui.text.input.KeyboardType | |
| import androidx.compose.ui.text.input.PasswordVisualTransformation | |
| import androidx.compose.ui.text.style.TextAlign | |
| import androidx.compose.ui.unit.dp | |
| import androidx.compose.ui.unit.sp | |
| import kotlinx.coroutines.* | |
| @Composable | |
| fun AuthenticationView( authenticationViewModel : AuthenticationViewModel) { | |
| var email by remember { mutableStateOf("") } | |
| var password by remember { mutableStateOf("") } | |
| var confirmPassword by remember { mutableStateOf("") } | |
| var title by remember { mutableStateOf("Login") } | |
| var signIn by remember { mutableStateOf(true) } | |
| var emailError by remember { mutableStateOf(false) } | |
| var passwordError by remember { mutableStateOf(false) } | |
| var confirmPasswordError by remember { mutableStateOf(false) } | |
| var signInText by remember { mutableStateOf("Create a new account") } | |
| var loginError by remember { mutableStateOf(false) } | |
| var coroutineScope: CoroutineScope = MainScope() | |
| Column( | |
| modifier = Modifier.fillMaxSize().padding(horizontal = 16.dp), | |
| verticalArrangement = Arrangement.Center | |
| ) { | |
| Spacer(modifier = Modifier.height(28.dp)) | |
| Text( | |
| text = title, | |
| fontSize = 28.sp, | |
| textAlign = TextAlign.Center, | |
| modifier = Modifier.fillMaxWidth().padding(vertical = 32.dp) | |
| ) | |
| OutlinedTextField( | |
| value = email, | |
| isError = emailError, | |
| onValueChange = { email = it }, | |
| label = { Text("Email") }, | |
| keyboardOptions = KeyboardOptions( | |
| keyboardType = KeyboardType.Email, | |
| imeAction = ImeAction.Next | |
| ), | |
| modifier = Modifier.fillMaxWidth() | |
| ) | |
| Spacer(modifier = Modifier.height(16.dp)) | |
| OutlinedTextField( | |
| value = password, | |
| isError = passwordError, | |
| onValueChange = { password = it }, | |
| label = { Text("Password") }, | |
| visualTransformation = PasswordVisualTransformation(), | |
| keyboardOptions = KeyboardOptions( | |
| keyboardType = KeyboardType.Password, | |
| imeAction = ImeAction.Done | |
| ), | |
| modifier = Modifier.fillMaxWidth() | |
| ) | |
| AnimatedVisibility( | |
| visible = !signIn, | |
| enter = fadeIn(initialAlpha = 0.4f), | |
| exit = fadeOut(animationSpec = tween(250)) | |
| ) { | |
| OutlinedTextField( | |
| value = password, | |
| isError = confirmPasswordError, | |
| onValueChange = { password = it }, | |
| label = { Text("Confirm Password") }, | |
| visualTransformation = PasswordVisualTransformation(), | |
| keyboardOptions = KeyboardOptions( | |
| keyboardType = KeyboardType.Password, | |
| imeAction = ImeAction.Done | |
| ), | |
| modifier = Modifier.fillMaxWidth() | |
| ) | |
| } | |
| Spacer(modifier = Modifier.height(32.dp)) | |
| Button( | |
| onClick = { | |
| if (email.isEmpty()) | |
| emailError = true | |
| else if (password.isEmpty()) | |
| passwordError = true | |
| when(signIn) { | |
| true -> { | |
| emailError = authenticationViewModel.validateEmail(email) | |
| if (!emailError) | |
| { | |
| coroutineScope.launch { | |
| val authResult = authenticationViewModel.login(email, password) | |
| loginError = (authResult==null) | |
| } | |
| } | |
| } | |
| false -> { | |
| var error = authenticationViewModel.signUp(email,password,confirmPassword) | |
| if (error == email) emailError = true | |
| else if(error == password) passwordError = true | |
| else if(error == confirmPassword) confirmPasswordError = true | |
| } | |
| } | |
| }, | |
| modifier = Modifier.fillMaxWidth() | |
| ) { | |
| Text(text = "Next") | |
| } | |
| Spacer(modifier = Modifier.height(32.dp)) | |
| if (loginError) { | |
| Text(text = "Login Failed") | |
| } | |
| ClickableText( | |
| text = AnnotatedString(signInText), | |
| onClick = { | |
| if (signIn) { | |
| signIn = false | |
| title = "Sign In" | |
| signInText = "Log In to existing Account" | |
| } else { | |
| signIn = true | |
| title = "Login" | |
| signInText = "Create a New Account" | |
| } | |
| }, | |
| modifier = Modifier.fillMaxWidth(), | |
| ) | |
| } | |
| } |
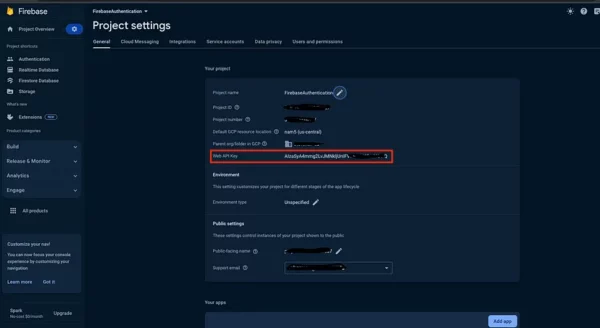
Step 3: Configure Firebase Project.
Once the Firebase Project is configured, you can visit the project settings to get API Key that will be used along with Firebase REST API to authenticate user.
Step 4: Configure Ktor in a project.
Kotlin’s Ktor framework provides a powerful and flexible HTTP client that makes interacting with external APIs seamless. Before diving into the implementation, ensure you have a Kotlin project set up with the necessary dependencies, including Ktor’s client library. You can add the Ktor client to your project by including the following dependencies in libs.versions.toml file inside gradle folder.
[versions]
...
kotlin = "1.9.21"
kotlinx-coroutines = "1.7.3"
ktor = "2.3.6"

[libraries]
....
ktor-serialization-kotlinx-json = { module = "io.ktor:ktor-serialization-kotlinx-json", version.ref = "ktor" }
ktor-client-core = { module = "io.ktor:ktor-client-core", version.ref = "ktor" }
ktor-client-darwin = { module = "io.ktor:ktor-client-darwin", version.ref = "ktor" }
ktor-client-okhttp = { module = "io.ktor:ktor-client-okhttp", version.ref = "ktor" }
ktor-client-content-negotiation = { module = "io.ktor:ktor-client-content-negotiation", version.ref = "ktor" }

[plugins]
androidApplication = { id = "com.android.application", version.ref = "agp" }
androidLibrary = { id = "com.android.library", version.ref = "agp" }
jetbrainsCompose = { id = "org.jetbrains.compose", version.ref = "compose-plugin" }
kotlinMultiplatform = { id = "org.jetbrains.kotlin.multiplatform", version.ref = "kotlin" }
kotlinxSerialization = { id = "org.jetbrains.kotlin.plugin.serialization", version.ref = "kotlin" }
Check libs.versions.toml for reference.
Once you have added library inside libs.versions.toml file you can add dependencies in build.gradle.kts of composeApp and Sync the project :
        androidMain.dependencies {
            ...
            implementation(libs.ktor.client.okhttp)
        }
        commonMain.dependencies {
            ...
            implementation(libs.ktor.client.core)
            implementation(libs.ktor.client.content.negotiation)
            implementation(libs.ktor.serialization.kotlinx.json)
        }
        desktopMain.dependencies {
            ..
            implementation(libs.ktor.client.okhttp)
        }
Check build.gradle.kts for reference.
Step 5: Call Firebase REST API
Once Ktor libraries are added and project is Synced, we can use Ktor functions to call Firebase REST API. Before that we need to initialize the HttpClient to make any API request. So, we will create an AuthenticationViewModel.kt file which will handle all the backend operations and add the below code
private val httpClient = HttpClient() {
        install(ContentNegotiation) {
            json()
        }
    }
Conquering User Creation:
Now, let’s create new users! Craft a Ktor client call to the https://identitytoolkit.googleapis.com/v1/accounts:signUp?key=${API_KEY} endpoint. Remember to serialize your user data (email and password) into JSON format using Kotlinx serialization. Send the POST request with your data and await the Firebase response. Upon successful user creation, parse the response to extract the user ID and other relevant information.
Please check below code snippet of signUp() method added in AuthenticationViewModel.kt
fun signUp(
        email: String,
        password: String,
        confirmPassword: String,
        onCompletion: onCompletion
    ) {
        if (password == confirmPassword) {
            viewModelScope.launch {
                val responseBody = httpClient
                    .post("https://identitytoolkit.googleapis.com/v1/accounts:signUp?key=${API_KEY}") {
                        header("Content-Type", "application/json")
                        parameter("email", email)
                        parameter("password", password)
                        parameter("returnSecureToken", true)
                    }
                if (responseBody.status.value in 200..299) {
                    val response = Json { ignoreUnknownKeys = true }
                        .decodeFromString<AuthResponse>(responseBody.bodyAsText())
                    onCompletion.onSuccess(response.idToken)
                } else {
                    onCompletion.onError(Exception(responseBody.bodyAsText()))
                }
            }
        } else {
            onCompletion.onError(Exception("Password doesn't match"))
        }
    }
Click here to check signUp method code on Github for a reference.
The Login Quest:
Time to tackle login! Similar to user creation, construct a Ktor client call to thehttps://identitytoolkit.googleapis.com/v1/accounts:signInWithPassword?key=${API_KEY} endpoint. Again, serialize your user credentials (email and password) and send the POST request. Parse the response to obtain the ID token, a crucial piece for verifying user identity and accessing protected resources.
Please check below code snippet of login() method added in AuthenticationViewModel.kt
fun login(
        email: String,
        password: String,
        onCompletion: onCompletion
    ) {
        viewModelScope.launch {
            val responseBody = httpClient
                .post("https://identitytoolkit.googleapis.com/v1/accounts:signInWithPassword?key=${API_KEY}") {
                    header("Content-Type", "application/json")
                    parameter("email", email)
                    parameter("password", password)
                    parameter("returnSecureToken", true)
                }
            if (responseBody.status.value in 200..299) {
                val response = Json { ignoreUnknownKeys = true }
                    .decodeFromString<AuthResponse>(responseBody.bodyAsText())
                storeUserDetails(response)
                onCompletion.onSuccess(response.idToken)
            } else {
                onCompletion.onError(Exception(responseBody.bodyAsText()))
            }
        }
    }
Click here to check login method code in Github for a reference.
Step 6: Add SQLDelight for cache support.
SQLDelight, a powerful Kotlin library for writing platform-agnostic SQL queries, joins forces with caching to create a dynamic duo that elevates your app’s efficiency. Here will be storing the refreshToken which we will get from the response of login & signUp API call. So next time when user opens app, it won’t ask for authentication.
Setup SQLDelight Dependencies
First you need to add required SQLDelight dependencies and plugins in libs.versions.toml file inside gradle folder.
[versions]
...
...
sqlDelight = "2.0.1"

[libraries]
...
...
sqldelight-androidDriver = { module = "app.cash.sqldelight:android-driver", version.ref = "sqlDelight" }
sqldelight-jvmDriver = { module = "app.cash.sqldelight:sqlite-driver", version.ref = "sqlDelight" }
sqldelight-nativeDriver = { module = "app.cash.sqldelight:native-driver", version.ref = "sqlDelight" }
sqldelight-coroutines = { module = "app.cash.sqldelight:coroutines-extensions", version.ref = "sqlDelight" }
sqldelight-primitiveAdapters = { module = "app.cash.sqldelight:coroutines-extensions", version.ref = "sqlDelight" }

[plugins]
androidApplication = { id = "com.android.application", version.ref = "agp" }
androidLibrary = { id = "com.android.library", version.ref = "agp" }
jetbrainsCompose = { id = "org.jetbrains.compose", version.ref = "compose-plugin" }
kotlinMultiplatform = { id = "org.jetbrains.kotlin.multiplatform", version.ref = "kotlin" }
kotlinxSerialization = { id = "org.jetbrains.kotlin.plugin.serialization", version.ref = "kotlin" }
sqlDelight = { id = "app.cash.sqldelight", version.ref = "sqlDelight" }
Next step is to add plugin in project-level build.gradle.kts file
plugins {
    // this is necessary to avoid the plugins to be loaded multiple times
    // in each subproject's classloader
    alias(libs.plugins.androidApplication) apply false
    alias(libs.plugins.androidLibrary) apply false
    alias(libs.plugins.jetbrainsCompose) apply false
    alias(libs.plugins.kotlinMultiplatform) apply false
    //SQLDelight Plugin
    alias(libs.plugins.sqlDelight) apply false
}
Finally, you need to configure SQLDelight in composeApp build.gradle.kts file. Here we will add dependencies based on the required platform and add name of SQLDelight database. You will see sqlDelight block at the end which will contain a list of databases and their parameter
import org.jetbrains.compose.ExperimentalComposeLibrary
import org.jetbrains.compose.desktop.application.dsl.TargetFormat

plugins {
    alias(libs.plugins.kotlinMultiplatform)
    alias(libs.plugins.androidApplication)
    alias(libs.plugins.jetbrainsCompose)
    alias(libs.plugins.kotlinxSerialization)
    alias(libs.plugins.sqlDelight)
}

kotlin {

    androidTarget {
        compilations.all {
            kotlinOptions {
                jvmTarget = "1.8"
            }
        }
    }


    jvm("desktop")

    listOf(
        iosX64(),
        iosArm64(),
        iosSimulatorArm64()
    ).forEach { iosTarget ->
        iosTarget.binaries.framework {
            baseName = "ComposeApp"
            // This should be set to false to run on iOS
            isStatic = false
            // Add it to avoid sqllite3 issues in iOS
            linkerOpts.add("-lsqlite3")
        }
    }

    sourceSets {
        val desktopMain by getting

        androidMain.dependencies {
            implementation(libs.compose.ui.tooling.preview)
            implementation(libs.androidx.activity.compose)
            implementation(libs.ktor.client.okhttp)
            //SqlDelight for Android
            implementation(libs.sqldelight.androidDriver)
        }
        commonMain.dependencies {
            implementation(compose.runtime)
            implementation(compose.foundation)
            implementation(compose.material)
            implementation(compose.ui)
            @OptIn(ExperimentalComposeLibrary::class)
            implementation(compose.components.resources)
            //Ktor
            implementation(libs.ktor.client.core)
            implementation(libs.ktor.client.content.negotiation)
            implementation(libs.ktor.serialization.kotlinx.json)
            //Moko MVVM
            implementation(libs.moko.mvvm.core)
            implementation(libs.moko.mvvm.compose)
            //Kamel
            implementation(libs.kamel)
            // Navigator
            implementation(libs.voyager.navigator)
            //SqlDelight for common
            implementation(libs.sqldelight.coroutines)
            implementation(libs.sqldelight.primitiveAdapters)
        }
        desktopMain.dependencies {
            implementation(compose.desktop.currentOs)
            implementation(libs.kotlinx.coroutines.swing)
            implementation(libs.ktor.client.okhttp)
            //SqlDelight for jvm
            implementation(libs.sqldelight.jvmDriver)
        }
        iosMain.dependencies {
            //SqlDelight for iOS
            implementation(libs.sqldelight.nativeDriver)
        }
    }
}

sqldelight {
    databases {
        //Note: Name of your Database and .sq file should be same
        create("Database") {
            packageName.set("com.dwarshb.firebaseauthentication")
        }
    }
    // Add this line to avoid library linking issues
    linkSqlite = true
}

android {
    ...
}

compose.desktop {
    ...
}
Create Database.sq file for Queries
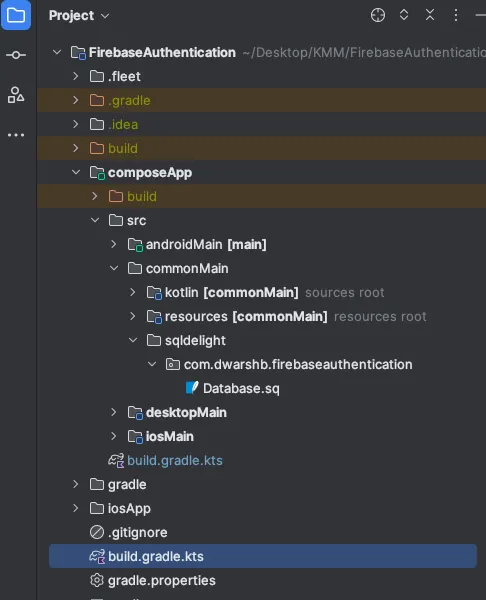
Next step is to create .sq file.which will contain all the needed SQL queries. By default, the SQLDelight plugin reads .sq from the packages folder in sqldelight folder which will be directly inside commainMain folder.
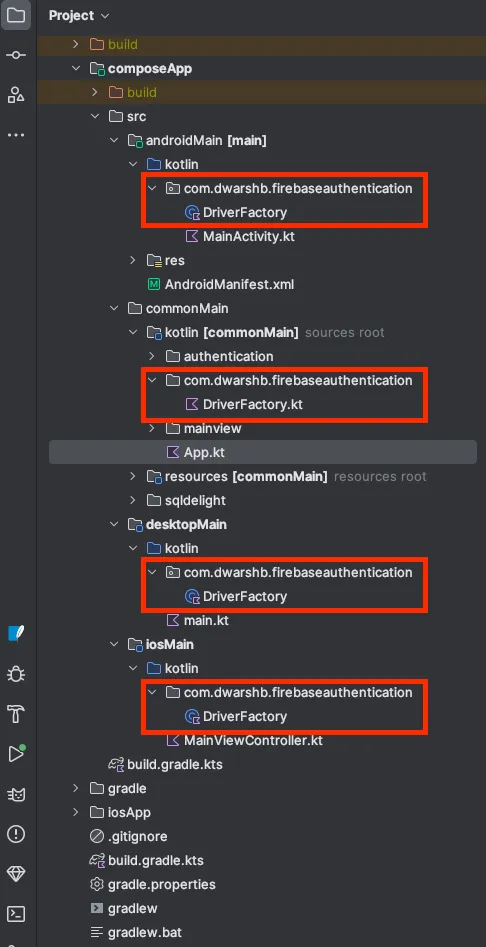
Please check below Screenshot of Folder Structure where Database.sq file is placed.
OUR VIDEO RECOMMENDATION


Jobs
If your package name is
com.example.projectName, then yourDatabase.sq file should be placed insidecommonMain/sqldelight/com/example/projectName/Database.sq
Add below code inside your Database.sq file which contains queries such as createTable, insertUser, removeAllUsers and getAllUsers
| CREATE TABLE IF NOT EXISTS User ( | |
| idToken TEXT NOT NULL , | |
| email TEXT NOT NULL, | |
| refreshToken TEXT, | |
| name TEXT | |
| ); | |
| insertUser: | |
| INSERT INTO User(idToken,email,refreshToken,name) | |
| VALUES(?, ?, ?, ?); | |
| removeAllUsers: | |
| DELETE FROM User; | |
| selectAllUsers: | |
| SELECT User.* | |
| FROM User; |
After the project is compiled, the generated Kotlin code will be stored in the composeApp/build/generated/sqldelight directory. Or else you can also use ./gradlew generateSqlDelightInterface command in terminal to generate sqldelight kotlin code.
Create database drivers
SQLDelight provides multiple platform-specific implementations of the SQLite driver, so you need to create them for each platform separately. You can do this by using expected and actual declarations.
In composeApp/src/commonMain/kotlin create the package and inside it create DriverFactory.kt class
package com.dwarshb.firebaseauthentication

import app.cash.sqldelight.db.SqlDriver

expect class DriverFactory {
    fun createDriver(): SqlDriver
}
Now we need to implement this for each target platform.
On Android, the AndroidSqliteDriver class implements the SQLite driver.
So, in composeApp/src/androidMain/kotlin create the package and inside it create DriverFactory.kt class
package com.dwarshb.firebaseauthentication

import android.content.Context
import app.cash.sqldelight.db.SqlDriver
import app.cash.sqldelight.driver.android.AndroidSqliteDriver

actual class DriverFactory(var appContext: Context) {

    actual fun createDriver(): SqlDriver {
        return AndroidSqliteDriver(Database.Schema, appContext, "firebase.db")
    }
}
Now you need to create its instance in MainActivity.kt file available in composeApp/src/androidMain/kotlin to make it work for Android.
class MainActivity : ComponentActivity() {
    override fun onCreate(savedInstanceState: Bundle?) {
        super.onCreate(savedInstanceState)
        //Create instance of DriverFactory for Android
        val driverFactory = DriverFactory(this)
        setContent {
            App(driverFactory.createDriver())
        }
    }
}
On iOS, the SQLite driver implementation is the NativeSqliteDriver class.
So, in composeApp/src/iosMain/kotlin create the package and inside it create DriverFactory.kt class
package com.dwarshb.firebaseauthentication

import app.cash.sqldelight.db.SqlDriver
import app.cash.sqldelight.driver.native.NativeSqliteDriver

actual class DriverFactory {
    actual fun createDriver(): SqlDriver {
        return NativeSqliteDriver(Database.Schema, "firebase.db")
    }
}
Now you need to create its instance in MainViewController.kt file available in composeApp/src/iosMain/kotlin to make it work for iOS.
import androidx.compose.ui.window.ComposeUIViewController
import com.dwarshb.firebaseauthentication.DriverFactory

fun MainViewController() = ComposeUIViewController {
    val driverFactory = DriverFactory()
    App(driverFactory.createDriver())
}
On Desktop, the SQLite driver implementation is the JdbcSqliteDriver class.
So, in composeApp/src/desktopMain/kotlin create the package and inside it create DriverFactory.kt class
package com.dwarshb.firebaseauthentication

import app.cash.sqldelight.db.SqlDriver
import app.cash.sqldelight.driver.jdbc.sqlite.JdbcSqliteDriver
import java.io.File

actual class DriverFactory {
    actual fun createDriver(): SqlDriver {
        val databasePath = File(System.getProperty("java.io.tmpdir"), "firebase.db")
        val driver: SqlDriver = JdbcSqliteDriver(url = "jdbc:sqlite:${databasePath.absolutePath}")
        Database.Schema.create(driver)
        return driver
    }
}
Now you need to create its instance in main.kt file available in composeApp/src/desktopMain/kotlin to make it work for Desktop.
import androidx.compose.ui.window.Window
import androidx.compose.ui.window.application
import com.dwarshb.firebaseauthentication.DriverFactory

fun main() = application {
    Window(onCloseRequest = ::exitApplication, title = "FirebaseAuthentication") {
        val driverFactory = DriverFactory()
        App(driverFactory.createDriver())
    }
}
Once, you have configured the DriverFactory in all the platform and followed all the above steps. You need to modify App() function and add SqlDriver as parameter, Since it’s the only way through which we will be able to get instances of SqlDriver from different platforms. So inside composeApp/src/commanMain/kotlin/App.kt
@Composable
fun App(sqlDriver: SqlDriver) {
    val authenticationViewModel = AuthenticationViewModel(sqlDriver)

    MaterialTheme {
      ...
    }
}
Step 7: Configure SQLDelight queries
In this step, we will be using insertUser query to store the token received from Firebase Authentication API’s to maintain the user session. And selectAllUser query to get the token store in local database. So inside AuthenticationViewModel.kt we will initialize the database first.
    var databaseQuery : DatabaseQueries

    val database = Database(sqlDriver)
    databaseQuery = database.databaseQueries
Now, we will create a method named storeUserDetails() which will store the response received from API’s. It uses insertUser query to store the information in local database. You can add this method inside login() or signUp() method in AuthenticationViewModel.kt
internal fun storeUserDetails(response: AuthResponse) {
        databaseQuery.insertUser(
            response.idToken, response.email, response.refreshToken,
            response.email
        )
    }
To maintain a session, we need to check if the system already has a token in its local database or not. So, we will create a checkSession() which uses selectAllUsers query to a token saved in local database.
internal fun checkSession(onCompletion: onCompletion) {
        for(user in databaseQuery.selectAllUsers().executeAsList()) {
            if (user!=null) {
                onCompletion.onSuccess(user.refreshToken.toString())
            } else {
                onCompletion.onError(Exception("No session found"))
            }
        }
    }
We can use the checkSession() method and update our UI based on the result. For example, if the token exist then inside onSuccess we can navigate the app to MainScreen or else the AuthenticationView Screen will be shown.
Demo
Check below Github Link for complete code.
Reference Links:
- https://www.jetbrains.com/help/kotlin-multiplatform-dev/multiplatform-ktor-sqldelight.html#build-an-sdk
- https://firebase.google.com/docs/reference/rest/auth#section-api-usage
This article is previously published on proandroiddev.com


