


Software projects rarely work in isolation. Projects often rely on reusable functionality from libraries. Some projects organize unrelated functionality into separate parts of a modular system.
In the life of an Android Developer, library dependencies are like the heart of the project. These library dependencies grow as the project grows because of our modules, functionalities, and requirements. It becomes somewhat challenging to maintain them in the best way possible and have them available to all the modules in the project.
You have probably worked on at least one Android project. It means you’re familiar with the Gradle build system and the pain that comes with management.
In this article, we will explore the different options that are available today. We will see how these options are configured and maintained in the long run. The examples will use the Kotlin DSL syntax.
The Gradle Build System
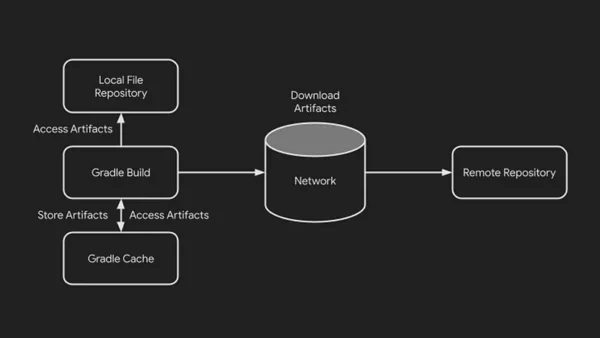
Android Studio uses the Gradle build system to build an Android app project. Gradle makes it easy to include external binaries or other library modules to your project as dependencies. The dependencies can be located on your computer or in a remote repository, and any transitive dependencies they declare are automatically included as well.
During the build process, Gradle locates and downloads the dependencies. Gradle then stores resolved dependencies in a local cache. Subsequent builds use this cache to avoid unnecessary network calls and speed up the build process.
In this section, we will have a look at some of the available methods to manage our dependencies in Android Studio.
If you wish to benchmark each of the methods on your computer, clone this repository and run sh benchmark.sh for each branch’s benchmark. main branch can be used a baseline
Manual/Hardcoded Declaration
Whether you are just starting, or a seasoned developer, we have been haunted by hardcoded declarations of dependencies in our Android projects.
| dependencies { | |
| implementation("my.spectacular:library:1.2.3") | |
| } |
Pros
- Good for small projects or when dependencies are stable and do not require frequent updates
Cons
- Difficult to manage — If you need to update a dependency, you will have to manually search for all the places where the dependency is used and update each occurrence individually.
- Code duplication — If your project has multiple modules that depend on the same library, hardcoding dependencies in each
build.gradlefile can lead to code duplication, making maintenance more difficult. - Limited flexibility — This approach can be problematic when dealing with different testing scenarios, different development environments, or when experimenting with different versions of libraries.
Checkout the branch hardcoded of the repository to run a benchmark for this method.
Link: https://github.com/kartikarora/android-14/tree/hardcoded
buildSrc module
buildSrc is a special module that is recognised by Gradle and is known as a composite build. Upon discovery of the directory, Gradle automatically compiles and tests this code and puts it in the classpath of your build script. This allows developers to write build classes and objects in one central location within the project including build logic and convention plugins.
Please note: buildSrc is compiled before other Android application or library module but after the
settings.gradle.ktsfile
Within this module, we can create kotlin files to store information of the dependencies as follows.
| object Versions { | |
| const val mySpectacularLibararyVersion = "1.2.3" | |
| } | |
| object Libraries { | |
| const val val mySpectacular = | |
| "my.spectacular:library:${Versions.mySpectacularLibararyVersion}" | |
| } |
Then within the build.gradle.kts file of the application/library module, the declaration can be added like this.
| dependencies { | |
| implementation(Libraries.mySpectacular) | |
| } |
Pros
buildSrcas a module has great integration with Android Studio with full autocomplete and IntelliSense support- Build logic can sit in a separate module and doesn’t get mixed with your project’s code.
- Since this module is in the classpath of the buildscript, the result of the compilation is available across all modules in the project.
Cons
buildSrcneeds to be built first and comes with its own set of configurations and dependencies- Any change in the code within buildSrc invalidates all caches across the project and requires a full project rebuild.
- This approach is scalable only within a project. It is difficult to share build logic with different projects.
Checkout the branch buildSrcof the repository to run a benchmark for this method.
Link: https://github.com/kartikarora/android-14/tree/buildSrc
Version Catalog
A version catalog is a list of dependencies, represented as dependency coordinates, that you can pick from when declaring dependencies in a build script. In the world of Android Development, version catalogs have recently received first-party support in Android Studio.
A version catalog has four sections, versions , libraries , bundles & plugins . Version catalogs can be declared as a standalone file or as a description in the settings.gradle.kts file of the project.
When declared using Kotlin DSL, it looks like this
OUR VIDEO RECOMMENDATION


Jobs
| dependencyResolutionManagement { | |
| versionCatalogs { | |
| create("libs") { | |
| version() | |
| library() | |
| bundle() | |
| plugin() | |
| } | |
| } | |
| } |
When declared in a file, gradle expects the version catalog to be in a TOML file. A typical TOML-based version catalog looks like this.
| [versions] | |
| [libraries] | |
| [bundles] | |
| [plugins] |
The convention in Gradle is to look for a file called libs.versions.toml within the gradle directory of the project.
TOML expects aliases to consist of a series of identifiers separated by a dash (-, recommended), an underscore (_) or a dot (.). Identifiers themselves must consist of ASCII characters, preferably lowercase, eventually followed by numbers.
| [versions] | |
| mySpectacularLibraryVersion = "1.2.3" | |
| [libraries] | |
| my-spectacular = { group = "my.spectacular", name = "library", version.ref = "mySpectacularLibraryVersion" } |
To add the implementation to your module
| dependencies { | |
| implementation(libs.my.spectacular) | |
| } |
The separators get converted to a . accessor when the version catalog is referenced in the gradle file.
Pros
- Great integration with Android Studio with full autocomplete support. New projects use this by default. New modules in existing projects which have version catalog support will use it as well.
- The version catalogs can be shared across projects from a centralised location.
- No recompilation is required whenever a change is made to the version catalog since it is not a separate module that needs to be compiled
Cons
- Boring and repetitive migration — There’s a lot of copy-paste and reformatting of text involved, especially if you have a large set of dependencies.
- Requires one-time upskilling of team members
Checkout the branch versionCatalogof the repository to run a benchmark for this method.
Link: https://github.com/kartikarora/android-14/tree/versionCatalog
Wrapping Up
Did you run the benchmarks? Share your results and let us see what seems to be the fastest.
In conclusion, there are several methods to manage dependencies in Android Studio, each with its advantages and disadvantages.
Manual/hardcoded declaration is simple but inflexible and error-prone.
buildSrc is more organized but requires additional setup and can slow down builds.
Version catalogs are the most recent approach, offering centralized management, easy sharing, and integration with Android Studio.
Since Android Studio Hedgehog, Version Catalogs have become the default for new projects.
Thank you for making it to the end! You can find my other articles here. Massive thanks to Enrique for his support in reviewing & proofreading this article!
I also speak on various Android & Kotlin topics in meetups & conferences. Check out my talks here.
If you want to support me with the work I do, feel free to buy me a coffee!
https://www.buymeacoffee.com/kartikarora?source=post_page—–a6ce647315f2——————————–
This article is previously published on proandroiddev.com


