


Android developers can build complex apps with annotations scattered throughout, such as @Provides from Dagger or @ColorRes from AndroidX, without fully understanding how they work; they can almost feel like magic. This article will unshroud some of the magic by exploring the three main mechanisms that handle annotations: annotation processing, reflection, and lint. My next article will provide a case study on how a real-world annotation-based library, Moshi, uses all three mechanisms.
What are Kotlin annotations?
Annotations are a means of attaching metadata to code. To declare an annotation, put the annotation modifier in front of a class:
annotation class CustomAnnotation
We can annotate it with meta-annotations to provide additional details:
@Target(AnnotationTarget.FUNCTION, AnnotationTarget.TYPE_PARAMETER)
@Retention(AnnotationRetention.SOURCE)
annotation class CustomAnnotation
@Target specifies the possible kinds of elements which can be annotated with the annotation (such as classes, functions, parameters), and @Retention specifies whether the annotation is stored in binary output and whether it’s visible for reflection at runtime. In its default value RUNTIME, both are true.
Annotation processing and reflection fall into the category of metaprogramming, a technique in which programs use other programs (eg. Kotlin source code) as their data. Both mechanisms leverage annotations to reduce boilerplate code and automate common tasks. For example, most dependency injection (eg. Dagger) and serialization (eg. Moshi) libraries use one or the other, or both. Annotation processing and reflection can achieve similar behavior — Moshi supports both mechanisms for generating JSON adapters. Lint is a different use case, using annotations to check source files for issues. Whether it counts as metaprogramming is hazy.
All three mechanisms offer powerful and flexible APIs, so different annotations can achieve very different effects depending on how they’re handled in code. Developers rarely have to write this code ourselves, because we use annotations from libraries that already handle them more often than we create our own annotations.
Annotation Processing
Annotation processors are compiler plugins that generate code based on annotations at compile time. You know a third-party library includes an annotation processor when it requires using annotationProcessor, kapt or ksp instead of implementation as its build.gradle dependency configuration. Popular libraries that rely on annotation processing include Dagger (@Provides, @Inject), Moshi (@Json), and Room (@Entity, @Dao).
An annotation processor must be registered to the compiler for it to run during compilation. The most common way to register one is via Google’s AutoService library — just annotate your processor with @AutoService(Processor.class).
There are three main APIs for creating annotation processors: Annotation Processor Tool (APT), Kotlin Annotation Processor Tool (kapt), and Kotlin Symbol Processing (KSP). Processors created with APT and kapt extend the same base AbstractProcessor class, whereas KSP has a separate SymbolProcessor class.
Annotation processing takes multiple rounds. In each round, the compiler searches for annotations in the generated source files and calls their corresponding processors. If the processors generate any new files, a new round starts with the generated files as input. The process continues until no new files are generated.
Annotation Processor Tool
APT is the only API from the pre-Kotlin Android world. It’s used by the Java compiler (javac) and corresponds to the annotationProcessor dependency configuration. It’s rarely seen in Android projects nowadays because it doesn’t support Kotlin files.
APT annotation processors work with .java source code files. To create one, we need to make a class that extends AbstractProcessor. The two main functions to implement are getSupportedAnnotationTypes(), which should return which annotations it can process, and process(), which is the main block getting called on every processing round. Here, we have to think about source code as structured text instead of something executable — similar to a JSON file. The source code is represented as a tree of Elements, which represents program elements including packages, classes, or functions.
AbstractProcessor.process()’s second parameter is roundEnv, a RoundEnvironment object with information about the current and prior processing rounds. It provides access to the tree of Elements and several ways to examine annotations associated with the Elements, for example getElementsAnnotatedWith().
We can generate code based on annotated Elements in process(). The Filer from the processor’s ProcessingEnvironment lets us create new files, then write to them like any other file. Generated files will appear under the project’s <module>/build/generated/source/ directory. This is how Dagger generates its Something_Factory and Something_MembersInjector classes, and Moshi its SomethingAdapter classes. JavaPoet is a popular library for writing Java source code.
I won’t go over implementing a custom AbstractProcessor because there are plenty of resources on it already, which I’ll link to at the end of this article. In my next article, I’ll explore how Moshi’s JsonClassCodegenProcessor implements it.
Kotlin Annotation Processor Tool
Kapt became the go-to annotation processor API once Kotlin gained popularity. It’s a compiler plugin built on top of APT and supports both Kotlin and Java source code. It corresponds to the kapt dependency configuration. It uses the same AbstractProcessor as APT, so the previous section’s information about creating APT annotation processors also applies to kapt. Kapt can run any AbstractProcessor regardless if it was written with Kotlin or Java support in mind. KotlinPoet is a popular library for generating Kotlin source code during processing.
Kapt’s main downside is its slow compilation time. It runs on javac like APT, and works with Kotlin by generating Java stubs from Kotlin files that the processors can then read. This stub generation is an expensive operation and has a significant impact on build speed.
Kotlin Symbol Processing
KSP is a Kotlin-first alternative to kapt introduced in 2021. With direct integration into the Kotlin compiler (kotlinc), KSP analyzes Kotlin code directly without generating Java stubs and is up to 2x faster than kapt. It also has a better understanding of Kotlin’s language constructs.
If a module has any kapt processors remaining, it’ll still generate Java stubs during compilation. This means we only get KSP’s performance improvements if all usages of kapt are removed from the module.
To create a KSP annotation processor, we need to implement SymbolProcessor. KSP also represents source code as a syntax tree and provides a similar API to Kapt. A KsDeclaration or KsDeclarationContainer in KSP maps to an Element in Kapt. The Resolver, like Kapt’s RoundEnvironment, is the parameter in SymbolProcessor.process() providing access to the syntax tree. Resolver.getSymbolsWithAnnotation() lets us examine symbols with custom annotations that we’re interested in. Finally, like Filer, SymbolProcessorEnvironment’s CodeGenerator lets us generate code while processing.
Reflection
Reflection is defined as a language’s ability to inspect its classes, interfaces, fields, and methods at runtime without knowing their names at compile time. It lets programs dynamically instantiate new objects and invoke methods — ie. modify their structure and behavior at runtime. Popular libraries that use reflection to modify program behavior include Moshi (@Json) and Retrofit (@GET, @POST).
The standard Java reflection library works in Kotlin. Kotlin also has its own reflection API, available through the kotlin-reflect package, which provides a few additional features, including access to properties and nullable types.
Here’s an example of invoking a method at runtime via reflection:
class HelloPrinter {
  fun printHello() {
    println("Hello, world!!!")
  }
}

val printer = HelloPrinter()
val methods = printer::class.java.methods
val helloFunction = methods.find { it.name == "printHello" }
helloFunction?.invoke(printer)
Reflection doesn’t always involve annotations, but it provides a robust API for working with them and annotations can make its usage safer and more powerful.
For example, we can update the previous code to invoke all methods annotated with @Greeter without specifying their names in hard-coded strings:
@Target(AnnotationTarget.FUNCTION)
annotation class Greeter

class HelloPrinter {
  @Greeter
  fun printHello() {
    println("Hello, world!!!")
  }
}

val printer = HelloPrinter()
val methods = printer::class.java.methods
val helloFunctions = methods.filter {
  it.isAnnotationPresent(Greeter::class.java)
}
helloFunctions.forEach {
  it.invoke(printer)
}
Other annotation-related functions available in Kotlin’s reflection API include KAnnotatedElement.findAnnotations() and KAnnotatedElement.hasAnnotation(). For an annotation to work with reflection, its @Retention policy needs to be RUNTIME (the default retention).
When deciding between handling annotations via reflection or annotation processing, the main trade offs are:
- Reflection means slower runtime vs annotation processing means slower compile time
- Reflection fails at runtime vs annotation processing fails at compile time
Most libraries prefer annotation processing, because its slower compile time won’t impact the end user experience and its compile time errors fail fast, whereas reflection’s runtime errors are more likely to go unnoticed until they reach end users. Dagger completely got rid of reflection when migrating from v1 to v2 for these reasons.
Retrofit, a popular HTTP client library, still relies entirely on reflection. It uses Proxy to generate instances of annotated interfaces. Reflection makes sense here because the latency of a network request far outweighs any latency introduced by reflection, and runtime failures are relatively easy to identify; we can test new Retrofit code by triggering its corresponding API call.
Jobs
Lint
Lint is a code scanning tool that checks your Android project source files for potential bugs and improvements ranging from security, performance, accessibility, internationalization, and more. For the sake of brevity, I’m only discussing the first-party lint tool and won’t cover any third-party tools like Detekt.
Lint is deeply integrated into Android Studio, and highlights issues as warnings or errors in the IDE.
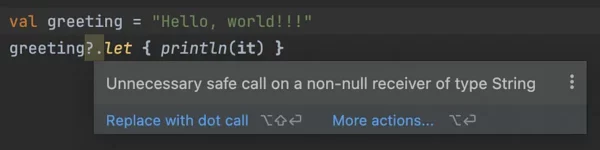
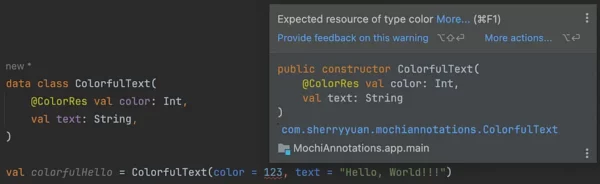
Many lint checks, including the “Unnecessary safe call” above, don’t involve annotations. However, annotations can help lint detect more subtle code problems. Since Java doesn’t have built-in nullability like Kotlin, @Nonnull and @Nullable let lint provide the same null-safety warnings for Kotlin. Another example is @ColorRes, which lets lint know that an Int parameter should be a color resource reference (e.g. android.R.color.black).
Unlike annotation processing and reflection, Lint only performs static code analysis and can’t affect program behavior. And unlike the other two where annotations usually come from third-party libraries, most commonly-used lint-related annotations are from the androidx.annotations package and handled by Android Studio’s built-in checks.
When we do want to add a custom lint check — either our own or from a third-party library -, we’ll have to use the lintChecks or lintPublish dependency configuration. lintChecks makes the lint rule available only for that module, whereas lintPublish makes it available to all upstream modules.
To add a new lint check, we have to create a subclass of Detector. Detectors can run on different file types depending on which FileScanner it implements. For example, SourceCodeScanner can analyze Kotlin or Java source files and GradleScanner can analyze Gradle files.
SourceCodeScanner is the relevant scanner for handling annotations. It offers two Abstract Syntax Tree (AST) APIs, developed by Jetbrains, for analyzing source code. The Universal Abstract Syntax Tree (UAST) API represents multiple languages the same way, making it possible to write a single analyzer which works “universally” across all languages supported by UAST, including Kotlin and Java.
Before UAST, there was Program Structure Interface (PSI). PSI represents Kotlin and Java differently and is sometimes still needed for language-specific nuances. UAST is built on top of PSI, so its API occasionally leaks PSI elements. Navigating the ASTs looks similar to navigating the Elements trees from annotation processing.
Google’s custom lint rules guide has a helpful page on how to add a lint check that visits annotated elements. If we want to visit usages of a custom annotation directly rather than only the elements annotated with it, we can override SourceCodeScanner’s getApplicatbleUastTypes() to return UAnnotation::class.java, then override createUastHandler() to return a custom UElementHandler. Any issue detection related to our custom annotation can go in the UElementHandler’s visitAnnotation().
Mysterious custom annotations
Sometimes, you’ll encounter a custom annotation in a codebase that isn’t referenced in any custom annotation processors, reflection code, or lint checks, so what’s it doing?
It’s most likely annotated with a meta-annotation from a third-party library; several popular ones provide functionality that relies on meta-annotations. For example, Dagger has a @Qualifier meta-annotation for cases where the type alone is insufficient to identify a dependency.
@Qualifier lets us create custom annotations like this:
@Qualifier
@Target(AnnotationTarget.FIELD, AnnotationTarget.VALUE_PARAMETER, AnnotationTarget.FUNCTION)
annotation class Authorized

@Qualifier
@Target(AnnotationTarget.FIELD, AnnotationTarget.VALUE_PARAMETER, AnnotationTarget.FUNCTION)
annotation class Unauthorized
We could use them to inject different instances of a class depending on whether the user is signed in.
@Provides
@Authorized
OkHttpClient.Builder provideAuthorizedOkHttpClientBuilder(…)

@Provides
@Unauthorized
OkHttpClient.Builder provideUnauthorizedOkHttpClientBuilder(…)
You don’t need to write any code to handle these custom annotations; Dagger’s annotation processor will search for all @Qualifier custom annotations and process them for you. Moshi has a similar @JsonQualifier meta-annotation for specifying how a type is encoded for some fields without changing its encoding everywhere.
Additional resources
- Annotation Processing Boilerplate Destruction talk
- Writing your own Annotation Processors in Android article
- Baeldung’s Kotlin Annotations article
- Android custom lint rules guide
As always, thanks for reading! And shoutout to Russell and Kelvin for their valuable editing and feedback 🖤
This article is previously published on proandroiddev.com


