


Disclaimer: This blog post does not aim to compare various navigation libraries; instead, it offers insights into my personal journey of arriving at a navigation solution. The intention is not to provide a comparative analysis of different libraries but to share my decision-making process.
Intro:
Now, let’s delve into the journey. My initial focus was on streamlining Compose Screens and refining the presentation layer. I wanted to relocate the navigation logic from the screens to the presentation layer. This decision stemmed from my perspective that navigation is inherently more of a state management concern than a UI element. After conducting some brief research, I decided to centralize and share the navigation logic. Have the logic in a separate navigation module and have it handle routing to different screens. After some experimentation, I shared the navigation logic between iOS and Android.
This is a part of an ongoing series on my journey with Kotlin Multiplatform.
- Going Modular — The Kotlin Multiplatform Way
- KMM Preferences Datastore
- KMP Environment Variables (Part 1)
- Intercepting Ktor Network Responses in Kotlin Multiplatform
- Navigating the Waters of Kotlin Multiplatform: Exploring Navigation Solutions — You are here. 👈
If you’d like to know how things looked initially, read Going Modular — The Kotlin Multiplatform Way. Let’s dive in and see how we ended up here.
Navigating the Sea Of Libraries
There are a couple of things to consider before deciding what library to use, as there’s no “best” library. This could be something like how new the library is. What does the support look like? Is it actively maintained? Might it add complexity to your app? If you are in a team, how many people are familiar with it? How does it impact your architecture? I could go on, but it depends on your desire.
There are a couple of third-party alternatives that you can choose from:
- Voyager: A pragmatic approach to navigation
- Decompose: An advanced approach to navigation that covers the full lifecycle and any potential dependency injection.
- Appyx: Model-driven navigation with gesture control.
- PreCompose: A navigation and view model inspired by Jetpack Lifecycle, ViewModel, LiveData, and Navigation
Fortunately or unfortunately, I only tried two of the mentioned libraries; my experience is below.
1. Voyager
Voyager is a new navigation library explicitly built for Compose multiplatform, which is designed to make navigation in Compose-based apps more straightforward and intuitive.
Setup & General Use
My experience with Voyager was seamless. It’s easy to set up and get things going. The `ScreenModel` class is also useful for multiplatform state management.
*Dependency injection(Optional)
Voyager integrates well with the different dependency injection frameworks. It currently supports koin, kodein, hilt, and Kotlin-inject.
Conclusion
I did not go with Voyager because I wanted to keep the UI side native per platform (Android: Compose & iOS SwiftUI) and only share the ScreenModel. It’s possible to create a custom ScreenModel/ViewModel where the Lifecycle is bound on the Voyager lifecycle and, on iOS, the UiViewController lifecycle. However, I was looking for something that works out of the box. This was an oversight on my end, but it was a good experiment. If/when I create a Compose Multiplatform App, I will go with Voyager.
2. Decompose
Decompose is a Kotlin Multiplatform library for breaking down your code into tree-structured lifecycle-aware business logic components (aka BLoC), with routing functionality and pluggable UI
Setup & General Use
Decompose does a good job of decoupling from the OS libraries. I had a hard time getting things up and running compared to my experience with Voyager. Once you understand the core concepts, it’s not that bad. The good thing is the project is well documented, and there are multiple project samples. [John O’Reilly’s](https://johnoreilly.dev/) project, Confetti, also helped immensely with my migration.
*Dependency injection(Optional)
Decompose is flexible and should work with any dependency injection framework. It currently supports koin, kodein, and Kotlin-inject, which I use in my project].
Conclusion
Decompose works for me because it allows me to keep the native UI instead of using Compose Multiplatform and share the navigation and presentation logic between platforms.
Pre-Decompose
Let’s take a trip down memory lane and see what things look like before moving to decompose. Each platform handled its navigation — i.e., Jetpack Navigation on Android and Navigation API for iOS. The image below shows what the Android architecture looked like. This was highly inspired by Lachlan McKee’s article Scalable Jetpack Compose Navigation.
OUR VIDEO RECOMMENDATION


Jobs
Each feature module is responsible for creating its navigation factory, which the App module adds to the NavGraph.
Hello Decompose
Let’s quickly look at how things look with decompose in place. I will not go through the setup process. There are multiple articles on how to do this, but here’s an overview of what the architecture looks like with Decompose.
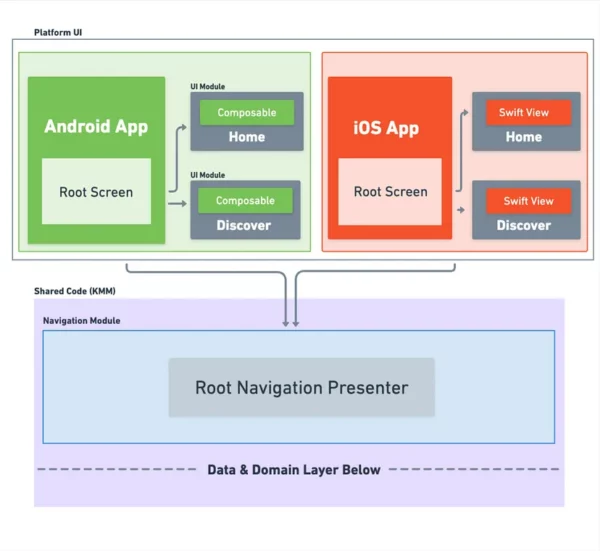
Thanks to the implementation of decompose, navigation logic joins the shared codebase (KMM). This means each platform only has UI implementation, such as Android with Jetpack Compose and iOS with Swift, and no business logic.
One thing I might do in the future is move the Android Feature modules to the presentation layer, as they are currently just composables. I’m still thinking about this. 🤔
With this structure, I can easily change the presentation & navigation layers and try something else if needed.
The gif below shows how both apps work with shared logic. Thanks to Decompose, we can handle navigation, display, and hide views, in this case, the BottomBar.
Until next time
There’s no silver bullet for navigation yet, so use what works for you or your team. One significant takeaway from this experiment is the importance of considering an iOS perspective first. The adage ‘If it works on iOS, it should translate smoothly to Android’ underscores the value of prioritizing platform considerations in development decisions.
If you are curious about how the Migration looked, you can look at the PR below.
https://github.com/thomaskioko/tv-maniac/pull/108?source=post_page—–eef81aaa1a61——————————–
Thank you for taking the time to join me on this journey. Feel free to share any opinions or ask any questions you may have. With that, my app has been Decomposed. ✌️
Big thanks to Arkadii Ivanov and Hannah Olukoye for reviewing this post.


