Scaffold is a composable component that makes designing some of the basic UI extremely easy. It follows material design principle and provides slots to fill in with components like top bar, bottom bar, navigation drawer, FAB etc. It’s like a template that can be modified based on the requirement.
In the previous post I talked about navigation using navigation drawer. This did not use a scaffold. In this post I’ll show navigation using bottom navigation (and navigation drawer) created using a scaffold. Most of the things will be pretty similar to what we saw in the previous post.
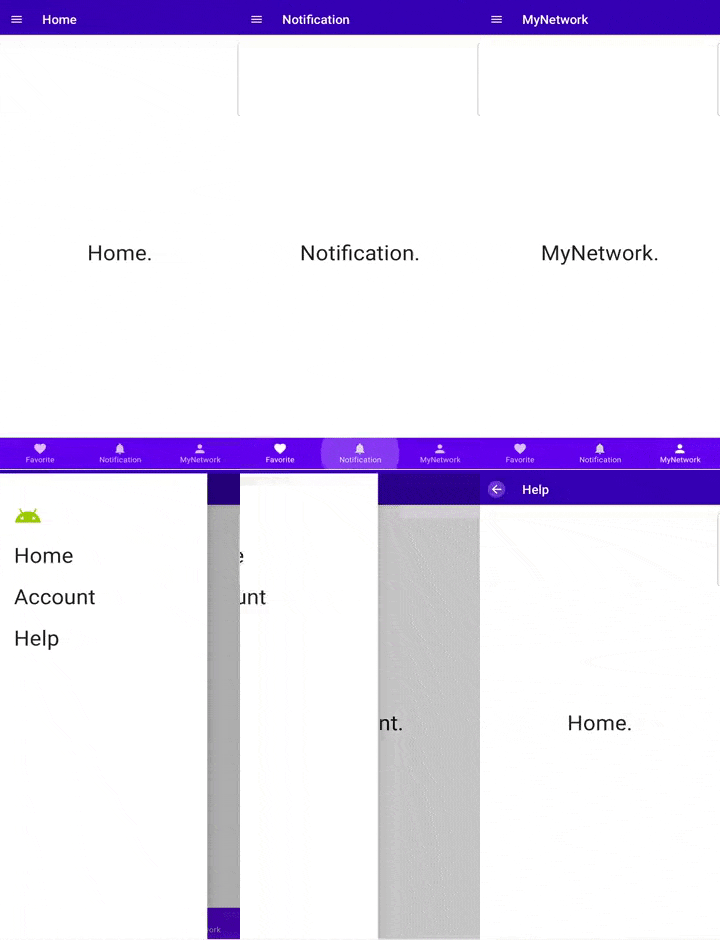
Here’s what we are trying to achieve for this post:

The app launches with a default home screen. The home screen has three screens that it can navigate to from the bottom navigation. The drawer also has three screens to navigate; Home (default screen on launch), Account and Help. The bottom navigation is available for home screen only.
Screens
| sealed class Screens(val route: String, val title: String) { | |
| sealed class HomeScreens( | |
| route: String, | |
| title: String, | |
| val icon: ImageVector | |
| ) : Screens( | |
| route, | |
| title | |
| ) { | |
| object Favorite : HomeScreens("favorite", "Favorite", Icons.Filled.Favorite) | |
| object Notification : HomeScreens("notification", "Notification", Icons.Filled.Notifications) | |
| object MyNetwork : HomeScreens("network", "MyNetwork", Icons.Filled.Person) | |
| } | |
| sealed class DrawerScreens( | |
| route: String, | |
| title: String | |
| ) : Screens(route, title) { | |
| object Home : DrawerScreens("home", "Home") | |
| object Account : DrawerScreens("account", "Account") | |
| object Help : DrawerScreens("help", "Help") | |
| } | |
| } | |
| val screensInHomeFromBottomNav = listOf( | |
| Screens.HomeScreens.Favorite, | |
| Screens.HomeScreens.Notification, | |
| Screens.HomeScreens.MyNetwork | |
| ) | |
| val screensFromDrawer = listOf( | |
| Screens.DrawerScreens.Home, | |
| Screens.DrawerScreens.Account, | |
| Screens.DrawerScreens.Help, | |
| ) |
The screens are divided in to two categories, HomeScreens (navigable from bottom nav) and DrawerScreens (navigable from drawer).
Each screen is just a simple composable with a text:
| @Composable | |
| fun Home(modifier: Modifier = Modifier, viewModel: MainViewModel) { | |
| viewModel.setCurrentScreen(Screens.DrawerScreens.Home) | |
| Column( | |
| modifier = modifier.fillMaxSize(), | |
| verticalArrangement = Arrangement.Center, | |
| horizontalAlignment = Alignment.CenterHorizontally | |
| ) { | |
| Text(text = "Home.", style = MaterialTheme.typography.h4) | |
| } | |
| } |
ViewModel
To keep a track of the screen we are in, we’ll use a view model.
| class MainViewModel : ViewModel() { | |
| private val _currentScreen = MutableLiveData<Screens>(Screens.DrawerScreens.Home) | |
| val currentScreen: LiveData<Screens> = _currentScreen | |
| fun setCurrentScreen(screen: Screens) { | |
| _currentScreen.value = screen | |
| } | |
| } |
Bottom Navigation
The BottomNavigation code looks like this. Pretty much same as what we had for navigation from drawer. Here we are using the backStackEntry to mark the selected screen.
Scaffold
Lets checkout the scaffold code:
| @Composable | |
| fun AppScaffold() { | |
| val viewModel: MainViewModel = viewModel() | |
| val navController = rememberNavController() | |
| val scaffoldState = rememberScaffoldState() | |
| val scope = rememberCoroutineScope() | |
| val currentScreen by viewModel.currentScreen.observeAsState() | |
| var topBar : @Composable () -> Unit = { | |
| TopBar( | |
| title = currentScreen!!.title, | |
| buttonIcon = Icons.Filled.Menu, | |
| onButtonClicked = { | |
| scope.launch { | |
| scaffoldState.drawerState.open() | |
| } | |
| } | |
| ) | |
| } | |
| if (currentScreen == Screens.DrawerScreens.Help) { | |
| topBar = { | |
| TopBar( | |
| title = Screens.DrawerScreens.Help.title, | |
| buttonIcon = Icons.Filled.ArrowBack, | |
| onButtonClicked = { | |
| navController.popBackStack() | |
| } | |
| ) | |
| } | |
| } | |
| val bottomBar: @Composable () -> Unit = { | |
| if (currentScreen == Screens.DrawerScreens.Home || currentScreen is Screens.HomeScreens) { | |
| BottomBar( | |
| navController = navController, | |
| screens = screensInHomeFromBottomNav | |
| ) | |
| } | |
| } | |
| Scaffold( | |
| topBar = { | |
| topBar() | |
| }, | |
| bottomBar = { | |
| bottomBar() | |
| }, | |
| scaffoldState = scaffoldState, | |
| drawerContent = { | |
| Drawer { screen -> | |
| scope.launch { | |
| scaffoldState.drawerState.close() | |
| } | |
| navController.navigate(screen.route) { | |
| popUpTo = navController.graph.startDestination | |
| launchSingleTop = true | |
| } | |
| } | |
| }, | |
| drawerGesturesEnabled = scaffoldState.drawerState.isOpen, | |
| ) { innerPadding -> | |
| NavigationHost(navController = navController, viewModel = viewModel) | |
| } | |
| } |
Job Offers
The Scaffold composable takes various UI components as parameters. For our use case we are passing in the topBar, bottomBar and a drawer.
Our top bar is different in help screen. It has a back button, so our top bar changes based on the screen. Also, the bottom bar is present only for Home and the 3 home screens. Hence, both of these are set conditionally.
We pass NavigationHost composable as a content to the Scaffold. This means that our screens will be contained within the components of the scaffold, in our case, between the top and the bottom bar. It is for this reason that the individual screens do not have a top bar present.
Navigation Host
The Navigation host has all the screens added to the graph that we need.
We’ll use the AppScaffold composable in the activity.
| class MainActivity : ComponentActivity() { | |
| override fun onCreate(savedInstanceState: Bundle?) { | |
| super.onCreate(savedInstanceState) | |
| setContent { | |
| NavigationDrawerTheme { | |
| AppScaffold() | |
| } | |
| } | |
| } | |
| } |
And this is all we need to use scaffold for holding our various UI components and managing navigation across various screens.
A point to note here is that we have not used any animation while navigating and that is because animation is still being worked upon in compose navigation.
Additional Readings
Handling back press
In the above and the previous post, you will notice that (when you run the app) when the drawer is open, it does not closes on press of device back button.
To handle this, we’ll intercept the backpress and close the drawer if it’s open.
We’ll add this below code at the beginning of our AppScaffold composable:
| if (scaffoldState.drawerState.isOpen) { | |
| BackPressHandler { | |
| scope.launch { | |
| scaffoldState.drawerState.close() | |
| } | |
| } | |
| } |
The BackPressHandler is as below:
| @Composable | |
| fun BackPressHandler(onBackPressed: () -> Unit) { | |
| // Safely update the current `onBack` lambda when a new one is provided | |
| val currentOnBackPressed by rememberUpdatedState(onBackPressed) | |
| // Remember in Composition a back callback that calls the `onBackPressed` lambda | |
| val backCallback = remember { | |
| object : OnBackPressedCallback(true) { | |
| override fun handleOnBackPressed() { | |
| currentOnBackPressed() | |
| } | |
| } | |
| } | |
| val backDispatcher = LocalBackPressedDispatcher.current | |
| // Whenever there's a new dispatcher set up the callback | |
| DisposableEffect(backDispatcher) { | |
| backDispatcher.addCallback(backCallback) | |
| // When the effect leaves the Composition, or there's a new dispatcher, remove the callback | |
| onDispose { | |
| backCallback.remove() | |
| } | |
| } | |
| } | |
| val LocalBackPressedDispatcher = | |
| staticCompositionLocalOf<OnBackPressedDispatcher> { error("No Back Dispatcher provided") } |
This handler adds a callback to the back press dispatcher which is obtained from CompositionLocal. A CompositionLocal is a way of passing data between compositions. Read more about CompositionLocal here:
https://medium.com/mobile-app-development-publication/android-jetpack-compose-compositionlocal-made-easy-8632b201bfcd
https://developer.android.com/reference/kotlin/androidx/compose/runtime/CompositionLocal
The callback to handle back press is registered and unregistered using a DisposableEffect. A DisposableEffect is a side effect which is used when a cleanup is required when the Key of the effect changes or the composable leaves the composition. Read more here:
https://developer.android.com/jetpack/compose/lifecycle#disposableeffect
Read more about side effects here:
https://developer.android.com/jetpack/compose/lifecycle
https://jorgecastillo.dev/jetpack-compose-effect-handlers
To provide the backpress dispatcher to the composables we need to wrap it with CompositionLocalProvider. Since we need it at scaffold itself, we wrap our AppScaffold with it. This will provide the dispatcher to AppScaffold and all the other composables under this tree.
| setContent { | |
| NavigationDrawerTheme { | |
| CompositionLocalProvider(LocalBackPressedDispatcher provides this.onBackPressedDispatcher) { | |
| AppScaffold() | |
| } | |
| } | |
| } |
The above code for the backpress handler is taken from this Compose sample:
JetChat
Handling State Across Screens
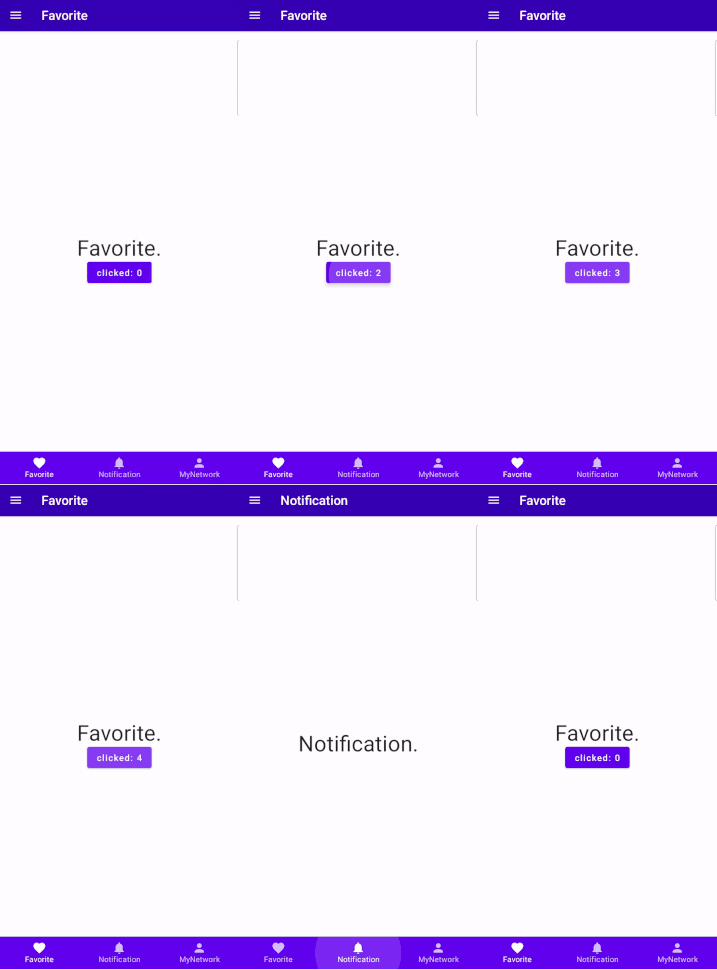
While state in a particular screen/composable can be retained across re-composition by using remember, the same is lost when the screen/composable navigates to a different composable and leaves the composition. Eg:

Here, I have added a button in the favorite screen. On click, the text in the button updates and shows number of times it has been clicked. This is achieved by using rememberSaveable (same as remember but retains sate on reconfiguration of screen when device is rotated), which remembers the click value every time the button composable is recomposed and updates it to the new value. But the value is reset when you navigate to a different screen and come back.
| @Composable | |
| fun Favorite(modifier: Modifier = Modifier, viewModel: MainViewModel) { | |
| viewModel.setCurrentScreen(Screens.HomeScreens.Favorite) | |
| var click by rememberSaveable { mutableStateOf(0) } | |
| Column( | |
| modifier = modifier.fillMaxSize(), | |
| verticalArrangement = Arrangement.Center, | |
| horizontalAlignment = Alignment.CenterHorizontally | |
| ) { | |
| Text(text = "Favorite.", style = MaterialTheme.typography.h4) | |
| Button( | |
| onClick = { | |
| click++ | |
| } | |
| ) { | |
| Text("clicked: $click") | |
| } | |
| } | |
| } |
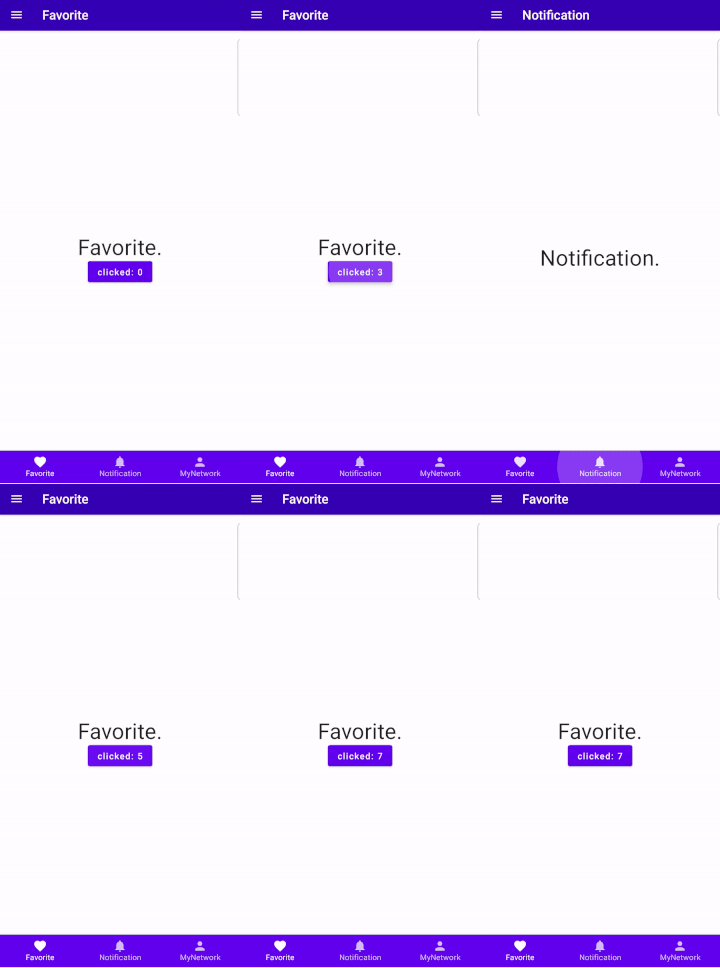
To retain a state across different screen/composable we can use a ViewModel. The viewmodel is bound to the lifecycle of the activity and the same is passed to each composable. We use the view model to retain the state of the button click count.
| class MainViewModel : ViewModel() { | |
| ...... | |
| private val _clickCount = MutableLiveData(0) | |
| val clickCount: LiveData<Int> = _clickCount | |
| fun updateClick(value: Int) { | |
| _clickCount.value = value | |
| } | |
| } |
The composable for Favorite screen now looks like this:
| @Composable | |
| fun Favorite(modifier: Modifier = Modifier, viewModel: MainViewModel) { | |
| viewModel.setCurrentScreen(Screens.HomeScreens.Favorite) | |
| val clickCount by viewModel.clickCount.observeAsState() | |
| var click = clickCount?: 0 | |
| Column( | |
| modifier = modifier.fillMaxSize(), | |
| verticalArrangement = Arrangement.Center, | |
| horizontalAlignment = Alignment.CenterHorizontally | |
| ) { | |
| Text(text = "Favorite.", style = MaterialTheme.typography.h4) | |
| Button( | |
| onClick = { | |
| click++ | |
| viewModel.updateClick(click) | |
| } | |
| ) { | |
| Text("clicked: $click") | |
| } | |
| } | |
| } |
Here we observe the clickCount livedata as a state from the viewmodel and use a local variable click to update the count. And now our state for click count is retained even when the screen changes.

And that’s all I have for this post. Thanks for reading.
Checkout the code on GitHub:
NavigationAndScaffold


