

Posted By: Peng Jiang
One of the new features announced at WWDC this year was Live Text. It allows users to select, translate, and search for text found within any image. The demo used during the keynote was a meeting whiteboard with handwritten text. Opening the camera app on iPhone and pointing it at the whiteboard, a small indicator appears in the bottom right corner showing text is recognized in the viewfinder.
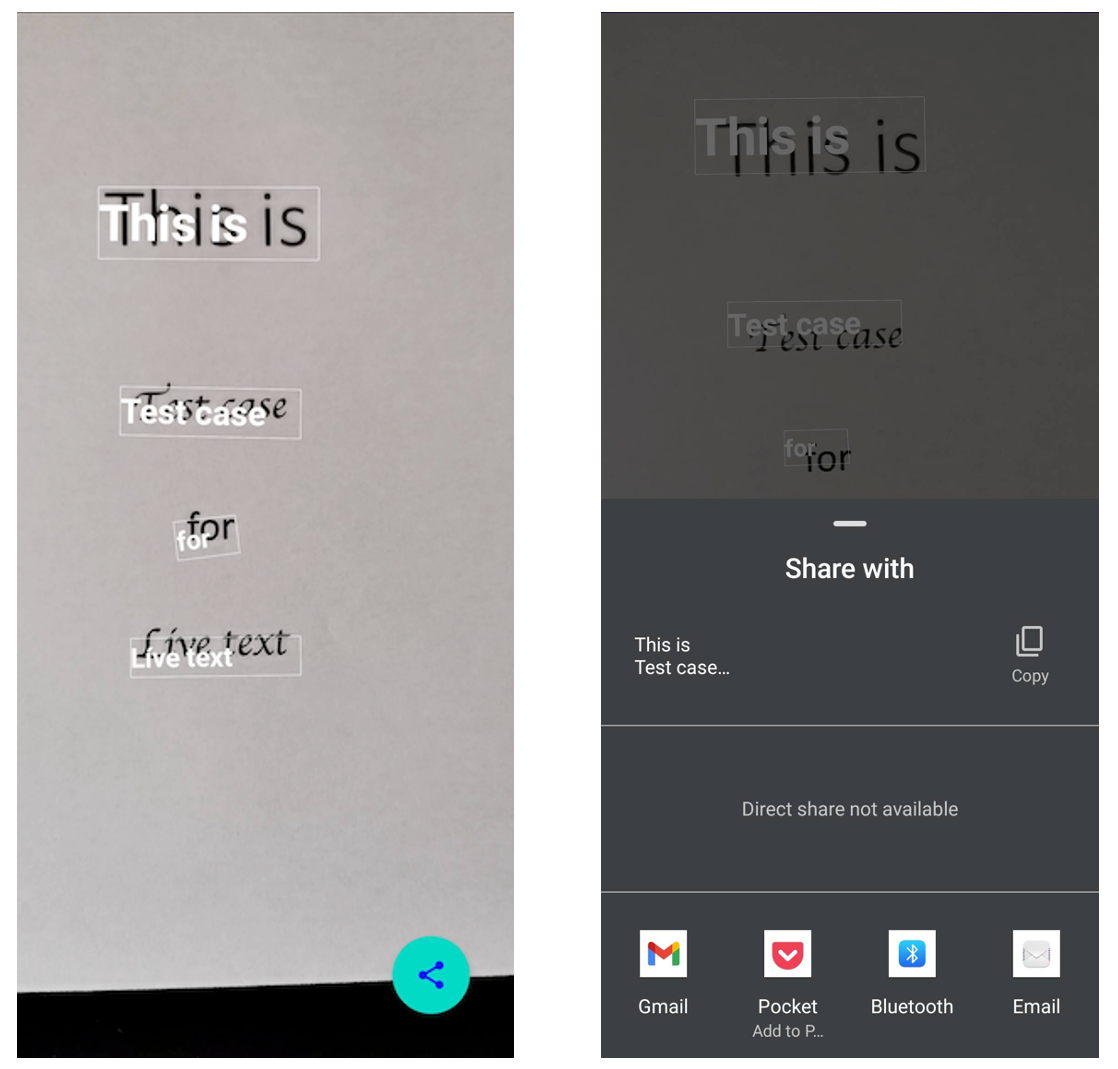
Android users may notice that the Live Text feature works the same as Google Lens. However, it isn’t as integrated into the Android experience as Live Text on iOS. You can trigger Live Text from any text input field on iPhone. In this post, I would like to show you how to build a simple version of the Live Text with Android Jetpack compose and CameraX. Here are some screenshots from the demo App. You can find the demo app code here.
Requirements
Before we dive into the implementation part, let’s define what are the basic functionalities of Live Text first. If you have seen the Live Text demo or use the Google lens, the basic steps are:
- Recognizes the text from the image or camera frame
- Handles the text selection.
- Understand the text content and suggest potential actions, such as an address, phone number, email, etc.
You may notice this can be just a basic optical character recognition (OCR) process with context awareness suggestions. However, when I started to dig deeper and implement the features, the difficulty coming up especially from the user experience point of view.
App Structure
Using the ViewModel and other Jetpack libraries in the demo, the demo app structure is very simple. The following diagram shows the components and data flows:
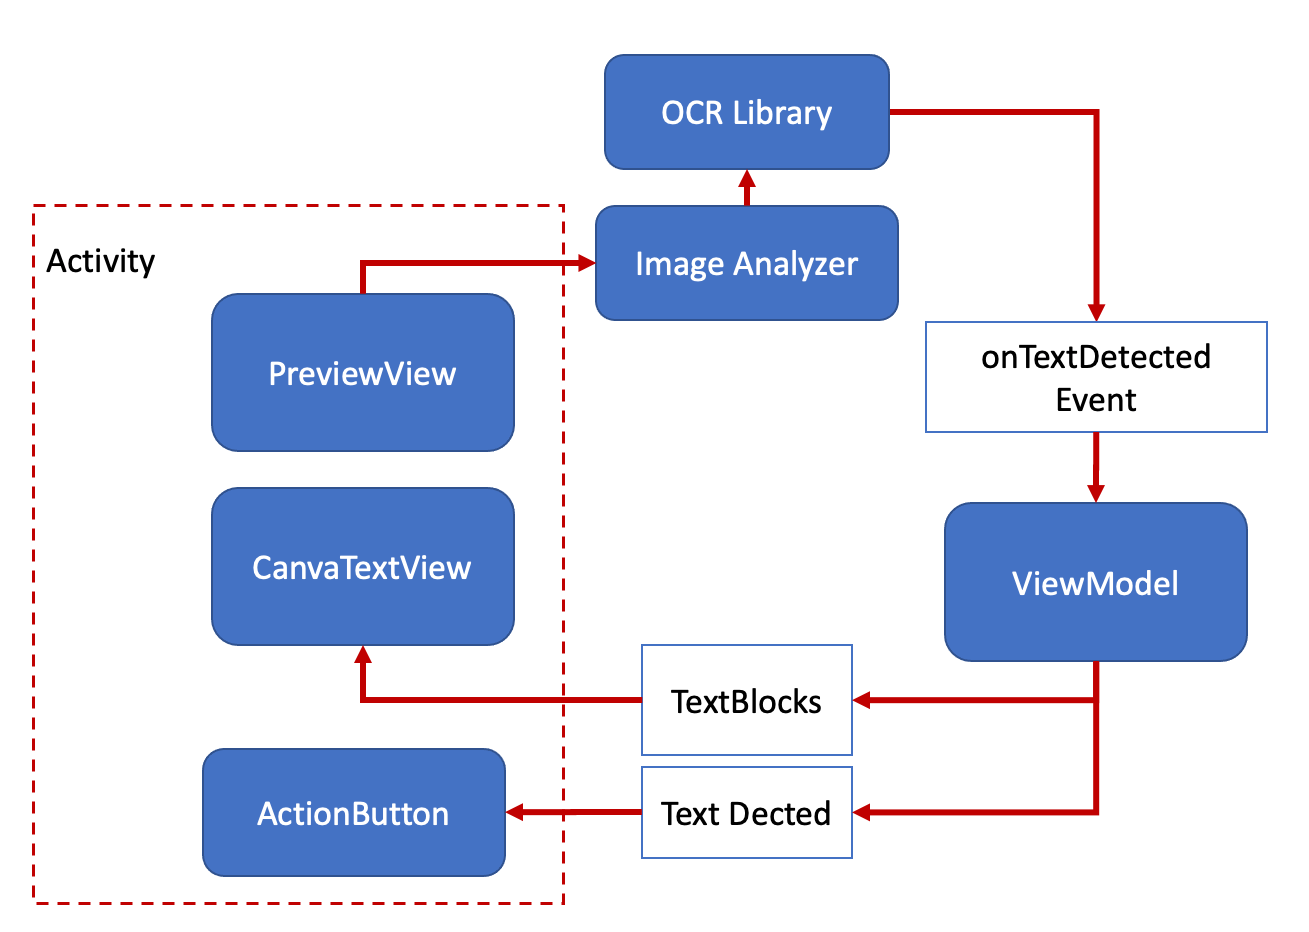
The activity host three Composable views, which display the preview, detected text content and action button.
The CameraX library is used to handle the preview and image frame analysis. The analysis interface provides a CPU-accessible image to perform image processing on each frame. The analyzer is set to work in a non-block model (using STRATEGY_KEEP_ONLY_LATESTflag), which always tries to get the latest image frame and check the text in the frame.
In this demo app, the Huawei OCR library is used to handle the OCR process. You can also use other OCR libraries, such as the Firebase ML kit. The OCR service can run on the cloud or device. The text recognition service running on the cloud recognizes text with higher accuracy and more language support. But the on-device version can provide a real-time process, which is a small ML algorithm that can be added to your app. It has limited language support, more details you can find here. The following recognize steps are very similar to most of the OCR libraries, so you can replace them with the one you prefer.
| class TextAnalyzer(private val onTextDetected: (MLText) -> Unit) : ImageAnalysis.Analyzer { | |
| private val setting = MLLocalTextSetting.Factory() | |
| .setOCRMode(MLLocalTextSetting.OCR_TRACKING_MODE) | |
| .setLanguage("en") | |
| .create() | |
| private val analyzer = MLAnalyzerFactory.getInstance().getLocalTextAnalyzer(setting) | |
| @SuppressLint("UnsafeOptInUsageError") | |
| override fun analyze(imageProxy: ImageProxy) { | |
| imageProxy.image?.let { image -> | |
| analyzer.asyncAnalyseFrame(MLFrame.fromMediaImage(image, imageProxy.imageInfo.rotationDegrees)) | |
| .addOnSuccessListener { mlText -> | |
| mlText?.let { | |
| onTextDetected.invoke(it) | |
| } | |
| imageProxy.close() | |
| }.addOnFailureListener { | |
| imageProxy.close() | |
| } | |
| } | |
| } | |
| } |
TextAnalyzer
- Create a text analyzer instance MLTextAnalyzer to recognize text in the camera frame. You can use MLLocalTextSetting to specify the support languages and OCR detection mode. There are two detection modes, one is for single image detection (
OCR_DETECT_MODE), the other one is for video stream text detection (OCR_TRACKING_MODE). The detection result of the preceding frame is used as the basis to quickly detect the text position in the camera frame. - Create a MLFrame object using
MLFrame.fromMediaImage. You need to pass the rotation value when creating the MLFrame, but if you are using the CameraX, theImageAnalysis.Analyzerclasses calculate the rotation value (imageProxy.imageInfo.rotationDegrees) for you. - Pass the MLFrame object to the asyncAnalyseFrame method for text recognition. The recognition result is specified by the
MLText.Blockarray.
OUR VIDEO RECOMMENDATION


Jobs
Display the text and action
Once the text is recognized, the library will return the detected text content and vertices of the text bounding box. The share action button will be shown and the detected text will also display above the image. Once you click the text, it will copy the text to the clipboard. You can also click the share button to share all texts detected in the image frame.
When implementing the detected text, I was thinking to use the Text component and put above the preview, but the performance is not good, especially when you have lots of text blocks. Then I change to draw the text on the canvas, which looks better, but the click action need more code to handle, you need to check the touchpoint is in any text block area. The final result will look like this:

Conclusion
After finishing this simple demo, I think the most difficult part is still the text recognition. The demo app will only detect English characters. If more than one language character is in the camera stream or the characters are not easily recognised, the demo app performance will drop dramatically. The device-only OCR can improve privacy protection but it may increase the difficulty if you want to handle multiple languages at the same time. I think maybe that’s why the Live Text on iOS 15 only recognizes seven languages in the initial release.
The second one is the user experience, especially when users try to select the detected text. Draw text on the canvas makes the text display more accurately but the selection part will be more difficult. As I mentioned initially, the Live Text is integrated with the iOS system, so it needs to be fast and lightweight. My current implementation took around 130MB memory when run and 18MB installed space. This included the OCR model around 500KB.
Another part I didn’t touch in this demo is the device machine learning. From the detected text content to understanding the context. When more and more actions are triggered, the local model can be improved based on the feedback. Free free to fork the repo and create your own Live Text.


