

Learn to create custom shapes and handle states in Jetpack Compose
This is part of a multi-part series about learning to use Jetpack Compose through code. This part of the series will be focusing on building the game details screen and also covering the test cases for this screen.
Other articles in this series:
Learn with code: Jetpack Compose — Lists and Pagination (Part 1)
Note: All the images and game data in the article are taken from the awesome RAWG API.
Dissecting the details screen
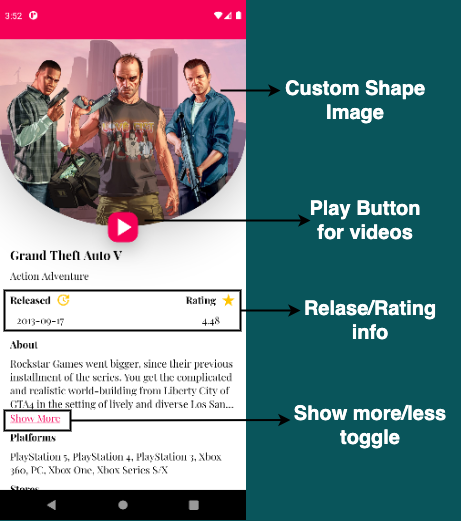
Game details screen
There are a few components here and I have highlighted only the main ones in the above image. Let’s see what each of these components are from top to bottom: Game image, play button, game title, game genre, then below that on the same row you have released info and rating info, game description, show more/less toggle, platforms, stores, game developer and finally the game publisher.
Phew! Quite a few components one below the other! By the time we finish designing this screen you will see how easy and fast we can do this. Let’s code!
Column
As you would have guessed by now, we can use a Column to design this layout as all the components are one below the other.
Column is a layout composable that places its children in a vertical sequence.
| @Composable | |
| fun GameDetails( | |
| gameDetails: GameDetailsEntity, | |
| openGameTrailer: () -> Unit | |
| ) { | |
| Column(modifier = Modifier.fillMaxSize()) { | |
| // Game image | |
| GameImage(image = gameDetails.backgroundImage) | |
| // Play button | |
| PlayTrailer(openGameTrailer = openGameTrailer) | |
| // Title | |
| Text( | |
| modifier = | |
| Modifier.padding( | |
| start = 16.dp, | |
| top = 30.dp, | |
| end = 16.dp | |
| ), | |
| text = gameDetails.name, | |
| color = Color.Black, | |
| fontWeight = FontWeight.Bold, | |
| fontSize = 20.sp | |
| ) | |
| // Genres | |
| Text( | |
| modifier = Modifier.getDetailsModifier(), | |
| text = gameDetails.genresEntity.toGenres() | |
| ) | |
| // Released and rating info | |
| ReleaseRating() | |
| // About | |
| Text( | |
| modifier = | |
| Modifier.padding( | |
| start = 16.dp, | |
| top = 16.dp, | |
| end = 16.dp | |
| ), | |
| text = "About", | |
| color = Color.Black, | |
| fontWeight = FontWeight.Bold, | |
| fontSize = 20.sp | |
| ) | |
| //Description with show more/less toggle | |
| GameDescription(gameDetails.description) | |
| // Platforms info | |
| Text( | |
| modifier = Modifier.getDetailsModifier(), | |
| text = "Platforms", | |
| color = Color.Black, | |
| fontWeight = FontWeight.Bold, | |
| fontSize = 20.sp | |
| ) | |
| Text( | |
| modifier = Modifier.getDetailsModifier(), | |
| text = gameDetails.platformsEntity.toPlatforms() | |
| ) | |
| // Stores | |
| Text( | |
| modifier = Modifier.getDetailsModifier(), | |
| text = "Stores", | |
| color = Color.Black, | |
| fontWeight = FontWeight.Bold, | |
| fontSize = 20.sp | |
| ) | |
| Text( | |
| modifier = Modifier.getDetailsModifier(), | |
| text = gameDetails.storesEntity.toStores() | |
| ) | |
| // Developer | |
| Text( | |
| modifier = Modifier.getDetailsModifier(), | |
| text = "Developer", | |
| color = Color.Black, | |
| fontWeight = FontWeight.Bold, | |
| fontSize = 20.sp | |
| ) | |
| Text( | |
| modifier = Modifier.getDetailsModifier(), | |
| text = | |
| gameDetails.developersEntity.toDevelopers() | |
| ) | |
| // Publisher | |
| Text( | |
| modifier = Modifier.getDetailsModifier(), | |
| text = "Publisher", | |
| color = Color.Black, | |
| fontWeight = FontWeight.Bold, | |
| fontSize = 20.sp | |
| ) | |
| Text( | |
| modifier = | |
| Modifier.padding( | |
| start = 16.dp, | |
| top = 8.dp, | |
| end = 16.dp, | |
| bottom = 16.dp | |
| ), | |
| text = | |
| gameDetails.publishersEntity.toPublishers() | |
| ) | |
| } | |
| } | |
| fun Modifier.getDetailsModifier(): Modifier = | |
| this.padding(start = 16.dp, top = 8.dp, end = 16.dp) |
Initial details screen
Running the app now will give you the following screen:

Initial game details screen
The one thing you will notice right away is that your screen is not scrollable! To enable scrolling we can make use of verticalScroll modifier.
The
verticalScrollandhorizontalScrollmodifiers provide the simplest way to allow the user to scroll an element when the bounds of its contents are larger than its maximum size constraints.
Let’s go ahead and add it to our Column.
| @Composable | |
| fun GameDetails( | |
| gameDetails: GameDetailsEntity, | |
| openGameTrailer: () -> Unit | |
| ) { | |
| val scrollState = rememberScrollState() | |
| Column( | |
| modifier = | |
| Modifier.fillMaxSize() | |
| .verticalScroll(scrollState) | |
| ) { | |
| // column children as above code snippet | |
| } | |
| } |
Scroll behaviour to game details screen

Game details screen with scroll
As promised, it hardly took us a few minutes to build this! Now, onto the interesting parts of the design!
Game Image and Play Button
The play button is overlapping the game image. First, let’s style our play button.
| @Composable | |
| fun PlayTrailer( | |
| modifier: Modifier = Modifier, | |
| openGameTrailer: () -> Unit | |
| ) { | |
| Box(modifier = modifier) { | |
| IconButton(onClick = openGameTrailer) { | |
| Image( | |
| modifier = | |
| Modifier.width(50.dp) | |
| .height(50.dp) | |
| .align(Alignment.Center) | |
| .graphicsLayer { | |
| shadowElevation = 20.dp.toPx() | |
| shape = | |
| RoundedCornerShape(15.dp) | |
| clip = true | |
| } | |
| .background(Color(0xFFF50057)), | |
| painter = | |
| painterResource( | |
| id = R.drawable.ic_play | |
| ), | |
| contentDescription = "Play Trailer" | |
| ) | |
| } | |
| } | |
| } |
Styled play button
Now, let’s align the play button to the bottom of our game image. To do this, we can simply wrap our GameImage and PlayTrailer inside a ConstraintLayout and provide the necessary constraints.
Let’s preview this and see what we got so far.

Game image and play button
Jobs
We have almost got our desired result but the GameImage is missing something.
Custom shapes
In traditional XML layouts you could shape your views using a custom drawable or you could use a ShapeableImageView for shaping your images.
Compose already provides some basic shapes like RoundedCornerShape, CircleShape, CutCornerShape but if you want to draw your own custom shape you can easily do it by extending the Shape interface. Here, you will have to override the createOutline() method which expects you to return anOutline.
If you look at the code, Outline is a sealed class which has 3 subclasses:
Rectangle— used for a rectangular areaRounded— used for rectangular area with rounded cornersGeneric— this let’s you define your ownPath
As you would have guessed, we will using the generic shape and providing it with our custom path.
| class BottomRoundedArcShape : Shape { | |
| override fun createOutline( | |
| size: Size, | |
| layoutDirection: LayoutDirection, | |
| density: Density | |
| ): Outline { | |
| return Outline.Generic( | |
| path = drawArcPath(size = size) | |
| ) | |
| } | |
| } |
Custom shape in compose
Let’s now create our custom path by implementing the drawArchPath() method. Our image needs a rounded bottom shape. You can visualise the path as follows:

Custom shape path
| fun drawArcPath(size: Size): Path { | |
| return Path().apply { | |
| reset() | |
| // go from (0,0) to (width, 0) | |
| lineTo(size.width, 0f) | |
| // go from (width, 0) to (width, height) | |
| lineTo(size.width, size.height) | |
| // Draw an arch from (width, height) to (0, height) | |
| // starting from 0 degree to 180 degree | |
| arcTo( | |
| rect = | |
| Rect( | |
| Offset(0f, 0f), | |
| Size(size.width, size.height) | |
| ), | |
| startAngleDegrees = 0f, | |
| sweepAngleDegrees = 180f, | |
| forceMoveTo = false | |
| ) | |
| // go from (0, height) to (0, 0) | |
| lineTo(0f, 0f) | |
| close() | |
| } | |
| } |
Custom path
Let’s add the shape we just created to our GameImage.
| @Composable | |
| fun GameImage( | |
| image: String, | |
| modifier: Modifier = Modifier | |
| ) { | |
| Image( | |
| modifier = | |
| modifier | |
| .fillMaxWidth() | |
| .height(300.dp) | |
| .graphicsLayer { | |
| clip = true | |
| shape = BottomRoundedArcShape() | |
| shadowElevation = 50.dp.toPx() | |
| }, | |
| contentScale = ContentScale.Crop, | |
| painter = | |
| rememberImagePainter( | |
| data = image, | |
| builder = { | |
| placeholder(R.drawable.app_logo) | |
| crossfade(true) | |
| } | |
| ), | |
| contentDescription = "Game Image" | |
| ) | |
| } |
GameImage.kt
Let’s preview our GameImage and PlayTrailer now and see what we get.

Final game image and play button
Looks pretty good! I will leave designing the release and rating info to you. Let me know about your design in the comments!
As you can see so far, the game description is pretty long and not everyone will be interested in reading it all. Let’s create a show more/less toggle to handle this use case.
Show more/less toggle — Compose States
One way we can handle this show more/less use case is by simply changing the maxLines attribute of your Text composable. To do this, we can basically make use of States to tell our composable to recompose whenever the maxLines value changes.
One more thing to consider here is that, we need to display Show More only if the game description overflows maxLines. To do this, we can make use of onTextLayout callback. Let’s code!
State in an app is any value that can change over time.
| @Composable | |
| fun GameDescription(description: String) { | |
| val maxLines = remember { mutableStateOf(4) } | |
| val toggle = remember { | |
| mutableStateOf(DescriptionStatus.DEFAULT) | |
| } | |
| Column { | |
| // Desctiption text | |
| Text( | |
| modifier = | |
| Modifier.getDetailsModifier() | |
| .testTag("Description"), | |
| text = description, | |
| overflow = TextOverflow.Ellipsis, | |
| maxLines = maxLines.value, | |
| onTextLayout = { | |
| if (it.lineCount == 4 && | |
| it.isLineEllipsized(3) | |
| ) { | |
| // game description has overflowed maxLines | |
| // show Show More | |
| toggle.value = | |
| DescriptionStatus.SHOW_MORE | |
| } else if (it.lineCount > 4) { | |
| // showing entire description | |
| // show Show Less | |
| toggle.value = | |
| DescriptionStatus.SHOW_LESS | |
| } else { | |
| // game description has not overflowed maxLines | |
| // do not show Show More at all | |
| } | |
| } | |
| ) | |
| when (toggle.value) { | |
| DescriptionStatus.SHOW_MORE -> { | |
| // display show more | |
| Text( | |
| modifier = | |
| Modifier.padding( | |
| start = 16.dp, | |
| end = 16.dp | |
| ) | |
| .clickable { | |
| maxLines.value = | |
| Int.MAX_VALUE | |
| }, | |
| text = "Show More", | |
| color = Color(0xFFF50057), | |
| textDecoration = | |
| TextDecoration.Underline, | |
| ) | |
| } | |
| DescriptionStatus.SHOW_LESS -> { | |
| // display show less | |
| Text( | |
| modifier = | |
| Modifier.padding( | |
| start = 16.dp, | |
| end = 16.dp | |
| ) | |
| .clickable { | |
| maxLines.value = 4 | |
| }, | |
| text = "Show Less", | |
| color = Color(0xFFF50057), | |
| textDecoration = | |
| TextDecoration.Underline, | |
| ) | |
| } | |
| else -> { | |
| // show more is not displayed at all | |
| // do not do anything | |
| } | |
| } | |
| } | |
| } | |
| enum class DescriptionStatus { | |
| DEFAULT, | |
| SHOW_MORE, | |
| SHOW_LESS | |
| } |
Game description and toggle
Let’s run the app now and see what we get.

Game details screen
Looks pretty good! Again, I am leaving the designing of release and rating info to you.
Testing the composables
Now that we have our game details screen ready, let’s go ahead and write a test for it.
| class GameDetailsTest { | |
| @get:Rule val composeTestRule = createComposeRule() | |
| @Test | |
| fun game_details_should_be_shown() { | |
| composeTestRule.setContent { | |
| EpicWorldTheme { | |
| GameDetails( | |
| gameDetails = | |
| FakeGamesData.getFakeGameDetails(), | |
| openGameTrailer = {} | |
| ) | |
| } | |
| } | |
| // Game image should be shown | |
| composeTestRule | |
| .onNodeWithContentDescription("Game Image") | |
| .assertIsDisplayed() | |
| // Trailer play button should be shown and clickable | |
| composeTestRule | |
| .onNodeWithContentDescription("Play Trailer") | |
| .assertIsDisplayed() | |
| .assertHasClickAction() | |
| // Game title should be shown | |
| composeTestRule | |
| .onNodeWithText("Grand Theft Auto V") | |
| .assertIsDisplayed() | |
| // Game genres should be shown | |
| composeTestRule | |
| .onNodeWithText("Action Adventure") | |
| .assertIsDisplayed() | |
| // Game description should be shown | |
| composeTestRule | |
| .onNodeWithText("About") | |
| .assertIsDisplayed() | |
| composeTestRule | |
| .onNodeWithText("Show More") | |
| .assertIsDisplayed() | |
| composeTestRule | |
| .onNodeWithTag("Description") | |
| .assertIsDisplayed() | |
| // Game platforms should be shown | |
| composeTestRule | |
| .onNodeWithText("Platforms") | |
| .assertIsDisplayed() | |
| composeTestRule | |
| .onNodeWithTag("Game Platforms") | |
| .assertIsDisplayed() | |
| // Scroll to desired view | |
| composeTestRule | |
| .onNodeWithText("Stores") | |
| .performScrollTo() | |
| composeTestRule | |
| .onNodeWithTag("Game Stores") | |
| .performScrollTo() | |
| // Game stores should be shown | |
| composeTestRule | |
| .onNodeWithText("Stores") | |
| .assertIsDisplayed() | |
| composeTestRule | |
| .onNodeWithTag("Game Stores") | |
| .assertIsDisplayed() | |
| // Scroll to desired view | |
| composeTestRule | |
| .onNodeWithText("Developer") | |
| .performScrollTo() | |
| composeTestRule | |
| .onNodeWithText("Rockstar North") | |
| .performScrollTo() | |
| // Game developers should be shown | |
| composeTestRule | |
| .onNodeWithText("Developer") | |
| .assertIsDisplayed() | |
| composeTestRule | |
| .onNodeWithText("Rockstar North") | |
| .assertIsDisplayed() | |
| // Scroll to desired view | |
| composeTestRule | |
| .onNodeWithText("Publisher") | |
| .performScrollTo() | |
| composeTestRule | |
| .onNodeWithText("Rockstar Games") | |
| .performScrollTo() | |
| // Game publishers should be shown | |
| composeTestRule | |
| .onNodeWithText("Publisher") | |
| .assertIsDisplayed() | |
| composeTestRule | |
| .onNodeWithText("Rockstar Games") | |
| .assertIsDisplayed() | |
| } | |
| } | |
| object FakeGamesData { | |
| fun getFakeGameDetails(): GameDetailsEntity { | |
| // provide fake game details data | |
| } | |
| } |
Game details test
The test is pretty self-explanatory. We are passing in fake GameDetailsEntity to our composable and then asserting that all the views are displayed.
One thing to note here is that, if your view is off-screen and you are trying to assert that the view is displayed then your test case will fail. For this, you can first scroll to your view using performScroll() before making your assertion.
I will leave the rest of the test cases to you. Use all your creativity and make sure you cover as many test cases as possible for this screen!
You can find the complete source code with all the tests for the details screen in this repository.
What’s next?
In this post we have designed our game details screen and also tested the same. In the next post, let’s explore and build the game videos screen and also the different UI tests for this screen. See you there:
Thanks for reading! If you liked the article please do leave a clap 👏 and don’t forget to subscribe and follow to get regular updates! 🙂 You can also connect with me on LinkedIn. I would love to see your designs and tests!
Additional Resources
- Android Developers website to dive deeper into column in compose
- Android Developers website to learn more about shapes
- Android Developers website to understand more about states in compose
- Android Developers website to dive deeper into testing in jetpack compose


