

CameraX OverView:
CameraX is a Jetpack support library, built to help you make camera app development easier. It provides a consistent and easy-to-use API surface that works across most Android devices, with backward compatibility to Android 5.0 (API level 21).
While it leverages the capabilities of camera2, it uses a simpler, use a case-based approach that is lifecycle-aware. It also resolves device compatibility issues for you so that you don’t have to include device-specific code in your codebase. These features reduce the amount of code you need to write when adding camera capabilities to your app.
Lastly, CameraX enables developers to leverage the same camera experiences and features that preinstalled camera apps provide, with as little as two lines of code. CameraX Extensions are optional add-ons that enable you to add effects on supported devices. These effects include Portrait, HDR, Night, and Beauty.
The Architecture:
CameraX architecture is based on use cases, each use case has its own implementation. However, the basic implementation is the same for all the use cases. Following are the use cases currently available to CameraX API.
- Preview: In the preview use case, you get a preview of what the camera is seeing. To display it to the user you can use Preview View
- Image analysis: If you are building an application using TensorFlow lite or any other machine learning task, Image Analysis provides you with a buffer of images that is accessible by the CPU
- Image capture: As the name suggests in this use case you can click and save pictures.
The Process:
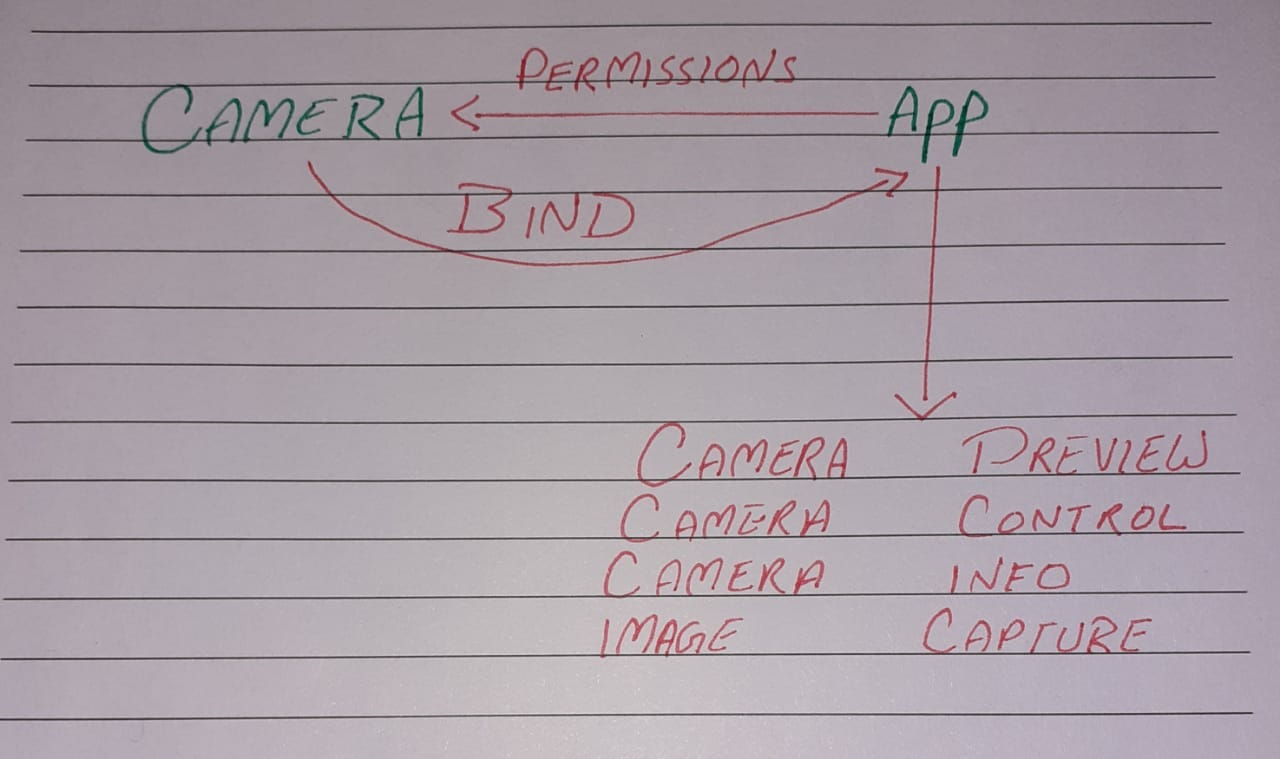 CameraX Process of Image Capture
- Step 1: The camera is hardware and to access it you need permissions. So, the first step is to ask the user for camera access permission
- Step 2: Once you get the permission you need to bind the camera to your application to get a preview of what the camera is seeing
- Step 3: After binding the camera to our app, We need to get the preview as described in the preview use case.
- Step 4: Now, we need to add some control to our layout, so, the user can interact with the camera.
- Step 5: Start capturing pictures
Let’s Get To Code:
First, we need to add dependencies to our build.gradle file
dependencies {
  // CameraX core library using the camera2 implementation
  def camerax_version = "1.0.0-rc03"
  // The following line is optional, as the core library is included indirectly by camera-camera2
  implementation "androidx.camera:camera-core:${camerax_version}"
  implementation "androidx.camera:camera-camera2:${camerax_version}"
  // If you want to additionally use the CameraX Lifecycle library
  implementation "androidx.camera:camera-lifecycle:${camerax_version}"
  // If you want to additionally use the CameraX View class
  implementation "androidx.camera:camera-view:1.0.0-alpha22"
  // If you want to additionally use the CameraX Extensions library
  implementation "androidx.camera:camera-extensions:1.0.0-alpha22"
}
Now, we need a preview to our layout so we can see the world from the camera’s eye
| <androidx.constraintlayout.widget.ConstraintLayout | |
| android:layout_width="match_parent" | |
| android:layout_height="match_parent" | |
| android:background="@color/black"> | |
| <androidx.camera.view.PreviewView | |
| android:id="@+id/viewFinder" | |
| android:layout_width="match_parent" | |
| android:layout_height="match_parent" | |
| android:background="@color/black" | |
| android:foreground="@color/black" | |
| app:layout_constraintBottom_toTopOf="parent" | |
| app:layout_constraintTop_toBottomOf="parent" /> | |
| </androidx.constraintlayout.widget.ConstraintLayout> |
Lets get the permissions. In your manifest file add this permission.
| <uses-permission android:name="android.permission.CAMERA" /> | |
| <uses-permission android:name="android.permission.WRITE_EXTERNAL_STORAGE" /> | |
| <uses-feature | |
| android:name="android.hardware.camera2" | |
| android:required="true" /> |
We will use Activity Result contracts to get the required permission from user.
| private val cameraPermission = | |
| registerForActivityResult(ActivityResultContracts.RequestPermission()) { granted -> | |
| with(binding.root) { | |
| when { | |
| granted -> { | |
| showToastMessageInCenter("Permission Granted") | |
| startCamera() | |
| } | |
| shouldShowRequestPermissionRationale(Manifest.permission.CAMERA) -> { | |
| //this will be shown if the phone is running on api level > 23 else only classic dialog will be shown | |
| showToastMessageInCenter("Permission Denied,Permission is needed to take photos") | |
| } | |
| else -> showToastMessageInCenter("Permission Denied") | |
| } | |
| } | |
| } |
After showing rationale you can also send the user to settings if the user declined the permission request
| private fun openSettings() { | |
| Intent(Settings.ACTION_APPLICATION_DETAILS_SETTINGS).apply { | |
| addCategory(Intent.CATEGORY_DEFAULT) | |
| data = Uri.parse("package:$packageName") | |
| }.run(::startActivity) | |
| } |
Now, we have to check if permission is allowed then let’s start building our camera and implement the startCamera() function.
| private fun checkPermissions() { | |
| if (allPermissionsGranted()) { | |
| startCamera() | |
| } else { | |
| cameraPermission.launch(Manifest.permission.CAMERA) | |
| } | |
| } | |
| private fun allPermissionsGranted() = REQUIRED_PERMISSIONS.all { | |
| ContextCompat.checkSelfPermission( | |
| requireContext(), it | |
| ) == PackageManager.PERMISSION_GRANTED | |
| } |
If you recall, the first step was to connect the camera to your application. In order to do so, first, we get an instance of the Camera using ProcessCameraProvider which returns a complete able future. Using the get method we then acquire an instance of the camera.
| val cameraProviderFuture = ProcessCameraProvider.getInstance(requireContext()) | |
| cameraProviderFuture.addListener(Runnable { | |
| val cameraProvider = cameraProviderFuture.get() | |
| }, ContextCompat.getMainExecutor(requireContext())) |
To show the user what our camera is seeing we need to get a preview from the camera and display it into the preview that we created in the XML file. To complete the preview we set the surface provider using the preview view.
| val cameraProviderFuture = ProcessCameraProvider.getInstance(requireContext()) | |
| cameraProviderFuture.addListener(Runnable { | |
| val cameraProvider = cameraProviderFuture.get() | |
| preview = Preview.Builder().build().apply { | |
| setSurfaceProvider(binding.viewFinderPkgDetails.createSurfaceProvider()) | |
| } | |
| }, ContextCompat.getMainExecutor(requireContext())) |
After getting the preview we will create an image capture object which will eventually help us in capturing images using our camera
| val cameraProviderFuture = ProcessCameraProvider.getInstance(requireContext()) | |
| cameraProviderFuture.addListener(Runnable { | |
| val cameraProvider = cameraProviderFuture.get() | |
| preview = Preview.Builder().build().apply { | |
| setSurfaceProvider(binding.viewFinderPkgDetails.createSurfaceProvider()) | |
| } | |
| imageCapture = ImageCapture.Builder() | |
| .setCaptureMode(ImageCapture.CAPTURE_MODE_MINIMIZE_LATENCY) | |
| .build() | |
| }, ContextCompat.getMainExecutor(requireContext())) |
Some other app may be using the camera so we need to unbind the camera from that application. We will use cameraProvider.unbindAll() to do this task. Then we will bind the camera to our activity/fragment lifecycle and set which camera to use, our preview so the camera can send a preview to our preview view and our image capture object.
| val cameraProviderFuture = ProcessCameraProvider.getInstance(requireContext()) | |
| cameraProviderFuture.addListener(Runnable { | |
| val cameraProvider = cameraProviderFuture.get() | |
| preview = Preview.Builder().build().apply { | |
| setSurfaceProvider(binding.viewFinderPkgDetails.createSurfaceProvider()) | |
| } | |
| imageCapture = ImageCapture.Builder() | |
| .setCaptureMode(ImageCapture.CAPTURE_MODE_MINIMIZE_LATENCY) | |
| .build() | |
| cameraProvider.unbindAll() | |
| cameraX = cameraProvider.bindToLifecycle(viewLifecycleOwner, CameraSelector.DEFAULT_BACK_CAMERA , preview, imageCapture) | |
| }, ContextCompat.getMainExecutor(requireContext())) |
OUR VIDEO RECOMMENDATION


Jobs
This is the final code for our start camera function after that you should be able to view the camera preview in your app
In the next part, we will add torch, flashlight, zoom and image capturing capabilities to our app.
Connect with me on LinkedIn


