Practical example of the power of Jetpack Compose
In this article I will cover the development of a chromatic tuner for Wear OS, an android version designed for wearable devices — such as smartwatches, using Jetpack Compose 😎.
First of all, do you know what a chromatic tuner is? Not? Come on:
Chromatic tuner is for detecting the pitch of 12 musical notes, allowing instruments to be tuned correctly.
All musical notes have their specific vibration frequency. Note A4, for example, oscillates at 440Hz. Based on this, our goal is to develop an application that detects the frequency being played and how above or below the specific frequency of each of the 12 notes, so that the musician can tune his instrument correctly. Let’s go?
User Interface
Our app’s interface will be quite simple:

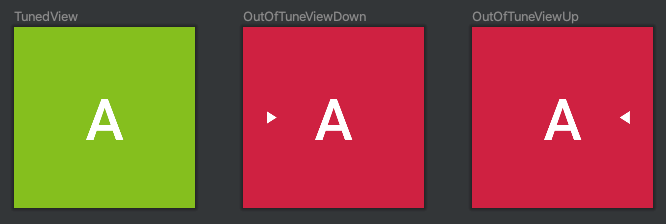
The first state, with a green background, indicates that the played note has the same frequency as the A# note, that is, the note is in tune.
The second, in addition to the red color to indicate that the frequency is not correct, also displays side arrows to indicate whether the musician must increase or decrease the pitch of the note, in order to reach the correct frequency.
Setting up Project
It doesn’t take much mystery to create a project that supports Wear OS and Compose. You can create a new project as usual and add these three tags to AndroidManifest.xml:
| <manifest xmlns:android="http://schemas.android.com/apk/res/android" | |
| package="dev.arildo.tuner"> | |
| <uses-feature android:name="android.hardware.type.watch" /> | |
| <application | |
| android:allowBackup="true".........> | |
| <uses-library android:name="com.google.android.wearable" android:required="true" /> | |
| <meta-data android:name="com.google.android.wearable.standalone" android:value="true" /> |
Wear Compose
In addition to the conventional Compose packages, there are also specific packages for wearable devices:
| implementation "androidx.wear.compose:compose-foundation:$version" | |
| implementation "androidx.wear.compose:compose-material:$version" | |
| implementation "androidx.wear.compose:compose-navigation:$version" |
https://developer.android.com/jetpack/androidx/releases/wear-compose
We are going to use two of these packages and, taking advantage of the fact that we are configuring the project’s dependencies, we will add a DSP library called TarsosDSP which, among other features, has frequency recognition.
- you can download it here
| dependencies { | |
| implementation 'androidx.core:core-ktx:1.7.0' | |
| // Compose | |
| implementation "androidx.activity:activity-compose:1.3.1" | |
| implementation "androidx.compose.runtime:runtime-livedata:1.0.5" | |
| implementation "androidx.compose.ui:ui-tooling-preview:1.0.5" | |
| implementation "androidx.compose.ui:ui:1.0.5" | |
| implementation "androidx.compose.compiler:compiler:1.0.5" | |
| implementation "androidx.compose.foundation:foundation:1.0.5" | |
| implementation "androidx.wear.compose:compose-material:1.0.0-alpha10" | |
| implementation "androidx.wear.compose:compose-foundation:1.0.0-alpha10" | |
| debugImplementation "androidx.compose.ui:ui-tooling:1.0.5" | |
| // TarsosDSP | |
| implementation files('../libs/tarsos-dsp-android.jar') | |
| } |
Okay, dependencies added, now the project is ready to start development. This is our MainActivity():
| class MainActivity : ComponentActivity() { | |
| private val viewModel: MainViewModel by viewModels() | |
| override fun onCreate(savedInstanceState: Bundle?) { | |
| super.onCreate(savedInstanceState) | |
| setContent { | |
| MaterialTheme { } | |
| } | |
| } | |
| } |
One of the coolest things about Compose for Wear OS is that it gives us its own Scaffold and some useful views, like TimeText():
| MaterialTheme { | |
| Scaffold( | |
| timeText = { TimeText() } | |
| ) { | |
| Column( | |
| verticalArrangement = Arrangement.Center, | |
| horizontalAlignment = Alignment.CenterHorizontally, | |
| modifier = Modifier.fillMaxSize() | |
| ) { | |
| Text("Hello World", color = Color.White) | |
| } | |
| } | |
| } |

preview image of our hello world in the emulator
With only 13 lines, our app is like this and yes, my friends, TimeText() is a ready-made clock 😎.
Now let’s implement the UI and @Preview for each of the screen states:
| @Composable | |
| fun TunerScreen(tunerState: TunerState) { | |
| Column( | |
| modifier = Modifier.fillMaxSize().background(tunerState.bgColor), | |
| verticalArrangement = Arrangement.Center, | |
| horizontalAlignment = Alignment.CenterHorizontally | |
| ) { | |
| Row(verticalAlignment = Alignment.CenterVertically) { | |
| LeftArrow(isVisible = tunerState is TunerState.Down) | |
| TextNote(note = tunerState.note.title) | |
| RightArrow(isVisible = tunerState is TunerState.Up) | |
| } | |
| } | |
| } | |
| @Preview(widthDp = 200, heightDp = 200) | |
| @Composable | |
| fun TunedView() = TunerScreen(TunerState.Tuned(NotesEnum.A)) | |
| @Preview(widthDp = 200, heightDp = 200) | |
| @Composable | |
| fun OutOfTuneViewDown() = TunerScreen(TunerState.Down(NotesEnum.A)) | |
| @Preview(widthDp = 200, heightDp = 200) | |
| @Composable | |
| fun OutOfTuneViewUp() = TunerScreen(TunerState.Up(NotesEnum.A)) |
Once that’s done, we’ll have the following previews:
 preview image of the three screen states
Note that in the code above, the TunerScreen() function receives a TunerState(), which is a sealed class I created to make it easier to manage the states:
| sealed class TunerState(open val note: NotesEnum, val bgColor: Color) { | |
| class Down(override val note: NotesEnum) : TunerState(note, OutOfTuneColor) | |
| class Tuned(override val note: NotesEnum) : TunerState(note, TunedColor) | |
| class Up(override val note: NotesEnum) : TunerState(note, OutOfTuneColor) | |
| } |
This way, through just one class, we have all the necessary information to propagate the changes and update our view 😎.
Frequency Detection
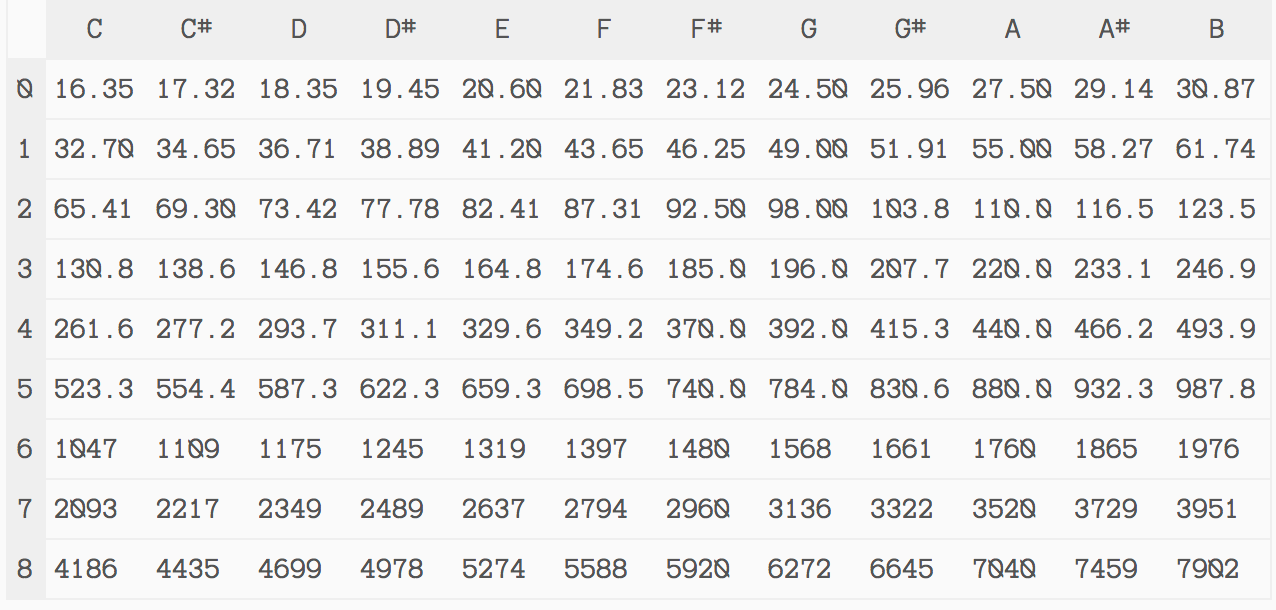
The TarsosDSP library has the PitchDetectionHandler interface that, among several resources, provides us with the frequency and volume of the sound being captured. With that, just use these values obtained and implement the logic of comparison with the reference values we have for each of the 12 notes and their octaves:
 Source: https://www.treinaweb.com.br/blog/gerando-sons-com-a-web-audio-api-do-javascript
Job Offers
Inside the PitchDetectionHandler, we receive the frequency (in Hz) and check if we should update the screen state. The shouldUpdateTunerState() function is responsible for this part, validating if the captured audio has a minimum volume, to avoid noise processing and if the captured frequency is valid.
If it passes this validation, we call the getCurrentPitchState() function, which is responsible for returning an instance of TunerState(), and then we propagate the result to the LiveData _tunerState:
| PitchDetectionHandler { result, audioEvent -> | |
| val pitchInHz = result.pitch.toDouble() | |
| if (shouldUpdateTunerState(pitchInHz, audioEvent)) { | |
| val capturedNoteState = getCurrentPitchState(pitchInHz) | |
| _tunerState.postValue(capturedNoteState) | |
| saveLastUpdatedTime() | |
| } | |
| } |
| fun getCurrentPitchState(pitchHz: Double): TunerState { | |
| val closestFrequency = getClosestFrequencyInAllNotes(pitchHz) | |
| val note = getNoteByFrequency(closestFrequency) | |
| val diff = if (closestFrequency > pitchHz) { | |
| abs(closestFrequency - pitchHz).unaryMinus() | |
| } else { | |
| abs(pitchHz - closestFrequency) | |
| } | |
| return when { | |
| diff.isInPermittedTolerance() -> TunerState.Tuned(note) | |
| diff < -0.5 -> TunerState.Down(note) | |
| else -> TunerState.Up(note) | |
| } | |
| } |
The logic of the getCurrentPitchState() function is quite simple:
- Check which of the frequencies, among all the notes, is closest to the captured frequency;
- Get the note corresponding to the closest frequency;
- Calculate the difference between the input frequency and the reference frequency;
- Return an instance of TunerState(), taking into account this difference, whether it is within acceptable limits, below or above.
As string instruments suffer frequency variations due to the amplitude of the string vibration, therefore we have to adopt an acceptable range for a sound to be considered in tune. For this, we will use the ISO16 standard, which foresees a tolerance of ±0.5Hz.
This logic is implemented in line 12 of the code above, in the extension isInPermittedTolerance(), which is nothing more than the following line:
| fun Double.isInPermittedTolerance() = this in -0.5..0.5 |
LiveData.observeAsState()
Another thing worth talking about is how our ui observes the information propagated to LiveData. Compose has the extension LiveData.observeAsState(), which works very similarly to the traditional way of observing changes in LiveData, with the Observer interface. The difference is that using this approach, the screen is automatically recomposed and the code is much cleaner:
| Scaffold( | |
| timeText = { TimeText() } | |
| ) { | |
| TunerScreen(viewModel.tunerState.observeAsState().value) | |
| } |
And now? Well, now we can skip to the next step, which is to see the app working (or not 😅).
Action
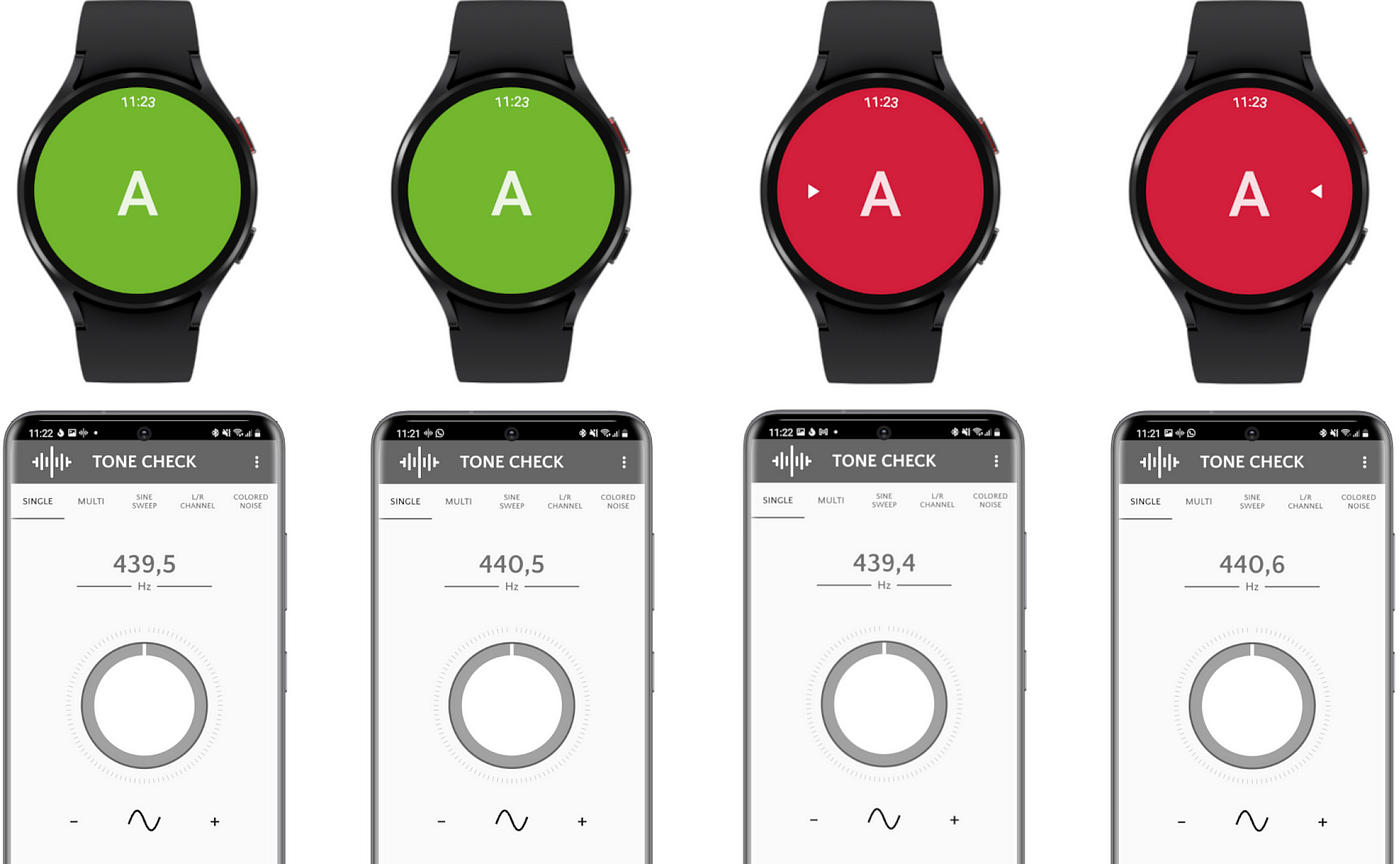
To validate how our tuner works, we’re going to use a tone generator app reproducing specific frequencies in order to verify that the tuner is behaving as expected. As we know that the A4 note has a frequency of 440Hz, let’s use it in our test cases:
- Frequency 439.5Hz should display Note A in tune
- Frequency 440.5Hz should display Note A in tune
- Frequency 439.4Hz should display Note A tuned down
- Frequency 440.6Hz should display Note A tuned up
 screenshots of my Galaxy Watch4 + smartphone
Okay, it worked 😎
You can check the full code at:
Any suggestions or questions, feel free to leave your comment.
Thanks for reading and see you next time!


1 Comment. Leave new
Hello Arildo!
First of all, thank you for the great app!
I have a question about this: In the orchestra, the preferred pitch for the concert pitch A is not 440 Hertz, but 443 Hertz. Is it possible to customize the app accordingly?
Thank you and best regards, Peter Dynow