

Sometimes being in a lazy state feels good!!
There is a common scenario that we as Android app developers face a lot and that is to have a list and on each item click we would have to process some data in background and reflect the end result back on the list item.
Consider a list like instagram and say we’ve a ‘Like’ button, clicking on which updates the data on server and on successful result, the ‘Like’ button background changes to different color. Now this is a single action on the list. A user can click ‘Like’ button on different items in list and we’ve to update our list for each item correctly as per the result obtained.
In this article we’ll see how can we manage our list state and process data in background concurrently for multiple items and updating them on UI correctly.
End result
By the end we’ll be able to achieve the following result.
Presumption
We’ll assume that we’ve a list of 20 items (could be more/less) and clicking on each item initiates a background task for some time. We’ll be simulating the long running task using delay function and this delay will be randomly assigned to each item so that we can see all items updating themselves randomly.
Control Flow
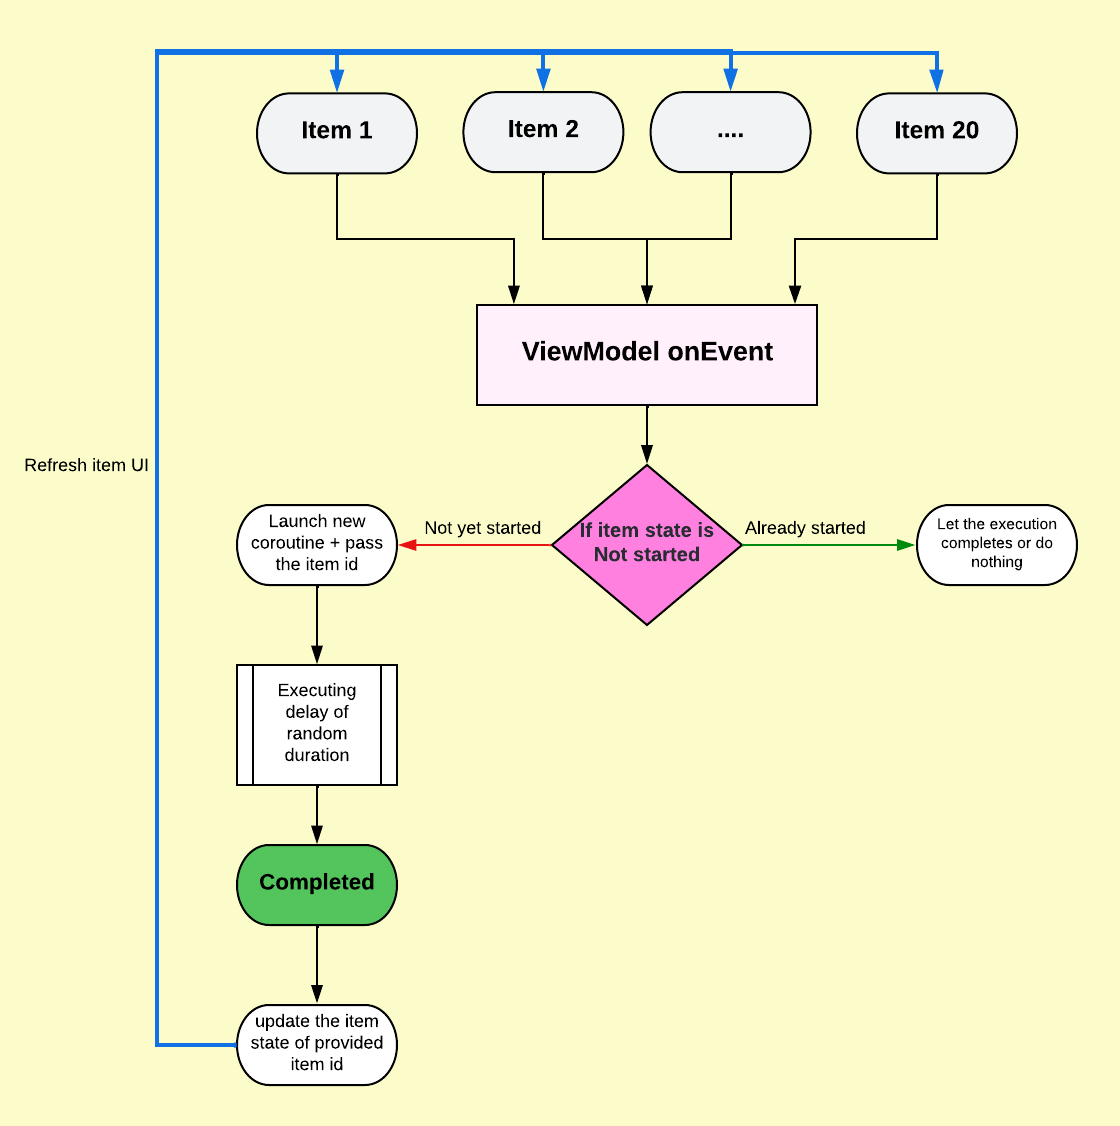 Control Flow
Let’s code the flow
We’ll have a basic list item for tutorial purpose(no fancy stuff here).
In case you want to checkout how to create custom views/layouts in jetpack compose, do give this and this a read. You won’t be disappointed.
So let’s create our list item first.
| @Composable | |
| fun ListItem( | |
| item: AppItem, | |
| background: Color, | |
| onItemClick: (Int) -> Unit | |
| ) { | |
| Row( | |
| modifier = Modifier | |
| .fillMaxWidth() | |
| .height(60.dp) | |
| .background(background) | |
| .clickable { | |
| onItemClick(item.id) | |
| }, | |
| horizontalArrangement = Arrangement.Start, | |
| verticalAlignment = Alignment.CenterVertically, | |
| ) { | |
| Text( | |
| modifier = Modifier.weight(1f).padding(horizontal = 16.dp), | |
| text = item.text, | |
| style = TextStyle( | |
| fontSize = 20.sp, | |
| fontWeight = FontWeight.SemiBold | |
| ) | |
| ) | |
| Box( | |
| modifier = Modifier.size(60.dp), | |
| contentAlignment = Alignment.Center | |
| ) { | |
| /** show indicator only for loading state */ | |
| if (item.taskStatus == TaskStatus.IN_PROGRESS) | |
| CircularProgressIndicator( | |
| modifier = Modifier.size(30.dp), | |
| strokeWidth = 3.dp, | |
| color = Color.Magenta, | |
| ) | |
| else | |
| Icon( | |
| if (item.taskStatus == TaskStatus.NOT_STARTED) | |
| Icons.Default.PlayArrow | |
| else Icons.Default.Check, | |
| "action icon", | |
| tint = if (item.taskStatus == TaskStatus.NOT_STARTED) | |
| Color.Gray | |
| else | |
| Color.Blue, | |
| ) | |
| } | |
| } | |
| } |
OUR VIDEO RECOMMENDATION


Jobs
And it looks like this
 List item — Not started
Our list item, when clicked, will start a loader and initiates a background task of some random duration and it looks like as follows
 List item — In progress
And once the task returns, then it marks it as checked.
 List item — Completed
Alright! So now we know how our list item will operate. Let’s add it in our list.
| @Composable | |
| fun HomeScreen( | |
| viewModel: HomeViewModel = viewModel() | |
| ) { | |
| val state = viewModel.itemsState | |
| LazyColumn( | |
| modifier = Modifier | |
| .fillMaxSize() | |
| .background(Color.White), | |
| verticalArrangement = Arrangement.Top | |
| ) { | |
| items( | |
| items = state, | |
| key = { | |
| it.id | |
| } | |
| ) { item -> | |
| ListItem( | |
| item = item, | |
| background = if (item.id % 2 == 0) Color.LightGray else Color.White, | |
| onItemClick = { | |
| viewModel.uiEvent(UiEvent.ItemClick(item)) | |
| } | |
| ) | |
| } | |
| } | |
| } |
The code is self explanatory. Few key points to note here:
- Our list item is stateless which is important. We should follow state hoisting.
- Event handling is done in View model.
- State is updated in list item as it is changed.
Let’s move to view model which provides us with state and data handling.
We prepare a itemList of 20 items with id as index. We create the state for our list by using mutableStateListOf<AppItem>() and also creates an immutable state of this list as itemsState. Finally in init block we add our list objects into our mutable state.
| private val itemList = (0..20).map { i -> | |
| AppItem( | |
| id = i, | |
| text = "Item ${i+1}" | |
| ) | |
| } | |
| private val _itemsState = mutableStateListOf<AppItem>() | |
| val itemsState: List<AppItem> = _itemsState | |
| init { | |
| _itemsState.addAll(itemList) | |
| } |
Now once our item is clicked, we check if it is in Not Started state then we launch a new coroutine and pass the item id. We then generate a small random delay and once the delay is over, we update our item id task status which in turn forces a recomposition of our affected list item.
| private fun processTask(id: Int) { | |
| viewModelScope.launch(Dispatchers.IO) { | |
| try { | |
| Log.e("Tag","thread = ${Thread.currentThread().name}") | |
| backgroundTask(id) | |
| } finally { | |
| Log.e("Tag","cancelled $id") | |
| } | |
| } | |
| } | |
| private suspend fun backgroundTask(id: Int) { | |
| val delay = id + Random.nextInt(5) | |
| Log.e("Tag","delay for id $id is $delay") | |
| delay(delay * 1000L) | |
| _itemsState[id] = itemsState[id].copy( | |
| taskStatus = TaskStatus.COMPLETED | |
| ) | |
| } |
We use IO dispatcher here just to simulate that we’re performing some I/O operation. Lastly, we cancel our coroutines once our scope is finished.
override fun onCleared() {
    super.onCleared()
    viewModelScope.cancel()
}
Bamn! We now have the output in which we’re making concurrent calls and updating our items accordingly.
Once again below is the output for reference.
Checkout the complete code at
Let’s connect on medium or on github.
And I’ll see you again in next interesting tutorial.
Until next time…
Cheers!
This article was originally published on proandroiddev.com on June 27, 2022


