

Google has announced a new open-source project, Now in Android. In this article, you will cover the overall architecture, each layer, and tech stacks that are used in Now in Android project, such as Material3, Jetpack Compose, and app performance.
Before you dive in, we recommend cloning the Now in Android on your local device and opening the project with your Android Studio.
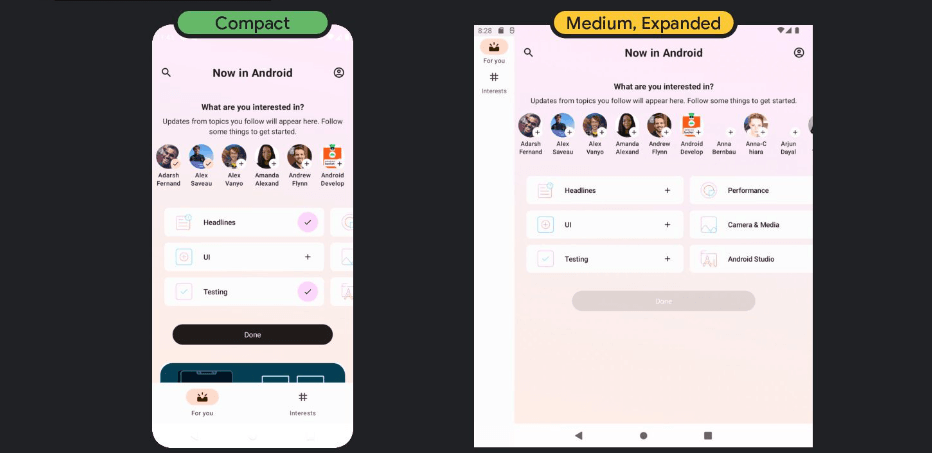
If you build Now in Android, the result will look like this:

Now in Android uses content that is video playlist on Youtube by the Google team and articles on Android Developers, so you can learn the Android-relevant skills with this application.
Tech Stack
Let’s see which libraries are used to build the UI layer in Now in Android project:
- Compose: Now in Android built with 100% Jetpack Compose to build UI elements. Also, this project uses Compose relevant libraries such as Activity, Foundation, Material3, and Accompanist.
- Navigation: This project uses Navigation Compose for navigating screens and Hilt Navigation Compose for injecting dependencies.
- WindowManager: Jetpack WindowManager is used to support responsive layouts.
- Coil: Coil is used to load images over the UI elements.
Next, let’s see which libraries are used to handle business works:
- DataStore: Store data asynchronously into the local data storage as key-value pairs.
- Room Database: Constructs local database by providing an abstraction layer over SQLite to allow fluent database access.
- Retrofit: Retrofit is a type-safe REST client that aims to consume the REST APIs.
- Kotlin Serialization: Serialize and deserialize data formats such as JSON and protocol buffers that can be transferred over a network or stored in a database.
- Kotlin Coroutines: Provides asynchronous or non-blocking solutions at the language level. Coroutines have been used entirely in this project to handle tasks asynchronously.
- WorkManager: WorkManager is the recommended solution for running tasks in the background and this was used to synchronize the local data with the network resources in Now in Android.
Also, Now in Android was built with the libraries below to improve the app architecture and performance:
- Hilt: Hilt is a dependency injection library that allows you to construct dependency injection containers easily and manage their lifecycles automatically.
- App Startup: App Startup allows you to initialize components at application startup.
- Baseline Profiles: Baseline Profiles allow you to improve app performance by including a list of classes and methods specifications in your APK that can be used by Android Runtime.
In this article, we’ll explore some libraries and tech stacks above that were covered in this 2022 Google I/O, along with the app architecture.
App Architecture
Google introduced the Guide to app architecture to encompass best practices and recommended architectures for building a robust, high-quality app.
Now in Android was built with Guide to app architecture, so it would be a great sample to show how the architecture works in real-world projects.
Now let’s explore the app architecture.
Architecture Overview
The overall architecture is composed of two layers: a data layer and UI layer.

The architecture follows the concepts below:
- The app architecture follows unidirectional data flow. So the UI layer forwards events down, and the data layer forwards results up.
- The data layer exposes data as streams using Kotlin Flows, and UI elements configure screens by observing the streams.
Now, let’s see each layer for more details.
UI Layer
The UI Layer consists of UI elements like buttons that could interact with users and ViewModel that holds app states and restores data when configuration changes.

The main role of the UI layer is like the below:
- Modeling UI states: UI states are modeled as sealed classes/interfaces that represent the business data following single source-of-truth.
- Transforming streams into UI states: The view model transforms data streams into UI states, representing the business data. UI elements observe the UI states and render them on the canvas following all possible cases.
- Processing user interactions: User actions are communications with users that flows from UI elements to view models, and the view models execute proper business logic. The events must flow down from UI elements to the data layer, and this concept is called unidirectional data flow.
Data Layer
The data Layer consists of repositories, which include business logic such as persisting and querying data from the database and requesting remote data from the network. It is implemented as an offline-first source of business logic and follows the single source of truth principle.
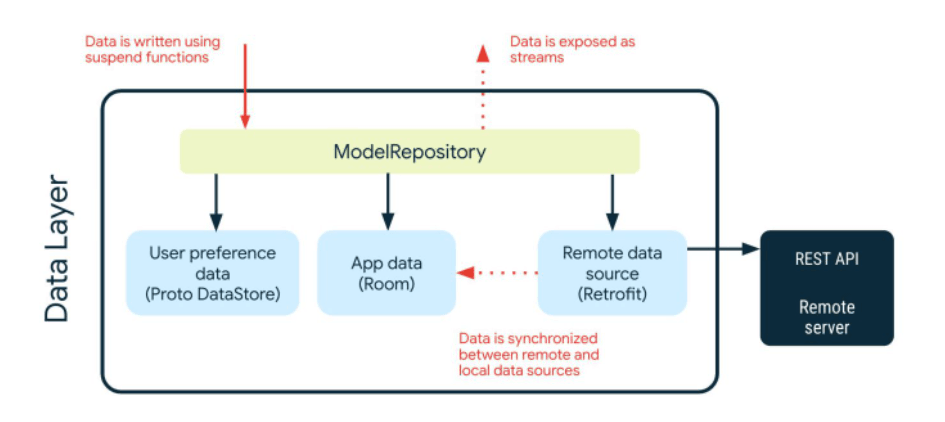
The main role of the data layer is like the below:
- Exposing data to the UI layer: The data layer exposes data as streams and UI elements configure screens by observing the streams.
- Guarantee the single source of truth: Now in Android guarantees the single source of truth that aggregates app data from multiple data sources such as local databases and networks. The repository uses data synchronization for guaranteeing the single source of truth principle.
- Data synchronization: Synchronize data between the local database and network data. The synchronization works are started at app initialization by App Startup.
Architecture Flows
The overall flow of the architecture is like the figure below:

Let’s see each of the steps, one by one:
- App startup runs WorkManager that performs data synchronizations.
- WorkManager starts data synchronization in the background thread. The worker requests remote data sources from the network, and synchronizes app data with the local database.
- The repository transforms the internal data model into the external data as streams and exposes the stream to external layers.
- UI elements configure screens by observing the streams.
UI Layer With Compose
Now in Android was built with 100% Jetpack Compose to configure screens. Jetpack Compose is getting stable to use at production-level and Now in Android shows how to utilize Compose in your project.
Let’s explore how Now in Android utilize the Jetpack Compose components.
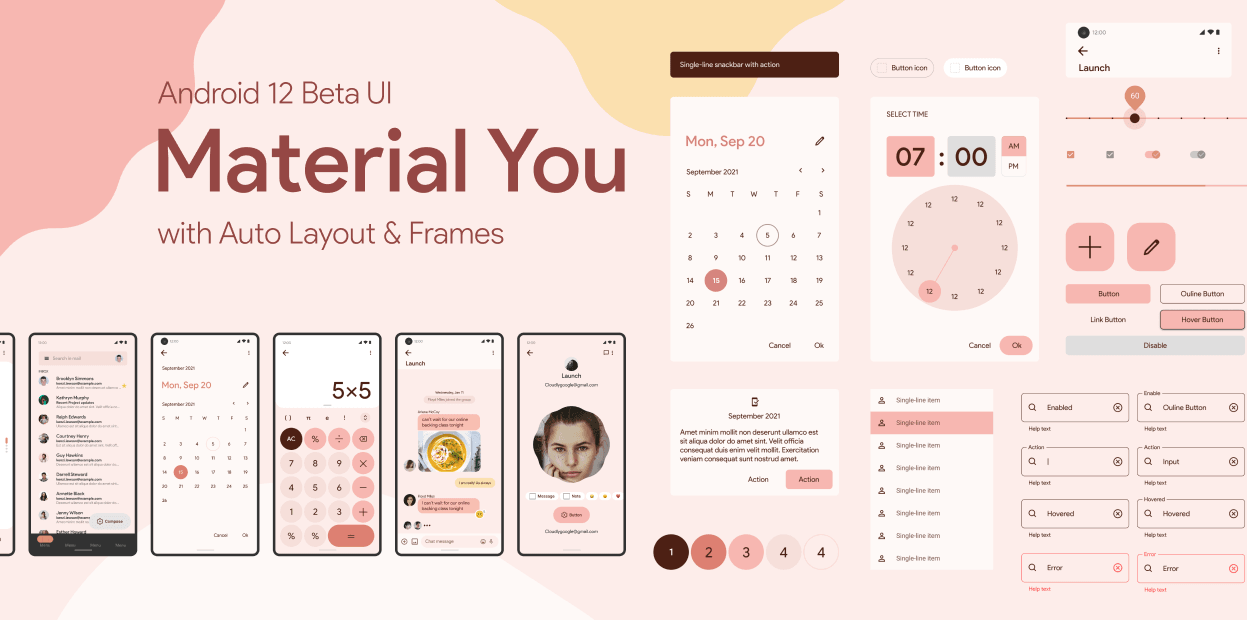
Material You
Last year, Google’s design team announced Material You, which is a new design language that guides application themes. Material You provides the dynamic color schemes, which is a color extraction algorithm that allows you to get color schemes from user device’s wallpaper.
By adding the dependency below in your project, you can use Material Theme, Material components, and dynamic color schemes:
| implementation "androidx.compose.material3:material3:1.0.0-alpha10" |
Next, you can create different dynamic color schemes whether your system theme is in dark mode or not:
| dynamicColor && Build.VERSION.SDK_INT >= Build.VERSION_CODES.S -> { | |
| val context = LocalContext.current | |
| if (darkTheme) dynamicDarkColorScheme(context) else dynamicLightColorScheme(context) | |
| } |
For more information about the Material You, check out the Exploring Material You for Jetpack Compose.
As a result, you will see the different colors of components like the below:

Theming
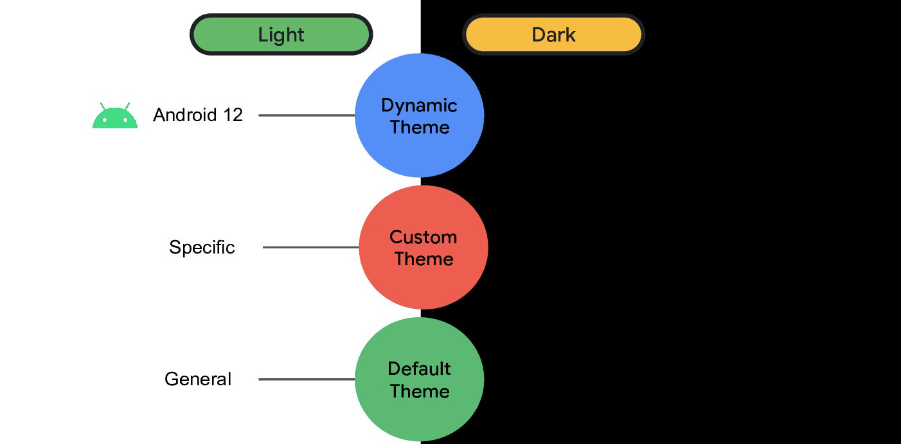
Theming is one of the essential parts of modern Android development, and it’s not easy to apply consistent themes in every XML-based UI element. However, with Jetpack Compose, defining themes and applying them to UI elements is easy and most of the attributes are customizable.
Now in Android uses Material Theme for defining color schemes and customizing themes. As you can see in the example below, you can define your color schemes with lightColorSceme and darkColorSceme methods:
| private val LightDefaultColorScheme = lightColorScheme( | |
| primary = Purple40, | |
| onPrimary = Color.White, | |
| primaryContainer = Purple90, | |
| .. | |
| private val DarkDefaultColorScheme = darkColorScheme( | |
| primary = Purple80, | |
| onPrimary = Purple20, | |
| primaryContainer = Purple30, | |
| .. |
OUR VIDEO RECOMMENDATION


Jobs
Also, Now in Android uses dynamicLightColorScheme and dynamicDarkColorScheme methods for getting dynamic color schemes that are generated from the user device’s wallpaper.
| dynamicColor && Build.VERSION.SDK_INT >= Build.VERSION_CODES.S -> { | |
| val context = LocalContext.current | |
| if (darkTheme) dynamicDarkColorScheme(context) else dynamicLightColorScheme(context) | |
| } |
Finally, the NiaTheme composable function looks like the below:
| @Composable | |
| fun NiaTheme( | |
| darkTheme: Boolean = isSystemInDarkTheme(), | |
| dynamicColor: Boolean = false, | |
| androidTheme: Boolean = false, | |
| content: @Composable () -> Unit | |
| ) { | |
| val colorScheme = when { | |
| dynamicColor && Build.VERSION.SDK_INT >= Build.VERSION_CODES.S -> { | |
| val context = LocalContext.current | |
| if (darkTheme) dynamicDarkColorScheme(context) else dynamicLightColorScheme(context) | |
| } | |
| androidTheme && darkTheme -> DarkAndroidColorScheme | |
| androidTheme -> LightAndroidColorScheme | |
| darkTheme -> DarkDefaultColorScheme | |
| else -> LightDefaultColorScheme | |
| } |
As you can see in the theming example above, you can apply custom or dynamic color schemes and switch between them easily in particular situations.
Large Screen
Recently, as various large screen devices have been released, supporting large screens is one of the important parts of modern Android development. Now in Android supports adaptive layouts using Jetpack WindowManager.
First, you need to add the dependencies below to your build.gradle file:
| dependencies { | |
| implementation "androidx.compose.material3:material3-window-size-class:1.0.0-alpha10" | |
| implementation "androidx.window:window:1.0.0" | |
| } |
Next, you can calculate window size classes based on the width size of the user device with calculateWindowSizeClass method below:
| val windowSizeClass: WindowSizeClass = calculateWindowSizeClass(activity = this) |
The WindowSizeClass consists of three types of breakpoints: Compact, Medium, and Expanded. As you can see in the internal code below, those three breakpoints are calculated by the design specifications of Material design guide:
| value class WindowWidthSizeClass private constructor(private val value: String) { | |
| companion object { | |
| /** Represents the majority of phones in portrait. */ | |
| val Compact = WindowWidthSizeClass("Compact") | |
| /** | |
| * Represents the majority of tablets in portrait and large unfolded inner displays in | |
| * portrait. | |
| */ | |
| val Medium = WindowWidthSizeClass("Medium") | |
| /** | |
| * Represents the majority of tablets in landscape and large unfolded inner displays in | |
| * landscape. | |
| */ | |
| val Expanded = WindowWidthSizeClass("Expanded") | |
| /** Calculates the [WindowWidthSizeClass] for a given [width] */ | |
| internal fun fromWidth(width: Dp): WindowWidthSizeClass { | |
| require(width >= 0.dp) { "Width must not be negative" } | |
| return when { | |
| width < 600.dp -> Compact | |
| width < 840.dp -> Medium | |
| else -> Expanded | |
| } | |
| } | |
| } | |
| } |
After calculating the WindowSizeClass, Now in Android draws different UI elements with the WindowSizeClass:
| Scaffold( | |
| modifier = Modifier, | |
| containerColor = Color.Transparent, | |
| bottomBar = { | |
| if (windowSizeClass.widthSizeClass == WindowWidthSizeClass.Compact) { | |
| NiABottomBar( | |
| onNavigateToTopLevelDestination = niaTopLevelNavigation::navigateTo, | |
| currentDestination = currentDestination | |
| ) | |
| } | |
| } | |
| ) { padding -> { | |
| .. | |
| if (windowSizeClass.widthSizeClass != WindowWidthSizeClass.Compact) { | |
| NiANavRail( | |
| onNavigateToTopLevelDestination = niaTopLevelNavigation::navigateTo, | |
| currentDestination = currentDestination, | |
| modifier = Modifier.safeDrawingPadding() | |
| ) | |
| } | |
| .. | |
| } |
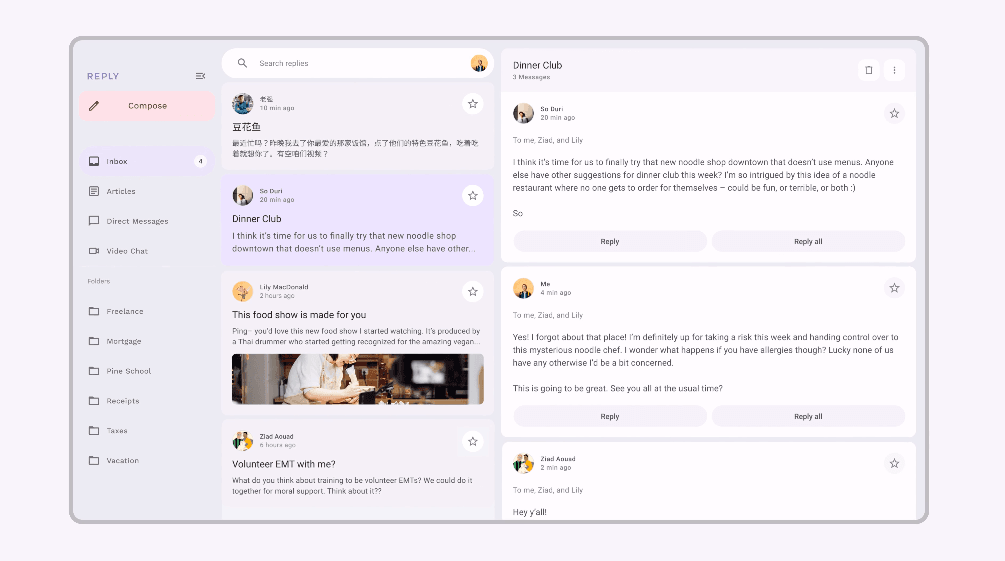
In the example above, the main screen draws the bottom bar if the WindowSizeClass is Compact and a side bar if the WindowSizeClass is Medium or Expanded.
As a result, you will see different screens following the width size of the user device, like the image below:
For more information about the adaptive layouts, check out the Exploring Jetpack WindowManager for Foldable Devices.
App Performance
Android devices use very limited resources, so improving App performance is the most important part of Android development to provide great user experiences.
So let’s explore how we can improve app performance with Jetpack Compose.
Remember
Jetpack Compose uses the remember API to store an object in memory. The remember API stores a computed value in the Composition phases and restores the stored value during Recomposition.
Let’s see an example. The codes below will sort the entire contacts whenever recomposition happens:
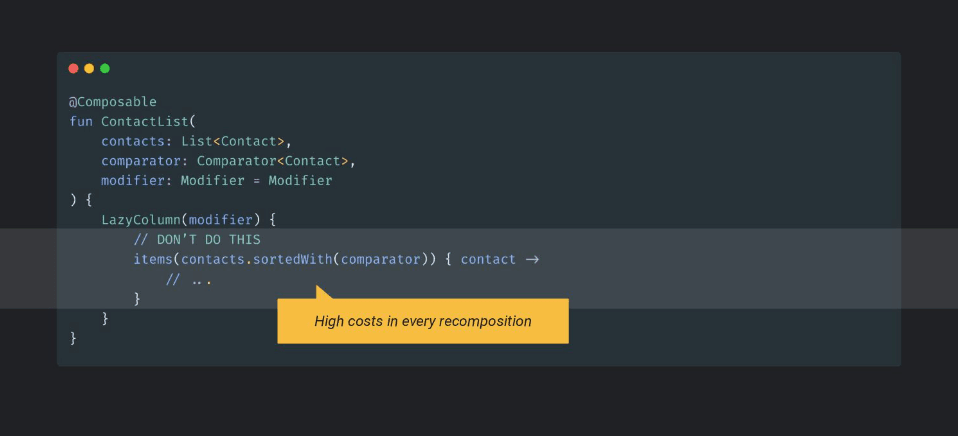
It requires a high expense to sort the list if the list of contacts includes many items, and it may decrease the app performance. So you can utilize the remember to memorize a computational value that requires high expense, such as sorting.
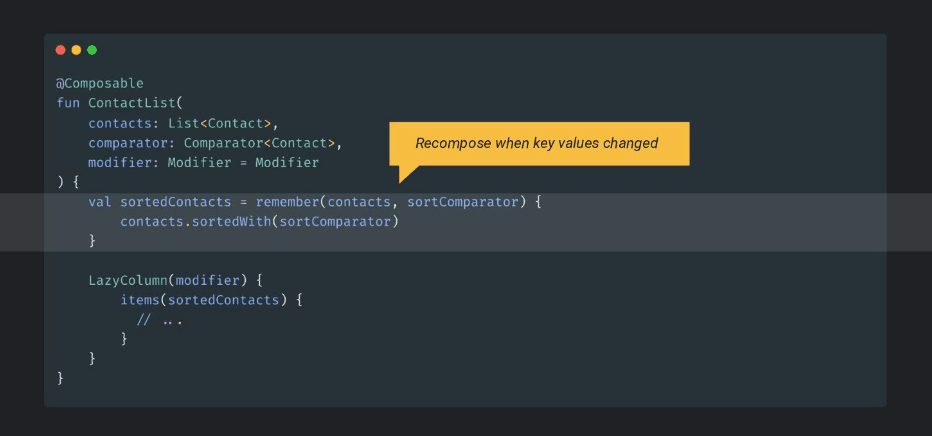
As the example above shows, you can save the sorted value on the memory with the remember API. The computation will not be executed when the recomposition happens and reuse the sorted value.
Also, it uses the list of contacts and comparator as keys in the remember, so the sort will be only re-executed if the key values are changed.
Lazy Lists
Before exploring the lazy lists, let’s see what’s difference between Column and LazyColumn in Jetpack Compose.

They look very similar and the Column also can show a list of items with the for statement. But the Column render all items in the Column scope whether an item is visible or not and it may decrease the app performance if there are many items in the list.
On the other hand, LazyColumn adopted a similar concept to RecyclerView, and LazyColumn render only visible items on the screen. So you can increase the app performance if you use the LazyColumn instead of Column when there are many items.
Next, let’s assume the position of an item is changed. For now, LazyColumn can’t distinguish between the distinct items in the list, LazyColumn will be recomposed for the entire item. So it derives bad performance whenever the position of an item is changed.
You can improve the performance of the LazyColumn by giving a key parameter that represents a unique id for each item like the below:
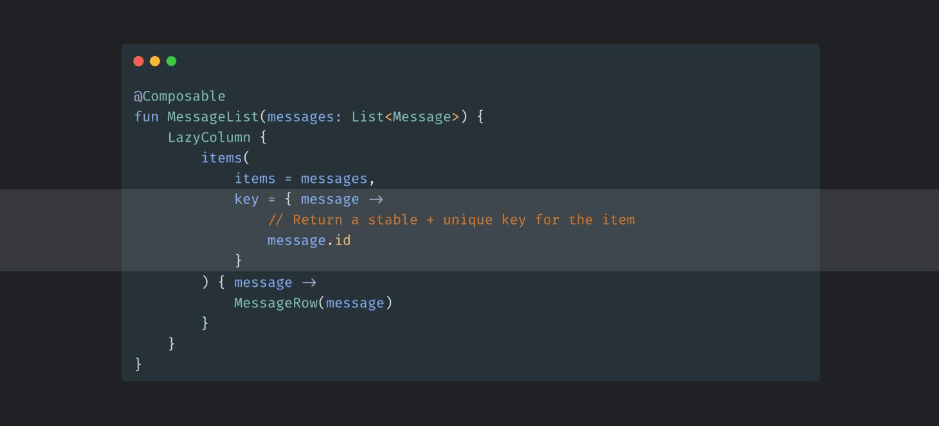
By giving a key parameter, LazyColumn can distinguish dedicated items whenever the position of an item is changed and it will not derive recomposition for the entire item.
If you want to learn more about the performance for Jetpack Compose, check out the Compose performance.
Baseline Profiles
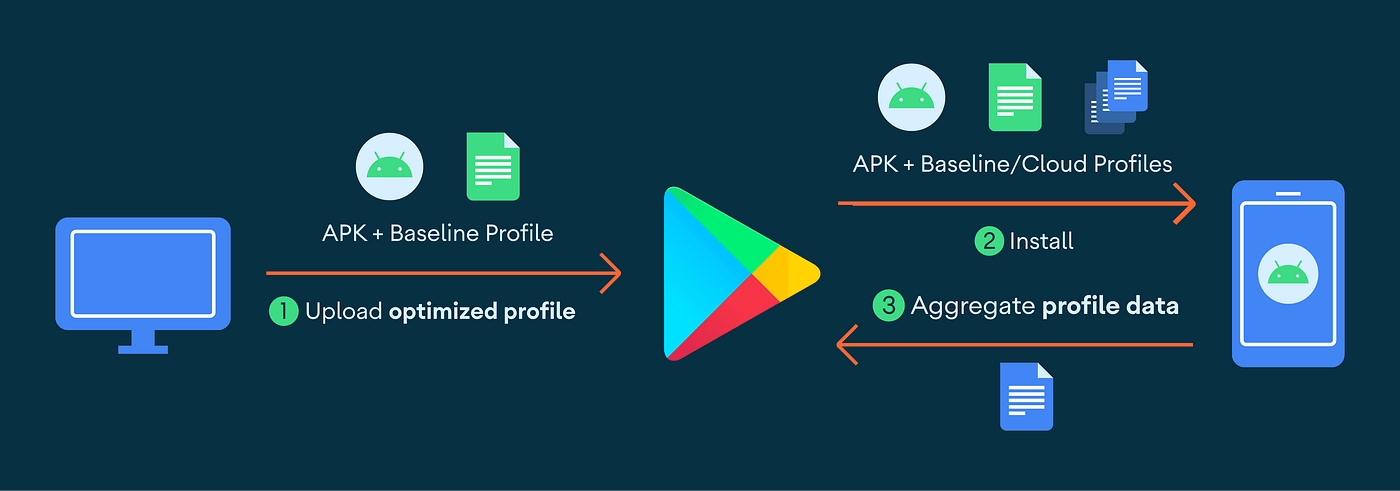
Baseline profiles are specifications of classes and methods that are included in an APK and AAB file, which can be used by Android Runtime. The specifications can be pre-compiled and pre-loaded on memory while installing or updating an application.
Android Runtime performs Ahead-of-time (AOT) compilation of the specifications, which lets applications optimize startup, reduce UI jank, and improve app performance.
Especially, Baseline Profiles increase a lot of app performance for the Jetpack Compose project. Because, Jetpack Compose is a library, which means it does not participate in system resource sharing in Android OS.
To generate the method specification with Baseline Profiles, add the dependency below to your build.gradle file:
| dependencies { | |
| implementation("androidx.profileinstaller:profileinstaller:1.2.0-beta01") | |
| } |
Now in Android uses BaselineProfileGenerator class below to generate profiles:
| class BaselineProfileGenerator { | |
| @get:Rule val baselineProfileRule = BaselineProfileRule() | |
| @Test | |
| fun startup() = | |
| baselineProfileRule.collectBaselineProfile( | |
| packageName = "com.google.samples.apps.nowinandroid" | |
| ) { | |
| pressHome() | |
| // This block defines the app's critical user journey. Here we are interested in | |
| // optimizing for app startup. But you can also navigate and scroll | |
| // through your most important UI. | |
| startActivityAndWait() | |
| device.waitForIdle() | |
| device.run { | |
| findObject(By.text("Interests")) | |
| .click() | |
| waitForIdle() | |
| } | |
| } | |
| } |
As a result, the profile generator will generate the specifications below in a txt file and it will be used to pre-compile by Android Runtime:

For more information, check out the Baseline Profiles.
Conclusion
This installment explored the Now in Android and covered the essential parts of modern Android development, including app architecture, Jetpack libraries, UI layer with Compose, and the app performance.
You can find the author of this article on Twitter @github_skydoves or GitHub if you have any questions or feedback. If you’d like to stay up to date with Stream, follow us on Twitter @getstream_io for more great technical content.
As always, happy coding!
— Jaewoong
Originally published at GetStream.io.


