

Weather App Preview
Flow of the article:
- What is Jetpack Compose for Wear OS?
- Fundamentals of Wear OS.
- Building Weather App for wearables
What is Jetpack Compose for Wear OS?
Now, To Build applications for Wearable devices. we can now use jetpack compose. We can use Jetpack Compose for building applications for Wearable devices by providing functionality to support wearable-specific devices, sizes, shapes, and navigation gestures.
Fundamental of Wear OS.
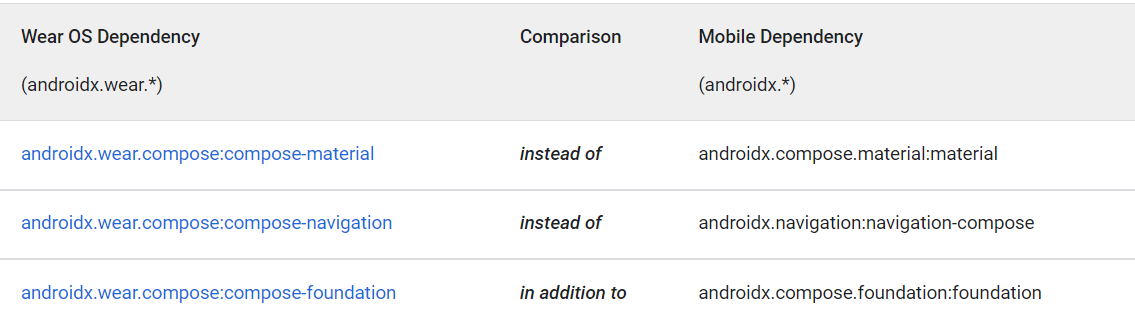
Building for Wearable apps is the same as for mobile apps. Just we have to change a few dependencies. You can use mobile dependencies but they are not optimized for wear os.
These are the differences between wearable and mobile dependencies
Now, I will explain the composables which we are going to use in our app.
Text: this is similar to the mobile dependency version.
Button: this is similar to the mobile dependency version.
ScalingLazyColumn: this is the wear os version of LazColumn is little different as for rounded watches top and bottom have less space to provide a better experience we use this.
Building Weather App for wearables.
Now, let us build the app. Here is the github link
So our task is to get the watch location and using the location we hit an open weather API to get the weather of the current location and display it on the app.
Step 1: Create a project and choose wear os and give the project any name you want.

Step 2: You need to add a few dependencies in build.gradle(:App)
| //request permission | |
| implementation "com.google.accompanist:accompanist-permissions:0.25.0" | |
| //location | |
| implementation 'com.google.android.gms:play-services-location:20.0.0' | |
| // Retrofit | |
| implementation 'com.squareup.retrofit2:retrofit:2.9.0' | |
| implementation 'com.squareup.retrofit2:converter-gson:2.9.0' | |
| implementation "com.squareup.okhttp3:okhttp:5.0.0-alpha.2" | |
| implementation "com.squareup.okhttp3:logging-interceptor:5.0.0-alpha.2" | |
| // Coroutines | |
| implementation 'org.jetbrains.kotlinx:kotlinx-coroutines-core:1.5.2' | |
| implementation 'org.jetbrains.kotlinx:kotlinx-coroutines-android:1.5.2' |
Step 3: Add permissions in Mainfest.xml
| <uses-permission android:name="android.permission.ACCESS_COARSE_LOCATION" /> | |
| <uses-permission android:name="android.permission.ACCESS_FINE_LOCATION" /> | |
| <uses-permission android:name="android.permission.INTERNET" /> |
OUR VIDEO RECOMMENDATION


Jobs
Step 4: Now our task would be to get location permissions.
a. we first request location permission.
here we are requesting multiple permissions ACCESS_COARSE_LOCATION and ACCESS_FINE_LOCATION. To check all permissions are granted
locationPermissionsState.allPermissionsGranted
if permissions are granted we will fetch the location. Otherwise, we will show the Location Icon to ask for permission.
| val locationPermissionsState = rememberMultiplePermissionsState( | |
| listOf( | |
| Manifest.permission.ACCESS_COARSE_LOCATION, | |
| Manifest.permission.ACCESS_FINE_LOCATION, | |
| ) | |
| ) | |
| if (locationPermissionsState.allPermissionsGranted){ | |
| if (!locationUtil.dataLoaded.value) | |
| item { TextWidget(contentModifier,"Thanks! I can access your exact location :D") } | |
| else{ | |
| item { CardWidget( | |
| modifier = contentModifier, | |
| title = locationUtil.data.value.name , | |
| weatherDescription = locationUtil.data.value.weatherDescription, | |
| time = locationUtil.data.value.time , temperature = 12.0) | |
| } | |
| } | |
| } | |
| else{ | |
| val allPermissionsRevoked = | |
| locationPermissionsState.permissions.size == | |
| locationPermissionsState.revokedPermissions.size | |
| val textToShow = if (!allPermissionsRevoked) { | |
| "Yay! Thanks for letting me access your approximate location. " + | |
| "But you know what would be great? If you allow me to know where you " + | |
| "exactly are. Thank you!" | |
| } else if (locationPermissionsState.shouldShowRationale) { | |
| "Getting your exact location is important for this app. " + | |
| "Please grant us fine location. Thank you :D" | |
| } else { | |
| "This feature requires location permission" | |
| } | |
| item { TextExample(contentModifier,textToShow) } | |
| item { ButtonWidget(contentModifier, iconModifier){ | |
| locationPermissionsState.launchMultiplePermissionRequest() | |
| } } | |
| } |

location button
b. we will create a WeatherApi interface for making network requests to get weather details.
| interface WeatherApi { | |
| companion object { | |
| const val BASE_URL = "https://api.openweathermap.org/" | |
| val apiInstance = Retrofit.Builder() | |
| .baseUrl(BASE_URL) | |
| .client(OkHttpClient.Builder().addInterceptor(HttpLoggingInterceptor().setLevel(HttpLoggingInterceptor.Level.BASIC)).build()) | |
| .addConverterFactory(GsonConverterFactory.create()) | |
| .build() | |
| .create(WeatherApi::class.java) | |
| } | |
| @GET("/data/2.5/weather") | |
| suspend fun getWeatherDetails(@Query("lat") lat: Double,@Query("lon") long: Double,@Query("appid") appid: String): WeatherDTO | |
| } |
c. we now create an instance of FusedLocationProviderClient. it will directly take the location of the mobile if the watch doesn’t support GPS.
| fusedLocationClient = LocationServices.getFusedLocationProviderClient(this) | |
| fun createLocationRequest(context: Context,fusedLocationClient: FusedLocationProviderClient) { | |
| val locationRequest = LocationRequest.create().apply { | |
| interval = 1000 | |
| fastestInterval = 1000 | |
| priority = LocationRequest.PRIORITY_BALANCED_POWER_ACCURACY | |
| } | |
| if (ActivityCompat.checkSelfPermission( | |
| context, | |
| Manifest.permission.ACCESS_FINE_LOCATION | |
| ) != PackageManager.PERMISSION_GRANTED && ActivityCompat.checkSelfPermission( | |
| context, | |
| Manifest.permission.ACCESS_COARSE_LOCATION | |
| ) != PackageManager.PERMISSION_GRANTED | |
| ) { | |
| return | |
| } | |
| fusedLocationClient.requestLocationUpdates(locationRequest,object : LocationCallback() { | |
| override fun onLocationResult(p0: LocationResult) { | |
| for (location in p0.locations){ | |
| CoroutineScope(Dispatchers.IO).launch { | |
| val weatherDTO = WeatherApi | |
| .apiInstance | |
| .getWeatherDetails(location.latitude, | |
| location.longitude, | |
| context.resources.getString(com.example.wear2.R.string.open_weather_api_key)) | |
| dataLoaded.value = true; | |
| data.value = AppCardData(name = weatherDTO.name, | |
| time = "${(weatherDTO.main.temp - 273).roundToInt()}°C", | |
| weatherDescription = weatherDTO.weather[0].description, | |
| temp = (weatherDTO.main.temp - 273).roundToInt().toDouble() | |
| ) | |
| } | |
| } | |
| } | |
| }, Looper.getMainLooper()) | |
| } |
here, we will set locationRequest defining the priority and interval. then we will call for location updates. and once we get the location we will hit the GET request.
Note: create account on openweather and add your api in strings.xml
Step 5: Now, we will create our UI.
| @OptIn(ExperimentalPermissionsApi::class) | |
| @Composable | |
| fun WearApp(locationUtil: LocationUtil) { | |
| val listState = rememberScalingLazyListState() | |
| Wear2Theme { | |
| val locationPermissionsState = rememberMultiplePermissionsState( | |
| listOf( | |
| Manifest.permission.ACCESS_COARSE_LOCATION, | |
| Manifest.permission.ACCESS_FINE_LOCATION, | |
| ) | |
| ) | |
| val contentModifier = Modifier | |
| .fillMaxWidth() | |
| .padding(bottom = 8.dp) | |
| val iconModifier = Modifier | |
| .size(24.dp) | |
| .wrapContentSize(align = Alignment.Center) | |
| ScalingLazyColumn( | |
| modifier = Modifier.fillMaxSize(), | |
| contentPadding = PaddingValues( | |
| top = 32.dp, | |
| start = 8.dp, | |
| end = 8.dp, | |
| bottom = 32.dp | |
| ), | |
| verticalArrangement = Arrangement.Bottom, | |
| state = listState, | |
| autoCentering = true | |
| ) { | |
| if (locationPermissionsState.allPermissionsGranted){ | |
| if (!locationUtil.dataLoaded.value) | |
| item { TextWidget(contentModifier,"Thanks! I can access your exact location :D") } | |
| else{ | |
| item { CardWidget( | |
| modifier = contentModifier, | |
| title = locationUtil.data.value.name , | |
| weatherDescription = locationUtil.data.value.weatherDescription, | |
| time = locationUtil.data.value.time , temperature = 12.0) | |
| } | |
| } | |
| } | |
| else{ | |
| val allPermissionsRevoked = | |
| locationPermissionsState.permissions.size == | |
| locationPermissionsState.revokedPermissions.size | |
| val textToShow = if (!allPermissionsRevoked) { | |
| "Yay! Thanks for letting me access your approximate location. " + | |
| "But you know what would be great? If you allow me to know where you " + | |
| "exactly are. Thank you!" | |
| } else if (locationPermissionsState.shouldShowRationale) { | |
| "Getting your exact location is important for this app. " + | |
| "Please grant us fine location. Thank you :D" | |
| } else { | |
| "This feature requires location permission" | |
| } | |
| item { TextWidget(contentModifier,textToShow) } | |
| item { ButtonWidget(contentModifier, iconModifier){ | |
| locationPermissionsState.launchMultiplePermissionRequest() | |
| } } | |
| } | |
| } | |
| } | |
| } |
This is our main UI where we will define ScalingLazyColumn and add items. I have created mutableState in LocationUtil.kt which tells whether we got location updates or not in UI and according to that we will show the card or the text and as we get data we will fill the CardWidget with data.
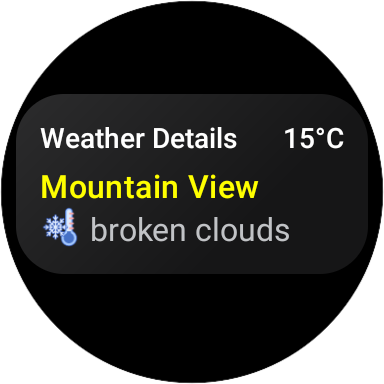
This is the UI
Now, you have created a weather application for wearables
Thank You for reading
This article was originally published on proandroiddev.com on October 08, 2022


