

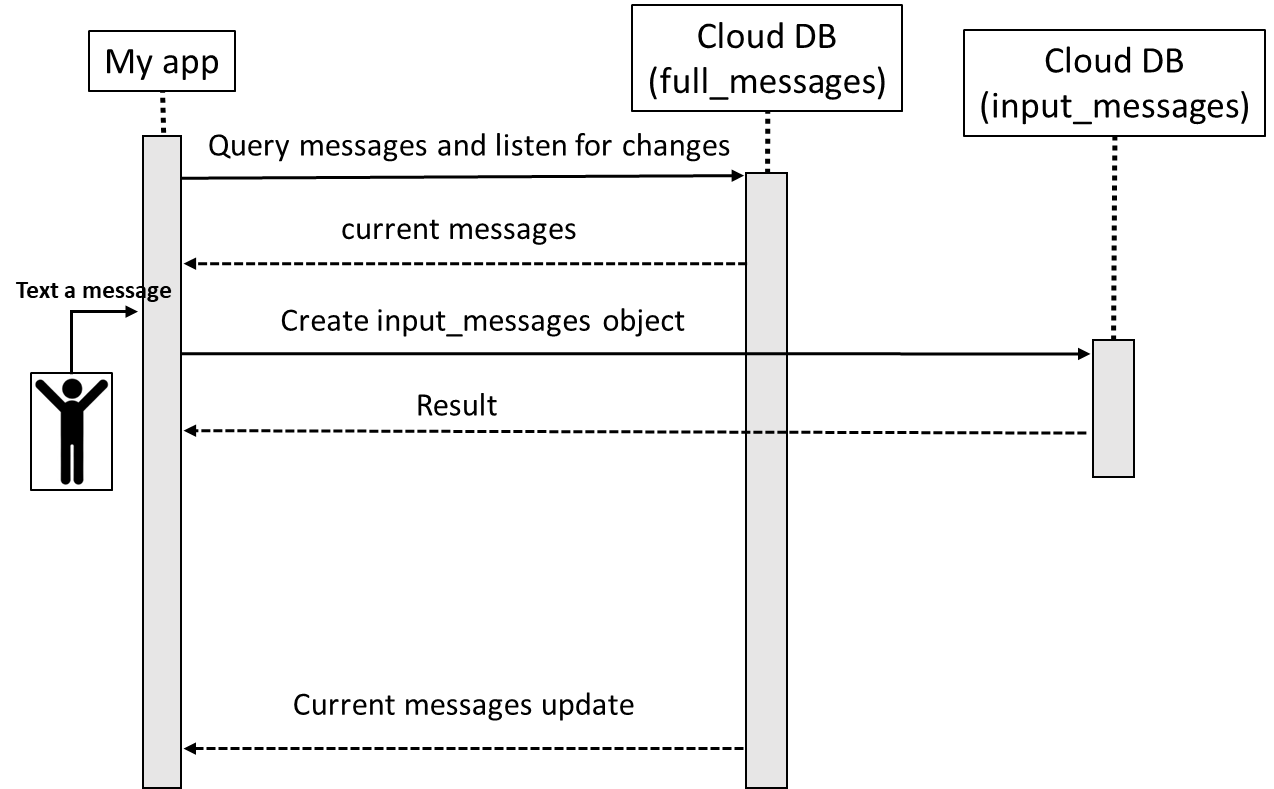
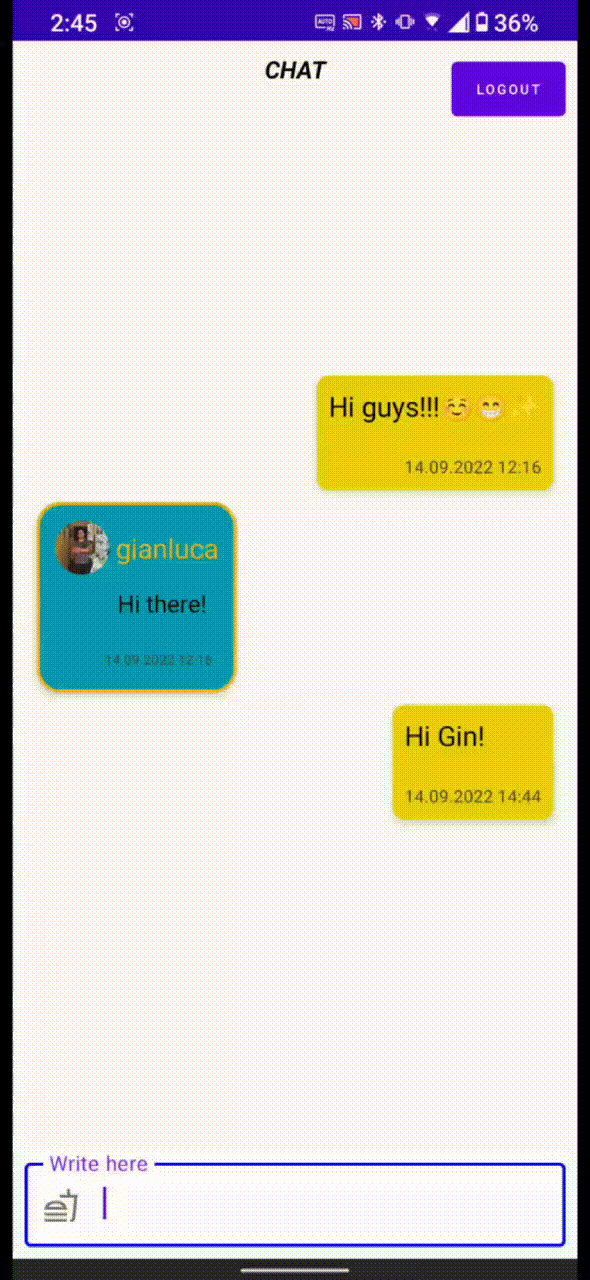
Hi, folks! Now it’s the time of the Chat Flow, where we have two Object Types related to the messages: input_messages and full_messages.
- Input_messages is the Object Type we create just for sending messages in the chat.
- Full_messages is the fusion between ‘users’ and ‘input_messages’ and we use that to show messages in the chat.
So basically we are sending input_messages to the server and we are showing full_messages in the app.
In order to receive new data, we are always in listening for full_messages Object Type changes on Cloud DB, so everytime there’s a new change, we get the new data in the app.
Just like we did in the Cloud Function for the user data, in order to access Cloud DB ObjectTypes from the app, we just need initialize AGConnectCloudDB passing the context and a basic configuration to obtain an AGConnectInstance object.
That object is essential in order to create a Cloud DB instance.
Then we need only to pass all the Object Types info to our Cloud DB instance, which is a function already included in the ObjectTypeInfoHelper class we downloaded from the developer console.
 example structure
fun initAGConnectCloudDB(
     context: Context,
     authInstance: AGConnectAuth
 ) {
     …
     if (DBZone == null) {
         AGConnectCloudDB.initialize(context)
         val agcConnectOptions = AGConnectOptionsBuilder()
             .setRoutePolicy(AGCRoutePolicy.GERMANY)
             .build(context)
         val agConnectInstance =     AGConnectInstance.buildInstance(agcConnectOptions)
         this.DBInstance = AGConnectCloudDB.getInstance(
             agConnectInstance,
             authInstance
         )
         this.DBInstance.createObjectType(ObjectTypeInfoHelper.getObjectTypeInfo())
         openCloudZone()
     }
 }
Finally we need to open the Cloud DB Zone where we want to work.
When we open the Cloud DB Zone we need to specify how to work, if manage the sync with local CACHE ONLY or with CLOUD and which kind of property access.
By setting ‘persistenceEnabled’ we want a copy of Cloud DB data in local. By calling ‘openCloudDBZone2’ we access the Cloud DB Zone, so we pass the configuration we setup before and then if it’s allowed to create the zone in case it doesn’t exist yet.
private fun openCloudZone() {
     val mConfig = CloudDBZoneConfig(
         "ChatDemo",
 CloudDBZoneConfig.CloudDBZoneSyncProperty.CLOUDDBZONE_CLOUD_CACHE,
 CloudDBZoneConfig.CloudDBZoneAccessProperty.CLOUDDBZONE_PUBLIC
     ).apply {
         persistenceEnabled = true
     }

     this.DBInstance.openCloudDBZone2(mConfig,true).addOnSuccessListener {
         …
}.addOnFailureListener {
         …
     }
 }
SEND MESSAGE
Now we can finally send our first message!
We just create an input_messages object and then invoke ‘executeUpsert’ with that object.
We will set an empty ‘id’, which is the primary key, because we want a random generated value set by the backend.
Pay attention that in this step we are not showing the message we sent, because the input_messages object is only to send to the server.
fun sendMessage(text: String) {
     val message = Message().apply {
         this.id = ""
         this.text = text
         this.user_id = userID
         this.type = ObjectTypeInfoHelper.MESSAGE_TYPE_STANDARD
     }

     sendMessageOnCloud(message)
 }
private fun sendMessageOnCloud(message: Message) {
     val upsertTask = this.DBZone!!.executeUpsert(message)
     upsertTask.addOnSuccessListener { cloudDBZoneResult ->
         …
     }.addOnFailureListener {
         …
     }
 }
BACKEND
So the input_messages object has been stored on Cloud DB.
In order to manage the backend part, we configured a CLOUD DB TRIGGER on that ObjectType that has been fired thanks to the eventType ‘onUpsert’. It will start the Cloud Function ‘create-full-message’ that will manage the full_messages ObjectType creation based on the users data of the user sending the message and the message just stored on Cloud DB, generating a random id.
Once the full_messages object has been stored, the app listening for full_messages changes will be notified and will received the new data.
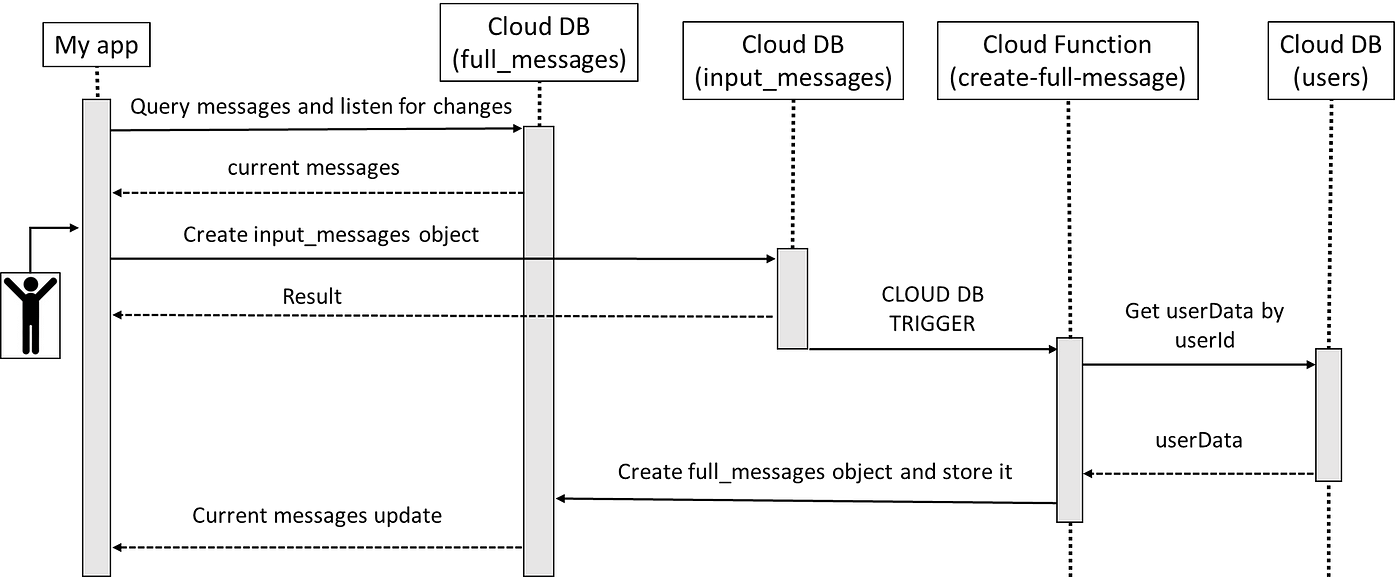
This time we have the data from the Cloud DB Trigger with the ‘onUpsert’ eventType.
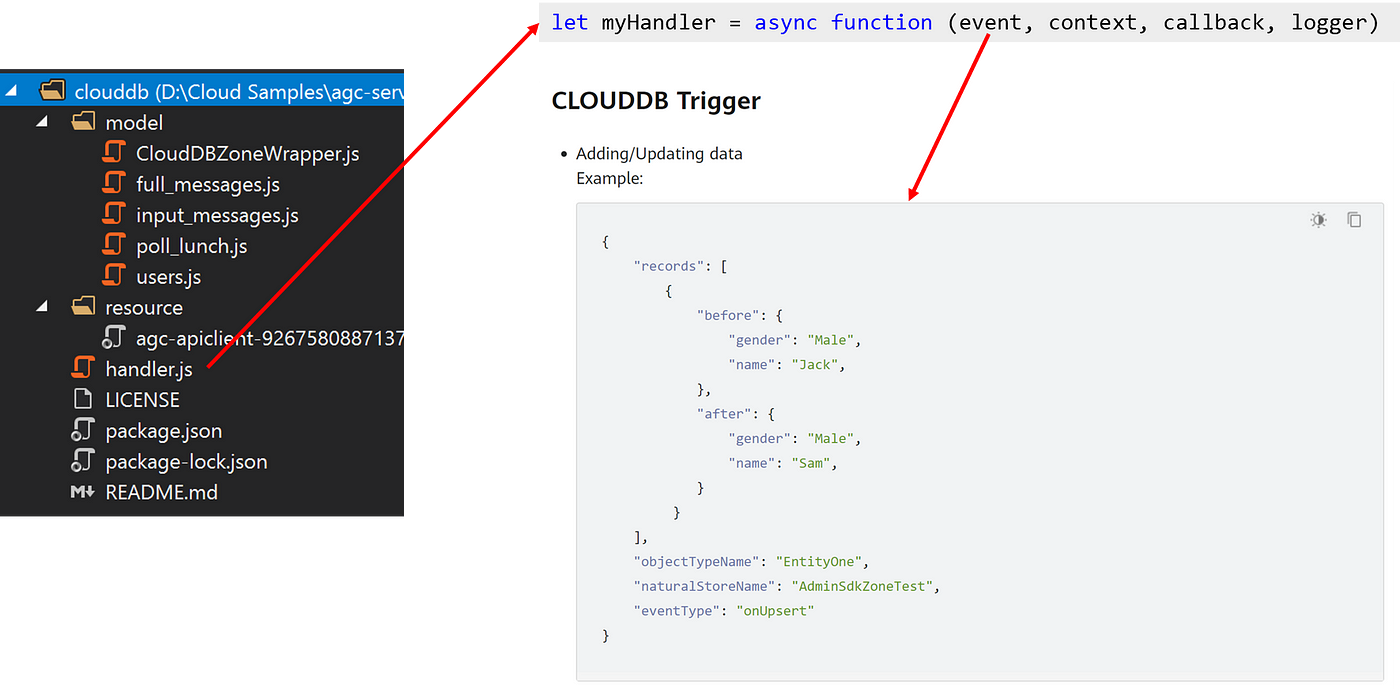
Since we need to merge the input_messages data together with the users data related to the user writing the message, we will use the user_id value included in the message data in order to execute a query to retrieve the user data.
const cloudDBZoneQuery = clouddb.CloudDBZoneQuery
                         .where(User.users)
                         .equalTo("id", user_id);
const resp = await this.cloudDBZoneClient
                       .executeQuery(cloudDBZoneQuery);
BACK TO THE APP AGAIN
Now that we have stored the full_messages data and so there’s a new change on that Object Type, the app that was in listening for changes will be notified.
But how to set the listener?
We just execute a query, in this case based on the ‘type’ value which is related to the messages type that we want to show in the chat. Then with the function ‘subscribeSnapshot’ we are telling the Cloud DB to stay in listening for changes based on that query and in this case we are specifying to listen only on CLOUD side, so we are not considering the CACHE/local storage.
fun getAllMessages() {
     val query = CloudDBZoneQuery.where(FullMessage::class.java)
         .equalTo("type",ObjectTypeInfoHelper.MESSAGE_TYPE_STANDARD)
         .or()
         .equalTo("type",ObjectTypeInfoHelper.MESSAGE_TYPE_POLL)

     val queryTask = this.DBZone!!.executeQuery(
         query,
         CloudDBZoneQuery.
         CloudDBZoneQueryPolicy.
         POLICY_QUERY_DEFAULT )
      queryTask.addOnSuccessListener { snapshot ->
          processQueryResult(snapshot)
          this.DBZone!!.subscribeSnapshot(
                        query,
                        CloudDBZoneQuery.
                        CloudDBZoneQueryPolicy.
                        POLICY_QUERY_FROM_CLOUD_ONLY,
                        mSnapshotListener)
}.addOnFailureListener {…}

}
So we have an OnSnapshotListener returning back a CloudDBZoneSnapshot as result, which is basically a Cursor containing the updated data. Since we need to set a list in the Compose LazyColumn, we need to parse it and so we used a LiveData observed as Compose State to update the UI on change.
var messages: MutableLiveData<List<FullMessage>> = MutableLiveData()
 private set
...
private val mSnapshotListener = OnSnapshotListener<FullMessage> { cloudDBZoneSnapshot, err ->
     err?.let {
         Log.w(TAG, "onSnapshot: ${err.message}")
     } ?: processQueryResult(cloudDBZoneSnapshot)
 }
...
private fun processQueryResult(snapshot:CloudDBZoneSnapshot<FullMessage>) {
     val messagesList = snapshot.toList()
     messages.postValue(messagesList.sortedBy { it.date_ins })
 }
Extra Tip: in order to parse the CloudDBZoneSnapshot to MutableList, we created a kotlin extended function named ‘toList()’ that just fetch the cursor and build up a MutableList.
private fun <T : CloudDBZoneObject> CloudDBZoneSnapshot<T>.toList() = run {
     val cursor = this.snapshotObjects
     val list = mutableListOf<T>()

     try {
         while (cursor.hasNext()) {
             list.add(cursor.next())
         }
     } catch (e: AGConnectCloudDBException) {
         …
     } finally {
         this.release()
     }

     list
 }
OUR VIDEO RECOMMENDATION


Jobs
Enjoy the chat
As discussed before, the MutableLiveData observed as Compose State will update the UI based on a LazyColumn through the data update.
...
val messagesValue by cloudDBViewModel.messages.observeAsState()
...
LazyColumn(…) {
     messagesValue?.let { … }
}
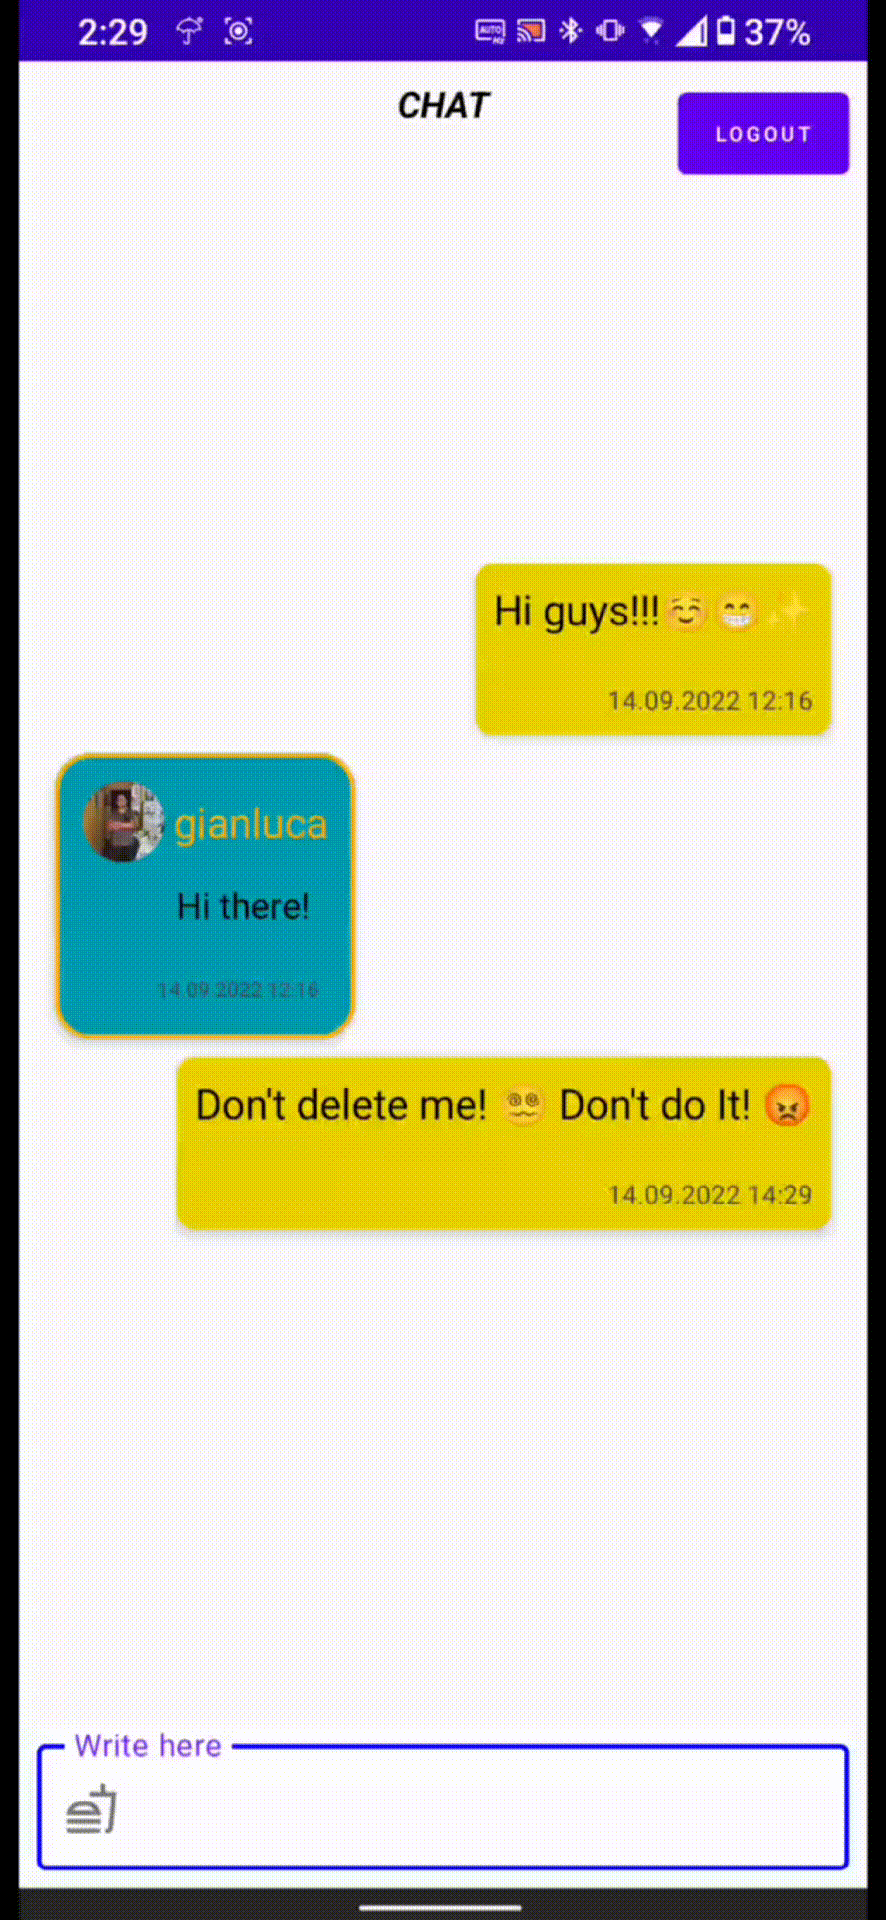
Edit / Delete messages (EXTRA)
There are two extra features in the chat: edit and delete messages.
- Edit a message: you just need to call an upsert of the message using the same message primary key value, the id, in this way its data will be updated without creating a new occurrence.
- Delete a message: it’s based on the Cloud DB function ‘executeDelete’ passing the full_messages object we want to remove from the chat.
In both cases, edit and delete, the data on full_messages will change and so they will notify the OnSnapshotListener we have created previously with the new data, so it’s strictly linked to the chat flow we saw before.
fun editMessage(text: String, fullMessage: FullMessage) {
     val message = Message().apply {
         this.id = fullMessage.id
         this.text = text
         this.user_id = fullMessage.user_id
         this.type = fullMessage.type
     }
     …
     sendMessageOnCloud(message)
 }
fun deleteMessage(message: FullMessage) {
     val deleteTask = this.DBZone!!.executeDelete(message)
     deleteTask.addOnSuccessListener {
         …
     }.addOnFailureListener {
         …
     }
 }
Now we are ready to cat! Stay tuned for Part 3, how to organize a lunch with polls. Thanks!
This article was originally published on proandroiddev.com on November 09, 2022


